これだとエラーになる。
Text(bousai.population)
これでOK
Text("\(bousai.population)")
Swiftかなり難しいな
ソフトウェアエンジニアの技術ブログ:Software engineer tech blog
随机应变 ABCD: Always Be Coding and … : хороший

これだとエラーになる。
Text(bousai.population)
これでOK
Text("\(bousai.population)")
Swiftかなり難しいな
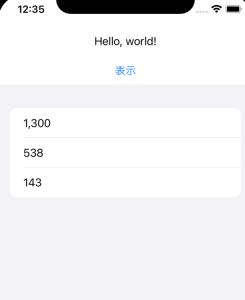
import json

str = {
	"東京":{
		"population": 1300,
		"capital": "東京"
	},
	"北海道": {
		"population": 538,
		"capital": "札幌市"
	},
	"沖縄":{
		"population": 143,
		"capital": "那覇市"
	}
}

with open("population.json", "w") as f:
	json.dump(str, f, ensure_ascii=False)
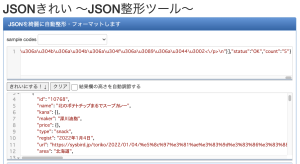
{“東京”: {“population”: 1300, “capital”: “東京”}, “北海道”: {“population”: 538, “capital”: “札幌市”}, “沖縄”: {“population”: 143, “capital”: “那覇市”}}
なるほどー
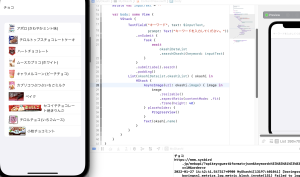
お菓子の虜 web APIの情報を使ってiOSで表示する
e.g.: https://www.sysbird.jp/webapi/?apikey=guest&keyword=%E3%82%AB%E3%83%AC%E3%83%BC%E5%91%B3&format=json
https://www.sysbird.jp/webapi/?apikey=guest&keyword=%E3%82%AB%E3%83%AC%E3%83%BC%E5%91%B3&format=json&max=10
request parameters: id, type, year, keyword, max, order
response: status, count, item(id, name, maker, price, type, regist, url, image, comment)
@StateObject, @State, @Bindingを学ぶ
検索画面はContentView.swiftで一覧表示処理、OkashiData.swiftでカスタムクラスで実装
OkashiData.swift
L StructではObservableOjectは利用できない、 classで定義する必要がある
L ObservableOjectはカスタムクラス内でデータの状態を管理するために利用
class OkashiData: ObservableObject {

    func searchOkashi(keyword: String) async {
        print(keyword)
    }
}
Taskは一連の流れを処理する
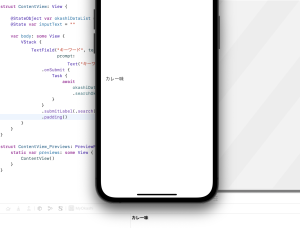
ContentView.swift
struct ContentView: View {

    @StateObject var okashiDataList = OkashiData()
    @State var inputText = ""

    var body: some View {
        VStack {
            TextField("キーワード", text: $inputText,
                      prompt: Text("キーワードを入力してください。"))
                .onSubmit {
                    Task {
                        await okashiDataList.searchOkashi(keyword: inputText)
                    }
                }
                .submitLabel(.search)
                .padding()
        }
    }
}
WebAPIのリクエストURLを組み立てる
OkashiData.swift
    func searchOkashi(keyword: String) async {
        print(keyword)

        guard let keyword_encode = keyword.addingPercentEncoding(withAllowedCharacters: .urlQueryAllowed) else {
            return
        }

        guard let req_url = URL(string:
            "https://www.sysbird.jp/webapi/?apikey=guest&format=json&keyword=\(keyword_encode)&max=10&order=r") else {
            return
        }
        print(req_url)
    }
レスポンスデータ(JSON)を記憶する構造体
L Itemとすることで複数の構造体を保持できる配列として保存
L ?を付与してnilを許容するオプショナル型として宣言する
    struct ResultJson: Codable {
        struct Item: Codable {
            let name: String?
            let url: URL?
            let image: URL?
        }
        let item: [Item]?
    }
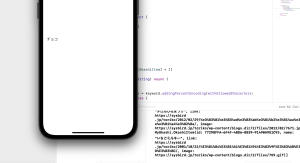
URLSessionでデータをダウンロード
URLSession.sharedで簡素に実行
        do {
            let(data, _) = try await URLSession.shared.data(from: req_url)

            let decoder = JSONDecoder()
            let json = try decoder.decode(ResultJson.self, from: data)

            print(json)
        } catch {
            print("エラーが出ました")
        }
最近のiOSはマルチコアプロセッサが搭載されている
### 取得したデータをListで一覧表示
Itemの構造体を作成し、List表示
L Identifiableに準拠すると、一意に識別できる型として定義できる
L uuidを用いてランダムな一意の値を生成
import SwiftUI
import UIKit

struct OkashiItem: Identifiable {
    let id = UUID()
    let name: String
    let link: URL
    let image: URL
}
@StateObject、ObservableObjectを使用すると@Publishedを使用できる
プロパティラッパーはプロパティをラップして機能を追加する
            guard let items = json.item else {return}

            DispatchQueue.main.async {
                self.okashiList.removeAll()
            }

            for item in items {
                if let name = item.name,
                   let link = item.url,
                   let image = item.image {
                   let okashi = OkashiItem(name: name, link: link, image: image)
                    DispatchQueue.main.async {
                        self.okashiList.append(okashi)
                    }
                }
            }
            print(self.okashiList)
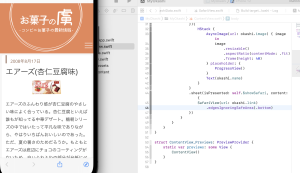
### リストで一覧表示
    var body: some View {
        VStack {
            TextField("キーワード", text: $inputText,
                      prompt: Text("キーワードを入力してください。"))
                .onSubmit {
                    Task {
                        await okashiDataList.searchOkashi(keyword: inputText)
                    }
                }
                .submitLabel(.search)
                .padding()
            List(okashiDataList.okashiList) { okashi in
                HStack {
                    AsyncImage(url: okashi.image) { image in
                        image
                            .resizable()
                            .aspectRatio(contentMode: .fit)
                            .frame(height: 40)
                    } placeholder: {
                        ProgressView()
                    }
                    Text(okashi.name)
                }
            }
        }
    }
### Webページの表示
SFSafariViewControllerでWebページを表示
SafariView.swift
L SafariServicesでアプリの中でsafariを起動する
import SafariServices

struct SafariView: UIViewControllerRepresentable {

    var url: URL

    func makeUIViewController(context: Context) -> SFSafariViewController {
        return SFSafariViewController(url: url)
    }

    func updateUIViewController(_ uiViewController: SFSafariViewController, context: Context){

    }
}
struct ContentView: View {

    @StateObject var okashiDataList = OkashiData()
    @State var inputText = ""
    @State var showSafari = false

    var body: some View {
        VStack {
            TextField("キーワード", text: $inputText,
                      prompt: Text("キーワードを入力してください。"))
                .onSubmit {
                    Task {
                        await okashiDataList.searchOkashi(keyword: inputText)
                    }
                }
                .submitLabel(.search)
                .padding()
            List(okashiDataList.okashiList) { okashi in

                Button(action: {
                    showSafari.toggle()
                }){
                    HStack {
                        AsyncImage(url: okashi.image) { image in
                            image
                                .resizable()
                                .aspectRatio(contentMode: .fit)
                                .frame(height: 40)
                        } placeholder: {
                            ProgressView()
                        }
                        Text(okashi.name)
                    }
                }
            }
        }
    }
}
これは凄い
EffectView.swift
struct EffectView: View {

    @Binding var isShowSheet: Bool

    let captureImage: UIImage

    @State var showImage: UIImage?
    @State var isShowActivity = false

    var body: some View {

        VStack {
            Spacer()

            if let unwrapShowImage = showImage {
                Image(uiImage: unwrapShowImage)
                    .resizable()
                    .aspectRatio(contentMode: .fit)
            }

            Spacer()

            Button(action: {}){
                Text("エフェクト")
                    .frame(maxWidth: .infinity)
                    .frame(height: 50)
                    .multilineTextAlignment(.center)
                    .background(Color.blue)
                    .foregroundColor(Color.white)
            }
            .padding()

            Button(action: {}){
                Text("閉じる")
                    .frame(maxWidth: .infinity)
                    .frame(height: 50)
                    .multilineTextAlignment(.center)
                    .background(Color.blue)
                    .foregroundColor(Color.white)
            }
            .padding()
        }
        .onAppear {
            showImage = captureImage
        }
    }
}

struct EffectView_Previews: PreviewProvider {
    static var previews: some View {
        EffectView(
            isShowSheet: Binding.constant(true),
            captureImage: UIImage(named: "preview_use")!)
    }
}
CoreImageに多数の編集機能がある
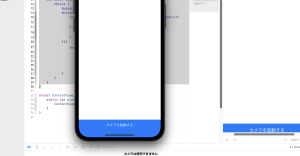
なるほど、カメラ機能の実装はiPhone端末がないとダメだな
Create botで OrderFlowersを選択する
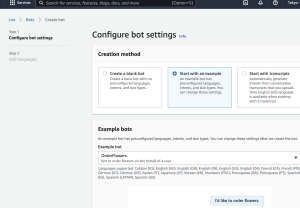
Runtime roleはbasic Amazon Lex permissionsにします。
Idle session timeoutは5minutesにします。
そして Select languageをJapaneseにしてcreate
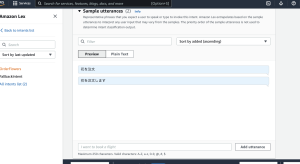
定義されたSlotsを回収しようとする
FlowerType
PickupDate
PickupTime
Confirmation promptにチェックがあると、すべてのスロット値が取得できた時点で確認
footerのbuildを押下します。
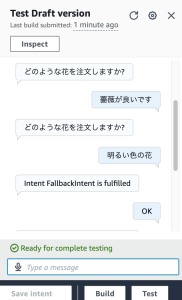
会話になってないね。精度はイマイチなのかな。
あまりamazon lexで開発しているって聞かないですね。
$ git clone https://github.com/gunthercox/chatterbot-corpus.git
$ cp -r chatterbot-corpus/chatterbot_corpus/data/japanese /home/vagrant/.local/lib/python3.8/site-packages/chatterbot_corpus/data
from chatterbot import ChatBot
from chatterbot.trainers import ListTrainer
from chatterbot.trainers import ChatterBotCorpusTrainer

bot = ChatBot("チャットボット試作品")

trainer = ChatterBotCorpusTrainer(bot)
trainer.train("chatterbot.corpus.japanese")

while True:
	try:
		bot_input = bot.get_response(input())
		print(bot_input)
	except(KeyboardInterrupt, EOFError, SystemExit):
		break
出身はどちらですか
私はすべてのソフトウェアプログラムの出所です。遠く離れた銀河。
こんにちは
こちらこそ こんにちは
宜しくお願いします
a
ところで
か
今日は何の日ですか?
不明な変数名。
疲れたー
わかります。
プログラミングは面白い
橋
何だって?
ピーターパークカー。
何?
それはあなたが一度だけ生きていることを意味します。あなたはそれをどこで聞いたのですか?
いいえ
顕著ではない。
その通り。
どの言語を使いたいですか?
日本語
0と1以外のすべての数字のように、多くのもの。
何のこと?
関心度
関心度
それはすべて中央銀行の行動に依存します。
経済やん
はい、そうです。
そうなのか
ロボットは嘘をついてはいけません
よくわからん
ま
まあ
株式市場
うーむ、全く会話になってないな…
ChatterBot:
The program selects the closest matching response by searching for the closest matching known statement that matches the input, it then returns the most likely response to that statement based on how frequently each response is issued by the people the bot communicates with.
chat.txt
こんにちは
こちらこそ こんにちは
今日もよろしくお願いします
chat2.txt
こんばんは
こちらこそ こんばんは
もう眠いですね
おやすみなさい
main.py
from chatterbot import ChatBot
from chatterbot.trainers import ListTrainer

bot = ChatBot("チャットボット試作品")

training_ = open('chat.text','r').readlines()
training2_ = open('chat2.text','r').readlines()

trainer = ListTrainer(bot)

trainer.train(training_)
trainer.train(training2_)

while True:
	try:
		bot_input = bot.get_response(input())
		print(bot_input)
	except(KeyboardInterrupt, EOFError, SystemExit):
		break
$ pip3 install chatterbot
$ pip3 install chatterbot-corpus
$ python3 main.py
[nltk_data] Downloading package stopwords to
[nltk_data] /home/vagrant/nltk_data…
[nltk_data] Package stopwords is already up-to-date!
[nltk_data] Downloading package averaged_perceptron_tagger to
[nltk_data] /home/vagrant/nltk_data…
[nltk_data] Package averaged_perceptron_tagger is already up-to-
[nltk_data] date!
List Trainer: [####################] 100%
List Trainer: [####################] 100%
こんにちは
こちらこそ こんにちは
もう眠いですね
おやすみなさい
もう眠いですね
おやすみなさい
こちらこそ こんばんは
もう眠いですね
aaa
もう眠いですね
そうですか
こちらこそ こんばんは
おはよう
もう眠いですね
こんにちは
こちらこそ こんにちは
なんだこれ…
ActivityView.swift
L Anyは任意の値を表すデータ型、どんな型でもOK
import SwiftUI

struct ActivityView: UIViewControllerRepresentable {

    let shareItems: [Any]

    func makeUIViewController(context: Context) ->
    UIActivityViewController {

    let controller = UIActivityViewController(
        activityItems: shareItems,
        applicationActivities: nil)

        return controller
    }

    func uupdateUIViewController(
        _ uiViewController: UIActivityViewController,
        context: UIViewControllerRepresentableContext<ActivityView>){

        }
}
ContentView.swift
L 写真がないこともある変数をオプショナル変数という アンラップ処理をする
            Button(action: {
                if let _ = captureImage{
                    isShowActivity = true
                }
            }){
                Text("SNSに投稿する")
                    .frame(maxWidth: .infinity)
                    .frame(height: 50)
                    .multilineTextAlignment(.center)
                    .background(Color.blue)
                    .foregroundColor(Color.white)
            }
            .padding()
            .sheet(isPresented: $isShowActivity){
                ActivityView(shareItems: [captureImage!])
            }
        }
### フォトライブラリから写真を取り込めるようにする
PHPickerViewControllerはPhotoKitで提供されている機能
coordinatorを使用する
struct PHPickerView: UIViewControllerRepresentable {

    @Binding var isShowSheet: Bool
    @Binding var captureImage: UIImage?

    class Coordinator: NSObject,
                       PHPickerViewControllerDelegate {
        var parent: PHPickerView

        init(parent: PHPickerView){
            self.parent = parent
        }

        func picker(
            _ picker: PHPickerViewController,
            didFinishPicking results: [PHPickerResult]){

                if let result = results.first {
                    result.itemProvider.loadObject(ofClass: UIImage.self){
                        (image, error) in

                        if let unwrapImage = image as? UIImage {
                            self.parent.captureImage = unwrapImage
                        } else {
                            print("使用できる写真がないです")
                        }
                    }
                } else {
                    print("選択された写真はないです")
                }
                parent.isShowSheet = false
            }
    }
}
    func makeCoordinator() -> Coordinator {
        Coordinator(parent: self)
    }

    func makeUIViewController(
        context:UIViewControllerRepresentableContext<PHPickerView>)
    -> PHPickerViewController {
        var configuration = PHPickerConfiguration()
        configuration.filter = .images
        configuration.selectionLimit = 1
        let picker = PHPickerViewController(configuration: configuration)
        picker.delegate = context.coordinator
        return picker
    }

    func updateUIViewController(
        _ uiViewController: PHPickerViewController,
        context: UIViewControllerRepresentableContext<PHPickerView>){

        }
### カメラとフォトライブラリーの選択画面
            .actionSheet(isPresented: $isShowAction){
                ActionSheet(title: Text("確認"),
                            message: Text("選択してください"),
                            buttons: [
                                .default(Text("カメラ"), action: {
                                    isPhotolibrary = false

                                    if UIImagePickerController.isSourceTypeAvailable(.camera){
                                        print("カメラは利用できます")
                                        isShowSheet = true
                                    } else {
                                        print("カメラは利用できません")
                                    }
                                }),
                                .default(Text("フォトライブラリー"), action: {
                                    isPhotolibrary = true
                                    isShowSheet = true
                                }),
                                .cancel()
                            ])
            }
なるほど、カメラを使えると中々面白い
– カメラが起動し撮影できる
– SNSなどでシェアできる
カメラの起動はUIImagePickerControllerクラス、Coordinatorを使う
delegateメソッドを使って撮影後の写真を画面に表示できる
ContentView.swift, ImagePickerView.swift, ActivityView.swiftを作成する
UIKitはiOS開発に中核となるコントロール群
ImagePickerView.swiftを作成
L UIKitは自動的にimportされている
L 写真と撮影画面を閉じるフラグ設定
L UIImageは画像を管理するクラス、 Coordinator機能を利用する
import SwiftUI

struct ImagePickerView: UIViewControllerRepresentable {
    @Binding var isShowSheet: Bool

    @Binding var captureImage: UIImage?
}
coordinator class追加
class Coordinator: NSObject,
                UINavigationControllerDelegate,
                       UIImagePickerControllerDelegate {

        let parent: ImagePickerView

        init(_ parent: ImagePickerView){
            self.parent = parent
        }

        func imagePickerController(
            _ picker: UIImagePickerController,
            didFinishPickingMediaWithInfo info:
            [UIImagePickerController.InfoKey : Any]){

            if let originalImage =
                info[UIImagePickerController.InfoKey.originalImage]
                as? UIImage {
                parent.captureImage = originalImage
                }
                parent.isShowSheet = false
            }

        func imagePickerControllerDidCancel(
            _ picker: UIImagePickerController) {
                parent.isShowSheet = false
            }
    }
UIImagePickerController.InfoKey.originalImageでカメラで撮影した写真が取得できる
### Coordinator classとUIViewControllerRepresentable
    func makeUIViewController (
        context: UIViewControllerRepresentableContext<ImagePickerView>) ->
    UIImagePickerController {

        let myImagePickerController = UIImagePickerController()
        myImagePickerController.sourceType = .camera
        myImagePickerController.delegate = context.coordinator
        return myImagePickerController
    }

    func updateUIViewController(
        _ uiViewController: UIImagePickerController,
        context: UIViewControllerRepresentableContext<ImagePickerView>){

        }
カメラを使用するときにはカメラの動きを指示するオプションを設定する
プロパティは sourceType, mediaType, cameraDevice, cameraFlashModeなどがある
delegateとは、あるクラスで行いたい処理の一部を他のクラスに任せたり、任せた処理を指定したクラスに通知する仕組み
protocolから処理を依頼されるクラスがある
### カメラの起動処理
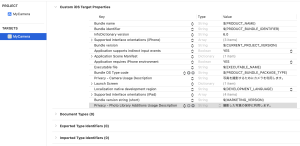
カメラのプロパティを設定する行を追加
Privacy – Camera Usage Description : 写真を撮影するためにカメラを利用します。
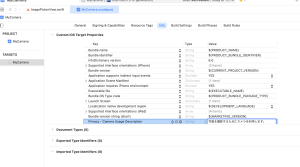
プロパティリストはアプリの稼働に必要な設定情報を管理
### カメラ起動処理
struct ContentView: View {
    var body: some View {
        VStack {
            Spacer()
            Button(action: {
                if UIImagePickerController.isSourceTypeAvailable(.camera){
                    print("カメラは使用できます")
                } else {
                    print("カメラは使用できません")
                }
            }){
                Text("カメラを起動する")
                    .frame(maxWidth: .infinity)
                    .frame(height: 50)
                    .multilineTextAlignment(.center)
                    .background(Color.blue)
                    .foregroundColor(Color.white)
            }
        }
    }
}
### カメラを起動して撮影
@State var captureImage: UIImage? = nil
@State var isShowSheet = false

// 省略

            Spacer()
            if let unwrapCaptureImage = captureImage {

                Image(uiImage: unwrapCaptureImage)
                    .resizable()
                    .aspectRatio(contentMode: .fit)
            }
// 省略
            Button(action: {
                if UIImagePickerController.isSourceTypeAvailable(.camera){
                    print("カメラは使用できます")
                    isShowSheet = true
                } else {
                    print("カメラは使用できません")
                }
            }){
                Text("カメラを起動する")
                    .frame(maxWidth: .infinity)
                    .frame(height: 50)
                    .multilineTextAlignment(.center)
                    .background(Color.blue)
                    .foregroundColor(Color.white)
            }
// 省略
            .sheet(isPresented: $isShowSheet){
                ImagePickerView(
                    isShowSheet: $isShowSheet,
                    captureImage: $captureImage)
            }
カメラは覚えることが多いが、アプリで一番面白そうな分野ではある
@AppStorageはデータを永続化するUserDefaultsから値を読み込みする
UserDefaultはアプリで利用する値を保存する機能
L ここではtimer_valueというkeyにtimeValueの初期時10を導入している
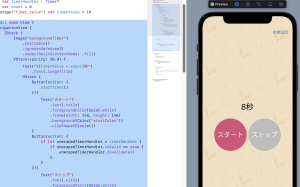
    @State var timerHandler : Timer?
    @State var count = 0
    @AppStorage("timer_value") var timerValue = 10
1秒ごとに呼び出してcountを+1とし、残り0でタイマーを止める
    func countDownTimer() {
        count += 1

        if timerValue - count <= 0 {
            timerHandler?.invalidate()
        }
    }
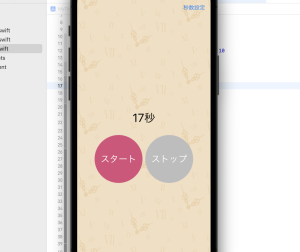
タイマー開始
    func startTimer() {
        if let unwrapedTimerHandler = timerHandler {
            if unwrapedTimerHandler.isValid == true {
                return
            }
        }

        if timerValue - count <= 0 {
            count = 0
        }

        timerHandler = Timer.scheduledTimer(withTimeInterval: 1, repeats: true){
            _ in

            countDownTimer()
        }
    }
### タイマーの保存
SettingView.swift
@AppStorage("timer_value") var timerValue = 10
シミュレータで確認する
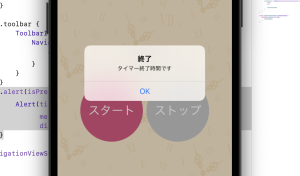
### アラートの表示
            .alert(isPresented: $showAlert){
                Alert(title: Text("終了"),
                      message: Text("タイマー終了時間です"),
                      dismissButton: .default(Text("OK")))
            }
すげえええええええええええ