## HTTPとは
・HTTP(Hyptertext Transfer Protocol)はWebサーバとWebブラウザの間でWeb情報をやり取りするためのプロトコル(通信規則)
・多くの場合、HTTPはTCPと組み合わせて使い、UDPと組み合わせるケースは稀。サーバがHTTP通信を受け取るポート番号は通常80番。HTTPプロキシ(高パフォーマンスのコンテンツフィルタなど)で特殊な用途で利用する場合は、80番ポート以外を利用する
## HTTPとHTTPSの違い
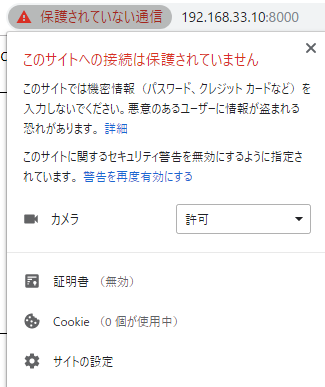
HTTPとHTTPSの違いは通信が暗号化されていないか暗号化されているかの違いで、HTTPSは暗号化されている。HTTPS(Hypertext Transfer Protocol Secure)は、HTTPで安全に通信を行うための仕組み。HTTPSのポート番号は443番が割り当てられている。
HTTPSは特別なプロトコルが定められているわけではなく、SSL(Secure Sockets Layer)/TLS(Transport Layer Security)と呼ばれる安全な接続を使って、その上でHTTPによる通信を行う。そのため、HTTPの持つシンプルで汎用性の高い特性はそのまま活かされている。
HTTPSは盗聴することができず、改ざんを検知することもできる。
## SSLサーバ証明書とHTTP暗号化通信
HTTPSによる暗号化通信はSSLサーバ証明書をサーバにインストールして実現できる
認証レベルにもDV認証、OV認証、EV認証と別れている
## httpsのページが表示されるまでの流れ
httpsではじまるURLにウェブブラウザがアクセスしようとすると、クライアント(ブラウザ)とサーバ間で以下のようなネゴシエーションが行われる
1. ブラウザはサーバにhttpsリクエストを送信
2. ブラウザとサーバで利用する暗号方式を決定
3. サーバからブラウザにSSLサーバ証明書と公開鍵を送付
4. ブラウザはプリマスターシークレットを送信し、ブラウザとサーバで共通鍵を生成
5. ブラウザとサーバは共通鍵を使用して、データを暗号化して送受信する
## 暗号アルゴリズムの決定メカニズム
大抵の場合、クライアントとサーバは複数の暗号アルゴリズムを使用できる。そのため、通信を開始する前に、使用するアルゴリズムを決定しなければならない
1. クライアントはサーバにSSL通信をリクエストする際に、サーバに利用可能な暗号アルゴリズムを送付する
2. サーバは使用するアルゴリズムを選択し決定する
3. サーバはSSLサーバ証明書と利用する暗号アルゴリズムをクライアントに送信
4. クライアントはサーバから受信した情報に基づいてデータを暗号化
## アルゴリズムの選択
2048ビット長の鍵が主流
SSL通信で使用されるアルゴリズムは公開されている。暗号データは暗号化と復号で使用される鍵で守られている。アルゴリズムが解っているため、鍵が重要。鍵長を長くすることで暗号は解読されにくくなる。
$ openssl ciphers -v ‘HIGH’
TLS_AES_256_GCM_SHA384 TLSv1.3 Kx=any Au=any Enc=AESGCM(256) Mac=AEAD
TLS_CHACHA20_POLY1305_SHA256 TLSv1.3 Kx=any Au=any Enc=CHACHA20/POLY1305(256) Mac=AEAD
TLS_AES_128_GCM_SHA256 TLSv1.3 Kx=any Au=any Enc=AESGCM(128) Mac=AEAD
ECDHE-ECDSA-AES256-GCM-SHA384 TLSv1.2 Kx=ECDH Au=ECDSA Enc=AESGCM(256) Mac=AEAD
ECDHE-RSA-AES256-GCM-SHA384 TLSv1.2 Kx=ECDH Au=RSA Enc=AESGCM(256) Mac=AEAD
DHE-DSS-AES256-GCM-SHA384 TLSv1.2 Kx=DH Au=DSS Enc=AESGCM(256) Mac=AEAD
DHE-RSA-AES256-GCM-SHA384 TLSv1.2 Kx=DH Au=RSA Enc=AESGCM(256) Mac=AEAD
ECDHE-ECDSA-CHACHA20-POLY1305 TLSv1.2 Kx=ECDH Au=ECDSA Enc=CHACHA20/POLY1305(256) Mac=AEAD
ECDHE-RSA-CHACHA20-POLY1305 TLSv1.2 Kx=ECDH Au=RSA Enc=CHACHA20/POLY1305(256) Mac=AEAD
DHE-RSA-CHACHA20-POLY1305 TLSv1.2 Kx=DH Au=RSA Enc=CHACHA20/POLY1305(256) Mac=AEAD
ECDHE-ECDSA-AES256-CCM8 TLSv1.2 Kx=ECDH Au=ECDSA Enc=AESCCM8(256) Mac=AEAD
ECDHE-ECDSA-AES256-CCM TLSv1.2 Kx=ECDH Au=ECDSA Enc=AESCCM(256) Mac=AEAD
DHE-RSA-AES256-CCM8 TLSv1.2 Kx=DH Au=RSA Enc=AESCCM8(256) Mac=AEAD
DHE-RSA-AES256-CCM TLSv1.2 Kx=DH Au=RSA Enc=AESCCM(256) Mac=AEAD
ECDHE-ECDSA-ARIA256-GCM-SHA384 TLSv1.2 Kx=ECDH Au=ECDSA Enc=ARIAGCM(256) Mac=AEAD
ECDHE-ARIA256-GCM-SHA384 TLSv1.2 Kx=ECDH Au=RSA Enc=ARIAGCM(256) Mac=AEAD
DHE-DSS-ARIA256-GCM-SHA384 TLSv1.2 Kx=DH Au=DSS Enc=ARIAGCM(256) Mac=AEAD
DHE-RSA-ARIA256-GCM-SHA384 TLSv1.2 Kx=DH Au=RSA Enc=ARIAGCM(256) Mac=AEAD
ADH-AES256-GCM-SHA384 TLSv1.2 Kx=DH Au=None Enc=AESGCM(256) Mac=AEAD
ECDHE-ECDSA-AES128-GCM-SHA256 TLSv1.2 Kx=ECDH Au=ECDSA Enc=AESGCM(128) Mac=AEAD
ECDHE-RSA-AES128-GCM-SHA256 TLSv1.2 Kx=ECDH Au=RSA Enc=AESGCM(128) Mac=AEAD
DHE-DSS-AES128-GCM-SHA256 TLSv1.2 Kx=DH Au=DSS Enc=AESGCM(128) Mac=AEAD
DHE-RSA-AES128-GCM-SHA256 TLSv1.2 Kx=DH Au=RSA Enc=AESGCM(128) Mac=AEAD
ECDHE-ECDSA-AES128-CCM8 TLSv1.2 Kx=ECDH Au=ECDSA Enc=AESCCM8(128) Mac=AEAD
ECDHE-ECDSA-AES128-CCM TLSv1.2 Kx=ECDH Au=ECDSA Enc=AESCCM(128) Mac=AEAD
DHE-RSA-AES128-CCM8 TLSv1.2 Kx=DH Au=RSA Enc=AESCCM8(128) Mac=AEAD
DHE-RSA-AES128-CCM TLSv1.2 Kx=DH Au=RSA Enc=AESCCM(128) Mac=AEAD
ECDHE-ECDSA-ARIA128-GCM-SHA256 TLSv1.2 Kx=ECDH Au=ECDSA Enc=ARIAGCM(128) Mac=AEAD
ECDHE-ARIA128-GCM-SHA256 TLSv1.2 Kx=ECDH Au=RSA Enc=ARIAGCM(128) Mac=AEAD
DHE-DSS-ARIA128-GCM-SHA256 TLSv1.2 Kx=DH Au=DSS Enc=ARIAGCM(128) Mac=AEAD
DHE-RSA-ARIA128-GCM-SHA256 TLSv1.2 Kx=DH Au=RSA Enc=ARIAGCM(128) Mac=AEAD
ADH-AES128-GCM-SHA256 TLSv1.2 Kx=DH Au=None Enc=AESGCM(128) Mac=AEAD
ECDHE-ECDSA-AES256-SHA384 TLSv1.2 Kx=ECDH Au=ECDSA Enc=AES(256) Mac=SHA384
ECDHE-RSA-AES256-SHA384 TLSv1.2 Kx=ECDH Au=RSA Enc=AES(256) Mac=SHA384
DHE-RSA-AES256-SHA256 TLSv1.2 Kx=DH Au=RSA Enc=AES(256) Mac=SHA256
DHE-DSS-AES256-SHA256 TLSv1.2 Kx=DH Au=DSS Enc=AES(256) Mac=SHA256
ECDHE-ECDSA-CAMELLIA256-SHA384 TLSv1.2 Kx=ECDH Au=ECDSA Enc=Camellia(256) Mac=SHA384
ECDHE-RSA-CAMELLIA256-SHA384 TLSv1.2 Kx=ECDH Au=RSA Enc=Camellia(256) Mac=SHA384
DHE-RSA-CAMELLIA256-SHA256 TLSv1.2 Kx=DH Au=RSA Enc=Camellia(256) Mac=SHA256
DHE-DSS-CAMELLIA256-SHA256 TLSv1.2 Kx=DH Au=DSS Enc=Camellia(256) Mac=SHA256
ADH-AES256-SHA256 TLSv1.2 Kx=DH Au=None Enc=AES(256) Mac=SHA256
ADH-CAMELLIA256-SHA256 TLSv1.2 Kx=DH Au=None Enc=Camellia(256) Mac=SHA256
ECDHE-ECDSA-AES128-SHA256 TLSv1.2 Kx=ECDH Au=ECDSA Enc=AES(128) Mac=SHA256
ECDHE-RSA-AES128-SHA256 TLSv1.2 Kx=ECDH Au=RSA Enc=AES(128) Mac=SHA256
DHE-RSA-AES128-SHA256 TLSv1.2 Kx=DH Au=RSA Enc=AES(128) Mac=SHA256
DHE-DSS-AES128-SHA256 TLSv1.2 Kx=DH Au=DSS Enc=AES(128) Mac=SHA256
ECDHE-ECDSA-CAMELLIA128-SHA256 TLSv1.2 Kx=ECDH Au=ECDSA Enc=Camellia(128) Mac=SHA256
ECDHE-RSA-CAMELLIA128-SHA256 TLSv1.2 Kx=ECDH Au=RSA Enc=Camellia(128) Mac=SHA256
DHE-RSA-CAMELLIA128-SHA256 TLSv1.2 Kx=DH Au=RSA Enc=Camellia(128) Mac=SHA256
DHE-DSS-CAMELLIA128-SHA256 TLSv1.2 Kx=DH Au=DSS Enc=Camellia(128) Mac=SHA256
ADH-AES128-SHA256 TLSv1.2 Kx=DH Au=None Enc=AES(128) Mac=SHA256
ADH-CAMELLIA128-SHA256 TLSv1.2 Kx=DH Au=None Enc=Camellia(128) Mac=SHA256
ECDHE-ECDSA-AES256-SHA TLSv1 Kx=ECDH Au=ECDSA Enc=AES(256) Mac=SHA1
ECDHE-RSA-AES256-SHA TLSv1 Kx=ECDH Au=RSA Enc=AES(256) Mac=SHA1
DHE-RSA-AES256-SHA SSLv3 Kx=DH Au=RSA Enc=AES(256) Mac=SHA1
DHE-DSS-AES256-SHA SSLv3 Kx=DH Au=DSS Enc=AES(256) Mac=SHA1
DHE-RSA-CAMELLIA256-SHA SSLv3 Kx=DH Au=RSA Enc=Camellia(256) Mac=SHA1
DHE-DSS-CAMELLIA256-SHA SSLv3 Kx=DH Au=DSS Enc=Camellia(256) Mac=SHA1
AECDH-AES256-SHA TLSv1 Kx=ECDH Au=None Enc=AES(256) Mac=SHA1
ADH-AES256-SHA SSLv3 Kx=DH Au=None Enc=AES(256) Mac=SHA1
ADH-CAMELLIA256-SHA SSLv3 Kx=DH Au=None Enc=Camellia(256) Mac=SHA1
ECDHE-ECDSA-AES128-SHA TLSv1 Kx=ECDH Au=ECDSA Enc=AES(128) Mac=SHA1
ECDHE-RSA-AES128-SHA TLSv1 Kx=ECDH Au=RSA Enc=AES(128) Mac=SHA1
DHE-RSA-AES128-SHA SSLv3 Kx=DH Au=RSA Enc=AES(128) Mac=SHA1
DHE-DSS-AES128-SHA SSLv3 Kx=DH Au=DSS Enc=AES(128) Mac=SHA1
DHE-RSA-CAMELLIA128-SHA SSLv3 Kx=DH Au=RSA Enc=Camellia(128) Mac=SHA1
DHE-DSS-CAMELLIA128-SHA SSLv3 Kx=DH Au=DSS Enc=Camellia(128) Mac=SHA1
AECDH-AES128-SHA TLSv1 Kx=ECDH Au=None Enc=AES(128) Mac=SHA1
ADH-AES128-SHA SSLv3 Kx=DH Au=None Enc=AES(128) Mac=SHA1
ADH-CAMELLIA128-SHA SSLv3 Kx=DH Au=None Enc=Camellia(128) Mac=SHA1
RSA-PSK-AES256-GCM-SHA384 TLSv1.2 Kx=RSAPSK Au=RSA Enc=AESGCM(256) Mac=AEAD
DHE-PSK-AES256-GCM-SHA384 TLSv1.2 Kx=DHEPSK Au=PSK Enc=AESGCM(256) Mac=AEAD
RSA-PSK-CHACHA20-POLY1305 TLSv1.2 Kx=RSAPSK Au=RSA Enc=CHACHA20/POLY1305(256) Mac=AEAD
DHE-PSK-CHACHA20-POLY1305 TLSv1.2 Kx=DHEPSK Au=PSK Enc=CHACHA20/POLY1305(256) Mac=AEAD
ECDHE-PSK-CHACHA20-POLY1305 TLSv1.2 Kx=ECDHEPSK Au=PSK Enc=CHACHA20/POLY1305(256) Mac=AEAD
DHE-PSK-AES256-CCM8 TLSv1.2 Kx=DHEPSK Au=PSK Enc=AESCCM8(256) Mac=AEAD
DHE-PSK-AES256-CCM TLSv1.2 Kx=DHEPSK Au=PSK Enc=AESCCM(256) Mac=AEAD
RSA-PSK-ARIA256-GCM-SHA384 TLSv1.2 Kx=RSAPSK Au=RSA Enc=ARIAGCM(256) Mac=AEAD
DHE-PSK-ARIA256-GCM-SHA384 TLSv1.2 Kx=DHEPSK Au=PSK Enc=ARIAGCM(256) Mac=AEAD
AES256-GCM-SHA384 TLSv1.2 Kx=RSA Au=RSA Enc=AESGCM(256) Mac=AEAD
AES256-CCM8 TLSv1.2 Kx=RSA Au=RSA Enc=AESCCM8(256) Mac=AEAD
AES256-CCM TLSv1.2 Kx=RSA Au=RSA Enc=AESCCM(256) Mac=AEAD
ARIA256-GCM-SHA384 TLSv1.2 Kx=RSA Au=RSA Enc=ARIAGCM(256) Mac=AEAD
PSK-AES256-GCM-SHA384 TLSv1.2 Kx=PSK Au=PSK Enc=AESGCM(256) Mac=AEAD
PSK-CHACHA20-POLY1305 TLSv1.2 Kx=PSK Au=PSK Enc=CHACHA20/POLY1305(256) Mac=AEAD
PSK-AES256-CCM8 TLSv1.2 Kx=PSK Au=PSK Enc=AESCCM8(256) Mac=AEAD
PSK-AES256-CCM TLSv1.2 Kx=PSK Au=PSK Enc=AESCCM(256) Mac=AEAD
PSK-ARIA256-GCM-SHA384 TLSv1.2 Kx=PSK Au=PSK Enc=ARIAGCM(256) Mac=AEAD
RSA-PSK-AES128-GCM-SHA256 TLSv1.2 Kx=RSAPSK Au=RSA Enc=AESGCM(128) Mac=AEAD
DHE-PSK-AES128-GCM-SHA256 TLSv1.2 Kx=DHEPSK Au=PSK Enc=AESGCM(128) Mac=AEAD
DHE-PSK-AES128-CCM8 TLSv1.2 Kx=DHEPSK Au=PSK Enc=AESCCM8(128) Mac=AEAD
DHE-PSK-AES128-CCM TLSv1.2 Kx=DHEPSK Au=PSK Enc=AESCCM(128) Mac=AEAD
RSA-PSK-ARIA128-GCM-SHA256 TLSv1.2 Kx=RSAPSK Au=RSA Enc=ARIAGCM(128) Mac=AEAD
DHE-PSK-ARIA128-GCM-SHA256 TLSv1.2 Kx=DHEPSK Au=PSK Enc=ARIAGCM(128) Mac=AEAD
AES128-GCM-SHA256 TLSv1.2 Kx=RSA Au=RSA Enc=AESGCM(128) Mac=AEAD
AES128-CCM8 TLSv1.2 Kx=RSA Au=RSA Enc=AESCCM8(128) Mac=AEAD
AES128-CCM TLSv1.2 Kx=RSA Au=RSA Enc=AESCCM(128) Mac=AEAD
ARIA128-GCM-SHA256 TLSv1.2 Kx=RSA Au=RSA Enc=ARIAGCM(128) Mac=AEAD
PSK-AES128-GCM-SHA256 TLSv1.2 Kx=PSK Au=PSK Enc=AESGCM(128) Mac=AEAD
PSK-AES128-CCM8 TLSv1.2 Kx=PSK Au=PSK Enc=AESCCM8(128) Mac=AEAD
PSK-AES128-CCM TLSv1.2 Kx=PSK Au=PSK Enc=AESCCM(128) Mac=AEAD
PSK-ARIA128-GCM-SHA256 TLSv1.2 Kx=PSK Au=PSK Enc=ARIAGCM(128) Mac=AEAD
AES256-SHA256 TLSv1.2 Kx=RSA Au=RSA Enc=AES(256) Mac=SHA256
CAMELLIA256-SHA256 TLSv1.2 Kx=RSA Au=RSA Enc=Camellia(256) Mac=SHA256
AES128-SHA256 TLSv1.2 Kx=RSA Au=RSA Enc=AES(128) Mac=SHA256
CAMELLIA128-SHA256 TLSv1.2 Kx=RSA Au=RSA Enc=Camellia(128) Mac=SHA256
ECDHE-PSK-AES256-CBC-SHA384 TLSv1 Kx=ECDHEPSK Au=PSK Enc=AES(256) Mac=SHA384
ECDHE-PSK-AES256-CBC-SHA TLSv1 Kx=ECDHEPSK Au=PSK Enc=AES(256) Mac=SHA1
SRP-DSS-AES-256-CBC-SHA SSLv3 Kx=SRP Au=DSS Enc=AES(256) Mac=SHA1
SRP-RSA-AES-256-CBC-SHA SSLv3 Kx=SRP Au=RSA Enc=AES(256) Mac=SHA1
SRP-AES-256-CBC-SHA SSLv3 Kx=SRP Au=SRP Enc=AES(256) Mac=SHA1
RSA-PSK-AES256-CBC-SHA384 TLSv1 Kx=RSAPSK Au=RSA Enc=AES(256) Mac=SHA384
DHE-PSK-AES256-CBC-SHA384 TLSv1 Kx=DHEPSK Au=PSK Enc=AES(256) Mac=SHA384
RSA-PSK-AES256-CBC-SHA SSLv3 Kx=RSAPSK Au=RSA Enc=AES(256) Mac=SHA1
DHE-PSK-AES256-CBC-SHA SSLv3 Kx=DHEPSK Au=PSK Enc=AES(256) Mac=SHA1
ECDHE-PSK-CAMELLIA256-SHA384 TLSv1 Kx=ECDHEPSK Au=PSK Enc=Camellia(256) Mac=SHA384
RSA-PSK-CAMELLIA256-SHA384 TLSv1 Kx=RSAPSK Au=RSA Enc=Camellia(256) Mac=SHA384
DHE-PSK-CAMELLIA256-SHA384 TLSv1 Kx=DHEPSK Au=PSK Enc=Camellia(256) Mac=SHA384
AES256-SHA SSLv3 Kx=RSA Au=RSA Enc=AES(256) Mac=SHA1
CAMELLIA256-SHA SSLv3 Kx=RSA Au=RSA Enc=Camellia(256) Mac=SHA1
PSK-AES256-CBC-SHA384 TLSv1 Kx=PSK Au=PSK Enc=AES(256) Mac=SHA384
PSK-AES256-CBC-SHA SSLv3 Kx=PSK Au=PSK Enc=AES(256) Mac=SHA1
PSK-CAMELLIA256-SHA384 TLSv1 Kx=PSK Au=PSK Enc=Camellia(256) Mac=SHA384
ECDHE-PSK-AES128-CBC-SHA256 TLSv1 Kx=ECDHEPSK Au=PSK Enc=AES(128) Mac=SHA256
ECDHE-PSK-AES128-CBC-SHA TLSv1 Kx=ECDHEPSK Au=PSK Enc=AES(128) Mac=SHA1
SRP-DSS-AES-128-CBC-SHA SSLv3 Kx=SRP Au=DSS Enc=AES(128) Mac=SHA1
SRP-RSA-AES-128-CBC-SHA SSLv3 Kx=SRP Au=RSA Enc=AES(128) Mac=SHA1
SRP-AES-128-CBC-SHA SSLv3 Kx=SRP Au=SRP Enc=AES(128) Mac=SHA1
RSA-PSK-AES128-CBC-SHA256 TLSv1 Kx=RSAPSK Au=RSA Enc=AES(128) Mac=SHA256
DHE-PSK-AES128-CBC-SHA256 TLSv1 Kx=DHEPSK Au=PSK Enc=AES(128) Mac=SHA256
RSA-PSK-AES128-CBC-SHA SSLv3 Kx=RSAPSK Au=RSA Enc=AES(128) Mac=SHA1
DHE-PSK-AES128-CBC-SHA SSLv3 Kx=DHEPSK Au=PSK Enc=AES(128) Mac=SHA1
ECDHE-PSK-CAMELLIA128-SHA256 TLSv1 Kx=ECDHEPSK Au=PSK Enc=Camellia(128) Mac=SHA256
RSA-PSK-CAMELLIA128-SHA256 TLSv1 Kx=RSAPSK Au=RSA Enc=Camellia(128) Mac=SHA256
DHE-PSK-CAMELLIA128-SHA256 TLSv1 Kx=DHEPSK Au=PSK Enc=Camellia(128) Mac=SHA256
AES128-SHA SSLv3 Kx=RSA Au=RSA Enc=AES(128) Mac=SHA1
CAMELLIA128-SHA SSLv3 Kx=RSA Au=RSA Enc=Camellia(128) Mac=SHA1
PSK-AES128-CBC-SHA256 TLSv1 Kx=PSK Au=PSK Enc=AES(128) Mac=SHA256
PSK-AES128-CBC-SHA SSLv3 Kx=PSK Au=PSK Enc=AES(128) Mac=SHA1
PSK-CAMELLIA128-SHA256 TLSv1 Kx=PSK Au=PSK Enc=Camellia(128) Mac=SHA256