### コンテンツのリスト
List, NavigationView, navigationTitle, navigationBarTitleDisplayMode
    var body: some View {
        List {
            Text("Content 1")
            Text("Content 2")
            Text("Content 3")
            Text("Content 4")
            Text("Content 5")
            Text("Content 6")
        }
    }
個別にviewを定義して呼び出す
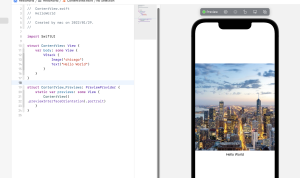
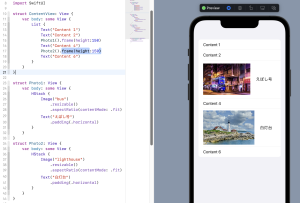
struct ContentView: View {
    var body: some View {
        List {
            Text("Content 1")
            Text("Content 2")
            Photo1().frame(height:150)
            Text("Content 4")
            Photo2().frame(height:150)
            Text("Content 6")
        }
    }
}

struct Photo1: View {
    var body: some View {
        HStack {
            Image("bus")
                .resizable()
                .aspectRatio(contentMode: .fit)
            Text("えぼし号")
                .padding(.horizontal)
        }
    }
}
struct Photo2: View {
    var body: some View {
        HStack {
            Image("lighthouse")
                .resizable()
                .aspectRatio(contentMode: .fit)
            Text("白灯台")
                .padding(.horizontal)
        }
    }
}
リストにタイトル
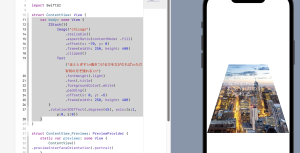
L NavigationViewのnavigationTitleを利用する
    var body: some View {
        NavigationView {
            List {
                Text("Content 1")
                Text("Content 2")
                Photo1().frame(height:150)
                Text("Content 4")
                Photo2().frame(height:150)
                Text("Content 6")
            }
            .navigationTitle("タイトル")
        }
    }
### 配列をリスト表示する
List, \.self, count, indices, ForEach-in, Array, append(), searchable, fillter(), inout
– Embed in List
        List(/*@START_MENU_TOKEN@*/0 ..< 5/*@END_MENU_TOKEN@*/) { item in
            Text("hello world")
        }
– Embed in HStack
        List(/*@START_MENU_TOKEN@*/0 ..< 5/*@END_MENU_TOKEN@*/) { item in
            HStack {
                Text(String(item))
                Text("hello world")
            }
        }
配列から要素を取り出してリストで表示
let metro = ["銀座線", "丸の内線", "日比谷線", "東西線", "千代田線", "半蔵門線", "南北線", "副都心線"]

struct ContentView: View {
    var body: some View {
        List(0 ..< 8) { item in
            HStack {
                Text(String(item))
                Text(metro[item])
            }
        }
    }
}
配列の要素の個数に影響されないコードにする
        List(0 ..< metro.count, id: \.self) { item in
            HStack {
                Text(String(item))
                Text(metro[item])
            }
        }

// このように書ける
    var body: some View {
        List(metro.indices, id: \.self) { item in
            HStack {
                Text(String(item))
                Text(metro[item])
            }
        }
    }
### 配列
import SwiftUI

let week:[String]
var nums:[Int]
var colors:[Color]
week = ["日","月","火","水","木","金","土"]
nums = [4, 8, 15, 16, 23, 42]
colors = [.red, .yellow, .green]
型推論
let week = ["日","月","火","水","木","金","土"]
var nums = [4, 8, 15, 16, 23, 42]
レンジで指定した要素を更新
var colors = ["green", "red", "blue", "pink"]
colors[1...2] = ["赤", "青", "黄"]
print(colors)
配列の追加
var words:[String] = []
words.append("花")
words.append("鳥")
words.append("風")
words.append("月")
print(words)
空配列
L append(contentsOf:)で複数の要素を一度に追加できる
var members = [String]()
members.append("英樹")
members.append("高次")
members.append(contentsOf: ["結城", "義郎", "正義"])
print(members)
配列の連結
L += で連結する
var data = Array<Double>()

let data1 = [3.6, 5.7, 2.2]
let data2 = [4.0, 3.1, 5.3]
data += data1
data += data2

data.sort()
print(data)
配列のスライス
let colorList = ["blue", "yellow", "red", "green", "pink"]
let myColor = colorList[1...3]
print(myColor)
配列から順に要素を取り出す ForEach-in
let colors:[Color] = [.red, .blue, .green, .orange, .yellow]
// 省略
        VStack {
            ForEach(colors.indices, id: \.self){index in
                Rectangle()
                    .frame(width: 150, height: 30)
                    .foregroundColor(colors[index])

            }
        }
randomElement()を使えば配列からランダムに要素を取り出すことができ、shuffle()あるいはshuffled()でシャッフルして並び替えることができる
fillter()関数を利用することで、リストに並んでいる値を検索で絞り込んで表示することができる
リストを検索表示
struct ContentView: View {
    let spots = ["東京都美術館", "国立新美術館", "国立近代美術館","東京国立博物館", "江戸東京博物館","国立科学博物館","新江ノ島水族館", "川崎水族館", "しながわ水族館"]
    @State private var searchText = "東京"

    var body: some View {
        NavigationView {
            List {
                ForEach(searchResults, id: \.self){ name in
                    Text(name)
                }
            }
            .searchable(text: $searchText, prompt: "スポットの検索")
            .keyboardType(.default)
            .navigationTitle("人気スポット")
        }
    }
    var searchResults: [String] {
        if searchText.isEmpty {
            return spots
        } else {
            return spots.filter {$0.contains(searchText)}
        }
    }
}
参照型
func incrimentNums(nums:inout [Int]){
    for i in 0..<nums.count{
        nums[i] += 1
    }
}

var data = [3, 5, 9]
print(data)
incrimentNums(nums: &data)
print(data)
これはエンドレスやな…