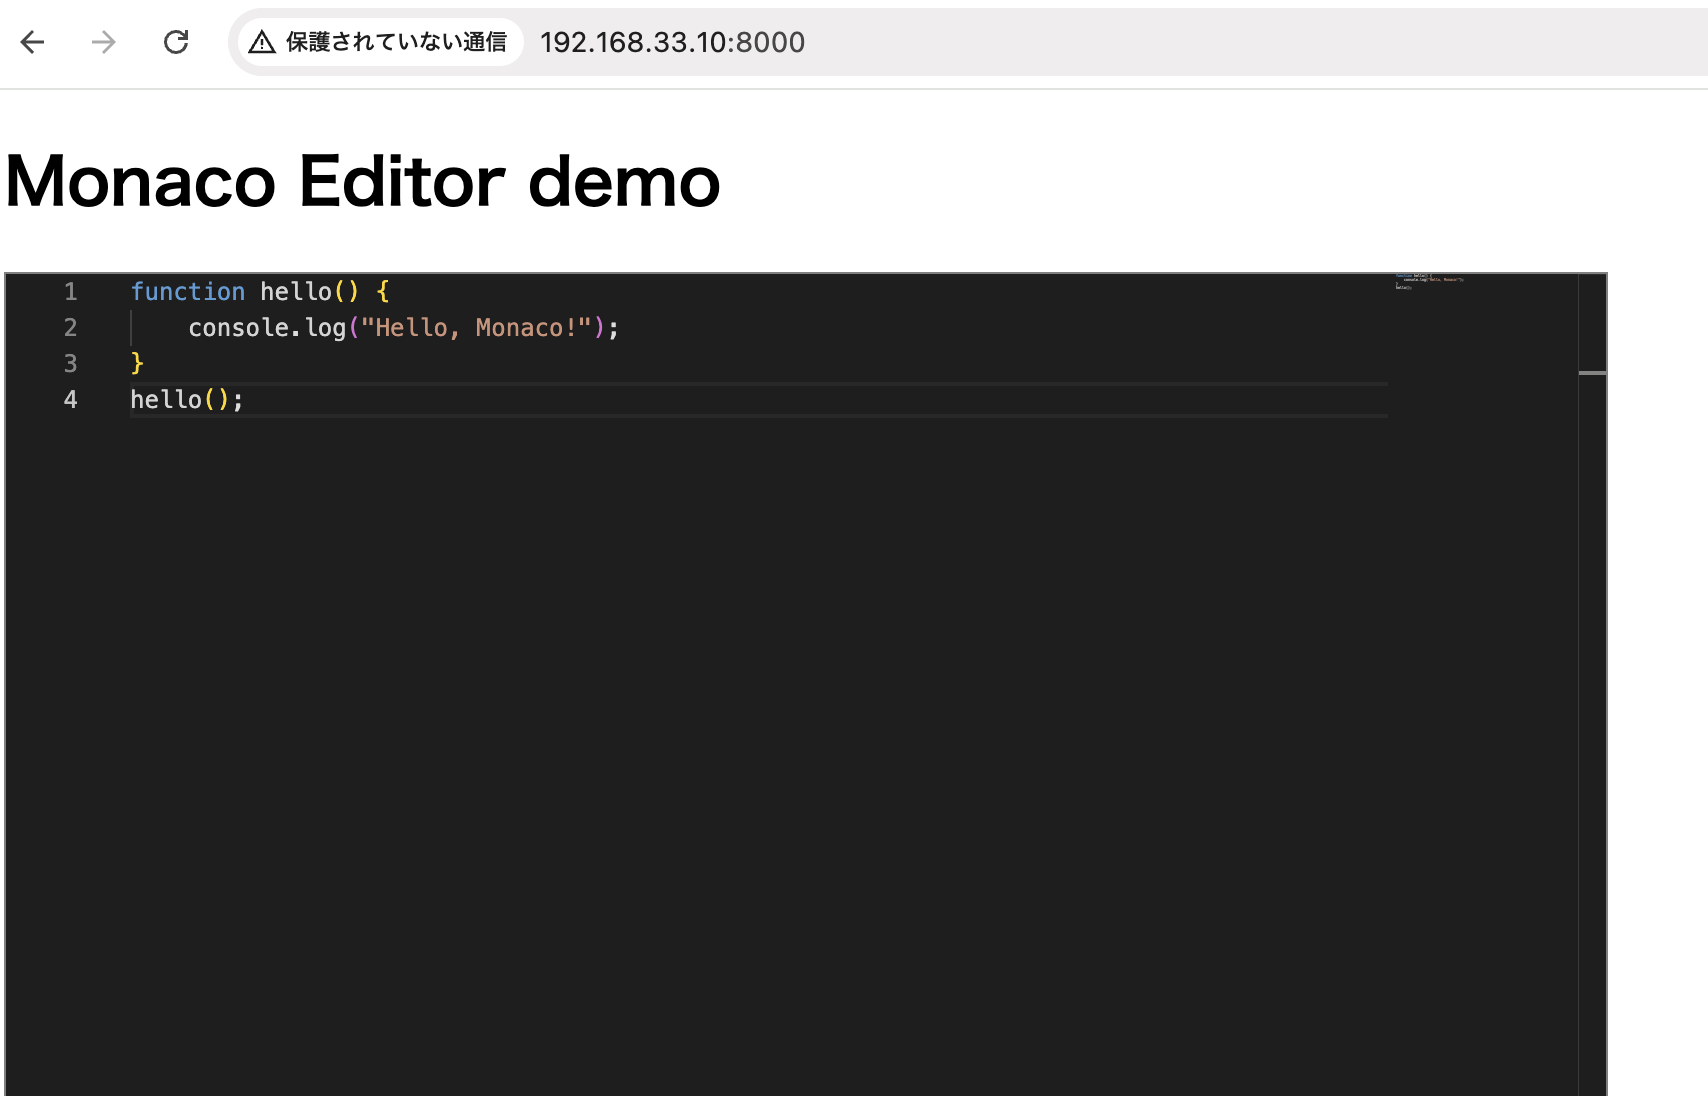
STS4.9.0でPivotal tc Server Delevoper Editionが無い。
と思ったら、stack over flowを見ていたらVMware tc Serverに変わったらしい。
https://stackoverflow.com/questions/54148054/pivotal-tc-server-is-not-included-in-sts-4
Javaって人気あるって思ってたけど、全然STSに関する日本語のドキュメントが無いな。。
ソフトウェアエンジニアの技術ブログ:Software engineer tech blog
随机应变 ABC: Always Be Coding
STS4.9.0でPivotal tc Server Delevoper Editionが無い。
と思ったら、stack over flowを見ていたらVMware tc Serverに変わったらしい。
https://stackoverflow.com/questions/54148054/pivotal-tc-server-is-not-included-in-sts-4
Javaって人気あるって思ってたけど、全然STSに関する日本語のドキュメントが無いな。。
そもそもmavenとは?
-> Javaをビルドするためのツール
-> C言語のmakeのようなもの
-> 似たツールにAntやGradleなどがある
-> XMLを書くと色々できる
pom.xml
-> POMとは、「Project Object Model」の略で、プロジェクトのさまざまな情報を扱うためのオブジェクトモデル
-> プロジェクトの設定をXMLのタグとして記述
<dependencyManagement> <dependencies> <dependency> <groupId>io.spring.platform</groupId> <artifactId>platform-bom</artifactId> <version>2.0.5.RELEASE</version> <type>pom</type> <scope>import</scope> </dependency> </dependencies> </dependencyManagement> <dependencies> <dependency> <groupId>javax.servlet</groupId> <artifactId>javax.servlet-api</artifactId> <scope>provided</scope> </dependency> <dependency> <groupId>org.apache.taglibs</groupId> <artifactId>taglibs-standard-jstlel</artifactId> </dependency> </dependencies>
saveすると、src/main/webapp/index.jspのエラーが解消される
$ brew cask install java
-> エラーになるので
$ brew install cask
-> 更にエラーになるので
$ git -C /usr/local/Homebrew/Library/Taps/homebrew/homebrew-core fetch –unshallow
$ brew install java
$ export JAVA_HOME=`/usr/libexec/java_home -v 15`
$ echo $JAVA_HOME
$ export PATH=$JAVA_HOME/bin:$PATH
$ echo $PATH
$ brew install maven
$ export M3_HOME=/usr/local/apache-maven-3.6.3
$ M3=$M3_HOME/bin
$ export PATH=$M3:$PATH
$ mvn –version
mavenのパスを通す
環境構築はこれでOKっぽい?
### 1. filmora9インストール
macにfilmora9をインストールします
### 2. filmora9を起動
16:9ワイドスクリーンを選択した状態で、「新しいプロジェクトを作成」を押下します。
### 3. 編集画面表示
– クリップウィンドウ: 動画、音、エフェクト、トランジションなどの素材を選ぶウィンドウ
– タイムラインウィンドウ: 上で選んだクリップを並べて動画にするウィンドウ
– プレビューウィンドウ: タイムラインを再生するウィンドウ
### 4. 動画をドラック&ドロップ
用意した動画を取り込みます。とりあえず適当に3本
### 5. タイトル作成
クリップウィンドウのタイトルタブを選択する
オーナー1を選択し、下にドラッグ&ドロップし、更にダブルクリックしてタイトルを編集します。
適当にMy First Videoとします。
### 6.動画挿入
タイトルに動画をつなげていきます。時間は自由にハサミで編集(切り抜き)できます。
### 7.音声追加
音量のフェードアウトも調整できる
### 8.トランジションの設定
動画の切り替え時にトランジションを設定できる
### 9. videoをエクスポート
なるほど、なんか凄え。こんな簡単にできるんや。。。
SVGとは
– XMLをベースにした二次元ベクターデータ
SVGのメリット
– 拡大・縮小に強い
– 軽い
– CSSで装飾させたりアニメーションも可
デメリット
– 写真やイラスト等に向かない
### SVG作成
まずPhotoshopでSVG画像を作ります
あれ、保存できない。。
というか、SVGはillustratorで作るらしい。 なるほど。。。。
気を取り直して、illustratorで画像を作ります。
保存した状態
sublimeに当ててみると。。。
<?xml version="1.0" encoding="utf-8"?> <!-- Generator: Adobe Illustrator 23.0.1, SVG Export Plug-In . SVG Version: 6.00 Build 0) --> <svg version="1.1" id="レイヤー_1" xmlns="http://www.w3.org/2000/svg" xmlns:xlink="http://www.w3.org/1999/xlink" x="0px" y="0px" viewBox="0 0 500 500" style="enable-background:new 0 0 500 500;" xml:space="preserve"> <style type="text/css"> .st0{fill:none;} .st1{font-family:'KozGoPr6N-Regular-83pv-RKSJ-H';} .st2{font-size:261px;} </style> <rect x="14" y="106.68" class="st0" width="478" height="269.86"/> <text transform="matrix(1 0 0 1 14 336.3662)" class="st1 st2">SVG</text> </svg>
ほう、こんなんなってるのか。
<h1>SVG</h1> <img src="/img/sample.svg">
### css表示
<div class="test"></div>
.test { background-image: url("img/sample.svg"); }
– fill, fill-opacity, stroke, stroke-width, stroke-dasharray, stroke-dashoffsetなど使用可能
### objectで表示
<object type="image/svg+xml" data="/img/sample.svg" width="200" height="100"></object>
### fillの例
<svg id="test" xmlns="http://www.w3.org/2000/svg"> <circle class="icon" cx="50" cy="50" r="50"/> </svg>
#test { fill: red; }
<body> <div class="wrapper"> <header> <h1 class="headline"> <a href="">Sample</a> </h1> <ul class="nav-list"> <li class="nav-list-item"><a href="">Home</a></li> <li class="nav-list-item"><a href="">About</a></li> <li class="nav-list-item"><a href="">Topic</a></li> </ul> </header> <div class="main"> <img src="butterfly.jpg"> <h1>Butterfly</h1> <p>Lorem ipsum dolor sit amet, consectetur adipiscing elit, sed do eiusmod tempor incididunt ut labore et dolore magna aliqua. Ut enim ad minim veniam, quis nostrud exercitation ullamco laboris nisi ut aliquip ex ea commodo consequat. Duis aute irure dolor in reprehenderit in voluptate velit esse cillum dolore eu fugiat nulla pariatur. Excepteur sint occaecat cupidatat non proident, sunt in culpa qui officia deserunt mollit anim id est laborum.</p> <p>Lorem ipsum dolor sit amet, consectetur adipiscing elit, sed do eiusmod tempor incididunt ut labore et dolore magna aliqua. Ut enim ad minim veniam, quis nostrud exercitation ullamco laboris nisi ut aliquip ex ea commodo consequat. Duis aute irure dolor in reprehenderit in voluptate velit esse cillum dolore eu fugiat nulla pariatur. Excepteur sint occaecat cupidatat non proident, sunt in culpa qui officia deserunt mollit anim id est laborum.</p> </div> <footer> <ul class="footer-menu"> <li>home |</li> <li>about |</li> <li>service |</li> <li>Contact Us</li> </ul> <p>© All rights reserved by Sample</p> </footer> </div> </body>
* { margin:0; padding:0; } .wrapper { min-height: 100vh; position:relative; padding-bottom: 120px; box-sizing: border-box; } header { height: 100px; width: 100%; padding: 15px 0; background-color: #337079; color: white; margin-top: 0px; position: fixed; } header .headline { line-height: 100px; float: left; font-size: 30px; margin-left: 100px; } .nav-list { line-height: 100px; float: left; margin-left: 30px; list-style:none; } .nav-list-item { list-style: none; display: inline-block; margin: 0 20px; } .main { width: 80vw; padding-top: 170px; margin: 0px auto; } footer { width: 100%; height: 100px; background-color: #cab64a; color: #fff; text-align: center; position: absolute; bottom:0; } ul.footer-menu li { display: inline; }
レポジトリに登録しておこう。
<!DOCTYPE html> <html lang="en"> <head> <meta charset="UTF-8"> <meta name="viewport" content="width=device-width, initial-scale=1.0"> <link rel="stylesheet" href="layout.css"> <title>Document</title> </head> <body> <header> <h1 class="headline"> <a href="">Sample</a> </h1> <ul class="nav-list"> <li class="nav-list-item"><a href="">Home</a></li> <li class="nav-list-item"><a href="">About</a></li> <li class="nav-list-item"><a href="">Topic</a></li> </ul> </header> <footer> <ul class="footer-menu"> <li>home |</li> <li>about |</li> <li>service |</li> <li>Contact Us</li> </ul> <p>© All rights reserved by Sample</p> </footer> </body> </html>
* { margin:0; padding:0; } header { height: 100px; width: 100%; padding: 15px 0; background-color: #337079; color: white; } header .headline { line-height: 100px; float: left; font-size: 30px; margin-left: 100px; } .nav-list { line-height: 100px; float: left; margin-left: 30px; list-style:none; } .nav-list-item { list-style: none; display: inline-block; margin: 0 20px; } footer { width: 100%; height: 100px; background-color: #cab64a; color: #fff; text-align: center; } ul.footer-menu li { display: inline; }
.wrapper { min-height: 100vh; position:relative; padding-bottom: 120px; box-sizing: border-box; } footer { width: 100%; height: 100px; background-color: #cab64a; color: #fff; text-align: center; position: absolute; bottom:0; }
意外とするできる。
GA APIでページビューやセッションだけでなく、rt:activeUsersでリアルタイムユーザを取得できる。
require_once '../google-api-php-client/src/Google/autoload.php'; $service_account_email = '*.iam.gserviceaccount.com'; $key = file_get_contents('*.p12'); $profile = '*'; $client = new Google_Client(); $analytics = new Google_Service_Analytics($client); $cred = new Google_Auth_AssertionCredentials( $service_account_email, array(Google_Service_Analytics::ANALYTICS_READONLY), $key ); $client->setAssertionCredentials($cred); if($client->getAuth()->isAccessTokenExpired()){ $client->getAuth()->refreshTokenWithAssertion($cred); } $optParams = array( 'dimensions' => 'rt:medium'); try { $results = $analytics->data_realtime->get( 'ga:' . $profile, 'rt:activeUsers', $optParams); } catch (apiServiceException $e) { $error = $e->getMessage(); } print("<pre>"); // print_r($results["totalsForAllResults"]["rt:activeUsers"]); print_r($results); print("</pre>");
$array[“totalsForAllResults”][“rt:activeUsers”] でアクティブユーザすうを取れるが、配列で何が取れるか確認した方が良い。
GAの場合、analytics.jsでajaxで処理しているので、ELBのアクセスログから例えば過去5分間のアクセス数を数えてログインユーザとして表示するってよりは、GA APIの方が現実的か。
ちなみに、rtって、リツイートの略かと思ったけど、real timeの略っぽいね。なんじゃそりゃw
cssの中でvwってよく見ますが、vwって何でしょう?
vw: viewport width -> 幅に対する割合、100がマックス
vh: viewport height -> 高さに対する割合
<style> img { display: inline-block; margin:auto; width: 50vw; } </style> <div class="container"> <img src="/img/test.jpg"> </div>
フォルクスワーゲンの事じゃないのね。。
VW、cssまで進出して凄いと思ってたが、違った様だ。
CSSトランジションとは、CSSプロパティが変化する際のアニメーション速度を操作する
<style> .sample { border: 1px solid #ccc; border-radius: 5px; width: 150px; height: 60px; line-height: 60px; font-weight: bold; text-align: center; color: green; box-shadow: 20px 10px 2px #8D9EB8; transition: 0.5s; } .sample:hover { color: orange; box-shadow: -20px 10px 5px #8D9EB8; } </style> <div class="container"> <div class="sample">Sample</div> </div>
transitionの値を2sとか0.5sとか変えると、動きも変わる。
なるほど、アニメーションの動きは、ここで制御しとるんか。