Node.jsでWebサーバーを作ってみよう

server.js

var http = require('http');
var server = http.createServer();
server.on('request', function(req, res){
  res.writeHead(200, {'Content-Type': 'text/plain'});
  res.write('hello world');
  res.end();
});
server.listen(1337, '192.168.33.10');
console.log("server listening ...");
[vagrant@localhost nodejs]$ node server.js
server listening ...

ブラウザ
%e7%84%a1%e9%a1%8c

Node.js ノンブロッキング処理

Node.jsのノンブロッキング処理を見てみましょう。下記のように、コールバック関数を実装すれば、次の処理をブロックしませんの、”world”を先にwriteします。

hello.js

setTimeout(function(){
  console.log("hello");
}, 1000);
console.log("world");
[vagrant@localhost nodejs]$ node hello.js
world
hello

コールバックの仕組みですね。
/*
Node is all about non-blocking, asynchronous architecture. This means any activity taking a long time to finish, such as file access, network communication, and database operations, are requested and put aside until the results are ready and returned via a callback function. Instead of asking to read a file and waiting for the operating system to come back with a file handler or buffer, the a callback function is invoked when the operation is completed, freeing the server to handle additional requests.
*/

VirtualBox(CentOS)にMongoDBをインストール

VirtualBoxにMongoDBをインストールする手順です。まず、10genリポジトリを追加しましょう。
追加にはvimを使います。vimは高機能エディタで、特にモーション(移動)とオペレータ(操作)が強みであると言われています。

では、vimが入っているか確認してみましょう。

[root@localhost vagrant]# yum list installed | grep vim
vim-minimal.x86_64   2:7.4.629-5.el6    @anaconda-CentOS-201605220104.x86_64/6.8

では、vimを使って、10genリポジトリを追加します。

[root@localhost vagrant]# vi /etc/yum.repos.d/10gen.repo

vimの操作は「i」で挿入、「Esc」でコマンドモード、「:wq」で保存して終了です。

[10gen]
name=10gen Repository
baseurl=http://downloads-distro.mongodb.org/repo/redhat/os/x86_64
gpgcheck=0
enabled=0

追加したら、mogodbをインストールしましょう。

[root@localhost vagrant]# yum install mongo-10gen-server.x86_64 mongo-10gen.x86_64 --enablerepo=10gen

少し時間がかかりますが、インストールしたら、自動起動の設定をして、アクセスしてみましょう。

[root@localhost ~]# sudo /etc/init.d/mongod start
Starting mongod:                                           [  OK  ]
[root@localhost ~]# sudo chkconfig mongod on
[root@localhost ~]# mongo
MongoDB shell version: 2.6.12
connecting to: test
Welcome to the MongoDB shell.
For interactive help, type "help".
For more comprehensive documentation, see
        http://docs.mongodb.org/
Questions? Try the support group
        http://groups.google.com/group/mongodb-user
> exit
bye

こちらで、インストール完了です。

hostファイルによる192.168.33.10 のアドレス変換

hostファイル編集により、下記のように、アドレスバーのhttp://192.168.33.10:8000/を任意のパスに変更する方法です。
%e7%84%a1%e9%a1%8c

まず、Windowsキー + r のショートカットで、「drivers」のフォルダを検索します。
%e7%84%a1%e9%a1%8c

そうしたら、driversのフォルダの中からetcのフォルダを開き、その中にある、hostファイルを開きます。
%e7%84%a1%e9%a1%8c

一番下に 192.168.33.10 dev.hogehoge.com を追加して保存します。「dev.hogehoge.com」は任意のパスを設定してください。

# Copyright (c) 1993-2009 Microsoft Corp.
#
# This is a sample HOSTS file used by Microsoft TCP/IP for Windows.
#
# This file contains the mappings of IP addresses to host names. Each
# entry should be kept on an individual line. The IP address should
# be placed in the first column followed by the corresponding host name.
# The IP address and the host name should be separated by at least one
# space.
#
# Additionally, comments (such as these) may be inserted on individual
# lines or following the machine name denoted by a '#' symbol.
#
# For example:
#
#      102.54.94.97     rhino.acme.com          # source server
#       38.25.63.10     x.acme.com              # x client host

# localhost name resolution is handled within DNS itself.
#	127.0.0.1       localhost
#	::1             localhost

192.168.33.10 dev.hogehoge.com

すると、以降、192.168.33.10でたたいた時は、dev.hogehoge.comに変換されるようになります。

Windows10 PuTTYとCyberduckでリモート接続

Windows10でVituralBoxの操作のために、PuTTYとCyberduckを使います。Macの場合は、Macのコマンドラインから操作するので必要ありません。

まず、PuTTYをダウンロードします。
PuTTY
※A Windows MSI installer package for everything except PuTTYtelのmsiをクリックしてください。

セットアップが終わったら、PuTTYを開き、下記のように、HostNameの箇所を、先ほどVagrantfileで設定したように192.168.33.10 と入力します。session名をMyCentOSなどと保存しておくと、今後の接続が楽になります。
%e7%84%a1%e9%a1%8c
PuTTY Security Alertは「はい」として問題ありません。

さて、以下のように、コマンドラインが開いたら、login as と聞かれるので、「vagrant」と入力し、Passwordも同じく「vagrant」とします。[vagrant@localhost ~]$が表示されればOKです。
%e7%84%a1%e9%a1%8c

では、PuTTYのコマンドラインで、以下の手順でアプリケーションをインストールしていきましょう。インストールに時間がかかるものもあります。

sudo yum -y update
sudo yum -y install git
git clone https://github.com/dotinstallres/centos6.git
cd centos6
./run.sh
exec $SHELL -l

終わったら、今度はCyberduckというツールをインストールします。
Cyberduck
ページ中段左の、Download Cyberduck for windowsをクリックします。

続いて、Cyberduckを開く前に、Cyberduckの操作をしやすくするため、フォルダの左上ファイルから「フォルダーと検索オプションの変更」を行います。
%e7%84%a1%e9%a1%8c
フォルダーオプションの、ファイルとフォルダーの表示で、下記のようにラジオボタンを「隠しファイル…を表示する」にします。
%e7%84%a1%e9%a1%8c
また、下にスクロールして、「登録されている拡張子は表示しない」のチェックボックスは外しておきましょう。

以上の設定が終わったら、Cyberduckを開き、新規接続を左上のクリックします。
接続方法は、下記のようにSFTP port22、サーバーは、設定したipの「192.168.33.10」、ユーザー名パスワードは、PuTTY同様に、vagrantと入力します。
%e7%84%a1%e9%a1%8c

ログイン後、以下のページが表示されたら、セットアップ完了です。このCyberduckのディレクトリで、ファイルの作成・編集の操作をしていきます。
%e7%84%a1%e9%a1%8c

お疲れ様でした。

Windows10にVirtualBox CentOS環境セットアップ

ここでは、Windows10でのローカル環境構築のセットアップを紹介します。
まず、VirtualBox、Vagrantをそれぞれ公式サイトからダウンロードし、インストールしましょう。

Virtual box
※Platform PackageのVirtualBox 5.1.8 for Windows hosts x86/amd64のリンクです。インストール後のSetupで、CustomSetupを聞かれますが、チェックボックスは一番下のRegister Associationだけにしておきましょう。
Vagrant
※Windows Universal(32 – 64bit)です。

VirtualBoxとは、PC上に仮想的なPCを作成し、別のOSをインストール・実行できるフリーのPC仮想化ソフトです。例えば、VirtualBoxを使って自分のPCにLinuxOSを入れることにより、簡単にPC内に仮想のサーバー環境を構築することができます。Railsをテストする場合は、標準でWEBrickというWebサーバー用フレームワークがついているので、必要ありません。また、WindowsOSの中に、MaxOSを入れることも可能です。

Vagrantは、テスト用の仮想マシン作成やその環境設定などを自動化するツールです。Vagrantをインストールすることで、VirtualBoxの操作がコマンドラインで簡単にできるようになり、楽になります。

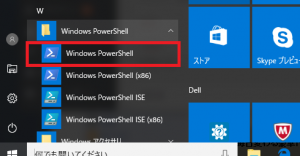
インストールが完了したら、WindowsPowerShellを立ち上げて、VirualBoxで、CentOSをPCに入れます。
%e7%84%a1%e9%a1%8c
コマンドラインには、以下の順に入力してください。

# vagrantの便利なプラグインを導入
vagrant plugin install vagrant-vbguest
mkdir MyVagrant
cd MyVagrant
mkdir MyCentOS
cd MyCentOS
vagrant init bento/centos-6.8

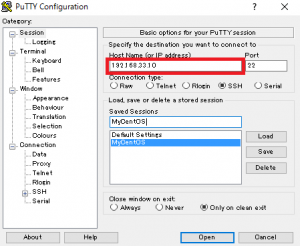
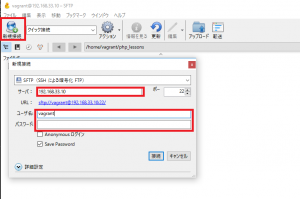
そうしたら、C:/ユーザー/hoge/MyVagrant/MyCentOS に行き、Vagrantfileをテキストファイルでよいので開きます。
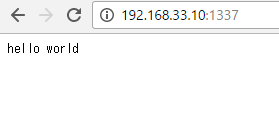
仮想マシンのIPアドレスを192.168.33.10にするために、config.vm.networkの#をはずして保存します。
config.vm.network “private_network”, ip: “192.168.33.10”

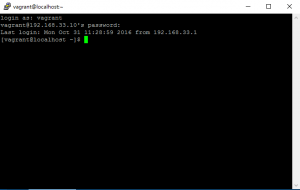
そしたら、再度WindowsPowerShellに行き、以下のように打ち込んでください。

vagrant up
vagrant status

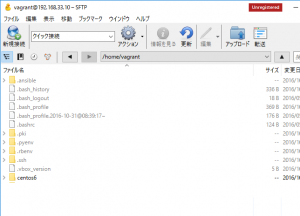
これで、コマンドラインにrunningと表示されていればひとまずOKです。続いて、仮想環境をリモートコントロールする方法を書きます。

ruby Sinatra 掲示板(bbs)

掲示板の作成です。DBにSQlite3、Deleteにjqueryを使っています。

C:/rails/sinatra/main.rb

require 'sinatra'
require 'sinatra/reloader'
require 'active_record'

ActiveRecord::Base.establish_connection(
	"adapter" => "sqlite3",
	"database" => "./bbs.db"
)

helpers do
	include Rack::Utils
	alias_method :h, :escape_html
end

class Comment < ActiveRecord::Base
end

get '/'  do
	@comments = Comment.order("id desc").all
		erb :index
end

post '/new'  do
	Comment.create({:body => params[:body]})
	redirect '/'
end

post '/delete'  do
	Comment.find(params[:id]).destroy
end

C:/rails/sinatra/views/index.erb

<!DOCTYPE>
<html lang="ja">
<head>
	<meta charset="utf-8">
	<title>BBS</title>
</head>
<body>
<h1>BBS</h1>
<ul>
	<% @comments.each do |comment| %>
	<li data-id="<%= comment.id %>">
	<%= h comment.body %>
		<span class="deleteCmd" style="cursor:pointer;color:blue">[x]</span>
	</li>
	<% end %>
</ul>
	<h2>Add New</h2>
	<form method="post" action="/new">
		<input type="text" name="body"><input type="submit" value="post!">

		<script src="https://ajax.googleapis.com/ajax/libs/jquery/1.12.4/jquery.min.js"></script>
		<script>
		$('.deleteCmd').click(function(){
			var el = $(this).parent();
			if (confirm('are you sure to delete?')){
				$.post('/delete', {
					id: el.data('id')
				}, function(){
					el.fadeOut(800);
				});
			}
		})
		</script>
</body>
</html>

C:/rails/sinatra/import.sql

create table comments (
 id integer primary key,
 body text
);

ブラウザで確認してみてください。
bbs

ruby Sinatra

sinatraはrubyのフレームワークで、簡単にwebアプリケーションを作ることができます。

shinatra

まずは、rubyのバージョンから

C:\rails\sinatra>ruby -v
ruby 2.3.1p112 (2016-04-26 revision 54768) [x64-mingw32]

C:\rails\sinatra>gem -v
2.5.1

C:\rails\sinatra>gem list activerecord

*** LOCAL GEMS ***

activerecord (5.0.0.1, 4.2.7.1)

C:\rails\sinatra>gem list sqlite3

*** LOCAL GEMS ***

sqlite3 (1.3.12 x64-mingw32)

そして、gem。sinatra-contribは、サーバー再起動を手間を省くために、インストールします。

C:\rails\sinatra>gem list sinatra

*** LOCAL GEMS ***

sinatra (1.4.7)
sinatra-contrib (1.4.7)

インストールしたら、早速、ファイルを作成して、ローカル環境(http://localhost:4567/)でテストしてみましょう。
C:/rails/sinatra/main.rb

require 'sinatra'
require 'sinatra/reloader'

get '/'  do
	erb :index
end

C:/rails/sinatra/views/index.erb

<!DOCTYPE>
<html lang="ja">
<head>
<meta charset="utf-8">
<title>sinatra</title>
</head>
<body>
<h1>hello world</h1>
</body>
</html>

ブラウザで確認します。
%e7%84%a1%e9%a1%8c

railsで遊ぼう application.html.erbエラー

新規にファイルを作った際に、window環境で、
application.html.erb に関して
「ActionView::Template::Error (TypeError: オブジェクトでサポートされていないプロパティまたはメソッドです。」と表示されることがあります。

/hoge/views/layouts/application.html.erb

<!DOCTYPE html>
<html>
  <head>
    <title>Myapp</title>
    <%= csrf_meta_tags %>

    <%= stylesheet_link_tag    'application', media: 'all', 'data-turbolinks-track': 'reload' %>
    <%= javascript_include_tag 'application', 'data-turbolinks-track': 'reload' %>
  </head>

  <body>
    <%= yield %>
  </body>
</html>

この場合、line7, 8 の’application’を’default’に変更すると、エラーが消えます。

<!DOCTYPE html>
<html>
  <head>
    <title>Myapp</title>
    <%= csrf_meta_tags %>

    <%= stylesheet_link_tag    'default', media: 'all', 'data-turbolinks-track': 'reload' %>
    <%= javascript_include_tag 'default', 'data-turbolinks-track': 'reload' %>
  </head>

  <body>
    <%= yield %>
  </body>
</html>

参考:stack overflow:ProgramError

railsで遊ぼう bcrypt-rubyのインストール

Gemパッケージのbrypt-rubyを使うために、Gemfileのコメントを外して、

# Use ActiveModel has_secure_password
gem 'bcrypt', '~> 3.1.7', require: 'bcrypt'

bcrypt-rubyをインストールしたところ、

gem install bcrypt -v '3.1.11' 

マイグレーションスクリプト作成時に、エラー発生。

C:/Ruby23-x64/lib/ruby/gems/2.3.0/gems/bcrypt-3.1.11-x64-mingw32/lib/bcrypt.rb:16:in `require': cannot load such file -- bcrypt_ext (LoadError)

その場合は、bcryptをインストールし直せば、エラーが解消されるはずです。

C:\rails\asa>gem uninstall bcrypt-ruby

C:\rails\asa>gem install bcrypt --platform=ruby
Fetching: bcrypt-3.1.11.gem (100%)
Temporarily enhancing PATH to include DevKit...
Building native extensions.  This could take a while...
Successfully installed bcrypt-3.1.11
Parsing documentation for bcrypt-3.1.11
Installing ri documentation for bcrypt-3.1.11
Done installing documentation for bcrypt after 1 seconds
1 gem installed

参考:
Bcrypt 3.1.11 – Cannot load file on Windows