Amazon OpenSearch Serviceを使いたい

Amazon OpenSearch Serviceは、旧Amazon Elasticsearch Service

create domain
– domain name: anything
– deployment type: deployment and test
– instance node: t2.small.search
– number of node: 1
– network: public access
createすると、domainが生成されます。

security policyのところがよくわからんが、ドキュメントが少なく、あまり使われてない印象か。。
さー、sqliteやりますか。

[Amazon Linux2] Elastic Searchを7系から5系にダウングレードする

Kibanaで、以下の様にアラートが出ているので、7系から5系にダウングレードする。
This version of Kibana requires Elasticsearch v5.6.16 on all nodes. I found the following incompatible nodes in your cluster: v7.10.1 @ 127.0.0.1:9200 (127.0.0.1)

$ yum remove elasticsearch
$ cd /etc/yum.repos.d/

[elasticsearch-5.x]
name=Elasticsearch repository for 5.x packages
baseurl=https://artifacts.elastic.co/packages/5.x/yum
gpgcheck=1
gpgkey=https://artifacts.elastic.co/GPG-KEY-elasticsearch
enabled=1
autorefresh=1
type=rpm-md

$ sudo yum install elasticsearch-5.6.16
$ sudo vi /etc/elasticsearch/jvm.options

-Xms256m
-Xmx256m

$ sudo service elasticsearch start
$sudo vi /etc/elasticsearch/elasticsearch.yml

network.host: 0.0.0.0

$ sudo service elasticsearch start
Starting elasticsearch (via systemctl): [ OK ]

$ sudo systemctl status elasticsearch -l
localhost elasticsearch[28744]: OpenJDK 64-Bit Server VM warning: If the number of processors is expected to increase from one, then you should configure the number of parallel GC threads appropriately using -XX:ParallelGCThreads=N

何故だ? さっぱりわからん。。。

[Amazon Linux2] LEKのKibana(5.6.16x86_64)をinstallして表示したい

公式サイトを参考にします。
https://www.elastic.co/guide/jp/kibana/current/rpm.html

$ cd /etc/yum.repos.d
$ ls
$ sudo touch kibana.repo
$ sudo vi kibana.repo

[kibana-5.x]
name=Kibana repository for 5.x packages
baseurl=https://artifacts.elastic.co/packages/5.x/yum
gpgcheck=1
gpgkey=https://artifacts.elastic.co/GPG-KEY-elasticsearch
enabled=1
autorefresh=1
type=rpm-md

$ sudo yum install kibana

$ sudo vi /etc/kibana/kibana.yml

server.host: "0.0.0.0"

$ sudo service kibana start
kibana started

http://192.168.33.10:5600/
あれ?

$ sudo vi /etc/kibana/kibana.yml

server.port: 5601
server.host: "192.168.33.10"
elasticsearch.url: "http://localhost:9200"

$ sudo service kibana restart

http://192.168.33.10:5601/

何これ、やべえ、インフラ構成見直そう。

あれ、何か出てる
This version of Kibana requires Elasticsearch v5.6.16 on all nodes. I found the following incompatible nodes in your cluster: v7.10.1

Elasticsearchとkibanaは同じバージョンを使わなければならないとのこと。。うーん、困った。

[Amazon Linux2] ELK(Elastic Search7.10.1-1)の環境を構築したい

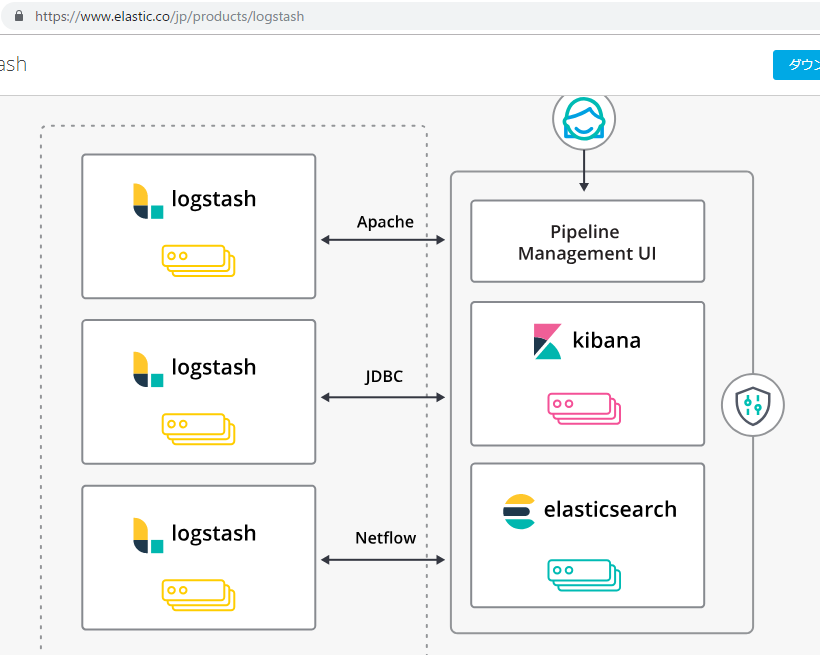
Logstash: ログの収集と記録のための機能を備えており、プラグイン形式で機能を拡張できる
Elastic Search: オープンソースで開発されている分散型データベース、 リアルタイムでのデータ分析や検索機能に優れている
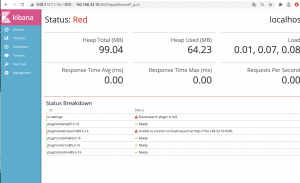
Kibana: Elasticsearch内に格納されているデータを可視化できる

ELKには、Java Runtime Environment(JRE)が必要で、openjdkで提供されている。
ログ収集のパフォーマンスはLogstashよりfluentdの方が優れている?

$ cat /etc/system-release
Amazon Linux release 2 (Karoo)
$ sudo yum update -y

### Java Install
$ sudo yum search java
$ sudo yum install java-1.8.0-openjdk-devel.x86_64
$ java -version
openjdk version “1.8.0_265”
OpenJDK Runtime Environment (build 1.8.0_265-b01)
OpenJDK 64-Bit Server VM (build 25.265-b01, mixed mode)
$ javac -version
javac 1.8.0_265

## ELKインストール
ElasticSearch -> Kibana -> logstash の順にインストールしていく
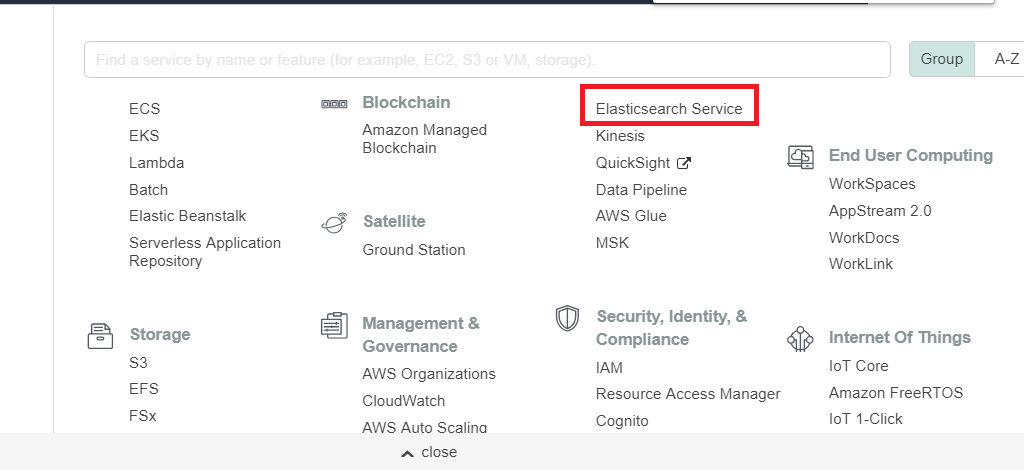
### Elastic Search
こちらのサイトを参考にする
https://www.elastic.co/guide/en/elasticsearch/reference/current/rpm.html

$ sudo rpm –import https://artifacts.elastic.co/GPG-KEY-elasticsearch
$ cd /etc/yum.repos.d/
$ sudo touch elasticsearch.repo
$ sudo vi elasticsearch.repo

[elasticsearch]
name=Elasticsearch repository for 7.x packages
baseurl=https://artifacts.elastic.co/packages/7.x/yum
gpgcheck=1
gpgkey=https://artifacts.elastic.co/GPG-KEY-elasticsearch
enabled=0
autorefresh=1
type=rpm-md

$ sudo yum install –enablerepo=elasticsearch elasticsearch
$ sudo cat /etc/elasticsearch/jvm.options
-> Xms1g, Xmx1gを -Xms256m、-Xmx256m に変更する

# Xms represents the initial size of total heap space
# Xmx represents the maximum size of total heap space

-Xms1g
-Xmx1g

$ sudo service elasticsearch start
ん? failed

$ sudo systemctl status elasticsearch -l
12月 15 19:05:52 localhost systemd-entrypoint[22869]: OpenJDK 64-Bit Server VM warning: INFO: os::commit_memory(0x0000000801511000, 131072, 0) failed; error=’Not enough space’ (errno=12)

何だと??
$ sudo /bin/dd if=/dev/zero of=/var/swap.1 bs=1M count=1024
$ sudo /sbin/mkswap /var/swap.1
$ sudo /sbin/swapon /var/swap.1
$ free
$ sudo service elasticsearch start
Starting elasticsearch (via systemctl): [ OK ]

きゃああああああああああああああああああああああああああああああ

$ curl localhost:9200/

うおおおおおおおお、酒飲みてえええええええええええ

vi elasticsearch.yml

[vagrant@localhost ~]$ sudo ls /etc/elasticsearch
elasticsearch.keystore jvm.options role_mapping.yml users
elasticsearch.yml log4j2.properties roles.yml users_roles
[vagrant@localhost ~]$ sudo cat /etc/elasticsearch/elasticsearch.yml
# ======================== Elasticsearch Configuration =========================
#
# NOTE: Elasticsearch comes with reasonable defaults for most settings.
# Before you set out to tweak and tune the configuration, make sure you
# understand what are you trying to accomplish and the consequences.
#
# The primary way of configuring a node is via this file. This template lists
# the most important settings you may want to configure for a production cluster.
#
# Please consult the documentation for further information on configuration options:
# https://www.elastic.co/guide/en/elasticsearch/reference/index.html
#
# ———————————- Cluster ———————————–
#
# Use a descriptive name for your cluster:
#
#cluster.name: my-application
#
# ———————————— Node ————————————
#
# Use a descriptive name for the node:
#
#node.name: node-1
#
# Add custom attributes to the node:
#
#node.attr.rack: r1
#
# ———————————– Paths ————————————
#
# Path to directory where to store the data (separate multiple locations by comma):
#
path.data: /var/lib/elasticsearch
#
# Path to log files:
#
path.logs: /var/log/elasticsearch
#
# ———————————– Memory ———————————–
#
# Lock the memory on startup:
#
#bootstrap.memory_lock: true
#
# Make sure that the heap size is set to about half the memory available
# on the system and that the owner of the process is allowed to use this
# limit.
#
# Elasticsearch performs poorly when the system is swapping the memory.
#
# ———————————- Network ———————————–
#
# Set the bind address to a specific IP (IPv4 or IPv6):
#
#network.host: 192.168.0.1
#
# Set a custom port for HTTP:
#
#http.port: 9200
#
# For more information, consult the network module documentation.
#
# ——————————— Discovery ———————————-
#
# Pass an initial list of hosts to perform discovery when this node is started:
# The default list of hosts is [“127.0.0.1”, “[::1]”]
#
#discovery.seed_hosts: [“host1”, “host2”]
#
# Bootstrap the cluster using an initial set of master-eligible nodes:
#
#cluster.initial_master_nodes: [“node-1”, “node-2”]
#
# For more information, consult the discovery and cluster formation module documentation.
#
# ———————————- Gateway ———————————–
#
# Block initial recovery after a full cluster restart until N nodes are started:
#
#gateway.recover_after_nodes: 3
#
# For more information, consult the gateway module documentation.
#
# ———————————- Various ———————————–
#
# Require explicit names when deleting indices:
#
#action.destructive_requires_name: true

Set IP where ElasticSearch is installed
#network.host: 192.168.0.1
→ 192.168.35.10

#http.port: 9200
→ http.port: 8000

[vagrant@localhost ~]$ sudo service elasticsearch restart
elasticsearch を停止中: [失敗]
elasticsearch を起動中: OpenJDK 64-Bit Server VM warning: Option UseConcMarkSweepGC was deprecated in version 9.0 and will likely be removed in a future release.
[ OK ]

Elastic searchをインストール

[vagrant@localhost ~]$ rpm –import https://artifacts.elastic.co/GPG-KEY-elasticsearch
[vagrant@localhost ~]$ cd /etc/yum.repos.d/
[vagrant@localhost yum.repos.d]$ sudo touch elasticsearch.repo
[vagrant@localhost yum.repos.d]$ sudo vi elasticsearch.repo

[elasticsearch-7.x]
name=Elasticsearch repository for 7.x packages
baseurl=https://artifacts.elastic.co/packages/7.x/yum
gpgcheck=1
gpgkey=https://artifacts.elastic.co/GPG-KEY-elasticsearch
enabled=1
autorefresh=1
type=rpm-md

[vagrant@localhost yum.repos.d]$ sudo yum install elasticsearch

### NOT starting on installation, please execute the following statements to configure elasticsearch service to start automatically using chkconfig
sudo chkconfig –add elasticsearch
### You can start elasticsearch service by executing
sudo service elasticsearch start
Created elasticsearch keystore in /etc/elasticsearch
Verifying : elasticsearch-7.0.0-1.x86_64 1/1

インストール:
elasticsearch.x86_64 0:7.0.0-1

完了しました!

[vagrant@localhost yum.repos.d]$ sudo chkconfig –add elasticsearch
[vagrant@localhost yum.repos.d]$ sudo service elasticsearch start
elasticsearch を起動中: OpenJDK 64-Bit Server VM warning: Option UseConcMarkSweepGC was deprecated in version 9.0 and will likely be removed in a future release.
OpenJDK 64-Bit Server VM warning: INFO: os::commit_memory(0x00000000c5330000, 986513408, 0) failed; error=’Not enough space’ (errno=12)
#
# There is insufficient memory for the Java Runtime Environment to continue.
# Native memory allocation (mmap) failed to map 986513408 bytes for committing reserved memory.
# An error report file with more information is saved as:
# /var/log/elasticsearch/hs_err_pid5271.log
[失敗]
なにいいいいいいいいいいいいいいいいいいいいいいいいいい
最近メモリが足りないってエラーが多すぎるんだが。。

[vagrant@localhost ~]$ sudo cat /etc/elasticsearch/jvm.options
## JVM configuration

################################################################
## IMPORTANT: JVM heap size
################################################################
##
## You should always set the min and max JVM heap
## size to the same value. For example, to set
## the heap to 4 GB, set:
##
## -Xms4g
## -Xmx4g
##
## See https://www.elastic.co/guide/en/elasticsearch/reference/current/heap-size.html
## for more information
##
################################################################

# Xms represents the initial size of total heap space
# Xmx represents the maximum size of total heap space

-Xms1g
-Xmx1g

################################################################
## Expert settings
################################################################
##
## All settings below this section are considered
## expert settings. Don't tamper with them unless
## you understand what you are doing
##
################################################################

## GC configuration
-XX:+UseConcMarkSweepGC
-XX:CMSInitiatingOccupancyFraction=75
-XX:+UseCMSInitiatingOccupancyOnly

## G1GC Configuration
# NOTE: G1GC is only supported on JDK version 10 or later.
# To use G1GC uncomment the lines below.
# 10-:-XX:-UseConcMarkSweepGC
# 10-:-XX:-UseCMSInitiatingOccupancyOnly
# 10-:-XX:+UseG1GC
# 10-:-XX:InitiatingHeapOccupancyPercent=75

## DNS cache policy
# cache ttl in seconds for positive DNS lookups noting that this overrides the
# JDK security property networkaddress.cache.ttl; set to -1 to cache forever
-Des.networkaddress.cache.ttl=60
# cache ttl in seconds for negative DNS lookups noting that this overrides the
# JDK security property networkaddress.cache.negative ttl; set to -1 to cache
# forever
-Des.networkaddress.cache.negative.ttl=10

## optimizations

# pre-touch memory pages used by the JVM during initialization
-XX:+AlwaysPreTouch

## basic

# explicitly set the stack size
-Xss1m

# set to headless, just in case
-Djava.awt.headless=true

# ensure UTF-8 encoding by default (e.g. filenames)
-Dfile.encoding=UTF-8

# use our provided JNA always versus the system one
-Djna.nosys=true

# turn off a JDK optimization that throws away stack traces for common
# exceptions because stack traces are important for debugging
-XX:-OmitStackTraceInFastThrow

# flags to configure Netty
-Dio.netty.noUnsafe=true
-Dio.netty.noKeySetOptimization=true
-Dio.netty.recycler.maxCapacityPerThread=0

# log4j 2
-Dlog4j.shutdownHookEnabled=false
-Dlog4j2.disable.jmx=true

-Djava.io.tmpdir=${ES_TMPDIR}

## heap dumps

# generate a heap dump when an allocation from the Java heap fails
# heap dumps are created in the working directory of the JVM
-XX:+HeapDumpOnOutOfMemoryError

# specify an alternative path for heap dumps; ensure the directory exists and
# has sufficient space
-XX:HeapDumpPath=/var/lib/elasticsearch

# specify an alternative path for JVM fatal error logs
-XX:ErrorFile=/var/log/elasticsearch/hs_err_pid%p.log

## JDK 8 GC logging

8:-XX:+PrintGCDetails
8:-XX:+PrintGCDateStamps
8:-XX:+PrintTenuringDistribution
8:-XX:+PrintGCApplicationStoppedTime
8:-Xloggc:/var/log/elasticsearch/gc.log
8:-XX:+UseGCLogFileRotation
8:-XX:NumberOfGCLogFiles=32
8:-XX:GCLogFileSize=64m

# JDK 9+ GC logging
9-:-Xlog:gc*,gc+age=trace,safepoint:file=/var/log/elasticsearch/gc.log:utctime,pid,tags:filecount=32,filesize=64m
# due to internationalization enhancements in JDK 9 Elasticsearch need to set the provider to COMPAT otherwise
# time/date parsing will break in an incompatible way for some date patterns and locals
9-:-Djava.locale.providers=COMPAT

-Xms1g、-Xmx1gの箇所ね。
VMのメモリを変えたいところだ。

デフォルトで2Gってどういうことだよ。。

とりあえず、500mに変える。
[vagrant@localhost ~]$ sudo vi /etc/elasticsearch/jvm.options
[vagrant@localhost ~]$ sudo service elasticsearch start
elasticsearch を起動中: OpenJDK 64-Bit Server VM warning: Option UseConcMarkSweepGC was deprecated in version 9.0 and will likely be removed in a future release.
[ OK ]

ELK(Elasticsearch, Kibana, Logstash)

ELKって何?持田香織? それELT😭
ELKはElasticsearch、 Logstash、Kibanaの頭文字で、ELK

あれ、ElasticsearchはConsoleにあるけど、LogstashはConsoleにないぞ。どういうことだ??

あら、LogstashはAWSのサービスではないのね。elasticというサービスの中の一つだ。む、これはなんか、機械学習と近い領域か。。

こちの図が関係性をよく表しています。
https://www.elastic.co/jp/products/logstash

わかったけど、ちょっと待て。Apacheは普通にわかるけど、JDBC、Netflowって何?