laravel 6.x 確認画面を挟んだstorage画像の保存処理

Laravelでは画像はstorageフォルダに格納する
Webからのアクセスを許すには、public/storageからstorage/app/publicへシンボリックリンクを張る必要がある
https://readouble.com/laravel/6.x/ja/filesystem.html

### 駄目な例
moveコマンドで、public配下に格納

UsersController.php

if($file = $request->file('file')){
            $name = $file->getClientOriginalName();
            $file->move('./images/tmp/', $name);
            $inputs['path'] = $name;

### 格納先・読み込み元をstorageに修正
$ php artisan storage:link
// ./public/storageが./storage/app/publicへのリンクとなる

UsersController.php

if($file = $request->file('file')){
            $name = $file->getClientOriginalName();
            // $file->move('./images/tmp/', $name);
            $file->storeAs('./public/images/tmp/', $name);
            $inputs['path'] = $name;

confirm.blade.php

<img src="{{ $inputs&#91;'path'&#93; ? asset('/storage/images/tmp/' . $inputs&#91;'path'&#93;) : 'https://placehold.jp/100x100.png' }}" class="img-icon">

確認画面で戻るボタンが押された場合は、Storage::deleteで削除する。確認画面で登録完了ボタンが押された場合は、画像の前部にCarbonでtimestampを付けて、prdフォルダに移動させる。画像のpathはDBに格納する。

UsersController.php

use Illuminate\Support\Facades\Storage;
use Carbon\Carbon;
public function store(Request $request)
    {
        $action = $request->get('action');
        $inputs = $request->except('action');

        if($action == '戻る'){
            Storage::delete('public/images/tmp/'.$inputs['profile_img']);
            return redirect()->action('UsersController@create')->withInput($inputs);
        }
        $timestamp = Carbon::now()->timestamp;
        $path = $timestamp.'_'.$inputs['profile_img'];
        Storage::move('public/images/tmp/'.$inputs['profile_img'], 'public/images/prd/'.$path);
        return 'done';
    }

ドキュメントを読む限り、storageに格納した方がファイルシステムの使う上で都合が良いように見えます。

laravel 6.x nullableなフォームのカスタムバリデーションの作り方

– 電話番号のフォームに入力があった場合、電話番号のバリデーションをかけたい

/^(([0-9]{2,4}-[0-9]{2,4}-[0-9]{3,4})|([0-9]{8,11})$/

– 未入力の場合はバリデーションをパスする

カスタムバリデーション公式ドキュメント: https://readouble.com/laravel/6.x/ja/validation.html#custom-validation-rules

$ php artisan make:rule PhoneRule

./app/Rules/PhoneRule.php
入力値がなかった場合は、tureを返す

 public function passes($attribute, $value)
    {
        if($value){
            return preg_match('/^(([0-9]{2,4}-[0-9]{2,4}-[0-9]{3,4})|([0-9]{8,11}))$/', $value);
        } else {
            return true;
        }       
    }
    public function message()
    {
        return trans('validation.phone');
    }

./app/Http/Requests/CreateUserRequest.php

use App\Rules\PhoneRule;
public function rules()
    {
        return [
            'phone' => [new PhoneRule],
        ];
    }

./resources/lang/ja/validation.php

'phone' => ':attributeはハイフン有りか無しで半角英数字8~11個の数字で入力してください。',
'attributes' => [
        'phone'=>'電話番号',
    ],

コントローラーやRequestsにクロージャーでも書けるそうですが、コードの保守性を鑑みても、make:ruleとしてカスタムバリデーションを作った方が良さそうです。

画像バリデーションにおけるbmp、SVG、webpの扱い

### 画像バリデーションの拡張子
一昔前は、画像の拡張子といえば、jpeg,jpg,gif,pngのみが多かった印象がありますが(自分だけ?)、Laravel6.xのimageのバリデーションでは「jpg、png、bmp、gif、svg、webp」となっております。そのまま、jpeg,jpg,gif,pngに加えて、bmp,svg, webpも採用するかについて考えたいと思います。

### SVGとは?
SVGとは、Scalable Vector Graphicsの略です。
名称からどのような画像かほぼ想像がつきますが、念の為コードを書きながら特徴を見てみましょう。

<svg width="160" height="160">
		<rect x="0" y="0" width="160" height="160" fill="skyblue"/>
		<rect x="40" y="40" width="80" height="80" fill="tomato"/>
	</svg>

### view box

<svg width="160" height="160">
		<rect x="0" y="0" width="160" height="160" fill="skyblue"/>
		<rect x="40" y="40" width="80" height="80" fill="tomato"/>
	</svg>
	<svg width="160" height="160" viewBox="0 0 320 320">
		<rect x="0" y="0" width="160" height="160" fill="skyblue"/>
		<rect x="40" y="40" width="80" height="80" fill="tomato"/>
	</svg>

<svg width="160" height="160">
		<rect x="0" y="0" width="160" height="160" fill="skyblue"/>
		<rect x="20" y="20" width="30" height="30" fill="#08c"/>
		<rect x="65" y="20" width="30" height="30" fill="rgb(255, 0, 0, 4)"/>
		<rect x="110" y="20" width="30" height="30" fill="hsla(120, 40%, 40%, .4)"/>
		<rect x="20" y="65" width="30" height="30" fill="none" stroke="olive" stroke-width="2"/>
		<rect x="65" y="65" width="30" height="30" fill="none" stroke="olive" stroke-dasharray="10"/>
		<rect x="110" y="65" width="30" height="30" fill="none" stroke="olive" stroke-width="2" stroke-dasharray="10, 2"/>
	</svg>

<svg width="160" height="160">
		<rect x="0" y="0" width="160" height="160" fill="skyblue"/>
		<rect x="20" y="20" width="30" height="30" style="fill:#08c; stroke:#eee; stroke-width:3;"/>
	</svg>

<svg width="160" height="160">
		<defs>
			<style>
				.my-box {
					fill: pink;
				}
			</style>
		</defs>
		<rect x="0" y="0" width="160" height="160" fill="skyblue"/>
		<rect x="20" y="20" width="30" height="30" style="fill:#08c; stroke:#eee; stroke-width:3;"/>
		<rect x="60" y="20" width="30" height="30" class="my-box"/>
	</svg>

<svg width="160" height="160">
		<rect x="0" y="0" width="160" height="160" fill="skyblue"/>
		<circle cx="80" cy="80" r="40" fill="gold" />
	</svg>	

### Photoshop、IllustratorのSVG、bmpの扱い
photoshopではbmpはありますが、SVGはありません。

一方、ベクターなのでIllustratorはSVGの取り扱いがあります。

### 結論
卒業写真など、オフィシャルなものであれば写真オンリーでしょうが、compassなどを見るとjpegの写真は殆どの見ないくらい写真以外をプロフィール画像にすることは浸透しているため、bmp,svg, webpもバリデーションに加えて良いでしょう。

プログラミングの義務教育が始まるので、近い未来、卒業写真にベクター画像を載せる学校が出てくるかもしれませんね。

jpeg/gif/bmp/svg

jpeg: Joint Photographic Experts Group, 24bit 1670万色, 1/10〜1/50圧縮率
gif: Graphic Interchange Format, 8bit 256色、高圧縮可能、ファイルサイズが小さい、ロゴ・ボタン・アイコンなど
png: Portable Network Graphic, 48bit, 280兆色、可逆圧縮、画質劣化がない、透明・不透明・半透明対応
bmp: Microsoft Windows Bitmap Image, 無圧縮、データが大きい
svg: Scalable Vector Graphics, XMLベースの2次元ベクターイメージ

jpg

gif

png

bmp
-> not permitted in wordpress

svgは割と最近使われていると言われているので、基礎は勉強する必要がありそうです。

Laravel6.x バリデーションのエラーメッセージを日本語化

### 初期(デフォルト)のメッセージ
./config/app.php

'locale' => 'ja',

$ php artisan make:request CreateUserRequest
CreateUserRequest.php

public function authorize()
    {
        return true;
    }
public function rules()
    {
        return [
            'name' => 'required',
        ];
    }

UsersController.php

public function confirm(CreateUserRequest $request)
    {
        return $request->all();
    }

view.blade.php

@if ($errors->has('name'))
  <br><span class="error">{{ $errors->first('name') }}</span>
@endif

エラーメッセージ
validation.required

### 英語のメッセージを複製
./resources/lang/ja/validation.php を作成
./resources/lang/en/validation.php の内容を ja/validation.php に複製

エラーメッセージ
The name field is required.

### 日本語メッセージにカスタマイズ
./resources/lang/ja/validation.php

'required' => ':attributeは必須です。',
'attributes' => [
        'last_name'=>'名前',
    ],

エラーメッセージ
名前は必須です。

バリデーションの仕様、メッセージに関しては、Wiki・Excelなどでステークホルダー全員で共有しながら管理することが多いでしょう。大規模なアプリケーションになるとバリデーションの数も増えてくるので、管理方法も工夫したい。

ruby install

$ git clone https://github.com/sstephenson/rbenv.git ~/.rbenv
$ git clone https://github.com/sstephenson/ruby-build.git ~/.rbenv/plugins/ruby-build
$ echo ‘export PATH=”$HOME/.rbenv/bin:$PATH”‘ >> ~/.bash_profile
$ echo ‘eval “$(rbenv init -)”‘ >> ~/.bash_profile
$ source ~/.bash_profile

$ rbenv install –list
$ rbenv install 2.7.0
$ rbenv global 2.7.0
$ rbenv rehash

$ which ruby
$ ruby –version

$ sudo yum install rubygems
$ gem update –system 2.7.10

linux timezone変更手順

$ date
$ cat /etc/localtime
TZif2UTCTZif2?UTC
UTC0
$ sudo cp /etc/localtime /etc/localtime.org
$ sudo ln -sf /usr/share/zoneinfo/Asia/Tokyo /etc/localtime
$ sudo cp /etc/sysconfig/clock /etc/sysconfig/clock.org
$ sudo vi /etc/sysconfig/clock

ZONE="Asia/Tokyo"
UTC=false

$ strings /etc/localtime
$ date

mysqlからカラム名も取得してfputcsvによる帳票出力

### データ作成
create database universe;
use universe;
create table planets(
id int primary key auto_increment,
name varchar(255),
diameter float,
mass float
);
describe planets;
insert into planets(name, diameter, mass) values (‘Sun’,’110′,’330000′);
insert into planets(name, diameter, mass) values (‘Mercury’,’0.38′,’0.06′);
insert into planets(name, diameter, mass) values (‘Venus’,’0.95′,’0.82′);
insert into planets(name, diameter, mass) values (‘Earth’,’1′,’1′);
insert into planets(name, diameter, mass) values (‘Mars’,’0.53′,’0.11′);
insert into planets(name, diameter, mass) values (‘Jupiter’,’11’,’320′);
insert into planets(name, diameter, mass) values (‘Saturn’,’9.5′,’95’);
insert into planets(name, diameter, mass) values (‘Uranus’,’4′,’15’);
insert into planets(name, diameter, mass) values (‘Neptune’,’3.9′,’17’);
select * from planets;

### データ出力
var_dumpでテストしてから、出力します。

try {
$dbh = new PDO('mysql:host=localhost;dbname=universe;charset=utf8','root','hogehoge', array(PDO::ATTR_EMULATE_PREPARES => false));
} catch(PDOException $e){
    exit('データベース接続失敗。'.$e->getMessage());
}

$export_sql = "select * from planets";

// $stmt = $dbh->query($export_sql);
// $row = $stmt->fetchAll(PDO::FETCH_ASSOC);
// var_dump($row);

$file_path = "csv/planets.csv";
$export_csv_title = ["id","name","diameter","mass"];

foreach($export_csv_title as $key => $val){
	$export_header[] = mb_convert_encoding($val, 'SJIS-win', 'UTF-8');
	}

	if(touch($file_path)){
		$file = new SplFileObject($file_path, "w");

		$file->fputcsv($export_header);
		$stmt = $dbh->query($export_sql);

		while($row = $stmt->fetch(PDO::FETCH_ASSOC)){
			$file->fputcsv($row);
		}
		$dbh = null;

	}

echo "done";

### カラム名も取得したい場合
show columnsとして配列を取得して、その中からFieldを取り出す

$export_column = "show columns from planets";
$stmt = $dbh->query($export_column);
while($row = $stmt->fetch(PDO::FETCH_ASSOC)){
	$field[] = $row["Field"];
}

つなげると

try {
$dbh = new PDO('mysql:host=localhost;dbname=universe;charset=utf8','root','hogehoge', array(PDO::ATTR_EMULATE_PREPARES => false));
} catch(PDOException $e){
    exit('データベース接続失敗。'.$e->getMessage());
}

$export_column = "show columns from planets";
$stmt = $dbh->query($export_column);
while($row = $stmt->fetch(PDO::FETCH_ASSOC)){
	$field[] = $row["Field"];
}

$export_sql = "select * from planets";
$file_path = "csv/planets.csv";
$export_csv_title = $field;

foreach($export_csv_title as $key => $val){
	$export_header[] = mb_convert_encoding($val, 'SJIS-win', 'UTF-8');
	}

	if(touch($file_path)){
		$file = new SplFileObject($file_path, "w");

		$file->fputcsv($export_header);
		$stmt = $dbh->query($export_sql);

		while($row = $stmt->fetch(PDO::FETCH_ASSOC)){
			$file->fputcsv($row);
		}
		$dbh = null;

	}

echo "done";

カラム名だけ取得のニーズはあるので、その命令文を作っても良いように思ったが、、、
MySQL8.0のGithubレポを見ると軽々しく言えんな。。
https://github.com/mysql/mysql-server/blob/8.0/sql/sql_select.cc

w3.org WebRTC 1.0

https://www.w3.org/TR/webrtc/

1. Introduction
– Connecting to remote peers using NAT-traversal technologies such as ICE, STUN, and TURN
2. Conformance
3. Terminology
– The EventHandler interface, representing a callback used for event handlers, and the ErrorEvent interface are defined in HTML
4.Peer-to-peer connections
4.1.Introduction
– Communications are coordinated by the exchange of control messages (called a signaling protocol) over a signaling channel which is provided by unspecified means, but generally by a script in the page via the server, e.g. using XMLHttpRequest [xhr] or Web Sockets
4.2.Configuration
4.2.1 RTCConfiguration Dictionary
 4.2.2 RTCIceCredentialType Enum
4.2.3 RTCIceServer Dictionary

  {urls: 'stun:stun1.example.net'},
  {urls: ['turns:turn.example.org', 'turn:turn.example.net'],
    username: 'user',
    credential: 'myPassword',
    credentialType: 'password'},

4.2.4 RTCIceTransportPolicy Enum
4.2.5 RTCBundlePolicy Enum
4.2.6 RTCRtcpMuxPolicy Enum
4.2.7 Offer/Answer Options
4.3 State Definitions
4.3.1 RTCSignalingState Enum
Non-normative signalling state transitions diagram
– Caller transition:
new RTCPeerConnection(): stable
setLocalDescription(offer): have-local-offer
setRemoteDescription(pranswer): have-remote-pranswer
setRemoteDescription(answer): stable
– Callee transition:
new RTCPeerConnection(): stable
setRemoteDescription(offer): have-remote-offer
setLocalDescription(pranswer): have-local-pranswer
setLocalDescription(answer): stable
4.3.2 RTCIceGatheringState Enum
4.3.3 RTCPeerConnectionState Enum
4.3.4 RTCPeerConnectionState Enum
4.4 RTCPeerConnection Interface
– An RTCPeerConnection object has a signaling state, a connection state, an ICE gathering state, and an ICE connection state
4.4.1.1 Constructor
4.4.1.2 Chain an asynchronous operation
-> operations chainにアルゴリズムが全て書いてある
4.4.1.3 Update the connection state
4.4.1.4 Update the ICE gathering state
4.4.1.5 Set the RTCSessionDescription
4.4.1.6 Set the configuration
4.4.2 Interface Definition
– createOffer, createAnswer, setLocalDescription, setRemoteDescription, addIceCandidate, restartIce, getConfiguration, setConfiguration, close
4.4.3 Legacy Interface Extensions
4.4.3.1 Method extensions
4.4.3.2 Legacy configuration extensions
4.4.4 Garbage collection
4.5 Error Handling
4.6 Session Description Model
4.6.1 RTCSdpType
– offer, pranswer, answer, rollback
4.6.2 RTCSessionDescription Class
4.7 RTCSessionDescription Class
– This event is fired according to the state of the connection’s negotiation-needed flag
4.7.1 Setting Negotiation-Needed
4.7.2 Setting Negotiation-Needed
4.7.3 Updating the Negotiation-Needed flag
4.8 Interfaces for Connectivity Establishment
4.8.1 RTCIceCandidate Interface
4.8.1.1 candidate-attribute Grammar
4.8.1.2 RTCIceProtocol Enum
4.8.1.3 RTCIceTcpCandidateType Enum
4.8.1.4 RTCIceCandidateType
4.82 RTCPeerConnectionIceEvent
4.8.3 RTCPeerConnectionIceErrorEvent
4.9 Certificate Management
4.9.1 RTCCertificateExpiration Dictionary
4.9.2 RTCCertificate Interface
5. RTP Media API
5.1 RTCPeerConnection Interface Extensions
5.1.1 Processing Remote MediaStreamTracks
5.2 RTCRtpSender Interface
5.2.1 RTCRtpParameters
5.2.2 RTCRtpSendParameters
5.2.3 RTCRtpReceiveParameters
5.2.4 RTCRtpCodingParameters
5.2.5 RTCRtpDecodingParameters
5.2.6 RTCRtpEncodingParameters
5.2.7 RTCRtcpParameters
5.2.8 RTCRtpHeaderExtensionParameters
5.2.9 RTCRtpCodecParameters
5.2.10 RTCRtpCapabilities
5.2.11 RTCRtpCodecCapability
5.2.12 RTCRtpHeaderExtensionCapability
5.3 RTCRtpReceiver
5.4 RTCRtpTransceiver
5.5 RTCDtlsTransport
5.5.1 RTCDtlsFingerprint
5.6 RTCIceTransport
5.6.1 RTCIceParameters
5.6.2 RTCIceCandidatePair
5.6.3 RTCIceGathererState
5.6.4 RTCIceTransportState
5.6.5 RTCIceRole
5.6.6 RTCIceComponent
5.7 RTCTrackEvent
6.Peer-to-peer Data API
6.1 RTCPeerConnection Interface Extensions
6.1.1 RTCSctpTransport
6.1.1.1 Create an instance
6.1.1.2 Update max message size
6.1.1.3 Connected procedure
6.2 RTCDataChannel
6.2.1 Creating a data channel
6.2.2 Announcing a data channel as open
6.2.3 Announcing a data channel instance
6.2.4 Closing procedure
6.2.5 Announcing a data channel as closed
6.2.6 Error on creating data channels
6.2.7 Receiving messages on a data channel
6.3 RTCDataChannelEvent
6.4 Garbage Collection
7. Peer-to-peer DTMF
7.1 RTCRtpSender Interface Extensions
7.2 RTCDTMFSender
7.3 canInsertDTMF algorithm
7.4 RTCDTMFToneChangeEvent
8. Statistics Model
8.1 Introduction
8.2 RTCPeerConnection Interface Extensions
8.3 RTCStatsReport
8.4 RTCStats
8.5 The stats selection algorithm
8.6 Mandatory To Implement Stats
9. Media Stream API Extensions for Network Use
9.2 MediaStream
9.2.1 id
9.3 MediaStreamTrack
9.3.1 MediaTrackSupportedConstraints, MediaTrackCapabilities, MediaTrackConstraints and MediaTrackSettings
10. Examples and Call Flows
10.1 Simple Peer-to-peer Example

const signaling = new SignalingChannel(); // handles JSON.stringify/parse
const constraints = {audio: true, video: true};
const configuration = {iceServers: [{urls: 'stun:stun.example.org'}]};
const pc = new RTCPeerConnection(configuration);

// send any ice candidates to the other peer
pc.onicecandidate = ({candidate}) => signaling.send({candidate});

// let the "negotiationneeded" event trigger offer generation
pc.onnegotiationneeded = async () => {
  try {
    await pc.setLocalDescription(await pc.createOffer());
    // send the offer to the other peer
    signaling.send({desc: pc.localDescription});
  } catch (err) {
    console.error(err);
  }
};

// once media for a remote track arrives, show it in the remote video element
pc.ontrack = (event) => {
  // don't set srcObject again if it is already set.
  if (remoteView.srcObject) return;
  remoteView.srcObject = event.streams[0];
};

// call start() to initiate
async function start() {
  try {
    // get a local stream, show it in a self-view and add it to be sent
    const stream = await navigator.mediaDevices.getUserMedia(constraints);
    stream.getTracks().forEach((track) => pc.addTrack(track, stream));
    selfView.srcObject = stream;
  } catch (err) {
    console.error(err);
  }
}

signaling.onmessage = async ({desc, candidate}) => {
  try {
    if (desc) {
      // if we get an offer, we need to reply with an answer
      if (desc.type == 'offer') {
        await pc.setRemoteDescription(desc);
        const stream = await navigator.mediaDevices.getUserMedia(constraints);
        stream.getTracks().forEach((track) => pc.addTrack(track, stream));
        await pc.setLocalDescription(await pc.createAnswer());
        signaling.send({desc: pc.localDescription});
      } else if (desc.type == 'answer') {
        await pc.setRemoteDescription(desc);
      } else {
        console.log('Unsupported SDP type. Your code may differ here.');
      }
    } else if (candidate) {
      await pc.addIceCandidate(candidate);
    }
  } catch (err) {
    console.error(err);
  }
};

10.2 Advanced Peer-to-peer Example with Warm-up

const signaling = new SignalingChannel();
const configuration = {iceServers: [{urls: 'stun:stun.example.org'}]};
const audio = null;
const audioSendTrack = null;
const video = null;
const videoSendTrack = null;
const started = false;
let pc;

// Call warmup() to warm-up ICE, DTLS, and media, but not send media yet.
async function warmup(isAnswerer) {
  pc = new RTCPeerConnection(configuration);
  if (!isAnswerer) {
    audio = pc.addTransceiver('audio');
    video = pc.addTransceiver('video');
  }

  // send any ice candidates to the other peer
  pc.onicecandidate = (event) => {
    signaling.send(JSON.stringify({candidate: event.candidate}));
  };

  // let the "negotiationneeded" event trigger offer generation
  pc.onnegotiationneeded = async () => {
    try {
      await pc.setLocalDescription(await pc.createOffer());
      // send the offer to the other peer
      signaling.send(JSON.stringify({desc: pc.localDescription}));
    } catch (err) {
      console.error(err);
    }
  };

  // once media for the remote track arrives, show it in the remote video element
  pc.ontrack = async (event) => {
    try {
      if (event.track.kind == 'audio') {
        if (isAnswerer) {
          audio = event.transceiver;
          audio.direction = 'sendrecv';
          if (started && audioSendTrack) {
            await audio.sender.replaceTrack(audioSendTrack);
          }
        }
      } else if (event.track.kind == 'video') {
        if (isAnswerer) {
          video = event.transceiver;
          video.direction = 'sendrecv';
          if (started && videoSendTrack) {
            await video.sender.replaceTrack(videoSendTrack);
          }
        }
      }

      // don't set srcObject again if it is already set.
      if (!remoteView.srcObject) {
        remoteView.srcObject = new MediaStream();
      }
      remoteView.srcObject.addTrack(event.track);
    } catch (err) {
      console.error(err);
    }
  };

  try {
    // get a local stream, show it in a self-view and add it to be sent
    const stream = await navigator.mediaDevices.getUserMedia({audio: true,
                                                              video: true});
    selfView.srcObject = stream;
    audioSendTrack = stream.getAudioTracks()[0];
    if (started) {
      await audio.sender.replaceTrack(audioSendTrack);
    }
    videoSendTrack = stream.getVideoTracks()[0];
    if (started) {
      await video.sender.replaceTrack(videoSendTrack);
    }
  } catch (err) {
    console.error(err);
  }
}

// Call start() to start sending media.
function start() {
  started = true;
  signaling.send(JSON.stringify({start: true}));
}

signaling.onmessage = async (event) => {
  if (!pc) warmup(true);

  try {
    const message = JSON.parse(event.data);
    if (message.desc) {
      const desc = message.desc;

      // if we get an offer, we need to reply with an answer
      if (desc.type == 'offer') {
        await pc.setRemoteDescription(desc);
        await pc.setLocalDescription(await pc.createAnswer());
        signaling.send(JSON.stringify({desc: pc.localDescription}));
      } else {
        await pc.setRemoteDescription(desc);
      }
    } else if (message.start) {
      started = true;
      if (audio && audioSendTrack) {
        await audio.sender.replaceTrack(audioSendTrack);
      }
      if (video && videoSendTrack) {
        await video.sender.replaceTrack(videoSendTrack);
      }
    } else {
      await pc.addIceCandidate(message.candidate);
    }
  } catch (err) {
    console.error(err);
  }
};

10.3 Simulcast Example
10.4 Peer-to-peer Data Example
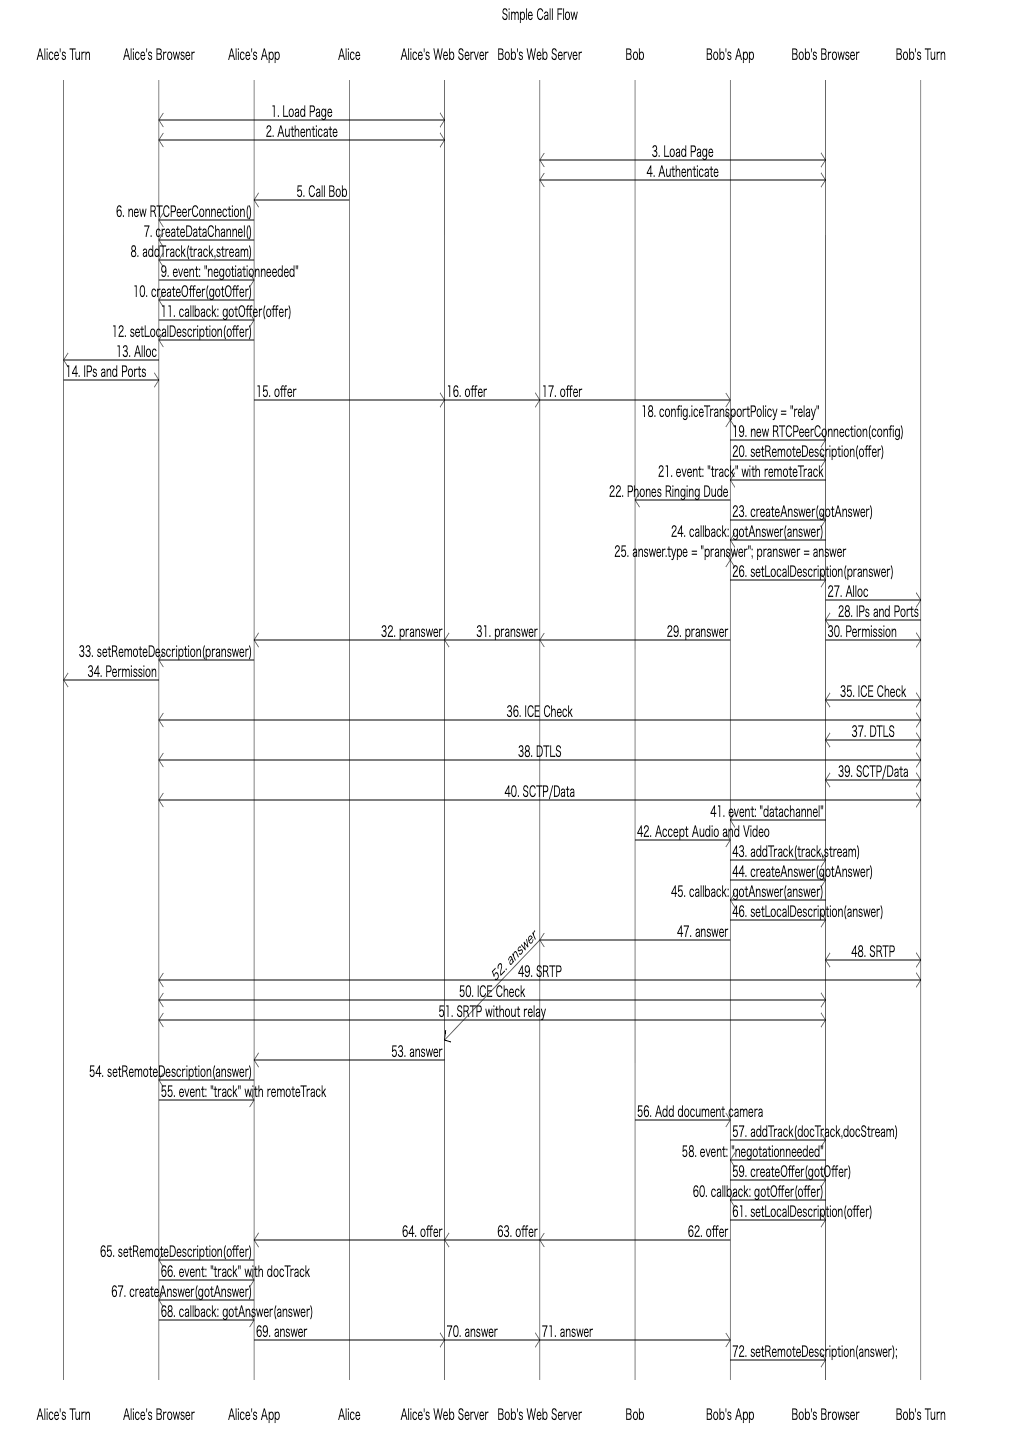
10.5 Call Flow Browser to Browser

10.6 DTMF Example
11. Error Handling

-> ICE CandidateはIPアドレス、プロトコル(TCP/UDP)だけでなく、ポート番号、コンポーネント、タイプ(host/srlfx/relay)、優先度(type preference, local preference, component IDなど)、ファウンデーション(ホールパンチ効率化)、ベース(無駄な候補を省く)も含まれる
-> 収集(IP&Portを集める)、交換(候補を交換)、整頓(相手の候補と自分の候補をペアにしてuniq & sort)、穴開(ペアに対して接続試行・ホールパンチ)、集結(候補を決定)
-> ローカル候補を取得(host)、STUNでNAT外部候補を取得(srlfx)、TurnにAllocation Request(relay)

express.ioによるchat room

### server.js

var express = require('express.io');
var app = express();
var PORT = 3000;

var fs = require("fs");
var https = require("https");
var options = {
	key: fs.readFileSync('key.pem'),
	cert: fs.readFileSync('server.crt')
}
app.https(options).io();

console.log('server started' + PORT);

app.use(express.static(__dirname + '/public'));
app.get('/', function(req, res){
	res.render('index.ejs');
});

app.io.route('ready', function(req){
	req.io.join(req.data)
	app.io.room(req.data).broadcast('announce', {
		message: 'New client in the ' + req.data + ' room.'
	})
})

app.io.route('send', function(req){
	app.io.room(req.data.room).broadcast('message', {
		message: req.data.message,
		author: req.data.author,
	})
})

app.listen(PORT);

### index.ejs

<!DOCTYPE html>
<html lang="en">
<head>
	<meta charset="UTF-8">
	<title>WebRTC</title>
	<link rel="stylesheet" type="text/css" href="public/styles.css">
	<script src="/socket.io/socket.io.js"></script>
</head>
<body>
	<p><button id="takeProfilePicture" type="button" autofocus="true">Create Profile Picture</button></p>
	<video id="videoTag" autoplay></video>
	<div>
		<label>Your Name</label><input id="myName" type="text">
		<label>Message</label><input id="myMessage" type="text">
		<input id="sendMessage" type="submit">
		<div id="chatArea">Message: output:<br></div>
	</div>

	<script>
		navigator.getUserMedia = navigator.getUserMedia || navigator.webkitGetUserMedia || window.navigator.mozGetUserMedia;
		var constraints = {audio: false, video: {
				mandatory: {
					maxWidth: 240,
					maxHeight: 240
				}
			}
		};
		var videoArea = document.querySelector("video");
		var myName = document.querySelector("#myName");
		var myMessage = document.querySelector("#myMessage");
		var sendMessage = document.querySelector("#sendMessage");
		var chatArea = document.querySelector("#chatArea");
		var ROOM = "chat";

		io = io.connect();
		io.emit('ready', ROOM);

		io.on('announce', function(data){
			displayMessage(data.message);
		});

		io.on('message', function(data){
			displayMessage(data.author + ": " + data.message);
		});

		sendMessage.addEventListener('click', function(ev){
			io.emit('send', {"author":myName.value, "message":myMessage.value, "room":ROOM});
			ev.preventDefault();
		}, false);

		function displayMessage(message){
			chatArea.innerHTML = chatArea.innerHTML + "<br>" + message;
		}

		navigator.getUserMedia(constraints, onSuccess, onError);

		function onSuccess(stream){
			console.log("Success! we have a stream!");
			// videoArea.src = window.URL.createObjectURL(stream);
			// videoArea.className = "grayscale_filter";
			videoArea.srcObject = stream;
		}

		function onError(error){
			console.log("Error with getUserMedia: ", error);
		}
	</script>
</body>
</html>

chat room top -> chat room create -> insert into mysql -> chat room display -> other user join って流れか
socket ioは、HTTP通信ではなく、WebSocketによって通信を行なっている

あれ、待てよ、webrtcだと、SDPの送信が必要なわけだけど、Socket.ioは、TURN serverは提供していないわけだから、TURNで取得したpublic ipをsocket.ioで転送するってこと?