まず、WebRTCとは?
-WebReal-Time Communicationsの略
-ウェブでシンプルなAPI経由でリアルタイム通信を提供する
-P2P通信
-オープンソース
アーキテクチャ
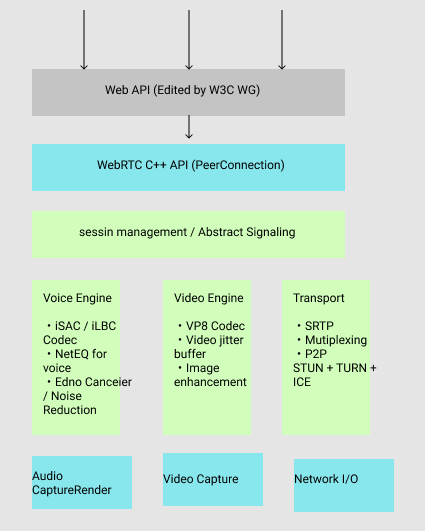
セッションでやりとりしてるんか。。
-getUserMedia
ブラウザから端末に取り付けられているカメラやマイクにアクセスしてストリームデータを取得
-RTCPeerConnection
マルチメディアセッションを確立するAPI
-RTCDataChannel
テキストデータ、バイナリデータのP2Pデータ通信API
vagrant でvideoのテスト
<!doctype html>
<html>
<head>
 <meta http-equiv="Content-Type" content="text/html; charset=UTF-8">
 <title>Wrap old and new getUserMedia</title>
</head>
<body>
  Wrap old and new getUserMedia<br />
  <button type="button" onclick="startVideo();">Start</button>
  <button type="button" onclick="stopVideo();">Stop</button>
  <br />
  <video id="local_video" autoplay style="width: 320px; height: 240px; border: 1px solid black;"></video>
</body>
<script type="text/javascript">
  var localVideo = document.getElementById('local_video');
  var localStream = null;

  // --- prefix -----
  navigator.getUserMedia  = navigator.getUserMedia    || navigator.webkitGetUserMedia ||
                            navigator.mozGetUserMedia || navigator.msGetUserMedia;

  // ---------------------- video handling -----------------------
  // start local video
  function startVideo() {
    getDeviceStream({video: true, audio: false})
    .then(function (stream) { // success
      localStream = stream;
      playVideo(localVideo, stream);
    }).catch(function (error) { // error
      console.error('getUserMedia error:', error);
      return;
    });
  }

  // stop local video
  function stopVideo() {
    pauseVideo(localVideo);
    stopLocalStream(localStream);
  }

  function stopLocalStream(stream) {
    let tracks = stream.getTracks();
    if (! tracks) {
      console.warn('NO tracks');
      return;
    }

    for (let track of tracks) {
      track.stop();
    }
  }

  function getDeviceStream(option) {
    if ('getUserMedia' in navigator.mediaDevices) {
      console.log('navigator.mediaDevices.getUserMadia');
      return navigator.mediaDevices.getUserMedia(option);
    }
    else {
      console.log('wrap navigator.getUserMadia with Promise');
      return new Promise(function(resolve, reject){
        navigator.getUserMedia(option,
          resolve,
          reject
        );
      });
    }
  }

  function playVideo(element, stream) {
    if ('srcObject' in element) {
      element.srcObject = stream;
    }
    else {
      element.src = window.URL.createObjectURL(stream);
    }
    element.play();
    element.volume = 0;
  }

  function pauseVideo(element) {
    element.pause();
    if ('srcObject' in element) {
      element.srcObject = null;
    }
    else {
      if (element.src && (element.src !== '') ) {
        window.URL.revokeObjectURL(element.src);
      }
      element.src = '';
    }
  }
</script>
</html>
built in
[vagrant@localhost webrtc]$ php -S 192.168.33.10:8000
あれ?
なに、みれないぞ。。
ソースコードがおかしいか?
同じソースコードで、*.github.ioにcommitして確認
=> 見れる
なにいいいいいいいいいいいいいいいいいいいいい
server側の設定か?
そんなばかな。。。
=> 2時間くらい調査
=> 少し疲れたので休憩
=> あれ、videoタグの設定か?
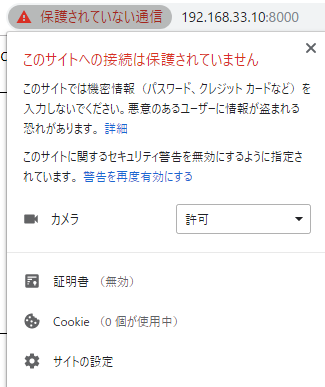
=> chromeのカメラの設定を確認
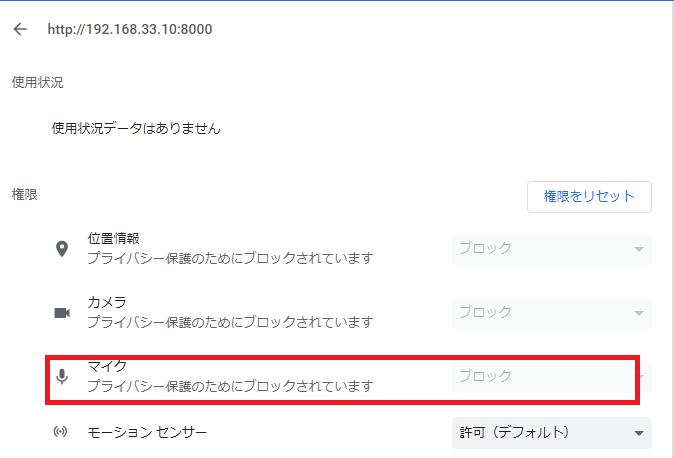
httpだと、カメラのアクセスがブロックされるのね。。。
amazon linuxにmod-sslを入れます。
[vagrant@localhost webrtc]$ sudo yum install -y mod_ssl
–> Finished Dependency Resolution
Error: httpd24 conflicts with httpd-2.2.34-1.15.amzn1.x86_64
Error: httpd24-tools conflicts with httpd-tools-2.2.34-1.15.amzn1.x86_64
ぎゃああああああああああああああああああああああ
[vagrant@localhost webrtc]$ sudo yum install mod24_ssl
Complete!
もうやだ。