VirtualBox_Guest_Additionsのインストール

Guest Additions CD イメージの挿入は設定済み
デバイスから操作すると、

[root@localhost ~]# mkdir /media/cdrom
[root@localhost ~]# mount -r /dev/cdrom /media/cdrom
[root@localhost ~]# ls-l /media/cdrom
-bash: ls-l: command not found
[root@localhost ~]# ls -l /media/cdrom
total 51462
dr-xr-xr-x 2 root root     2048 Jul 27  2017 32Bit
dr-xr-xr-x 2 root root     2048 Jul 27  2017 64Bit
-r-xr-xr-x 1 root root      647 Aug 17  2016 AUTORUN.INF
-r-xr-xr-x 1 root root     6381 Jul 27  2017 autorun.sh
dr-xr-xr-x 2 root root     2048 Jul 27  2017 cert
dr-xr-xr-x 2 root root     4096 Jul 27  2017 OS2
-r-xr-xr-x 1 root root     4824 Jul 27  2017 runasroot.sh
-r-xr-xr-x 1 root root  8160718 Jul 27  2017 VBoxLinuxAdditions.run
-r-xr-xr-x 1 root root 17789440 Jul 27  2017 VBoxSolarisAdditions.pkg
-r-xr-xr-x 1 root root 16407888 Jul 27  2017 VBoxWindowsAdditions-amd64.exe
-r-xr-xr-x 1 root root   268496 Jul 27  2017 VBoxWindowsAdditions.exe
-r-xr-xr-x 1 root root 10046608 Jul 27  2017 VBoxWindowsAdditions-x86.exe

あれ、なんだこれ。
lsコマンドの-lはリストを縦に表示

/media/は
>一時的なマウント用のディレクトリ。マウントとは接続された装置をOSに認識させて使うといった意味になります。このディレクトリは一時的なマウント用なので、例えば「USBメモリを接続した」とかした場合にここにファイルのような扱いでそのデバイスが置かれます。/mediaとの違いは「一時的な」という部分になりますね。

/dev
>主に記憶デバイスとかを入れておくディレクトリ。UNIXでは「デバイスをファイルのような扱いにして操作する」って設計になっているのでデバイスを追加とかするとここにファイルのような扱いでデバイスが置かれます。

mountコマンド
「mount」は、HDDやUSBメモリ、DVD-ROMなどのフォーマット済みの領域(ファイルシステム)を指定したディレクトリ(マウントポイント)と一時的に結び付けてアクセスできるようにするコマンド

うお、マニアックになってきた。
mount -r は読み取り専用

shコマンド シェルの起動

[root@localhost ~]# sh /media/cdrom/VBoxLinuxAdditions.run
Verifying archive integrity... All good.
Uncompressing VirtualBox 5.1.26 Guest Additions for Linux...........
VirtualBox Guest Additions installer
Copying additional installer modules ...
Installing additional modules ...
vboxadd.sh: Starting the VirtualBox Guest Additions.
Failed to set up service vboxadd, please check the log file
/var/log/VBoxGuestAdditions.log for details.

[root@localhost ~]# cat /var/log/VBoxGuestAdditions.log

vboxadd.sh: failed: Look at /var/log/vboxadd-install.log to find out what went wrong.
chcon: can’t apply partial context to unlabeled file ‘/usr/lib64/VBoxGuestAdditions/mount.vboxsf’
vboxadd.sh: failed: Look at /var/log/vboxadd-install.log to find out what went wrong.
vboxadd.sh: failed: modprobe vboxguest failed.

[root@localhost ~]# umount /media/cdrom
[root@localhost ~]# ls -l /media/cdrom
total 0

yumリポジトリの登録

yum install epel-release
curl -s https://setup.ius.io/ | sh
rpm --import http://rpms.famillecollet.com/RPM-GPG-KEY-remi
yum install http://rpms.famillecollet.com/enterprise/remi-release-6.rpm

yum update

開発環境用パッケージインストール

yum groupinstall "Development tools"
yum install man man-pages man-pages-overrides man-pages-ja

centos7のiptables無効化(firewalld)

[root@localhost ~]# service iptables stop
Redirecting to /bin/systemctl stop iptables.service
Failed to stop iptables.service: Unit iptables.service not loaded.
[root@localhost ~]# service iptables status
Redirecting to /bin/systemctl status iptables.service
Unit iptables.service could not be found.

なに?
あ、centos7では「iptables」から「firewalld」に変更されている。

[root@localhost ~]# systemctl is-enabled firewalld
enabled

enabledになってます。
firewalldを無効化にします。

systemctl stop firewalld

[root@localhost ~]# systemctl status firewalld
● firewalld.service - firewalld - dynamic firewall daemon
   Loaded: loaded (/usr/lib/systemd/system/firewalld.service; enabled; vendor preset: enabled)
   Active: inactive (dead) since Sat 2018-10-27 12:18:33 JST; 9s ago
     Docs: man:firewalld(1)
  Process: 623 ExecStart=/usr/sbin/firewalld --nofork --nopid $FIREWALLD_ARGS (code=exited, status=0/SUCCESS)
 Main PID: 623 (code=exited, status=0/SUCCESS)

Oct 27 12:01:06 localhost.localdomain systemd[1]: Starting firewalld - dynamic firewall daemon...
Oct 27 12:01:09 localhost.localdomain systemd[1]: Started firewalld - dynamic firewall daemon.
Oct 27 12:18:33 localhost.localdomain systemd[1]: Stopping firewalld - dynamic firewall daemon...
Oct 27 12:18:33 localhost.localdomain systemd[1]: Stopped firewalld - dynamic firewall daemon.

activeがinactive(dead)で無効化されているのでOK
続いて自動起動

[root@localhost ~]# systemctl is-enabled firewalld
enabled

firewalldの自動起動を無効化

[root@localhost ~]# systemctl disable firewalld
Removed symlink /etc/systemd/system/multi-user.target.wants/firewalld.service.
Removed symlink /etc/systemd/system/dbus-org.fedoraproject.FirewallD1.service.
[root@localhost ~]# systemctl is-enabled firewalld
disabled

しゃああああああああああああああああああ

iptablesの無効化

iptablesとは一般的なLinuxに搭載されているパケットフィルタ
パケットとは、ネットワーク上を流れるデータの事。パケットフィルタとは、このパケットを選別して、通すものと通さないものを分けるということを意味
iptablesは商用製品に匹敵する、とても高機能かつ高性能なパケットフィルタ
サーバ自身を守ることはもちろん、パケット転送などにも対応しているため、ネットワークアダプタを二つ搭載したマシンの上で動作させパケット転送制御を行うことで、ネットワーク型ファイアウォールとしても使用可能

現在設定されているポリシー
Chain INPUT (policy ACCEPT)
target prot opt source destination
ACCEPT all — anywhere anywhere ctstate RELATED,EST ABLISHED
ACCEPT all — anywhere anywhere
INPUT_direct all — anywhere anywhere
INPUT_ZONES_SOURCE all — anywhere anywhere
INPUT_ZONES all — anywhere anywhere
DROP all — anywhere anywhere ctstate INVALID
REJECT all — anywhere anywhere reject-with icmp-ho st-prohibited

Chain FORWARD (policy ACCEPT)
target prot opt source destination
ACCEPT all — anywhere anywhere ctstate RELATED,EST ABLISHED
ACCEPT all — anywhere anywhere
FORWARD_direct all — anywhere anywhere
FORWARD_IN_ZONES_SOURCE all — anywhere anywhere
FORWARD_IN_ZONES all — anywhere anywhere
FORWARD_OUT_ZONES_SOURCE all — anywhere anywhere
FORWARD_OUT_ZONES all — anywhere anywhere
DROP all — anywhere anywhere ctstate INVALID
REJECT all — anywhere anywhere reject-with icmp-ho st-prohibited

Chain OUTPUT (policy ACCEPT)
target prot opt source destination
OUTPUT_direct all — anywhere anywhere

Chain FORWARD_IN_ZONES (1 references)
target prot opt source destination
FWDI_public all — anywhere anywhere [goto]

Chain FORWARD_IN_ZONES_SOURCE (1 references)
target prot opt source destination

Chain FORWARD_OUT_ZONES (1 references)
target prot opt source destination
FWDO_public all — anywhere anywhere [goto]

Chain FORWARD_OUT_ZONES_SOURCE (1 references)
target prot opt source destination

Chain FORWARD_direct (1 references)
target prot opt source destination

Chain FWDI_public (2 references)
target prot opt source destination
FWDI_public_log all — anywhere anywhere
FWDI_public_deny all — anywhere anywhere
FWDI_public_allow all — anywhere anywhere
ACCEPT icmp — anywhere anywhere

Chain FWDI_public_allow (1 references)
target prot opt source destination

Chain FWDI_public_deny (1 references)
target prot opt source destination

Chain FWDI_public_log (1 references)
target prot opt source destination

Chain FWDO_public (2 references)
target prot opt source destination
FWDO_public_log all — anywhere anywhere
FWDO_public_deny all — anywhere anywhere
FWDO_public_allow all — anywhere anywhere

Chain FWDO_public_allow (1 references)
target prot opt source destination

Chain FWDO_public_deny (1 references)
target prot opt source destination

Chain FWDO_public_log (1 references)
target prot opt source destination

Chain INPUT_ZONES (1 references)
target prot opt source destination
IN_public all — anywhere anywhere [goto]

Chain INPUT_ZONES_SOURCE (1 references)
target prot opt source destination

Chain INPUT_direct (1 references)
target prot opt source destination

Chain IN_public (2 references)
target prot opt source destination
IN_public_log all — anywhere anywhere
IN_public_deny all — anywhere anywhere
IN_public_allow all — anywhere anywhere
ACCEPT icmp — anywhere anywhere

Chain IN_public_allow (1 references)
target prot opt source destination
ACCEPT tcp — anywhere anywhere tcp dpt:ssh ctstate NEW

Chain IN_public_deny (1 references)
target prot opt source destination

Chain IN_public_log (1 references)
target prot opt source destination

Chain OUTPUT_direct (1 references)
target prot opt source destination

chain forward, chain inputなどがある

Chain INPUT (policy DROP)
Chain FORWARD (policy DROP)
Chain OUTPUT (policy ACCEPT)

ルーティングして、input, forward, outputしてアプリケーションに接続している。
あああああああああ、これやべーやつだ。

selinuxの無効化

selinuxとは
セキュリティ関連のLinuxカーネル制御機能。Linuxディストリビューションではなく、強制アクセス制御機能を加えるモジュール。
Security-Enhanced-Linuxの略称
SELinuxを利用すると細かいアクセス制御が可能になる。例えば、サービス毎に最小限の権限を与え管理することなどが可能になる
root権限ですら制限をかけることも可能

なるほど、awsのAMIみたいなもんか。

[vagrant@localhost ~]$ getenforce
Enforcing

詳細を見てみる
[root@localhost ~]# sestatus
SELinux status: enabled
SELinuxfs mount: /sys/fs/selinux
SELinux root directory: /etc/selinux
Loaded policy name: targeted
Current mode: enforcing
Mode from config file: enforcing
Policy MLS status: enabled
Policy deny_unknown status: allowed
Max kernel policy version: 31

statusがenabledになってますね。これを変更していきます。

vi /etc/sysconfig/selinux

SELINUX=disabled

[root@localhost ~]# getenforce
Disabled

centos7.5で所々設定をしていきましょ~

vagrantユーザー設定

[root@localhost ~]# useradd -g wheel vagrant
[root@localhost ~]# id vagrant
uid=1000(vagrant) gid=10(wheel) groups=10(wheel)
[root@localhost ~]# passwd vagrant
Changing password for user vagrant.

ssh設定

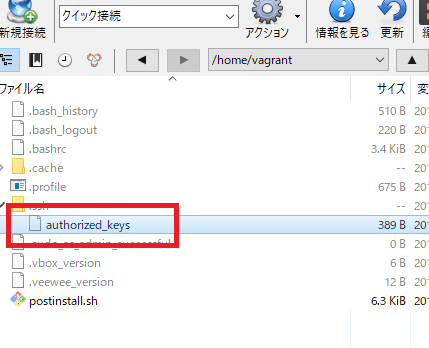
[root@localhost vagrant]# cd /.ssh
[root@localhost .ssh]# curl -k -L -o authorized_keys 'https://raw.github.com/mitchellh/vagrant/master/keys/vagrant.pub'
  % Total    % Received % Xferd  Average Speed   Time    Time     Time  Current
                                 Dload  Upload   Total   Spent    Left  Speed
  0     0    0     0    0     0      0      0 --:--:--  0:00:01 --:--:--     0
100   409  100   409    0     0    229      0  0:00:01  0:00:01 --:--:--   229
[root@localhost .ssh]# chmod 600 authorized_keys
[root@localhost .ssh]# chown -R vagrant:wheel /home/vagrant/.ssh
chown: cannot access ‘/home/vagrant/.ssh’: No such file or directory

うんうん!
続いてsshd設定:UseDNS
これがyesになっていると、サーバがリモートホストのIPアドレスを名前解決しにかかってしまうようで、名前解決の方法がない場合はタイムアウトするまで時間遅延が発生しちゃう

sshd
あれ、useDNSの項目ないけど。。

あ、下の方にコメントアウトでありました♪

vi /etc/ssh/sshd_config

UseDNS no

service sshd restart
Redirecting to /bin/systemctl restart sshd.service

sudoの設定

visudo

# コメントアウト
#defaults !visiblepw

## Allows people in group wheel to run all commands
%wheel  ALL=(ALL)       NOPASSWD: ALL

vagrantユーザになってsudo実行
[root@localhost .ssh]# su – vagrant
[vagrant@localhost ~]$ sudo ls /root
anaconda-ks.cfg
[vagrant@localhost ~]$

OK
長くなったので、一旦休憩

ネットワークカードの有効化

あれ、centos7だとifcfg-eth0がない!?
ifcfg-enp0s3を見てみる。
お、ONBOOT=no の項目がありますね。

ONBOOT=yes
service network restart

RHEL7/CentOS7では、net-toolsを「deprecated」

ssh接続してみましょう。
portは2222でしたね。
ちなみに、2222は
ESET remote administrator[
ほう!

login as: root
root@127.0.0.1’s password:
Last login: Sat Oct 27 10:06:53 2018
[root@localhost ~]#

osの確認

[root@localhost ~]# cat /etc/issue
\S
Kernel \r on an \m

[root@localhost ~]# cat /etc/redhat-release
CentOS Linux release 7.5.1804 (Core)
[root@localhost ~]# cat /proc/version
Linux version 3.10.0-862.el7.x86_64 (builder@kbuilder.dev.centos.org) (gcc versi on 4.8.5 20150623 (Red Hat 4.8.5-28) (GCC) ) #1 SMP Fri Apr 20 16:44:24 UTC 2018

ぎゃあああああああああああああああああああああああああああああああああ

ISOから仮想マシン新規作成

名前、タイプ、バージョンを指定
メモリ 512m

仮想ハードディスクのファイルタイプ
VirtualBox Disk Image

物理ハードディスクにあるストレージ
可変サイズ

仮想マシンが作成されました。

コントローラーIDEを編集する

コントローラーIDEでcentos7のiosを選択

オーディオの有効化のチェックを外す

ネットワーク アダプター1の「割り当て」に「NAT」が設定されている
「高度」を展開し、「ポートフォワーディング」をクリック

メルカリ機械学習

tech系のイベント@六本木ヒルズ18F メルカリ

ビールとご飯を無料配布
ビールは久しぶりに飲んだわ

で、学んだこと
1. apple, amazon, googleをwatchしている
2. 学会の論文を読んで、それをモデリングに落として試している
3. mercariはawsを使っている
4. 機械学習ができて当然は本当だった
5. MLチーム構成は半分日本人、次にインド人
6. 全部出来るやつが強い(当たり前か。。)

どうすっかなー