P(x1 = H) = 1/2 -> H:P(x2 = H |x1 = H) = 0.9
T:P(x2 = T |x1 = T) = 0.8
P(x2 = H) = 0.55
P(x2:h) = P(x2 = H| x1 = H)*P(x1 = h)+ P(x2=H | x1 = T)*P(x1= T)
P(Y) = Σi P(Y|X=i) P(x=i) :total probability
ソフトウェアエンジニアの技術ブログ:Software engineer tech blog
随机应变 ABCD: Always Be Coding and … : хороший

P(x1 = H) = 1/2 -> H:P(x2 = H |x1 = H) = 0.9
T:P(x2 = T |x1 = T) = 0.8
P(x2 = H) = 0.55
P(x2:h) = P(x2 = H| x1 = H)*P(x1 = h)+ P(x2=H | x1 = T)*P(x1= T)
P(Y) = Σi P(Y|X=i) P(x=i) :total probability
foursquare for developer
https://developer.foursquare.com/
OSI model
https://en.wikipedia.org/wiki/OSI_model
Redhat and CentOS users: sudo yum install cowsay
[vagrant@localhost rss]$ cowsay all is not better
 ___________________
< all is not better >
 -------------------
        \   ^__^
         \  (oo)\_______
            (__)\       )\/\
                ||----w |
                ||     ||
-manual
man cowsay
var home etc tmp
min jQuery is much faster than usual jQuery.
Client ID, Client Secretを発行し、php、mysqlでInstagramのOauthの仕組みを使ったログインを実装していきます。
リフェレンス
http_build_query:Generates a URL-encoded query string from the associative (or indexed) array provided.
PDO::prepare — 文を実行する準備を行い、文オブジェクトを返す
$dbh = new PDO:PDOオブジェクトのメソッドでデータベースを操作、$dbhという変数でPDOオブジェクトを管理
fetch:フィールドの配列参照として次の行を取り出す
Instagram Authentication: https://www.instagram.com/developer/authentication/
<?php
require_once('config.php');
session_start();
if (empty($_GET['code'])){
// 認証前の準備
$params = array(
'client_id' => CLIENT_ID,
'redirect_uri' => SITE_URL.'redirect.php',
'scope' => 'basic',
'response_type' => 'code'
);
$url = 'https://api.instagram.com/oauth/authorize/?'.http_build_query($params);
header('Location: '.$url);
exit;
// instagramへ飛ばす
} else {
// 認証後の処理
// usr情報の取得
$params = array(
'client_id' => CLIENT_ID,
'client_secret' => CLIENT_SECRET,
'code' => $_GET['code'],
'redirect_uri' => SITE_URL.'redirect.php',
'grant_type' => 'authorization_code'
);
$url = "https://api.instagram.com/oauth/access_token";
$curl = curl_init();
curl_setopt($curl, CURLOPT_URL, $url);
curl_setopt($curl, CURLOPT_POST, 1);
curl_setopt($curl, CURLOPT_POSTFIELDS, http_build_query($params));
curl_setopt($curl, CURLOPT_RETURNTRANSFER, 1);
$res = curl_exec($curl);
curl_close($curl);
var_dump($res);
exit;
//user情報の格納
// ログイン処理
// index.phpに飛ばす
}
  public function edit($id = null)
  {
    $post = $this->Posts->get($id);
    if ($this->request->is(['post', 'patch', 'put'])) {
      $post = $this->Posts->patchEntity($post, $this->request->data);
      if($this->Posts->save($post)){
        $this->Flash->success('Edit Success!');
        return $this->redirect(['action'=>'index']);
      } else {
        $this->Flash->error('Edit Error!');
      }
    }
    $this->set(compact('post'));
  }
edit.ctp: addと同じようにviewを作成します。buttonはUpdateになります。
<?php
$this->assign('title', 'Edit Post');
?>

<h1>
  <?= $this->Html->link('Back', ['action'=>'index'], ['class'=>['pull-right', 'fs12']]); ?>
  Edit Post
</h1>

<?= $this->Form->create($post); ?>
<?= $this->Form->input('title'); ?>
<?= $this->Form->input('body', ['row'=>'3']); ?>
<?= $this->Form->button('Update'); ?>

<?= $this->Form->end(); ?>
HamlはHTML Abstraction Markup Languageの略でhtmlのtemplate engineと呼ばれたりもします。rubyで書かれており、railsなどにも使われています。
index.haml -> (hamlコマンド) -> index.html
[vagrant@localhost haml]$ sudo gem install haml
以下のように字下げ・空白を作って記載します。
!!!
%html{:lang => "ja"}
  %head
    %meta(charset="UTF-8")
  %body
    hello world!
hamlで変換します。
[vagrant@localhost haml]$ haml index.haml index.html
[vagrant@localhost haml]$ haml -q -f html5 index.haml index.html
改行のコントロール
!!!
%html{:lang => "ja"}
  %head
    %meta(charset="UTF-8")
  %body
    %p hello
    %ul
      %li<>
        item
属性の記述
!!!
%html{:lang => "ja"}
  %head
    %meta(charset="UTF-8")
  %body
    $div{:id => "main", :class => "myClass"}
    %div(id="main" class="myClass")
    %div#main.myClass
フィルターの生成
!!!
%html{:lang => "ja"}
  %head
    %meta(charset="UTF-8")
  %body
    :css
      .myStyle {
        color: red;
      }
    :javascript
      alert(1)
        if(1){
         alret(2);
        }
ruby
!!!
%html{:lang => "ja"}
  %head
    %meta(charset="UTF-8")
  %body
    %p total is #{5 * 3}
    %p= Time.now
    - x = 5
    %p = x

    -(1..10).each do |i|
      %p = i
Emmet is a plugin for many popular text editors which greatly improves HTML & CSS workflow:
Emmet download
命令のショートカットキー(ctl + e)でコーディングの効率化します。
コマンド一覧
https://github.com/sergeche/emmet-sublime#readme
id
div#main -> ctl + e
span.blueItem -> ctl + e
ul>li -> ctl + e
div+div+div>p -> ctl + e
ul>li^div -> ctl + e
繰り返し
ul>li*3 -> ctl + e
ul>li.item$*3 -> ctl + e
table>tr*3>td*4 -> ctl + e
()
(ul>li*3)*2
a[title]
div{hello}
p>lorem
html>body>#main|e
#main>.sub>p*3|c
ul>li*3|s
html>body>#main>p*3|haml
-css
m, w, c-> ctl + e
-ctrl+w
あのAlan Kayが作った歴史ある言語です。Pharoの公式サイトより開発環境がダウンロードできます。
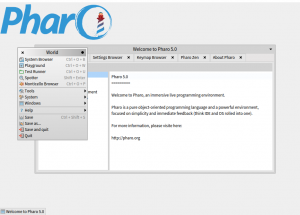
作ったコンテンツはimageとして保存することが可能です。
入力はplayground、表示はtranscriptで表示します。smalltalkはオブジェクトに対して、メッセージを送信するものになっています。
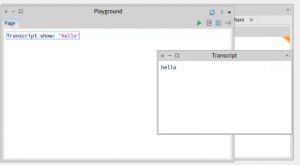
Transcript show: 'hello'
ctl + ‘d’で実行のショートカットになっています。
改行
Transcript show: 'hello'.
Transcript cr.
Transcript show: 'world'
カスケード
Transcript show: 'hello';
cr;
show: 'world'
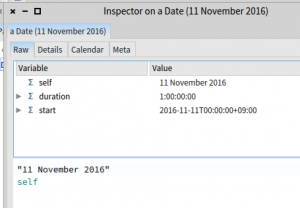
inspector it 感動の領域に入ってきました。
変数
message := 'hello'.
Transcript show:message.
二項メッセージ
4 + 3 factorial gcd: 5
クラスとインスタンス
t := Date today.
t addDays:14.
システムブラウザ
Color browse.
color :=Color random.
color.
2 sqrt
(5/2)asFloat
5 // 2
5 \\ 2
5 + 3 * 2
文字列、配列
$a charCode
#(1 2 3)
配列
#(1 2 3) size.
#(1 2 3) reverse.
#(1 2 #(5, 2)).
#(1 $a 'hello').
#(1 2 3),#(10, 12, 15).
x:= #(2 5 8 10)
x at:2.
x at: 2 put: 20
ブロック
[5 + 4] value.
[:x |x+2]value:2.
[:x :y | x* y ]value:10 value:20.

f :=[:x:y|x + y + 2].
f value:10 value 20.
条件分岐
score :80.
(score > 60)
 ifTrue:['great!']
 ifFalse:['so so...']
ループ処理
i:=1.
10 timesRepeat:
[ Transcript show:i; cr.i:=i + 1].
配列の処理
#(1 3 5)do:
	[:each| Transcript show:each; cr ].
組み込みが容易なスクリプト言語です。
[vagrant@localhost lua]$ lua -v
Lua 5.1.4  Copyright (C) 1994-2008 Lua.org, PUC-Rio
[vagrant@localhost lua]$ lua hello.lua
hello world
luaは多重代入も可能です。
x, y = 10, 15
x, y = y, x
print(x)
print(y)
文字列ではシングル、ダブルクォーテーションどちらも可能です。
s = "h'e'llo"
print(s)
配列:luaは1からカウントします。要素の個数は#です。
a = {23, 234, "hello"}
print(a[2])
print(#a)
条件分岐
score = 75
if score > 60 and score < 80 then
  print("ok")
else
  print("ng!")
end
ループ
i = 0
while i < 10 do
  print(i)
  i = i + 1
end
for文
for i = 0, 9, 2 do
  print(i)
end
構文
a = {12, 24, "hey"}
b = {name = "nari", score= 120}

for i, value in ipairs(a) do
 print(i, value)
 end
関数
function greet(name)
  print("hello, I am "..name)
end

greet("clinton")
可変引数
function sum(...)
  local a = {...}
  local total = 0
  for i = 1, #a do
    total = total + a[i]
  end
  return total
end
print(sum(2, 7, 23141, 131))
便利な命令文
math.max(2, 222, 14)
math.ceil(2.3)
math.floor(2.3)
math.random()
math.random(n) -- 1からnまでの整数値
文字列の命令文
s = string.len("google")
s =  #"google"
s = string.sub("google", 2, 3)
s = string.find("google", "l")
s = string.gsub("google", "e", "er")
s = string.reverse("google")
テーブルの命令文
a = {2, 25, 42, 1}
table.sort(a)

for i, v in inpairs(a) do
  print(v)
end
日付データの命令文
x = os.time()
x = os.date()
print(x)
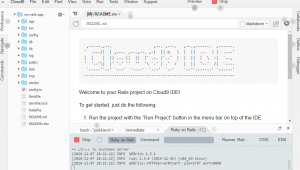
Cloud9はクラウドの統合開発環境で、ブラウザ上で手軽に開発環境を用意することができます。
Cloud9
sign inすると、クレジットカードの入力項目があり、ドキッとしますが、登録によるチャージはありません。

初期画面
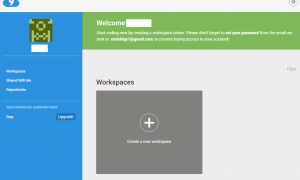
インターフェイスはdreamweaverっぽいですが、嫌いではないですね。javaのコンソールもあります。
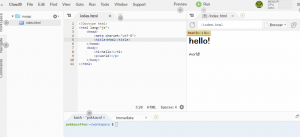
apacheを起動して、サーバー上で確認することも可能です。
JavaScript Consoleはブラウザで閲覧します。php, ruby, pythonはコマンドラインから作っていきましょう。
sqliteはsqliteコマンド、mysqlはmysql-ctl cliを打ち込みます。
cloud9を使えば、railsも簡単に環境をつくることができます。