[SwiftUI] アラート文

struct ContentView: View {
    @State var isError: Bool = false
    
    var body: some View {
        Button(action:{
            isError = true
        }){
            Text("Alertテスト")
        }.alert(isPresented: $isError){
            Alert(title: Text("タイトル"), message: Text("メッセージ文"),
                  dismissButton: .default(Text("OK"), action: {}))
        }
    }
}

OKとキャンセルがあるアラート

struct ContentView: View {
    @State var isError: Bool = false
    
    var body: some View {
        Button(action:{
            isError = true
        }){
            Text("Alertテスト")
        }.alert(isPresented: $isError){
            Alert(title: Text("タイトル"), message: Text("メッセージ文"),
                  primaryButton: .default(Text("OK"), action: {
                okAction()
            }),
                  secondaryButton: .cancel(Text("キャンセル"), action:{})
            )}
    }
}
func okAction(){
    print("OKボタンが選ばれた")
}

primaryButtonとsecondaryButtonを指定する

struct ContentView: View {
    @State var isError: Bool = false
    
    var body: some View {
        Button(action:{
            isError = true
        }){
            Text("Alertテスト")
        }.alert(isPresented: $isError){
            Alert(title: Text("タイトル"), message: Text("メッセージ文"),
                  primaryButton: .destructive(Text("削除する"), action: {}),
                  secondaryButton: .cancel(Text("キャンセル"), action:{})
            )}
    }
}

やべーな、swiftかなり舐めてたわ…orz

[SwiftUI] テキストエディタでテキストの読み書き

入力編集ができるテキストエディタを作る

    @State private var theText: String = """
    春はあけぼの。やうやう白くなりゆく山ぎは、すこしあかりて、紫だちたる
    雲のほそくたなびきたる。
    // 省略
    さらでもいと寒きに、火など急ぎおこして、炭もて渡るもいとつきづきし。
    昼になりて、ぬるくゆるびもていけば、火桶の火も白き灰がちになりてわろし。
    """
    var body: some View {
        TextEditor(text: $theText)
            .lineSpacing(10)
            .border(Color.gray)
            .padding()
    }

テキストエディタ

    @State var theText: String = ""
    
    var body: some View {
        NavigationView {
            TextEditor(text: $theText)
                .lineSpacing(10)
                .border(Color.gray)
                .padding([.leading, .bottom, .trailing])
                .navigationTitle("メモ")
        }
    }

保存・読み込みができるようにする
L ユーザが作って読み書きするファイルはDocumentsフォルダ内に保存する
  L DocumentsフォルダまでのURLはFileManager.defaultでfileManagerオブジェクトを作り、fileManager.url()で取得する
  L appendingPathComponent(fileName)で保存ファイル名を追加したURLを作り、そのURLをdocURL(fileName)の値として返す

import SwiftUI

func saveText(_ textData:String, _ fileName:String){
    guard let url = docURL(fileName) else {
        return
    }
    
    do {
        let path = url.path
        try textData.write(toFile: path, atomically: true, encoding: .utf8)
    } catch let error as NSError {
        print(error)
    }
}

func docURL(_ fileName:String) -> URL? {
    let fileManager = FileManager.default
    do {
        let docsUrl = try fileManager.url(
            for: .documentDirectory,
            in: .userDomainMask,
               appropriateFor: nil,
               create: false)
        let url = docsUrl.appendingPathComponent(fileName)
        return url
    } catch {
        return nil
    }
}

func loadText(_ fileName:String) -> String? {
    
    guard let url = docURL(fileName) else {
        return nil
    }
    
    do {
        let textData = try String(contentsOf: url, encoding: .utf8)
        return textData
    } catch {
        return nil
    }
}

struct ContentView: View {
    @FocusState var isInputActive: Bool
    @State var theText: String = ""
    
    var body: some View {
        NavigationView {
            TextEditor(text: $theText)
                .lineSpacing(10)
                .border(Color.gray)
                .padding([.leading, .bottom, .trailing])
                .navigationTitle("メモ")
                .focused($isInputActive)
                .toolbar {
                    ToolbarItem(placement: .navigationBarTrailing){
                        Button("読み込む"){
                            if let data = loadText("sample.txt"){
                                theText = data
                            }
                        }
                    }
                    ToolbarItem(placement: .navigationBarTrailing){
                        Button("保存"){
                            saveText(theText, "sample.txt")
                        }
                    }
                }
        }
    }
}

### do-try-catchの例外処理

enum KeyError: Error {
    case uniqueError
    case lengthError
}

func keyMaker(_ key1:String, _ key2:String) throws -> String {
    guard key1 != key2 else {
        throw KeyError.uniqueError
    }
    guard (5...10).contains(key1.count)&&(5...10).contains(key2.count) else {
        throw KeyError.lengthError
    }
    let result = (key1 + key2).shuffled()
    return String(result)
}

func testKeyMake1(_ key1:String, _ key2:String){
    do {
        let result = try keyMaker(key1, key2)
        print(result)
    } catch {
        print("エラー")
    }
}

testKeyMake1("Swift", "1234567")
testKeyMake1("Swift", "Swift")
testKeyMake1("Swift", "UI")

func testKeyMake2(_ key1:String, _ key2:String){
    do {
        let result = try keyMaker(key1, key2)
        print(result)
    } catch KeyError.uniqueError {
        print("2つのキーが同じエラー")
    } catch KeyError.lengthError {
        print("文字数エラー")
    } catch {
        print("エラー")
    }
}
testKeyMake2("Swift", "1234567")
testKeyMake2("Swift", "Swift")
testKeyMake2("Swift", "UI")

これは半端ないわ
凄い

[SwiftUI] テキストフィールドの入力

テキストフィールドに入力できるのはStringデータだけなので、型変換をする必要がある
オプショナルバリュー、オプショナルバインディングを学ぶ

TextField, textFieldStyle, isEmpty, keyboardType, Group, @FocusState, fucused, toolbar, ToolbarItemGroup, guard let-else, if let-else, !, ??, nil

### テキストフィールドを作る
入力した名前を表示する
 L TextFieldで作成する

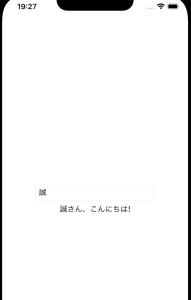
    @State var name: String = ""
        
    var body: some View {
        TextField("お名前は?", text: $name)
            .textFieldStyle(RoundedBorderTextFieldStyle())
            .frame(width: 250)
        
        if (!name.isEmpty){
            Text("\(name)さん、こんにちは!")
        }
    }

キーボードの種類を指定
L keyboardType(.numberPad)のように指定する
L 複数のビューを一纏めにする場合は Groupで囲む
  L guard let-elseで整数に変換できたら変換後の値をnumに代入、変換できなかったらfalse

struct ContentView: View {
    @State var kosu:String = ""
    let tanka:Double = 250
    let tax:Double = 1.1
        
    var body: some View {
        VStack(alignment: .leading){
            
            HStack {
                Text("個数:").padding(.horizontal, 0)
                TextField("0", text: $kosu)
                    .textFieldStyle(RoundedBorderTextFieldStyle())
                    .keyboardType(.numberPad)
                    .frame(width: 100)
            }
            .font(.title)
            .frame(width: 200)
            
            Group {
                if kosuCheck(min: 1, max: 10){
                    Text("\(price())円です。")
                        .font(.title)
                } else {
                    Text("個数は1〜10個を入れてください。")
                        .foregroundColor(.red)
                        .font(.headline)
                }
            }.frame(width: 300, height: 30)
        }
    }
    
    func kosuCheck(min:Int, max:Int) -> Bool {
        guard let num = Int(kosu) else {
            return false
        }
        return (num>=min && num <= max)
    }
    
    func price() -> Int {
        if let num = Double(kosu){
            let result = Int(tanka * num * tax)
            return result
        } else {
            return -1
        }
    }
}

Doneボタンの追加
L focusが終わるとキーボードが下がる

@FocusState var isInputActive: Bool
    @State var kosu:String = ""
    let tanka:Double = 250
    let tax:Double = 1.1
        
    var body: some View {
        VStack(alignment: .leading){
            
            HStack {
                Text("個数:").padding(.horizontal, 0)
                TextField("0", text: $kosu)
                    .textFieldStyle(RoundedBorderTextFieldStyle())
                    .keyboardType(.numberPad)
                    .frame(width: 100)
                    .focused($isInputActive)
            }
            .font(.title)
            .frame(width: 200)
            
            Group {
                if kosuCheck(min: 1, max: 10){
                    Text("\(price())円です。")
                        .font(.title)
                } else {
                    Text("個数は1〜10個を入れてください。")
                        .foregroundColor(.red)
                        .font(.headline)
                }
            }.frame(width: 300, height: 30)
        }
        .toolbar {
            ToolbarItemGroup(placement: .keyboard){
                Spacer()
                Button("Done"){
                    isInputActive = false
                }
            }
        }
    }

### オプショナルバインディング
nilかもしれないオプショナルバリュー

let nums:[Int] = []
let lastNum = nums.last
let ans = lastNum * 2

var num:Int
num = 5
num = nil

代入できる変数を作る

var num:Int?
num = 5
num = nil

??演算子を使う

let nums:[Int] = [1, 2, 3]
let lastNum = nums.last ?? 0
let ans = lastNum * 2
print(ans)

### guard let-elseを使ったオプショナルバインディング
関数を実行する前にオプショナルバリューをチェックするオプショナルバインディング構文
L Int(kosu)がnilならfalseを戻す
  L if let elseでも同様にオプショナルバインディングを行う

    func kosuCheck(min:Int, max:Int) -> Bool {
        guard let num = Int(kosu) else {
            return false
        }
        return (num>=min && num <= max)
    }

なるほど、中々深いな
バリデーションでチェックしてたから意識したことなかったけど、Swiftの場合はnilをチェックする場合はこう書くのね。

[SwiftUI] DatePickerを作る

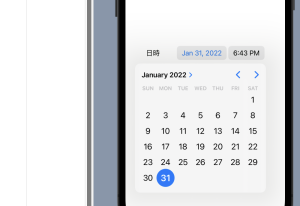
簡単なデートピッカーを作る

    var body: some View {
        DatePicker(selection: $theDate, label: {Text("日時")})
            .padding(50)
    }

日本語・和暦表示

        DatePicker(selection: $theDate, label: {Text("日時")})
            .environment(\.locale, Locale(identifier: "ja_JP"))
            .environment(\.calendar, Calendar(identifier: .japanese))
            .frame(height: 50)
            .padding()

選択できる日付の範囲制限

    @State var theDate = Date()
    
    var dateCloseRange: ClosedRange<Date>{
        let min = Calendar.current.date(byAdding: .day, value: -7, to: Date())!
        let max = Calendar.current.date(byAdding: .month, value: 1, to: Date())!
        return min...max
    }
    
    var body: some View {
        DatePicker(selection: $theDate, in: dateCloseRange, label: {Text("日時")})
            .environment(\.locale, Locale(identifier: "ja_JP"))
            .frame(height: 50)
            .padding()
    }

日時データの表示

@State var theDate = Date()
    
    var dateFormat1: DateFormatter {
        let df = DateFormatter()
        df.locale = Locale(identifier: "ja_JP")
        df.dateStyle = .full
        df.timeStyle = .short
        return df
    }
    
    var dateFormat2: DateFormatter {
        let df = DateFormatter()
        df.locale = Locale(identifier: "ja_JP")
        df.calendar = Calendar(identifier: .japanese)
        df.dateFormat = "令和yy(YYYY)年M月dd日(E)HH時mm分"
        return df
    }
    
    
    var body: some View {
        
        VStack {
            Text(dateFormat1.string(from: theDate))
            Text(dateFormat2.string(from: theDate))
            DatePicker(selection: $theDate, label: {EmptyView()})
                .environment(\.locale, Locale(identifier: "ja_JP"))
                .frame(width: 200, height: 40)
                .padding()
        }
    }

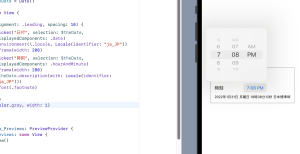
日付と時刻の2つのコンポーネントに分けて表示

    @State var theDate = Date()
        
    var body: some View {
        
        VStack(alignment: .leading, spacing: 10) {
            DatePicker("日付", selection: $theDate, displayedComponents: .date)
                .environment(\.locale, Locale(identifier: "ja_JP"))
                .frame(width: 200)
            DatePicker("時刻", selection: $theDate, displayedComponents: .hourAndMinute)
                .frame(width: 200)
            Text(theDate.description(with: Locale(identifier: "ja_JP")))
                .font(.footnote)
        }
        .padding()
        .border(Color.gray, width: 1)
    }

これはapple クソすげーわ
どうやって開発してんだこれ?

[SwiftUI] ピッカーとナビゲーションの組み合わせ

NavigationViewとFormで囲む

    @State var selectedSize = 2
    let sizes = ["XS", "S", "M", "L", "LL"]
    
    var body: some View {
        NavigationView {
            Form {
                Picker(selection: $selectedSize, label: Text("Size")){
                    ForEach(0..<sizes.count) { index in
                        Text(sizes[index])
                    }
                }
                Text("選んだサイズ:\(sizes[selectedSize])")
            }
        }
    }

複数ピッカーをセクション分けして表示

struct ContentView: View {
    @State var selectedSize = 2
    @State var selectedColor = 0
    let sizes = ["XS", "S", "M", "L", "LL"]
    let colors = ["Red", "Green", "Blue", "Yellow", "Pink", "White"]
    
    var body: some View {
        NavigationView {
            Form {
                Section(header: Text("サイズ").font(.headline), footer: Text("USサイズの少し大きめです").padding(.bottom, 20)){
                    Picker(selection: $selectedSize, label: Text("Size")){
                        ForEach(0..<sizes.count) { index in
                            Text(sizes[index])
                        }
                    }
                    Text("選んだサイズ:\(sizes[selectedSize])")
                }
                Section(header: Text("色").font(.headline)){
                    Picker(selection: $selectedColor, label: Text("Color")){
                        ForEach(0..<colors.count) { index in
                            Text(colors[index])
                        }
                    }
                    Text("選んだ色:\(colors[selectedColor])")
                }
            }
            .navigationTitle(Text("サイズと色"))
        }
    }
}

初めてFormが出てきましたね。興奮しました。

[SwiftUI] メニュースタイルのpickerを作る

    @State private var selectedColor = 0
    
    var body: some View {
        
        VStack {
            Picker(selection: $selectedColor, label: Text("Color")){
                Text("Red").tag(0)
                Text("Green").tag(1)
                Text("Blue").tag(2)
            }
        }
        .padding()        
    }

選択した色を表示する
L アイテムの並び順はtag()で指定する

struct ContentView: View {
    @State private var selectedColor = 0
    let colorViews:[Color] = [.red, .green, .blue]
    let colorNames = ["Red", "Green", "Blue"]
    
    var body: some View {
        VStack {
            Picker(selection: $selectedColor, label: Text("Color")){
                Text("Red").tag(0)
                Text("Green").tag(1)
                Text("Blue").tag(2)
            }
            
            HStack {
                colorViews[selectedColor]
                    .frame(width: 50, height:100)
                Text("value: \(selectedColor)").frame(width:60)
                Text("\(colorNames[selectedColor])").frame(width:70)
            }
        }
        .padding()
    }
}

segmented style

            Picker(selection: $selectedColor, label: Text("Color")){
                Text("Red").tag(0)
                Text("Green").tag(1)
                Text("Blue").tag(2)
            }.pickerStyle(.segmented)

処理の分岐

 VStack {
            Picker(selection: $selectedColor, label: Text("Color")){
                Text("Red").tag(0)
                Text("Green").tag(1)
                Text("Blue").tag(2)
            }
            .pickerStyle(.segmented)
            .frame(width: 250, height: 30)
            .padding()
            
            let color = colorViews[selectedColor]
            switch color {
            case .red:
                Rectangle()
                    .frame(width: 50, height: 50)
                    .foregroundColor(.red)
            case .green:
                Circle()
                    .frame(width: 50, height: 50)
                    .foregroundColor(.green)
            case .blue:
                Circle()
                    .stroke(lineWidth: 8)
                    .frame(width: 50, height: 50)
                    .foregroundColor(.blue)
            default:
                Text("default")
            }

Switch文

func fortune(color: String){
    switch color {
    case "red", "yellow":
        print("\(color)は、当たり")
    case "green":
        print("\(color)は、大当たり")
    default:
        print("\(color)は、ハズレ")
    }
}

fortune(color: "yellow")
fortune(color: "blue")
fortune(color: "green")
fortune(color: "red")

segmented pickerはカッコいいですね^^

[SwiftUI] Sliderを作る

    @State var volume: Float = 0.0
    
    var body: some View {
        HStack {
            Text("\(volume)").frame(width: 100)
            HStack {
                Image(systemName: "speaker.slash").imageScale(.large)
                Slider(value: $volume)
                Image(systemName: "speaker.3").imageScale(.large)
            }
            .frame(width: 200)
        }
    }

フォーマットする関数を作る

struct ContentView: View {
    @State var volume: Double = 0.0
    
    var body: some View {
        HStack {
            Text("\(format(volume))").frame(width: 100)
            HStack {
                Image(systemName: "speaker.slash").imageScale(.large)
                Slider(value: $volume)
                Image(systemName: "speaker.3").imageScale(.large)
            }
            .frame(width: 200)
        }
    }
}

func format(_ num:Double) -> String {
    let result = String(round(num*100)/100)
    return result
}

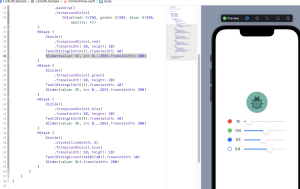
スライダーの値の範囲を設定
L .foregroundColor(Color(red: R/255, green: G/255, blue: B/255, opacity: A))で色を指定している

@State var R:Double = 0
    @State var G:Double = 0
    @State var B:Double = 0
    @State var A:Double = 1
    
    var body: some View {
        VStack(alignment: .center){
            ZStack {
                Image(systemName: "ladybug")
                    .scaleEffect(3)
                Circle()
                    .frame(width:100, height: 100)
                    .padding()
                    .foregroundColor(
                        Color(red: R/255, green: G/255, blue: B/255, opacity: A))
            }
            HStack {
                Circle()
                    .foregroundColor(.red)
                    .frame(width: 20, height: 20)
                Text(String(Int(R))).frame(width: 40)
                Slider(value: $R, in: 0...255).frame(width: 200)
            }
            HStack {
                Circle()
                    .foregroundColor(.green)
                    .frame(width: 20, height: 20)
                Text(String(Int(G))).frame(width: 40)
                Slider(value: $G, in: 0...255).frame(width: 200)
            }
            HStack {
                Circle()
                    .foregroundColor(.blue)
                    .frame(width: 20, height: 20)
                Text(String(Int(B))).frame(width: 40)
                Slider(value: $B, in: 0...255).frame(width: 200)
            }
            HStack {
                Circle()
                    .stroke(lineWidth: 2)
                    .foregroundColor(.blue)
                    .frame(width: 18, height: 18)
                Text(String(round(A*10)/10)).frame(width: 40)
                Slider(value: $A).frame(width: 200)
            }
        }
    }

これは凄い

### よく使う便利な関数

let price = 3520 * 1.24
var ans:Double
ans = floor(price) //切り捨て
ans = ceil(price) //切り上げ
ans = round(price) //四捨五入

// 任意の桁で計算
ans = floor(price/10)*10 //切り捨て
ans = ceil(price/10)*10 //切り上げ
ans = round(price/10)*10 //四捨五入

var ans: Int
ans = max(5, 9)
ans = min(5, 9)

var v1 = -10, v2 = 20
v1 = min(max(v1, 0), 10)
v2 = min(max(v2, 0), 10)

let a = 16.5
let b = 18.0
let ans = abs(a - b)

ランナーズハイ状態になってきた

[SwiftUI] Stepperでカウントアップ

カウントアップ、カウントダウンできるStepperを実装します

    @State var kosu:Int = 0
    
    var body: some View {
        Stepper(value: $kosu, in: 0...10, step: 2){
            Text("個数: \(kosu)")
        }
        .frame(width: 200)
    }

単価と個数から料金を計算して表示する

    @State var kosu:Int = 0
    let tanka = 240
    let tax = 0.1
    
    var body: some View {
        VStack(alignment: .leading, spacing: 20) {
            Text("1個 \(tanka)円")
            Stepper(value: $kosu, in: 0...10, step: 2){
                Text("個数: \(kosu)")
            }.frame(width: 200)
            let price = tanka * kosu
            let result = Int(Double(price) * (1 + tax))
            Text("料金:\(result) 円").font(.headline) + Text("(税込)").font(.footnote)
        }
    }

料金計算を別の関数として計算する

    var body: some View {
        VStack(alignment: .leading, spacing: 20) {
            Text("1個 \(tanka)円")
            Stepper(value: $kosu, in: 0...10, step: 2){
                Text("個数: \(kosu)")
            }.frame(width: 200)
            Text("料金:\(calc(kosu)) 円").font(.headline) + Text("(税込)").font(.footnote)
        }
    }
    func calc(_ num:Int) -> Int {
        var price = tanka + num
        price = Int(Double(price) * (1 + tax))
        return price
    }

Computedプロパティで計算して料金表示

    var price:Int {
        var value = tanka * kosu
        value = Int(Double(value) * (1 + tax))
        return value
    }
    
    var body: some View {
        VStack(alignment: .leading, spacing: 20) {
            Text("1個 \(tanka)円")
            Stepper(value: $kosu, in: 0...10, step: 2){
                Text("個数: \(kosu)")
            }.frame(width: 200)
            
            Text("料金:\(price) 円").font(.headline) + Text("(税込)").font(.footnote)
        }
    }

### 外部引数名がない関数
func hoge(_ num:Int) として、hoge(2) などで呼び出して実行できる

let tanka = 240

func calcA(num:Int) -> Int {
    let price = tanka * num
    return price
}
func calcB(kosu num:Int) -> Int {
    let price = tanka * num
    return price
}
func calcC(_ num:Int) -> Int {
    let price = tanka * num
    return price
}

let priceA = calcA(num: 2)
let priceB = calcB(kosu: 2)
let priceC = calcC(2)

なるほど、いわゆるライブラリみたいなのがswiftにdefaultで実装されていて、それを使うことで色々な表現ができるのね。

[SwiftUI] オン/オフ切り替えトグルスイッチ

    @State var iLike = true
    
    var body: some View {
        VStack {
            Toggle(isOn: $iLike){
                Text("Like or Not")
                    .font(.largeTitle)
            }
            .fixedSize()
            .padding(50)
            
            if iLike {
                Image(systemName: "heart.fill")
                    .font(.system(size: 80))
                    .foregroundColor(.red)
            } else {
                Image(systemName: "heart.slash")
                    .font(.system(size: 80))
                    .foregroundColor(.gray)
            }
        }
    }

ボタンタイプのtoggleスイッチ

    @State var isShow = true
    
    var body: some View {
        VStack {
            Toggle(isOn: $isShow){
                Label(isShow ? "消す " : "表示する",
                      systemImage: isShow ? "eye.slash" : "eye")
                    .frame(width: 150)
            }
            .toggleStyle(.button)
            .tint(isShow ? .red : .indigo)
            .clipShape(Capsule())
            .animation(.easeInOut(duration: 0.2), value:isShow)
            
            Image("eigakan")
                .resizable()
                .aspectRatio(contentMode: .fit)
                .frame(width: 300)
                .opacity(isShow ? 1.0 : 0.0)
                .animation(.easeInOut(duration: 1.0), value:isShow)
        }
    }

トグルスイッチの色指定

    @State var isYaruki = true
    @State var isAuto = true
    
    var body: some View {
        VStack(alignment: .leading) {
            Toggle("やる気モード", isOn: $isYaruki)
                .tint(.yellow)
            Toggle("自動設定", isOn: $isAuto)
                .tint(.red)
        }
        .frame(width: 200)
    }

Buttonでトグルボタン

    @State var isFast = true
    
    var body: some View {
        HStack {
            Button(action: {
                withAnimation {
                    isFast.toggle()
                }
            }){
                Text(isFast ? "RUN" : "STOP")
                    .font(.title)
                    .foregroundColor(isFast ? .red : .black)
                    .padding(.trailing)
                    .frame(width:100)
                Image(systemName: isFast ? "hare": "tortoise")
                    .foregroundColor(isFast ? .blue : .green)
                    .rotationEffect(.degrees(isFast ? 0 : 180))
                    .scaleEffect(3)
                    .frame(width: 100)
            }.frame(width: 240, height: 70)
        }
    }

手軽に使えるSF Symbols

        HStack {
            Image(systemName: "sun.max")
            Image(systemName: "cloud.rain")
            Image(systemName: "camera")
            Image(systemName: "message")
            Image(systemName: "a.circle")
            Image(systemName: "calendar")
            Image(systemName: "star.fill")
                .frame(width: 34, height: 34)
                .foregroundColor(Color.yellow)
                .background(Color.green)
                .clipShape(Circle())
        }
        .imageScale(.large)

条件分岐

func hantei(tokuten: Int) -> String {
    var result = "結果: \(tokuten)"
    if (tokuten >= 80) {
        result += " -> 合格・優秀"
    } else if(tokuten >= 60){
        result += " -> 合格"
    } else {
        result += " -> 不合格"
    }
    return result
}

let test1 = hantei(tokuten: 67)
let test2 = hantei(tokuten: 82)
let test3 = hantei(tokuten: 56)
print(test1)
print(test2)
print(test3)

条件式を論理演算子を使って作る

func hantei(sugaku:Int, eigo:Int) -> String {
    var result = "数学: \(sugaku), 英語:\(eigo)"
    if(sugaku >= 80) && (eigo >= 80){
        result += " -> 合格"
    } else {
        result += " -> 不合格"
    }
    return result
}

let test1 = hantei(sugaku: 97, eigo: 68)
let test2 = hantei(sugaku: 81, eigo: 83)
let test3 = hantei(sugaku: 72, eigo: 65)
print(test1)
print(test2)
print(test3)

ここら辺は特にOKやな

[SwiftUI] ボタンで実行する

構造体のプロパティを更新するために利用する@Stateの理解が大事

struct ContentView: View {
    var body: some View {
        Button(action: {
            let num = Int.random(in: 0...100)
            print(num)
        }){
            Text("Random Button")
                .font(.largeTitle)
                .frame(width: 280, height: 60, alignment: .center)
                .foregroundColor(Color.white)
                .background(Color.pink)
                .cornerRadius(15, antialiased: true)
            
        }
    }
}

初期値をセットする
L スコープ内にあるようにbodyの外に定義する
  L selfはimmutableなので、変更可能な変数にするために、宣言のvar numの前に@Stateを付ける ※SwiftUIを使用しない場合はmutatingをつける

    @State var num:Int = 0
    
    var body: some View {
        VStack {
            Button(action: {
                num = Int.random(in: 0...100)
                print(num)
            }){
                Text("Random Button")
                    .font(.largeTitle)
                    .frame(width: 280, height: 60, alignment: .center)
                    .foregroundColor(Color.white)
                    .background(Color.pink)
                    .cornerRadius(15, antialiased: true)
                
            }
            Text("\(num)")
                .font(.largeTitle)
                .padding()
        }
    }

ボタンの簡易的な書式

        VStack {
            Button("Tap"){
                msg = "ありがとう"
            }
            .font(.headline)
            .foregroundColor(.white)
            .background(
                Capsule()
                    .foregroundColor(.green)
                    .frame(width:80, height:30)
            )
            Text(msg).padding()
        }

ボタン名を引数labelで指定する書式

    @State var num:Int = 0
    
    var body: some View {
        HStack {
            Text("\(num)")
                .font(.system(size: 50))
                .padding(.trailing)
            Button(action: { num += 1}, label: {
                Text("Tap").font(.largeTitle)
            })
            .frame(width: 200, height: 80, alignment: .center)
            .border(Color.gray, width: 1)
        }
    }

乱数とシャッフル

for _ in 1 ... 5 {
    let num = Int.random(in: 1 ... 10)
    print(num)
}
for _ in 1 ... 5 {
    let num = Double.random(in: 0 ..< 1)
    print(num)
}
for _ in 1 ... 5 {
    let num = Bool.random()
    print(num)
}

配列などのコレクションからランダムに選択
L item! としてオプショナルをアンラップする必要がある

let colors = ["green", "red", "blue", "pink", "orange"]
for _ in 1 ... 5 {
    let item = colors.randomElement()
    print(item!)
}
let letters = "ABCDEFGHIJKLMN"
for _ in 1 ... 5 {
    let item = letters.randomElement()
    print(item!)
}

ジャンケン

    let janken = ["グー", "チョキ", "パー"]
    @State var te = ""
    
    var body: some View {
        VStack {
            Button("ジャンケン"){
                te = janken.randomElement()!
            }
            .foregroundColor(.white)
            .background(
                Capsule()
                    .foregroundColor(.blue)
                    .frame(width: 120, height: 40)
            )
            Text(te)
                .font(.largeTitle)
                .padding()
        }
    }

@Stateは状態を変更するって意味ね。言われてみれば簡単だな。