チーム開発する際は、複数人で作業する為、一人称でデプロイするのとは異なる。開発規模が大きくなれば、なおさら複数人で協力して開発していくことになろう。そこで、開発フローについて考察したい。
以下はGithubを用いた開発手法だ。
1. githubでissueを発行
2. issueの番号でブランチを切る
3. 開発
4. commit, push
5. プルリク
6. 配置
まず前提としてGithubもしくはGithub Enterpriseのアカウントがあることが必要になります。ない場合は、sign upしましょう。

https://github.com/
1. githubでissueを発行
Githubにログインし、submit new issueでissueを発行します。
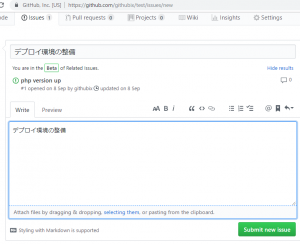
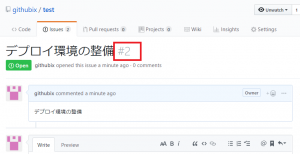
issueを発行すると番号が附番されます。下の例では#2となっています。
2. issueの番号でブランチを切る
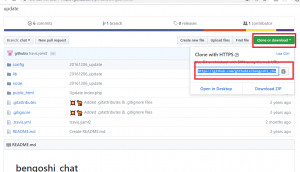
clone or downloadからgit cloneします。
コマンドラインの操作
// git cloneする
[vagrant@localhost sample]$ git clone https://github.com/githubix/bengoshi_chat.git
Initialized empty Git repository in /home/vagrant/local/sample/bengoshi_chat/.git/
remote: Enumerating objects: 3, done.
remote: Counting objects: 100% (3/3), done.
remote: Compressing objects: 100% (3/3), done.
remote: Total 53 (delta 0), reused 2 (delta 0), pack-reused 50
Unpacking objects: 100% (53/53), done.

// cloneされたかフォルダを確認
[vagrant@localhost sample]$ ls
bengoshi_chat

// ディレクトリに移動
[vagrant@localhost sample]$ cd bengoshi_chat
[vagrant@localhost bengoshi_chat]$ ls
README.md  config  lib  node  public_html

// ブランチを確認
[vagrant@localhost bengoshi_chat]$ git branch
* chat
chatというブランチが出来ています。
gitで開発していく場合には、git cloneしたブランチではなく、作業用ブランチを作成して作業していきます。それを「ブランチを切る」と言います。
gitのブランチを作成するには git branch hogehoge と打ちます。
早速やってみましょう。
[vagrant@localhost bengoshi_chat]$ git branch
* chat
// branchを切ります
[vagrant@localhost bengoshi_chat]$ git branch newbranch
// branchを確認
[vagrant@localhost bengoshi_chat]$ git branch
* chat
  newbranch
新しくnewbranchが出来ましたが、branchはchatのままです。branchの切り替えはcheckoutを使います。ホテルのチェックアウトと同じイメージです。
// newbranchに切り替えます
[vagrant@localhost bengoshi_chat]$ git checkout newbranch
Switched to branch 'newbranch'
// 確認すると、newbranchになっているのがわかります
[vagrant@localhost bengoshi_chat]$ git branch
  chat
* newbranch
続いて、fileを修正します。ここではサンプルとして、テキストを修正します。
※社会通念上、不適切と思われる相談内容は、<b>こちら</b>にユーザ名および内容をご連絡ください。
git add してstatusを見ると、状態がわかります。
// git add . とします。
[vagrant@localhost bengoshi_chat]$ git add .
// statusを確認すると、どのブランチ、ファイルか表示されます。
[vagrant@localhost bengoshi_chat]$ git status
# On branch newbranch
# Changes to be committed:
#   (use "git reset HEAD ..." to unstage)
#
#       modified:   public_html/index.php
#
続いて、commitして、pushします。
[vagrant@localhost bengoshi_chat]$ git commit -m "text modify"
[newbranch f7b8b29] text modify
 Committer: vagrant
Your name and email address were configured automatically based
on your username and hostname. Please check that they are accurate.
You can suppress this message by setting them explicitly:

    git config --global user.name "Your Name"
    git config --global user.email you@example.com

If the identity used for this commit is wrong, you can fix it with:

    git commit --amend --author='Your Name '

 1 files changed, 1 insertions(+), 1 deletions(-)

// pushします。
[vagrant@localhost bengoshi_chat]$ git push origin newbranch
error: The requested URL returned error: 403 Forbidden while accessing https://github.com/githubix/bengoshi_chat.git/info/refs

fatal: HTTP request failed
あれ、よくわかんなくなってきた。。
