メェー 今日は異常に疲れたぞ。。。無駄に気を張った。。明日が山場。終われば、今年もホボ終わりでござる。

ということで、MySQLで文字コードを確認したい。vagrantからmysqlにログインします。
Welcome to the MySQL monitor.  Commands end with ; or \g.
Your MySQL connection id is 22
Server version: 5.6.41 MySQL Community Server (GPL)

Copyright (c) 2000, 2018, Oracle and/or its affiliates. All rights reserved.

Oracle is a registered trademark of Oracle Corporation and/or its
affiliates. Other names may be trademarks of their respective
owners.

Type 'help;' or '\h' for help. Type '\c' to clear the current input statement.
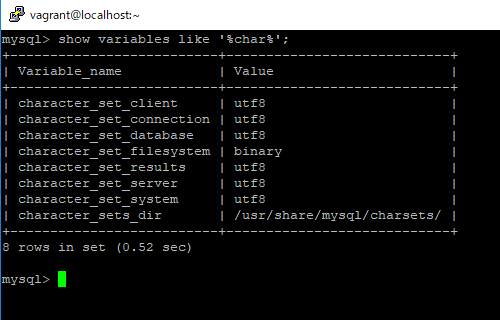
show variables like ‘%char%’と打つ
mysql> show variables like ‘%char%’;
+————————–+—————————-+
| Variable_name | Value |
+————————–+—————————-+
| character_set_client | utf8 |
| character_set_connection | utf8 |
| character_set_database | utf8 |
| character_set_filesystem | binary |
| character_set_results | utf8 |
| character_set_server | utf8 |
| character_set_system | utf8 |
| character_sets_dir | /usr/share/mysql/charsets/ |
+————————–+—————————-+
8 rows in set (0.52 sec)
character_set_client:クライアントがサーバにクエリを送信
character_set_connection:クライアントが送ったクエリをサーバが解析する際に使用
character_set_database:サーバのデフォルト
character_set_server:サービス起動時のデフォルト
character_set_system:ファイル名のcharset
character_sets_dir: charsetsのディレクトリ
う、限界だ。。