AWSのEC2のインスタンスタイプやEBSを見直したいとする。さて、どこから見直す?
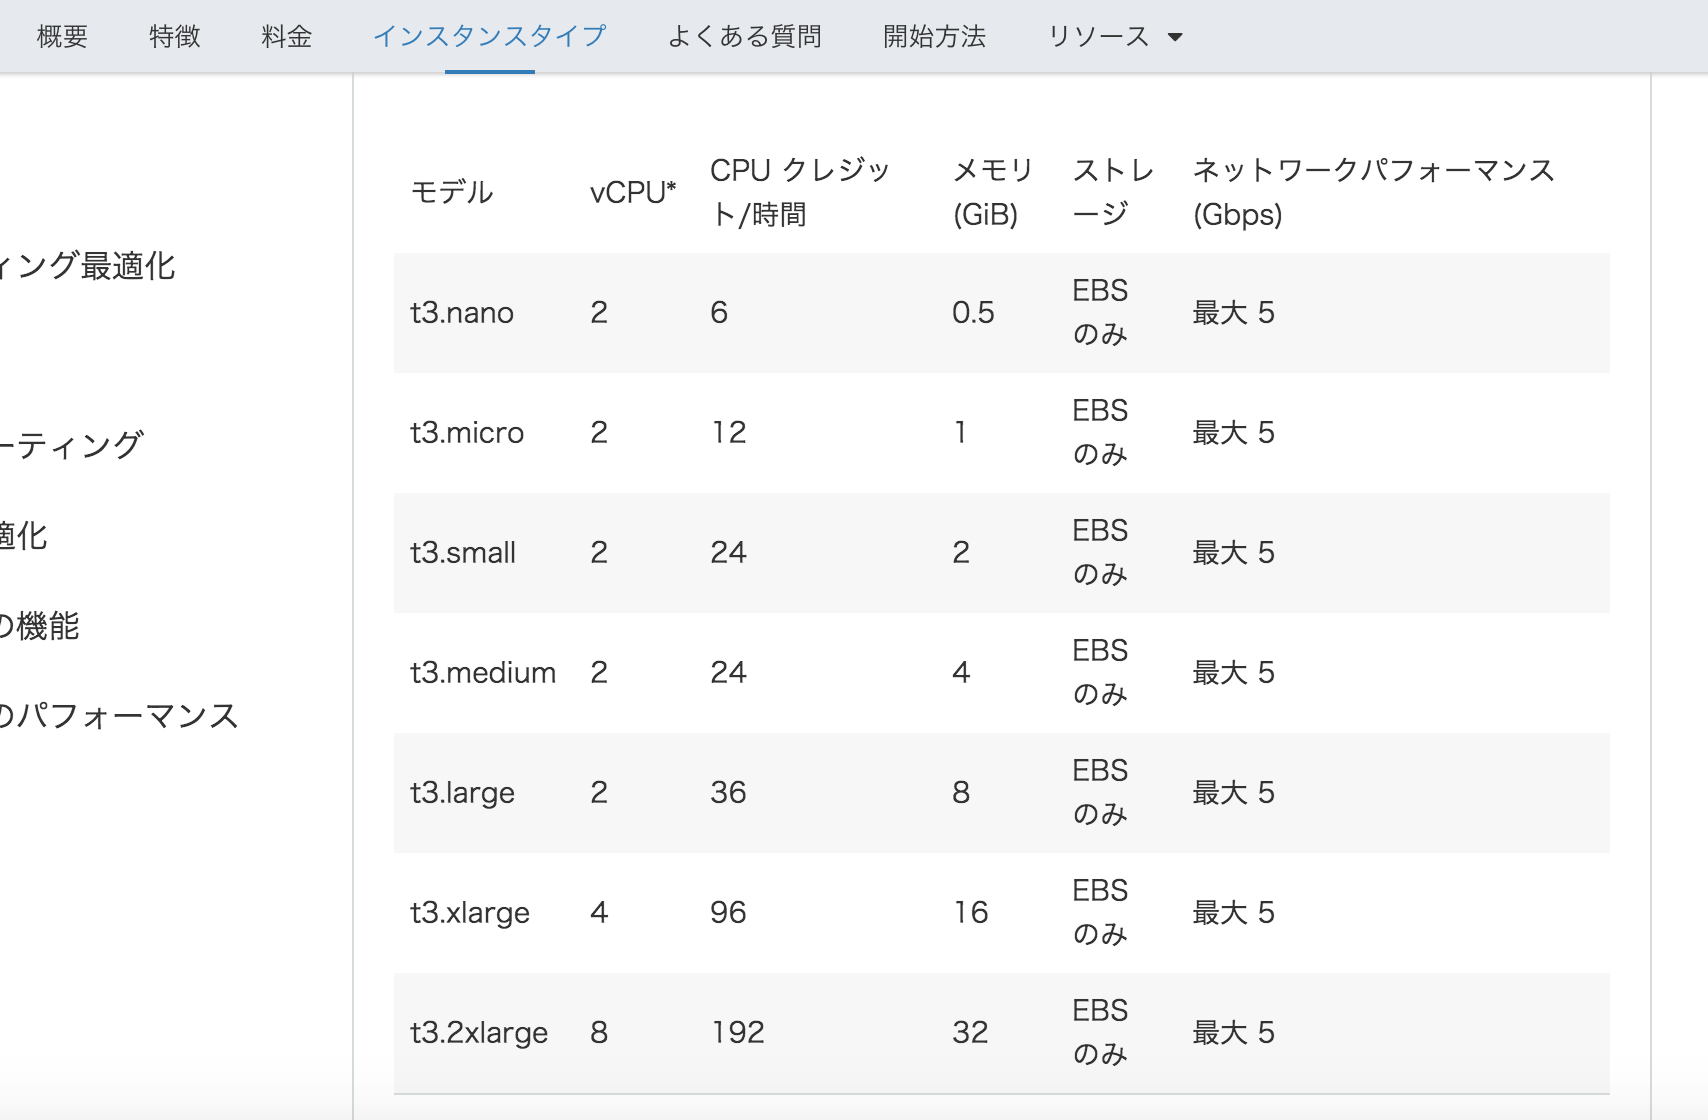
まず、現状を調べるところから。
モデル、VCP, CPUクレジット、メモリ(GiB), ストレージからか。
現状把握 → 検証方法検討 → パフォーマンス測定 → レビュー → インスタンスタイプ・EBS変更 → 事後レビュー
こんなところか。
随机应变 ABCD: Always Be Coding and … : хороший

AWSのEC2のインスタンスタイプやEBSを見直したいとする。さて、どこから見直す?
まず、現状を調べるところから。
モデル、VCP, CPUクレジット、メモリ(GiB), ストレージからか。
現状把握 → 検証方法検討 → パフォーマンス測定 → レビュー → インスタンスタイプ・EBS変更 → 事後レビュー
こんなところか。
■要件定義書
– システム概要(何をするシステムなのか、どうしてそのシステムが必要なのか、そのシステムの目的は何か)
– システム構成図(システム概念図、業務フロー、ユースケース図)
– 機能要件(システムの機能一覧、各機能の詳細)
– 入出力要件(入力データ一覧、各入力データの詳細、出力データ一覧、各出力データ詳細)
– 非機能要件(セキュリティ要求、品質・性能要求)
– その他(概略スケジュール、ステークホルダー相関図)
■外部設計
– システム概要
— シナリオ
— ビジネスロジック
– システムの構成
— システム構成図
— 業務フロー・アクティビティ図
— ハードウェア・ソフトウェア構成図
— ネットワーク構成図
– 機能一覧表
– データベース仕様
— ER図
— テーブル定義書
– UI設計
— 画面遷移図
— 画面レイアウト設計図
– その他
— 開発体制
— 開発スケジュール
— プロジェクト管理ツール
■内部設計
– 機能分割説明
— クラス図
– データフロー
— DFD図
– モジュール詳細
— モジュール名
— 役割
— 引数・戻り値
— 処理概要
— 備考
なんか、げっそりするな、見ただけで。
チームビルディングの参考に、座学を学ぼうと思って、
「情報処理技術者試験対策 プロジェクトマネージャ」を購入して読みました。
技術的な知識は皆無だが、開発手法についてはそこそこ体系的に記載されてあり、役に立った。
プログラマーとして読む価値はないかもしれないが、SIerとかだったら取得が推奨されるのかもしれない。
意気揚々とvirtual boxインストールを試みましたが、
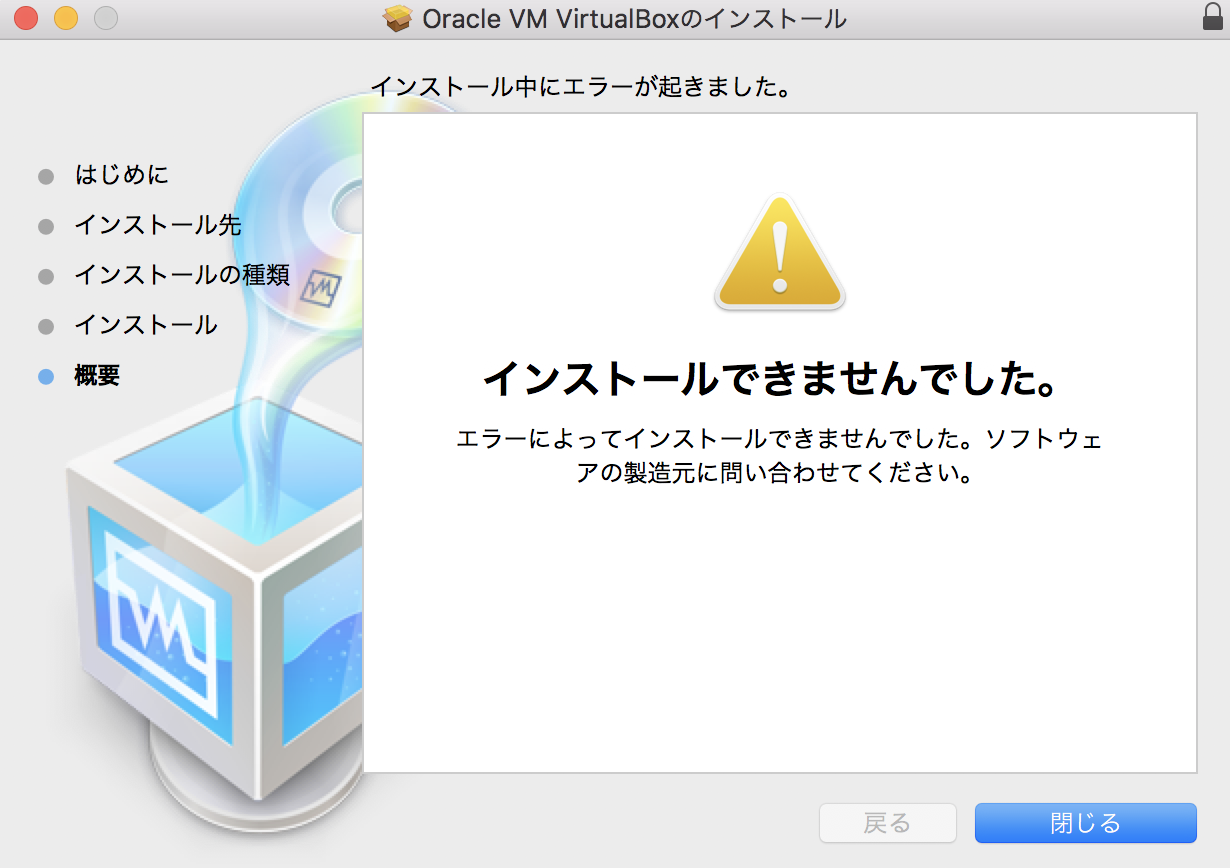
何いいいいいいい
セキュリティとプライバシーからoracleを許可します。
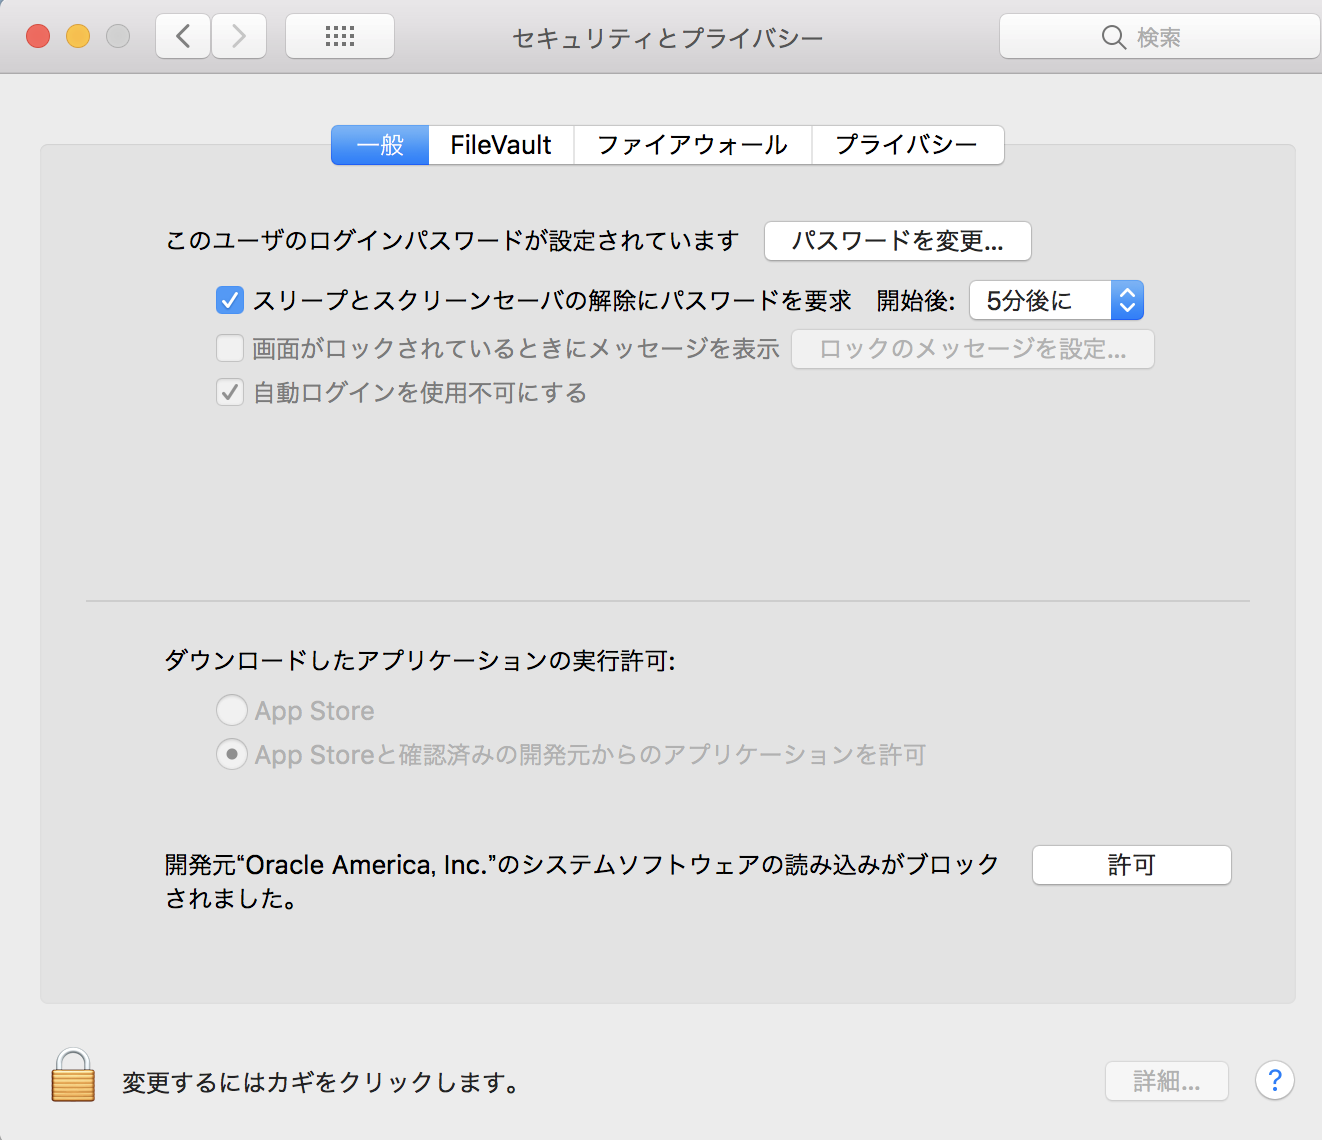
再度インストールします。
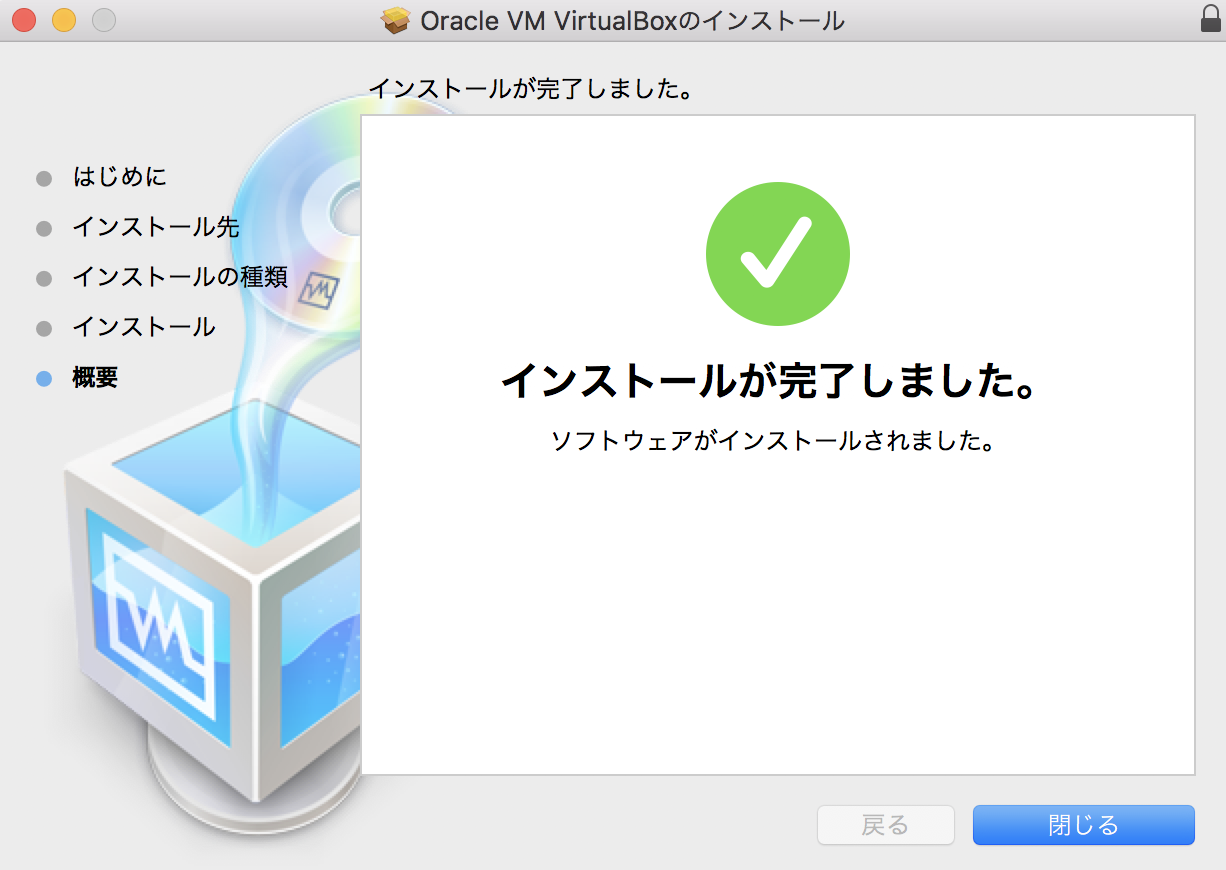
いけましたね。
開発のチームビルディングを考えるため、Team Geek (Google Brain W.Fitzpatrick)を購入して読みました。
https://amzn.to/2JUsl7R
Googleが 謙虚、尊敬、信頼 を大事にしているとは驚きだった。
もっと技術的な思想があるかと思ったら、割とteamでの姿勢的なことなんだ。。
どこの開発現場でも一緒なんだなー
Determine the coding style of the specified file based on the set rules.
This function is an extensive block algorithm such as CBC, OFB, CFB, ECB cipher modes DES, TripleDES, Blowfish (default), 3-WAY, SAFER-SK64, SAFER-SK128, TWOFISH, TEA, RC2 and GOST. Interface to the mcrypt library to support. In addition, it supports RC6 and IDEA, which are described as “not free”.
Check whether the Chef Client / Chef Solo exists in the instance or the expected version when starting Vagrant, and if not, automatically install it on the instance using Chef’s omnibus installer.
# -*- mode:ruby -*-
# vi: set ft=ruby :

Vagrant.configure("2") do |config|
  config.vm.box = "<your_box_name_here>"
  config.vm.network :private_network, ip: "192.168.33.33"

  config.omnibus.chef_version = "11.4.0"

  config.vm.provision :chef_solo do |chef|
      chef.cookbooks_path = "./cookbooks"
      chef.add_recipe "apache"
   end
end
Berkshelf is a tool to manage Chef cookbooks and their dependencies.
If you define a cookbook to be used for the definition file, you can eliminate depedencies automatically from the repository.
[vagrant@localhost test]$ gem install mixlib-archive -v 0.4.20
[vagrant@localhost test]$ gem install mixlib-config -v 2.2.18
[vagrant@localhost test]$ gem install berkshelf
Fetching: fuzzyurl-0.9.0.gem (100%)
Successfully installed fuzzyurl-0.9.0
Fetching: chef-config-15.1.36.gem (100%)
Successfully installed chef-config-15.1.36
Fetching: builder-3.2.3.gem (100%)
Successfully installed builder-3.2.3
Fetching: erubis-2.7.0.gem (100%)
Successfully installed erubis-2.7.0
Fetching: gssapi-1.3.0.gem (100%)
Successfully installed gssapi-1.3.0
Fetching: gyoku-1.3.1.gem (100%)
Successfully installed gyoku-1.3.1
Fetching: httpclient-2.8.3.gem (100%)
Successfully installed httpclient-2.8.3
Fetching: little-plugger-1.1.4.gem (100%)
Successfully installed little-plugger-1.1.4
Fetching: logging-2.2.2.gem (100%)
Successfully installed logging-2.2.2
Fetching: nori-2.6.0.gem (100%)
Successfully installed nori-2.6.0
Fetching: rubyntlm-0.6.2.gem (100%)
Successfully installed rubyntlm-0.6.2
Fetching: winrm-2.3.2.gem (100%)
Successfully installed winrm-2.3.2
Fetching: rubyzip-1.2.3.gem (100%)
Successfully installed rubyzip-1.2.3
Fetching: winrm-fs-1.3.2.gem (100%)
Successfully installed winrm-fs-1.3.2
Fetching: train-core-2.1.13.gem (100%)
ERROR: Error installing berkshelf:
There are no versions of train-core (>= 2.0.12, ~> 2.0) compatible with your Ruby & RubyGems. Maybe try installing an older version of the gem you’re looking for?
train-core requires Ruby version >= 2.4. The current ruby version is 2.3.0.
なにいいいいいいいいいいいいいいいいいいいい
$ zip -r filename directoryname
[vagrant@localhost test]$ ls
test
[vagrant@localhost test]$ zip -r sample test
-bash: zip: コマンドが見つかりません
あれ、zipが入っていない?!
[vagrant@localhost test]$ sudo yum install zip
インストール:
zip.x86_64 0:3.0-1.el6_7.1
完了しました!
zipファイルを作ります。
[vagrant@localhost test]$ zip -r sample.zip test
adding: test/ (stored 0%)
[vagrant@localhost test]$ ls
sample.zip test
お!?
$ zip -e -v
->オプション
-e: –encrypt: 暗号化する
-v: –verbose: 動作中のメッセージを詳しくする
ああああああああああああああああああ、
まだまだまだまだあるううううううううううううううううううう