mysql> describe users;
+—————————+—————–+——+—–+———+—————-+
| Field | Type | Null | Key | Default | Extra |
+—————————+—————–+——+—–+———+—————-+
| id | bigint unsigned | NO | PRI | NULL | auto_increment |
| name | varchar(255) | NO | | NULL | |
| email | varchar(255) | NO | UNI | NULL | |
| email_verified_at | timestamp | YES | | NULL | |
| password | varchar(255) | NO | | NULL | |
| two_factor_secret | text | YES | | NULL | |
| two_factor_recovery_codes | text | YES | | NULL | |
| remember_token | varchar(100) | YES | | NULL | |
| current_team_id | bigint unsigned | YES | | NULL | |
| profile_photo_path | text | YES | | NULL | |
| created_at | timestamp | YES | | NULL | |
| updated_at | timestamp | YES | | NULL | |
| role_id | int | NO | | NULL | |
+—————————+—————–+——+—–+———+—————-+
$ php artisan make:middleware IsAdmin
app/Http/Middleware/Kernel.php
protected $routeMiddleware = [
        'auth' => \App\Http\Middleware\Authenticate::class,
        'auth.basic' => \Illuminate\Auth\Middleware\AuthenticateWithBasicAuth::class,
        'cache.headers' => \Illuminate\Http\Middleware\SetCacheHeaders::class,
        'can' => \Illuminate\Auth\Middleware\Authorize::class,
        'guest' => \App\Http\Middleware\RedirectIfAuthenticated::class,
        'password.confirm' => \Illuminate\Auth\Middleware\RequirePassword::class,
        'signed' => \Illuminate\Routing\Middleware\ValidateSignature::class,
        'throttle' => \Illuminate\Routing\Middleware\ThrottleRequests::class,
        'verified' => \Illuminate\Auth\Middleware\EnsureEmailIsVerified::class,
        'IsAdmin'=>\App\Http\Middleware\IsAdmin::class,
    ];
app/Models/Users.php
public function isAdmin(){
        if($this->role_id == 1){
            return true;
        }
        return false;
    }
route
Route::get('/', function () {

	$user = Auth:: user();

	if($user->isAdmin()){
		echo "this user is admin";
	}
    // return view('welcome');
});
挙動確認
isAdmin.php
use Illuminate\Support\Facades\Auth;
public function handle(Request $request, Closure $next)
    {
        $user = Auth::user();
        if(!$user->isAdmin()){
            return redirect()->intended('/');
        }
        return $next($request);
    }
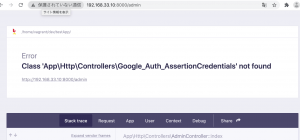
$ php artisan make:controller AdminController
AdminController.php
public function __construct(){
        $this->middleware('IsAdmin');
    }

    public function index(){
        return view('admin.index');
    }
route
use App\Http\Controllers\AdminController;
Route::get('/admin', [App\Http\Controllers\AdminController::class, 'index']);
もしくはrouteで制御
Route::group(['middleware' => ['auth','IsAdmin'] ], function(){
 	Route::get('/admin', [App\Http\Controllers\AdminController::class, 'index']);
 });
思い出したーーーーーー