$ create database mydata;
$ use mydata;
$ create table people (
id int primary key AUTO_INCREMENT,
name varchar(100),
mail varchar(200),
age int
);
mysql> describe people;
+——-+————–+——+—–+———+—————-+
| Field | Type | Null | Key | Default | Extra |
+——-+————–+——+—–+———+—————-+
| id | int | NO | PRI | NULL | auto_increment |
| name | varchar(100) | YES | | NULL | |
| mail | varchar(200) | YES | | NULL | |
| age | int | YES | | NULL | |
+——-+————–+——+—–+———+—————-+
4 rows in set (0.00 sec)
$ insert into people (name, mail, age) values
(“taro”, “taro@gmail.com”, 45),
(“hanako”, “hanako@gmail.com”, 34),
(“sachiko”, “sachiko@gmail.com”, 23),
(“ichiro”, “ichiro@gmail.com”, 12),
(“machiko”, “machiko@gmail.com”, 29);
app.php, app_local.phpを修正
    'Datasources' => [
        'default' => [
            'host' => 'localhost',
            /*
             * CakePHP will use the default DB port based on the driver selected
             * MySQL on MAMP uses port 8889, MAMP users will want to uncomment
             * the following line and set the port accordingly
             */
            //'port' => 'non_standard_port_number',
            'username' => 'hoge',
            'password' => 'fuga',
            'database' => 'mydata',
            'log' => true,
            'url' => env('DATABASE_URL', null),
        ],
    ],
### エンティティとテーブル
src/Model/Entity
src/Model/Table
テーブルクラス
src/Model/Table/PeopleTable.php
namespace App\Model\Table;

use Cake\ORM\Table;

class PeopleTable extends Table {

}
src/Model/Entity/Person.php
namespace App\Model\Entity;

use Cake\ORM\Entity;

class Person extends Entity {

}
PeopleController.php
namespace AppController;

use App\Controller\AppController;

class PeopleController extends AppController {

	public function index(){
		$data = $this->People->find('all');
		$this->set('data', $data);
	}
}
src/Template/People/index.ctp
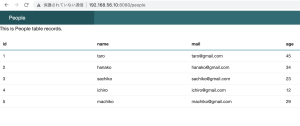
<p>This is People table records.</p>
<table>
<thead><tr>
	<th>id</th><th>name</th><th>mail</th><th>age</th>
</tr></thead>
<?php foreach($data->toArray() as $obj): ?>
<tr>
	<td><?=h($obj->id) ?></td>
	<td><?=h($obj->name) ?></td>
	<td><?=h($obj->mail) ?></td>
	<td><?=h($obj->age) ?></td>
</tr>
<?php endforeach; ?>
</table>
http://192.168.56.10:8080/people
PeopleTable.php
namespace App\Model\Table;

use Cake\ORM\Table;

class PeopleTable extends Table {

	public function initialize(array $config){
		parent::initialize($config);

		$this->setTable('people');
		$this->setDisplayField('name');
		$this->setPrimaryKey('id');
	}
}
Entity
class Person extends Entity {

	protected $_accessible = [
		'name' => true,
		'mail' => true,
		'age' => true
	];
}
なるほど、TableとEntityの使い方は何となく理解した。