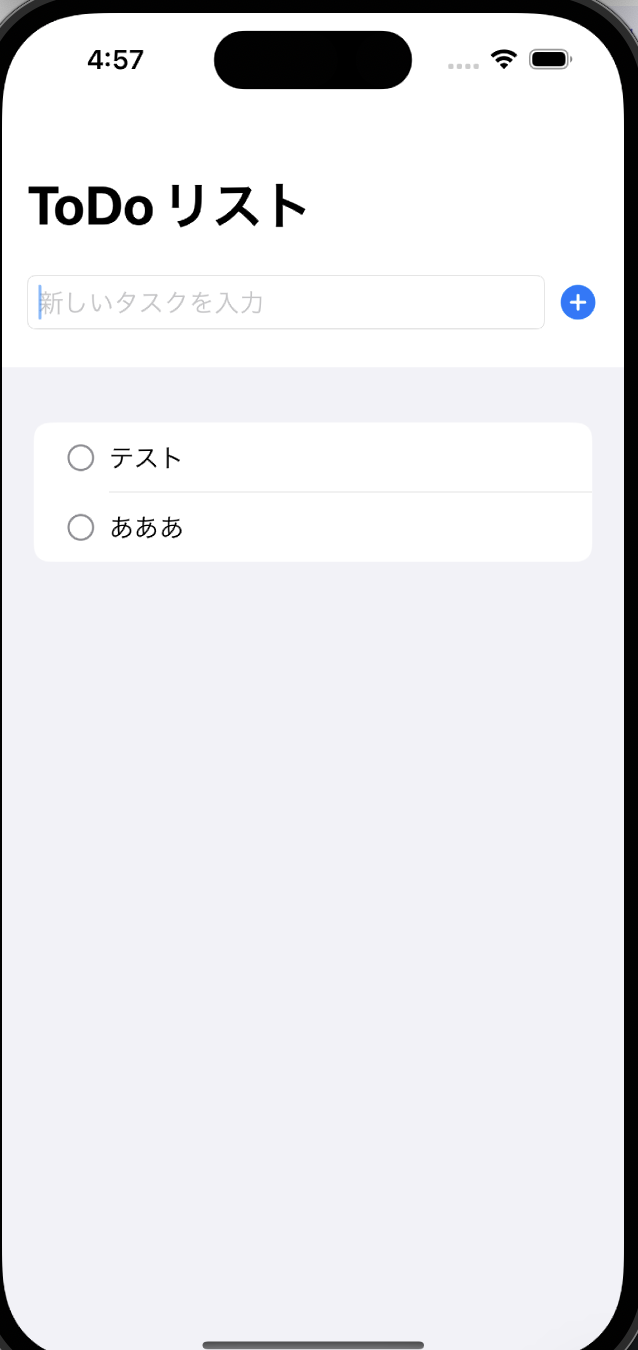
[iOS] MVVMアーキテクチャ

– Model:データ構造(ToDoアイテム)
– ViewModel:データ管理・ロジック
– View:UI(ユーザーが触れる部分)

ディレクトリ構成
MVVMToDoApp/
├── Models/
│ └── Todo.swift
├── ViewModels/
│ └── TodoViewModel.swift
└── Views/
└── ContentView.swift

### Model
Todo.swift

import Foundation

struct Todo: Identifiable, Codable {
    let id = UUID()
    var title: String
    var isCompleted: Bool = false
}

### View

//
//  ContentView.swift
//  CoreDataTest
//
//  Created by mac on 2025/10/25.
//

import SwiftUI

struct ContentView: View {
    @StateObject private var viewModel = TodoViewModel()
    @State private var newTodoTitle = ""
    
    var body: some View {
        NavigationView {
            VStack {
                HStack {
                    TextField("新しいタスクを入力", text: $newTodoTitle)
                        .textFieldStyle(RoundedBorderTextFieldStyle())
                    
                    Button(action: {
                        viewModel.addTodo(title: newTodoTitle)
                        newTodoTitle = ""
                    }) {
                        Image(systemName: "plus.circle.fill")
                            .font(.title2)
                    }
                }
                .padding()
                
                List {
                    ForEach(viewModel.todos) { todo in
                        HStack {
                            Image(systemName: todo.isCompleted ? "checkmark.circle.fill" : "circle")
                                .foregroundColor(todo.isCompleted ? .green : .gray)
                                .onTapGesture {
                                    viewModel.toggleCompletion(for: todo)
                                }
                            Text(todo.title)
                                .strikethrough(todo.isCompleted)
                        }
                    }
                    .onDelete(perform: viewModel.deleteTodo)
                }
            }
            .navigationTitle("ToDoリスト")
        }
    }
}

### ViewModels

import Foundation

class TodoViewModel: ObservableObject {
    @Published var todos: [Todo] = []
    
    func addTodo(title: String) {
        guard !title.isEmpty else { return }
        let newTodo = Todo(title: title)
        todos.append(newTodo)
    }
    
    func toggleCompletion(for todo: Todo) {
        if let index = todos.firstIndex(where: { $0.id == todo.id }) {
            todos[index].isCompleted.toggle()
        }
    }
    
    func deleteTodo(at offsets: IndexSet) {
        todos.remove(atOffsets: offsets)
    }
}

main

import SwiftUI

@main
struct MVVMToDoApp: App {
    var body: some Scene {
        WindowGroup {
            ContentView()
        }
    }
}

なるほど〜

[iOS] Combine / Swift Concurrency(async/await)

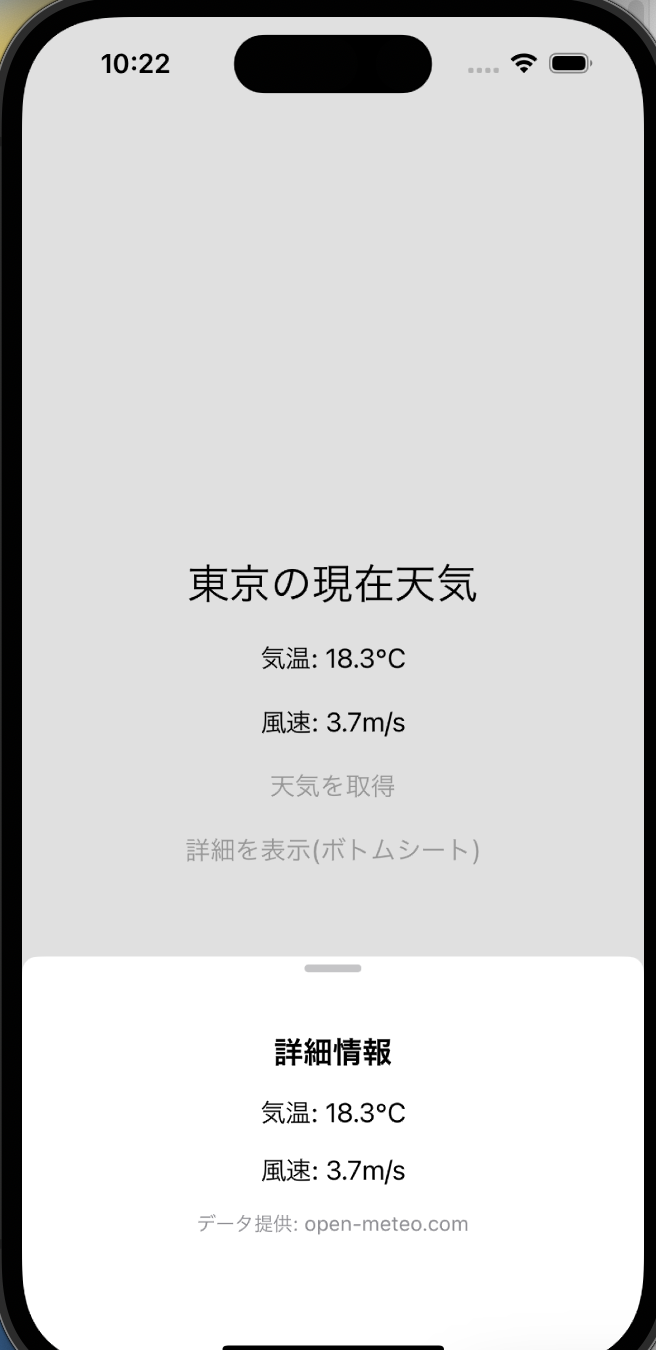
非同期で呼び出す仕組み

import SwiftUI

struct ContentView: View {
    @State private var temperature: String = "__"
    @State private var windspeed: String = "__"
    @State private var showSheet = false
    
    var body: some View {
        VStack(spacing: 20) {
            Text("東京の現在天気")
                .font(.title)
            
            Text("気温: \(temperature)°C")
            Text("風速: \(windspeed)m/s")
            
            Button("天気を取得") {
                Task {
                    await fetchWeather()
                }
            }
            
            Button("詳細を表示(ボトムシート)") {
                showSheet = true
            }
        }
        .padding()
        .sheet(isPresented: $showSheet) {
            BottomSheetView(
                temperature: temperature,
                windspeed: windspeed
            )
            .presentationDetents([.fraction(0.3), .medium, .large])
            .presentationDragIndicator(.visible)
        }
    }
    
    func fetchWeather() async {
        guard let url = URL(string: "https://api.open-meteo.com/v1/forecast?latitude=35.6895&longitude=139.6917&current_weather=true") else { return }
        
        do {
            // 非同期で通信(完了を待つ)
            let (data, _) = try await URLSession.shared.data(from: url)
            let decoded = try JSONDecoder().decode(WeatherResponse.self, from: data)

            // メインスレッドでUI更新
            await MainActor.run {
                self.temperature = String(decoded.current_weather.temperature)
                self.windspeed = String(decoded.current_weather.windspeed)
            }
        } catch {
            print("エラー: \(error.localizedDescription)")
        }
    }
}


struct BottomSheetView: View {
    let temperature: String
    let windspeed: String
    
    var body: some View {
        VStack(spacing: 16) {
            Text("詳細情報")
                .font(.title3)
                .bold()
            Text("気温: \(temperature)°C")
            Text("風速: \(windspeed)m/s")
            Text("データ提供: open-meteo.com")
                .font(.footnote)
                .foregroundColor(.gray)
        }
        .padding()
    }
}

struct WeatherResponse: Codable {
    struct CurrentWeather: Codable {
        let temperature: Double
        let windspeed: Double
    }
    let current_weather: CurrentWeather
}

struct ContentView_Previews: PreviewProvider {
    static var previews: some View {
        ContentView()
    }
}

fetchWeather() に async を付ける 非同期処理を行う関数になる
Task { await fetchWeather() } SwiftUI のボタン内で非同期関数を呼ぶための安全な方法
try await URLSession.shared.data(from:) 通信が完了するまで待機(コールバック不要)
await MainActor.run { … } UI更新は常にメインスレッドで行う

うん、asyncは他の言語でもよく出てくるのでわかりやすい。

[iOS] Bearer Token

■Bearer Tokenの仕組み
1. サーバーがユーザにアクセストークンを発行(OAuth2などで取得)
2. クライアント(iOSアプリ)はAPIリクエスト時にHTTPヘッダにトークンを付与
3. サーバ側でトークンを検証し、アクセス許可を判断

Header example

Authorization: Bearer <YOUR_ACCESS_TOKEN>

を実際のトークンに置き換える
トークンは Keychain に安全に保存するのが推奨
HTTPS で通信することが必須

    func fetchWeather() {
        
        guard let url = URL(string: "https://api.example.com/weather") else { return }
        
        var request = URLRequest(url: url)
        request.httpMethod = "GET"
        let token = "YOUR_ACCESS_TOKEN"
        request.setValue("Bearer \(token)", forHTTPHeaderField: "Authorization")
        
        URLSession.shared.dataTask(with: request) { data, response, error in
                if let data = data {
                    do {
                        let decoded = try JSONDecoder().decode(WeatherResponse.self, from: data)
                        DispatchQueue.main.async {
                            self.temperature = String(decoded.current_weather.temperature)
                            self.windspeed = String(decoded.current_weather.windspeed)
                        }
                    } catch {
                        print("JSONデコードエラー: \(error)")
                    }
                } else if let error = error {
                    print("通信エラー: \(error)")
                }
            }.resume()
    }

[iOS] ボトムシートの表示

import SwiftUI

struct ContentView: View {
    @State private var temperature: String = "__"
    @State private var windspeed: String = "__"
    @State private var showSheet = false
    
    var body: some View {
        VStack(spacing: 20) {
            Text("東京の現在天気")
                .font(.title)
            
            Text("気温: \(temperature)°C")
            Text("風速: \(windspeed)m/s")
            
            Button("天気を取得") {
                fetchWeather()
            }
            
            Button("詳細を表示(ボトムシート)") {
                showSheet = true
            }
        }
        .padding()
        .sheet(isPresented: $showSheet) {
            BottomSheetView(
                temperature: temperature,
                windspeed: windspeed
            )
            .presentationDetents([.fraction(0.3), .medium, .large])
            .presentationDragIndicator(.visible)
        }
    }
    
    func fetchWeather() {
        guard let url = URL(string: "https://api.open-meteo.com/v1/forecast?latitude=35.6895&longitude=139.6917&current_weather=true") else { return }
        URLSession.shared.dataTask(with: url) { data, response, error in
            if let data = data {
                do {
                    let decoded = try JSONDecoder().decode(WeatherResponse.self, from: data)
                    DispatchQueue.main.async {
                                            self.temperature = String(decoded.current_weather.temperature)
                                            self.windspeed = String(decoded.current_weather.windspeed)
                                        }
                } catch {
                    print("JSONデコードエラー: \(error)")
                }
            } else if let error = error {
                print("通信エラー: \(error)")
            }
        }.resume()
    }
}


struct BottomSheetView: View {
    let temperature: String
    let windspeed: String
    
    var body: some View {
        VStack(spacing: 16) {
            Text("詳細情報")
                .font(.title3)
                .bold()
            Text("気温: \(temperature)°C")
            Text("風速: \(windspeed)m/s")
            Text("データ提供: open-meteo.com")
                .font(.footnote)
                .foregroundColor(.gray)
        }
        .padding()
    }
}

struct WeatherResponse: Codable {
    struct CurrentWeather: Codable {
        let temperature: Double
        let windspeed: Double
    }
    let current_weather: CurrentWeather
}

struct ContentView_Previews: PreviewProvider {
    static var previews: some View {
        ContentView()
    }
}

なるほど〜

[iOS/Swift] ネットワーク通信

swiftでネットワーク通知を学ぶ
– URLSession でAPIを叩く(例:天気アプリでAPIから天気データを取得)
– JSONデータのデコード(Codable)

対象API
https://api.open-meteo.com/v1/forecast?latitude=35.6895&longitude=139.6917&current_weather=true

データ

{
    "latitude":35.6895,
    "longitude":139.6917,
    "generationtime_ms":0.234,
    "utc_offset_seconds":0,
    "current_weather":{
        "temperature":28.3,
        "windspeed":5.2,
        "winddirection":90
    }
}

Swiftの場合だと、New Group で新規 Views, Modelsなどのディレクトリを作成する
– Views:画面用の SwiftUI View ファイルを入れる
– Models:JSON の Codable 構造体やデータモデルを入れる
models/Weather.swift

import Foundation

struct WeatherResponse: Codable {
    let current_weather: CurrentWeather
}

struct CurrentWeather: Codable {
    let temperature: Double
    let windspeed: Double
    let winddirection: Double
}

ContentView

import SwiftUI

struct ContentView: View {
    @State private var temperature: String = "__"
    @State private var windspeed: String = "__"
    
    var body: some View {
        VStack(spacing: 20) {
            Text("東京の現在天気")
                .font(.title)
            
            Text("気温: \(temperature)°C")
            Text("風速: \(windspeed)m/s")
            
            Button("天気を取得") {
                fetchWeather()
            }
        }
        .padding()
    }
    
    func fetchWeather() {
        guard let url = URL(string: "https://api.open-meteo.com/v1/forecast?latitude=35.6895&longitude=139.6917&current_weather=true") else { return }
        URLSession.shared.dataTask(with: url) { data, response, error in
            if let data = data {
                do {
                    let decoded = try JSONDecoder().decode(WeatherResponse.self, from: data)
                    DispatchQueue.main.async {
                                            self.temperature = String(decoded.current_weather.temperature)
                                            self.windspeed = String(decoded.current_weather.windspeed)
                                        }
                } catch {
                    print("JSONデコードエラー: \(error)")
                }
            } else if let error = error {
                print("通信エラー: \(error)")
            }
        }.resume()
    }
}

struct ContentView_Previews: PreviewProvider {
    static var previews: some View {
        ContentView()
    }
}

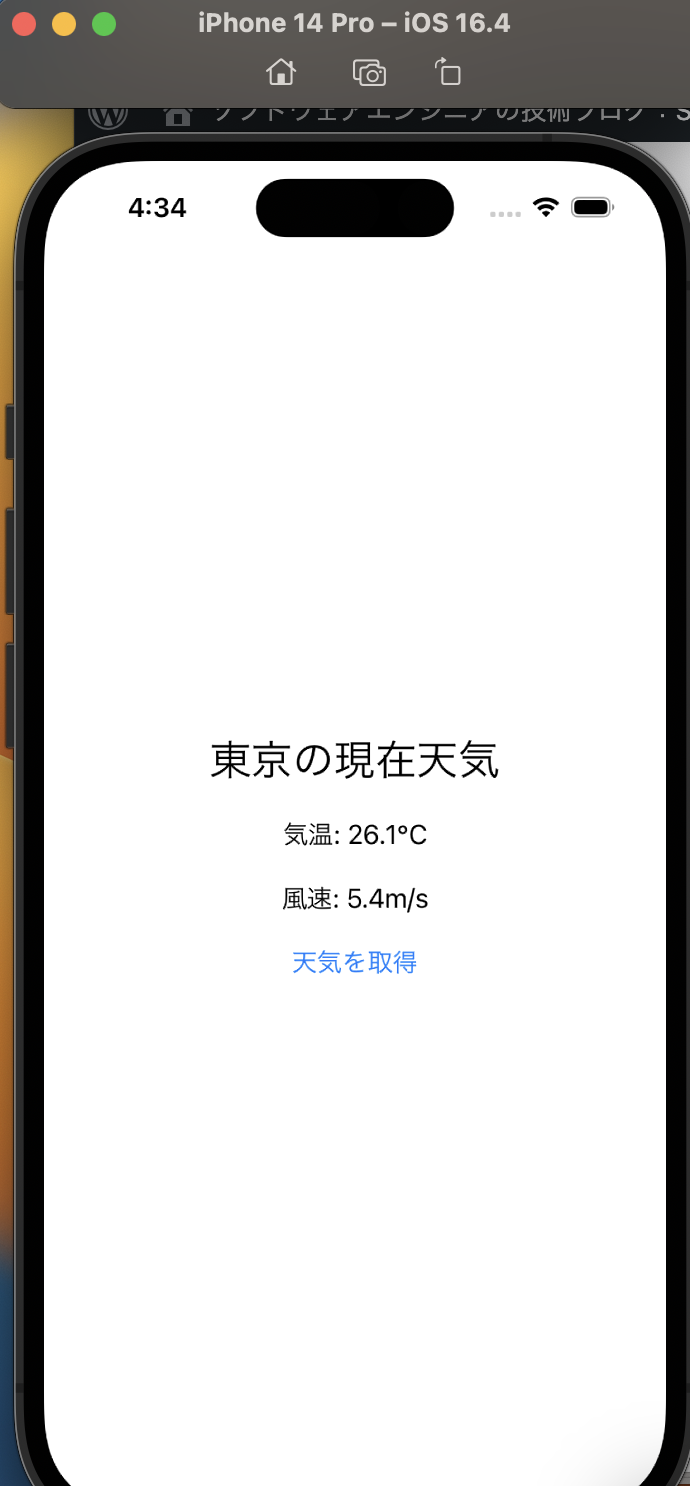
うおおおおおおおお、何だこれは すげえ

ポイント
– URLSession.shared.dataTask で非同期に API を叩く
– Codable で JSON を Swift の構造体にデコード
– DispatchQueue.main.async で UI 更新
– @State で変数をバインドして、UI に表示

[Swift] UsersDefaults

UsersDefaultsとはiOS や macOS アプリで ちょっとしたデータを簡単に保存できる仕組み です。

使い所
ユーザー名やメールアドレス
設定(ダークモードON/OFF、通知ON/OFFなど)
チュートリアルを見たかどうか
ちょっとしたリスト(お気に入りのIDなど)

struct ContentView: View {
    @State private var userMessage: String = ""
    @State private var aiReply: String = ""
    
    @State private var items: [String] = UserDefaults.standard.stringArray(forKey: "items") ?? ["りんご", "バナナ", "みかん"]
    
    var body: some View {
        NavigationView {
            VStack(spacing: 20) {
                Text("AI Chat Demo")
                    .font(.title)
                
                TextField("メッセージを入力", text: $userMessage)
                    .textFieldStyle(RoundedBorderTextFieldStyle())
                    .padding()
                
                Button("送信") {
                    sendMessage()
                }
                .padding()
                
                Text("AIの返答: \(aiReply)")
                    .padding()
                
                Divider()
                
                List {
                    ForEach(items, id:\.self) { item in
                        Text(item)
                    }
                    .onDelete(perform: deleteItem)
                    .onMove(perform: moveItem)
                }
                .frame(height: 200)
                
                Button("フルーツを追加") {
                    addItem()
                }
                .padding()
                
                Spacer()
                
                NavigationLink(destination: ImageViewPage()) {
                    Text("画像ページへ移動")
                        .foregroundColor(.white)
                        .padding()
                        .background(Color.blue)
                        .cornerRadius(8)
                }
                NavigationLink(destination: VideoViewPage()) {
                    Text("動画ページへ移動")
                        .foregroundColor(.white)
                        .padding()
                        .background(Color.green)
                        .cornerRadius(8)
                }
//                NavigationLink(destination: CounterPage()) {
//                    Text("カウンターページへ")
//                        .foregroundColor(.white)
//                        .padding()
//                        .background(Color.green)
//                        .cornerRadius(8)
//                }
            }
            .padding()
            .navigationTitle("チャット")
        }
    }
    
    func saveItems() {
        UserDefaults.standard.set(items, forKey: "items")
    }
    
    func addItem() {
        items.append("新しいフルーツ\(items.count + 1)")
        saveItems()
    }
    
    func deleteItem(at offsets: IndexSet) {
        items.remove(atOffsets: offsets)
        saveItems()
    }
    
    func moveItem(from source: IndexSet, to destination: Int) {
        items.move(fromOffsets: source, toOffset: destination)
        saveItems()
    }

[X-code/iOS]リスト表示と動的データ

@State private var items: [String] = ["りんご", "バナナ", "みかん"]

var body: some View {
        NavigationView {
            VStack(spacing: 20) {
                Text("AI Chat Demo")
                    .font(.title)
                
                TextField("メッセージを入力", text: $userMessage)
                    .textFieldStyle(RoundedBorderTextFieldStyle())
                    .padding()
                
                Button("送信") {
                    sendMessage()
                }
                .padding()
                
                Text("AIの返答: \(aiReply)")
                    .padding()
                
                Divider()
                
                List {
                    ForEach(items, id:\.self) { item in
                        Text(item)
                    }
                    .onDelete(perform: deleteItem)
                    .onMove(perform: moveItem)
                }
                .frame(height: 200)
                
                Button("フルーツを追加") {
                    addItem()
                }
                .padding()
                
                Spacer()
                
                NavigationLink(destination: ImageViewPage()) {
                    Text("画像ページへ移動")
                        .foregroundColor(.white)
                        .padding()
                        .background(Color.blue)
                        .cornerRadius(8)
                }
                NavigationLink(destination: VideoViewPage()) {
                    Text("動画ページへ移動")
                        .foregroundColor(.white)
                        .padding()
                        .background(Color.green)
                        .cornerRadius(8)
                }
//                NavigationLink(destination: CounterPage()) {
//                    Text("カウンターページへ")
//                        .foregroundColor(.white)
//                        .padding()
//                        .background(Color.green)
//                        .cornerRadius(8)
//                }
            }
            .padding()
            .navigationTitle("チャット")
        }
    }
    
    func addItem() {
        items.append("新しいフルーツ\(items.count + 1)")
    }
    
    func deleteItem(at offsets: IndexSet) {
        items.remove(atOffsets: offsets)
    }
    
    func moveItem(from source: IndexSet, to destination: Int) {
        items.move(fromOffsets: source, toOffset: destination)
    }
    func sendMessage() {

viewでのforeachはある程度想像がつきますね。

[Swift] データの受け渡し: @ObservedObject

class CounterModel: ObservableObject {
    @Published var count: Int = 0
}

struct CounterPage: View {
    @ObservedObject var counter = CounterModel()
    
    var body: some View {
        VStack(spacing: 20) {
            Text("カウンター")
                .font(.title)
            
            Text("現在の値: \(counter.count)")
                .font(.headline)
                 
            Button("+1") {
                counter.count += 1
            }
            .padding()
            .background(Color.blue)
            .foregroundColor(.white)
            .cornerRadius(8)
                 
            Button("リセット") {
                counter.count = 0
            }
            .padding()
            .background(Color.red)
            .foregroundColor(.white)
            .cornerRadius(8)
            
            Spacer()
        }
        .padding()
    }
}

使い方: 小画面に渡す

NavigationLink(destination: CounterPage(counter: counter)) {
    Text("カウンターページへ")
}

小画面で受け取って使う

struct CounterPage: View {
    @ObservedObject var counter: CounterModel

    var body: some View {
        VStack {
            Text("現在の値: \(counter.count)")
            Button("+1") { counter.count += 1 }
        }
    }
}

ObservableObject クラスは「共有したいデータの所有者側」で定義・生成」 するのが基本

[Swift] データの受け渡し :bindingと値渡し

ContentView.swift

                NavigationLink(destination: CounterPage(message: userMessage)) {
                    Text("カウンターページへ")
                        .foregroundColor(.white)
                        .padding()
                        .background(Color.green)
                        .cornerRadius(8)
                }

CounterPage.swift

struct CounterPage: View {
    let message: String
    @State private var count = 0
    
    var body: some View {
        VStack(spacing: 20) {
            Text("受け取ったメッセージ:")
                        Text(message)   // ← 表示して確認
                            .font(.title)
                            .foregroundColor(.blue)
 // 省略

ContentView.swiftで、api側にデータを送る際には、 TextField(“メッセージを入力”, text: $userMessage) としているのに、今回は NavigationLink(destination: CounterPage(message: userMessage)) としている

「text: $userMessage」と「message: userMessage」の違いは バインディング(Binding)か値のコピーか

1. text: $userMessage
$ をつけると バインディング(Binding) を渡している。
バインディングは「元の変数と直接つながっている参照」のようなもの。
TextField の入力が変わると、自動的に @State var userMessage の値も更新される。

👉 双方向のデータやり取りが可能。
例:入力欄に文字を打つと userMessage が変わるし、逆に userMessage を変えても入力欄が変わる。

2. message: userMessage
$ がついていないので、ただの 値のコピー を渡している。
遷移先 CounterPage の message: String に「現在の値」を渡すだけ。
遷移先で message を書き換えても、元の userMessage には影響しない。

元の画面で変更内容を反映させたい時などはbindingの方が良い

iOSのstate

stateとは、アプリのローカルメモリ
アプリを終了すると消える仕組み、アプリごとにローカルメモリを持つ

iOSアプリは1つの プロセス として動作する

OSは各プロセスに 独立した仮想アドレス空間 を割り当てる
アプリA (プロセスA) → 仮想メモリ 0x0000_0000〜0xFFFF_FFFF
アプリB (プロセスB) → 仮想メモリ 0x0000_0000〜0xFFFF_FFFF

iOSはメモリ管理に 制約が強い
バックグラウンドアプリは一定時間で メモリを解放される
メモリ不足になるとアプリが強制終了されることもある

iOSも Linux と同じく プロセスの中にスレッドがある 仕組みになっています。正確には、iOS は Darwin(macOS/iOSのカーネル)上で動く Unix 系 OS なので、プロセスとスレッドの概念は Linux とほぼ同じ

DispatchQueue.global(qos: .background).async {
    // 重い処理
    let result = doHeavyTask()

    // UI更新はメインスレッドで
    DispatchQueue.main.async {
        self.aiReply = result
    }
}
Task {
    let result = await fetchDataFromServer()
    // メインスレッドでUI更新
    await MainActor.run {
        self.aiReply = result
    }
}
let queue = OperationQueue()
queue.addOperation {
    let result = doHeavyTask()
    OperationQueue.main.addOperation {
        self.aiReply = result
    }
}

### 実際にstateを実装してみる
CounterPage.swift

import SwiftUI

struct CounterPage: View {
    @State private var count = 0
    
    var body: some View {
        VStack(spacing: 20) {
            Text("カウンター")
                .font(.title)
            
            Text("現在の値: \(count)")
                .font(.headline)
                 
            Button("+1") {
                count += 1
            }
            .padding()
            .background(Color.blue)
            .foregroundColor(.white)
            .cornerRadius(8)
                 
            Button("リセット") {
                count = 0
            }
            .padding()
            .background(Color.red)
            .foregroundColor(.white)
            .cornerRadius(8)
            
            Spacer()
        }
        .padding()
    }
}

ユーザー操作やイベントによって変わる値を保持することが多い
なるほど〜