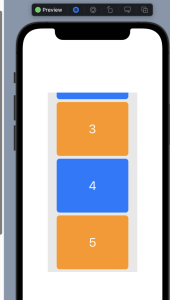
LazyVGrid, LazyHGrid, GridItem, fixed, flexible, adaptive
struct ContentView: View {
    let grids = Array(repeating: GridItem(.fixed(80)), count:4)

    var body: some View {
        ScrollView() {
            LazyVGrid(columns: grids){
                ForEach((1...100), id: \.self) {
                    num in Page(str: String(num))
                        .cornerRadius(8)
                        .frame(height: 60)
                }
            }
        }
    }
}

グリッドのサイズ指定の3つのモード
– LazyVGrid(columns:grids)のグリッドレイアウトで何列並べるか、列幅はどうするかは配列gridsで決まる
GridItem(_size: GridItem.Size = .flexible(), spacing: CGFloat? = nil, alignment:Alignment? = nil)
struct ContentView: View {
let grids = [GridItem(.fixed(30), spacing: 10, alignment: .center),
GridItem(.fixed(50), spacing: 10),
GridItem(.fixed(240))]
var body: some View {
LazyVGrid(columns: grids, alignment: .leading, spacing: 20){
ForEach(photoArray) {
item in Image(systemName: "doc")
Text(item.imageName).font(.caption)
Text(item.title)
}
}.padding()
}
}
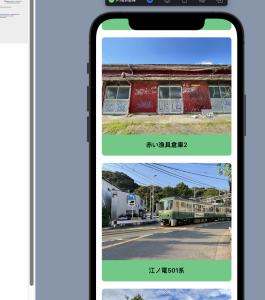
struct PhotoData: Identifiable {
var id = UUID()
var imageName:String
var title:String
}
var photoArray = [
PhotoData(imageName: "IMG_0463", title: "台風で流された親柱"),
PhotoData(imageName: "IMG_0495", title: "横須賀ヴェルニー記念講演"),
PhotoData(imageName: "IMG_1378", title: "恋人たちの湘南平テレビ塔"),
PhotoData(imageName: "IMG_1739", title: "赤い漁具倉庫1"),
PhotoData(imageName: "IMG_1742", title: "赤い漁具倉庫2"),
PhotoData(imageName: "IMG_2233", title: "江ノ電501系"),
PhotoData(imageName: "IMG_2406", title: "茅ヶ崎漁港引き上げモーター小屋"),
PhotoData(imageName: "IMG_2407", title: "茅ヶ崎漁港第二えぼし丸"),
PhotoData(imageName: "IMG_2864", title: "相模川河口調整水門"),
PhotoData(imageName: "IMG_2909", title: "つくばエキスポセンター H2ロケット")
]

struct ContentView: View {
    let grids = [GridItem(.fixed(150), spacing: 20, alignment: .leading),
                 GridItem(.fixed(20), spacing: 5, alignment: .leading),
                 GridItem(.fixed(20), alignment: .leading)]

    var body: some View {
        ScrollView(.horizontal){
            LazyHGrid(rows: grids, spacing:20){
                ForEach(photoArray) {
                    item in Image(item.imageName)
                        .resizable()
                        .aspectRatio(contentMode: .fit)
                        .cornerRadius(8)
                    Text(item.imageName).bold()
                    Text(item.title).font(.caption)
                }
            }.padding()
        }

    }
}
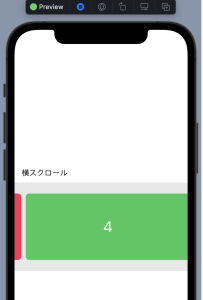
struct ContentView: View {
    let grids = [
        GridItem(.adaptive(minimum: 80, maximum:.infinity))
    ]

    var body: some View {
        ScrollView{
            LazyVGrid(columns: grids, alignment: .leading, spacing: 10){
                ForEach(1...100, id:\.self){
                    num in Ball(str: String(num))
                        .frame(width: 50, height: 50)
                }
                .padding()
            }
        }

    }
}

struct Ball: View {
    let str:String

    var body: some View {
        ZStack {
            Circle()
                .fill(Color.red)
            Text(str)
                .font(.title)
                .foregroundColor(.white)
        }
    }
}
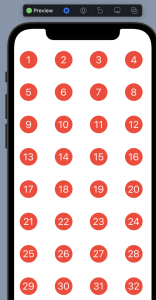
うおおおおおおお、なんか凄いことになってるな…