2000万ファイルの作成について

東京都の電話番号の全てのパターンをつくりたいとする

03-XXXX-YYYY

市外局番:03
市内局番:3100~6999(2264件)
加入者番号:0000~9999(9999件)

仮に全て、ファイルを作ったとすると、2264万ファイル作成することになる。

「Linuxの場合、一つのディレクトリの配下に10000個から15000個程度のファイルを作成することが出来るが、実際には5000個もファイルを作成するとディスクI/Oの性能が落ち、ファイル読み書きのパフォーマンスが落ちる」、とのこと。

vagrant・centosからsendmailでメールを送信する

まず完成版から

vagrantのコマンドラインで以下のように打ちます

[vagrant@localhost postfix]$ sendmail myaccount@gmail.com
Subject: test
test content
.

自分のgmailアカウント
vagrantからのメールが届いてますね。

ここまで来るのに5~6時間かかりました。。。

まず、postfixをインストール後、

sudo yum -y install cyrus-sasl-md5 cyrus-sasl-plain

そして、/etc/postfix/main.cfファイルの編集

# 116行目 inet_interfaces = localhostを編集
inet_interfaces = all

# 119行目 inet_protocols = allを編集
inet_protocols = ipv4

# 318行目 以下追加
relayhost = [smtp.gmail.com]:587
smtp_use_tls = yes
smtp_sasl_auth_enable = yes
smtp_sasl_password_maps = hash:/etc/postfix/sasl_passwd
smtp_sasl_tls_security_options = noanonymous
smtp_sasl_mechanism_filter = plain
smtp_sasl_security_options = noanonymous
smtp_tls_CApath = /etc/pki/tls/certs/ca-bundle.crt

因みに、main.cfの「318行目」は末尾ではありませんのでご注意を。

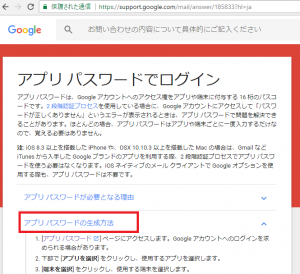
続いて、16桁のGmailのアプリパスワードを生成します。
https://secuirty.google.com/settings/security/apppasswords

その後、/etc/postfix/に、sasl_passwdファイルをvimで作成します。パスワードはつくったアプリパスワードを入力。

[smtp.gmail.com]:587 example@gmail.com:app_password(16桁)

ここで、passwordにgmailの普通のパスワードを入れると、authentification errorになるのでご注意。

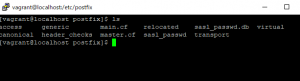
その後、postfixのディレクトリからコマンドラインで

postmap sasl_passwd

として、sasl_passwd.dbを作成します。

そして

sudo service postfix restart

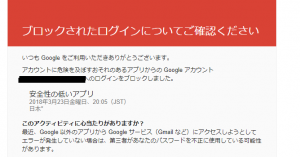
また、gmailの設定で、安全性の低いアプリ(失礼な!)の設定を変更する必要があります。

これでsendmailが使えるようになります。あて先は、gmail以外でもOKです。送信元がvagrantになってました。カッコいい!

[vagrant@localhost postfix]$ sendmail myaccount@gmail.com
Subject: test
test content
.

受信されてないようでしたらログを確認。

sudo cat /var/log/maillog

smtp結構複雑ですね。
別のvagrant環境立ち上げて試すなど、迷走しまくってました。。。

sudo yum -y install postfix

postfixを入れます。

  更新                    : 2:postfix-2.6.6-8.el6.x86_64                    1/2
  整理中                  : 2:postfix-2.6.6-6.el6_7.1.x86_64                2/2
  Verifying               : 2:postfix-2.6.6-8.el6.x86_64                    1/2
  Verifying               : 2:postfix-2.6.6-6.el6_7.1.x86_64                2/2

更新:
  postfix.x86_64 2:2.6.6-8.el6

完了しました!
[vagrant@localhost /]$ sudo alternatives --config mta

2 プログラムがあり 'mta' を提供します。

  選択       コマンド
-----------------------------------------------
   1           /usr/sbin/sendmail.postfix
*+ 2           /usr/sbin/sendmail.sendmail

Enter を押して現在の選択 [+] を保持するか、選択番号を入力します:1
[vagrant@localhost /]$ sudo chkconfig --add postfix
[vagrant@localhost /]$ sudo chkconfig postfix on
[vagrant@localhost /]$ chkconfig --list postfix
postfix         0:off   1:off   2:on    3:on    4:on    5:on    6:off

vagrantでのsendmail

SMTPサーバーはメールを相手のメールサーバーまで届けるサーバー

PHPで以下のように書いて

$to = "hoge@gmail.com";
$subject = "TEST MAIL";
$message = "Hello!\r\nThis is TEST MAIL.";
$headers = "From: hoge@hoge.com";
 
mail($to, $subject, $message, $headers);

echo "finish!";

以下のようにエラーが出たので

sendmail: fatal: parameter inet_interfaces: no local interface found for ::1

/etc/hostsを修正し

[vagrant@localhost mail]$ vi /etc/hosts
127.0.0.1   localhost localhost.localdomain localhost4 localhost4.localdomain4
#::1         localhost localhost.localdomain localhost6 localhost6.localdomain6

それでも全然finishしないので、SMTPサーバーを調べていたら、
>Postfix 2.10.1 ゲストOS上で稼働するMTA(SMTP)サーバー
>Dovecot 2.2.10 ゲストOS上で稼働するPOP3,IMAPサーバー
なるほど、Postfixをインストールしないといけないのね。

centos php7.0.27にintlを入れようとして嵌ったこと

まず、intlを入れようとします。

# sudo yum install --enablerepo=remi --enablerepo=remi-php56 -y php-intl

すると、phpが7.0.27とエラー表示されます。

Error: Package: php-intl-5.6.34-1.el6.remi.x86_64 (remi-php56)
           Requires: php-common(x86-64) = 5.6.34-1.el6.remi
           Installed: php-common-7.0.27-1.el6.remi.x86_64 (@remi-php70)
               php-common(x86-64) = 7.0.27-1.el6.remi
           Available: php-common-5.3.3-49.el6.x86_

phpのバージョン確認

# php -v
PHP 7.0.27 (cli) (built: Jan  2 2018 12:12:41) ( NTS )
Copyright (c) 1997-2017 The PHP Group
Zend Engine v3.0.0, Copyright (c) 1998-2017 Zend Technologies

intlのリストを表示

# yum list | grep intl
intltool.noarch                            0.41.0-1.1.el6              @anaconda       -CentOS-201703281317.x86_64/6.9
perl-libintl.x86_64                        1.20-1.el6                  base
php-intl.x86_64                            5.3.3-49.el6                base
php-symfony-intl.noarch                    2.3.42-1.el6                epel
php54-php-intl.x86_64                      5.4.45-14.el6.remi          remi-safe
php55-php-intl.x86_64                      5.5.38-8.el6.remi           remi-safe
php56-php-intl.x86_64                      5.6.34-1.el6.remi           remi-safe
php70-php-intl.x86_64                      7.0.28-1.el6.remi           remi-safe
php71-php-intl.x86_64                      7.1.15-1.el6.remi           remi-safe
php72-php-intl.x86_64                      7.2.3-1.el6.remi            remi-safe

php70-php-intl.x86_64 を入れます。

# sudo yum install php70-php-intl

はいったか確認します。

# php -i | grep intl
#

なに!? 入ってない。
/opt/remi/php70/root/usr/lib64/php/modules/ に入っている。

/usr/lib64/php/modules にintl.soを入れる。

phpinfo()

コマンドライン

# php -i | grep intl
intl
intl.default_locale => no value => no value
intl.error_level => 0 => 0
intl.use_exceptions => 0 => 0

ふー焦った。

optはアドオンアプリケーションソフトウェアパッケージ(追加アプリケーション)
remiサードパーティのリポジトリの一つ とのこと。

CentOSにLinuxBrewを入れる

himawari.jsを使うため、brewをインストールします。

sudo yum install -y gcc gcc-c++ git
sh -c "$(curl -fsSL https://raw.githubusercontent.com/Linuxbrew/install/master/install.sh)"
test -d ~/.linuxbrew && PATH="$HOME/.linuxbrew/bin:$HOME/.linuxbrew/sbin:$PATH"
test -d /home/linuxbrew/.linuxbrew && PATH="/home/linuxbrew/.linuxbrew/bin:/home/linuxbrew/.linuxbrew/sbin:$PATH"
test -r ~/.bash_profile && echo "export PATH='$(brew --prefix)/bin:$(brew --prefix)/sbin'":'"$PATH"' >>~/.bash_profile
echo "export PATH='$(brew --prefix)/bin:$(brew --prefix)/sbin'":'"$PATH"' >>~/.profile

getting started

brew install imagemagick
brew install graphicsmagick
npm i himawari

というか、himawari.jsってhttp://himawari8.nict.go.jp/ja/himawari8-image.htm から画像化してるだけっぽいですね。

vagrant upしようとした際に、error

コマンドラインで、vagrant upしようとしたら、error while executing `VBoxManage`と表示

>vagrant up
Bringing machine 'default' up with 'virtualbox' provider...
==> default: Importing base box 'bento/centos-6.8'...
==> default: Matching MAC address for NAT networking...
==> default: Checking if box 'bento/centos-6.8' is up to date...
==> default: A newer version of the box 'bento/centos-6.8' is available! You currently
==> default: have version '2.3.0'. The latest is version '2.3.4'. Run
==> default: `vagrant box update` to update.
==> default: Setting the name of the VM: FirstCentOs_default_1504414856800_6279
==> default: Clearing any previously set network interfaces...
==> default: Preparing network interfaces based on configuration...
    default: Adapter 1: nat
    default: Adapter 2: hostonly
==> default: Forwarding ports...
    default: 22 (guest) => 2222 (host) (adapter 1)
==> default: Booting VM...
There was an error while executing `VBoxManage`, a CLI used by Vagrant
for controlling VirtualBox. The command and stderr is shown below.

Command: ["startvm", "6663a9a1-034a-4794-b88f-xxxxxxxxxxxx", "--type", "headless"]

困りますよね。別の仮想マシンを立ち上げましたが、同じように、error while executing `VBoxManage`と表示されたので、windowsのアプリから、Oracle VM VirtualBox 5.1.22をアンインストールして、Oracle VM VirtualBox 5.1.26を再度インストール。

今度は上手くいきました。

>vagrant up
Bringing machine 'default' up with 'virtualbox' provider...
==> default: Checking if box 'bento/centos-6.8' is up to date...
==> default: A newer version of the box 'bento/centos-6.8' is available! You currently
==> default: have version '2.3.0'. The latest is version '2.3.4'. Run
==> default: `vagrant box update` to update.
==> default: Clearing any previously set forwarded ports...
==> default: Clearing any previously set network interfaces...
==> default: Preparing network interfaces based on configuration...
    default: Adapter 1: nat
    default: Adapter 2: hostonly
==> default: Forwarding ports...
    default: 22 (guest) => 2222 (host) (adapter 1)
==> default: Booting VM...
==> default: Waiting for machine to boot. This may take a few minutes...
    default: SSH address: 127.0.0.1:2222
    default: SSH username: vagrant
    default: SSH auth method: private key
    default: Warning: Connection reset. Retrying...
    default: Warning: Connection aborted. Retrying...
    default:
    default: Vagrant insecure key detected. Vagrant will automatically replace
    default: this with a newly generated keypair for better security.
    default:
    default: Inserting generated public key within guest...
    default: Removing insecure key from the guest if it's present...
    default: Key inserted! Disconnecting and reconnecting using new SSH key...
==> default: Machine booted and ready!

sudoers


vagrant@vagrant-ubuntu-trusty-64:~$ sudo cat /etc/sudoers
#
# This file MUST be edited with the 'visudo' command as root.
#
# Please consider adding local content in /etc/sudoers.d/ instead of
# directly modifying this file.
#
# See the man page for details on how to write a sudoers file.
#
Defaults        env_reset
Defaults        mail_badpass
Defaults        secure_path="/usr/local/sbin:/usr/local/bin:/usr/sbin:/usr/bin:/sbin:/bin:/snap/bin"

# Host alias specification

# User alias specification

# Cmnd alias specification

# User privilege specification
root    ALL=(ALL:ALL) ALL

# Members of the admin group may gain root privileges
%admin ALL=(ALL) ALL

# Allow members of group sudo to execute any command
%sudo   ALL=(ALL:ALL) ALL

# See sudoers(5) for more information on "#include" directives:

#includedir /etc/sudoers.d

無題

Change permission

vagrant@vagrant-ubuntu-trusty-64:~$ sudo cp /etc/sudoers.d/vagrant /etc/sudoers.    d/student
vagrant@vagrant-ubuntu-trusty-64:~$ sudo nano /etc/sudoers.d/student
student@vagrant-ubuntu-trusty-64:~$ sudo ufw status
Status: inactive