Laravel Accessing The Request

To obtain an instance of the current HTTP request via dependency injection, you should type-hint the Illuminate\Http\Request class on your controller method. The incoming request instance will automatically be injected by the service container:
ん、インジェクションを維持する?どういう意味だ?

namespace App\Http\Controllers;

use Illuminate\Http\Request;

class UserController extends Controller
{
    /**
     * Store a new user.
     *
     * @param  Request  $request
     * @return Response
     */
    public function store(Request $request)
    {
        $name = $request->input('name');
        //
    }
}

store(Request $request) だから、requestが来た値をnameに保存するというclassです。

Dependency Injection & Route Parameters
If your controller method is also expecting input from a route parameter you should list your route parameters after your other dependencies. For example, if your route is defined like so:
ルートパラメーターを書くべきとしている。

Route::put('user/{id}', 'UserController@update');
namespace App\Http\Controllers;

use Illuminate\Http\Request;

class UserController extends Controller
{
    /**
     * Update the specified user.
     *
     * @param  Request  $request
     * @param  string  $id
     * @return Response
     */
    public function update(Request $request, $id)
    {
        //
    }

リクエストを受け取って、レスポンスを返すclass。update(Request $request, $id)としか書いてないけど。

Accessing The Request Via Route Closures
You may also type-hint the Illuminate\Http\Request class on a route Closure. The service container will automatically inject the incoming request into the Closure when it is executed:

use Illuminate\Http\Request;

Route::get('/', function (Request $request) {
    //
});

これは一緒な気がする。

The Illuminate\Http\Request instance provides a variety of methods for examining the HTTP request for your application and extends the Symfony\Component\HttpFoundation\Request class. We will discuss a few of the most important methods below.

Retrieving The Request Path
The path method returns the request’s path information. So, if the incoming request is targeted at http://domain.com/foo/bar, the path method will return foo/bar:
The is method allows you to verify that the incoming request path matches a given pattern. You may use the * character as a wildcard when utilizing this method:

if ($request->is('admin/*')) {
    //
}

ワイルドカードです。

Retrieving The Request URL
To retrieve the full URL for the incoming request you may use the url or fullUrl methods. The url method will return the URL without the query string, while the fullUrl method includes the query string:

// Without Query String...
$url = $request->url();

// With Query String...
$url = $request->fullUrl();

また変なのが出てきた。documentというか用語集に近いか。
PSR-7 Requests
The PSR-7 standard specifies interfaces for HTTP messages, including requests and responses. If you would like to obtain an instance of a PSR-7 request instead of a Laravel request, you will first need to install a few libraries. Laravel uses the Symfony HTTP Message Bridge component to convert typical Laravel requests and responses into PSR-7 compatible implementations:
laravelのリクエストからPSR-7に変える意味が分からん。

composer require symfony/psr-http-message-bridge
composer require zendframework/zend-diactoros

Once you have installed these libraries, you may obtain a PSR-7 request by type-hinting the request interface on your route Closure or controller method:
libraryをcomposerでインストールするのか。classが変わった。

use Psr\Http\Message\ServerRequestInterface;

Route::get('/', function (ServerRequestInterface $request) {
    //
});

If you return a PSR-7 response instance from a route or controller, it will automatically be converted back to a Laravel response instance and be displayed by the framework.

Input Trimming & Normalization
By default, Laravel includes the TrimStrings and ConvertEmptyStringsToNull middleware in your application’s global middleware stack. These middleware are listed in the stack by the App\Http\Kernel class. These middleware will automatically trim all incoming string fields on the request, as well as convert any empty string fields to null. This allows you to not have to worry about these normalization concerns in your routes and controllers.

If you would like to disable this behavior, you may remove the two middleware from your application’s middleware stack by removing them from the $middleware property of your App\Http\Kernel class.
middlewareとリクエストの関係性がわからんぞ。

Retrieving Input
Retrieving All Input Data
You may also retrieve all of the input data as an array using the all method:
allでくくってしまえ、という例

$input = $request->all();

Retrieving An Input Value
Using a few simple methods, you may access all of the user input from your Illuminate\Http\Request instance without worrying about which HTTP verb was used for the request. Regardless of the HTTP verb, the input method may be used to retrieve user input:

$name = $request->input('name');
$name = $request->input('name', 'Sally');
$name = $request->input('products.0.name');
$names = $request->input('products.*.name');

ワイルドカードを上手く使う。
Retrieving Input From The Query String
While the input method retrieves values from entire request payload (including the query string), the query method will only retrieve values from the query string:
queryって検索か?

$name = $request->query('name');
$query = $request->query();

Retrieving Input Via Dynamic Properties
You may also access user input using dynamic properties on the Illuminate\Http\Request instance. For example, if one of your application’s forms contains a name field, you may access the value of the field like so:
$name = $request->name;
When using dynamic properties, Laravel will first look for the parameter’s value in the request payload. If it is not present, Laravel will search for the field in the route parameters.

Laravel Specifying The Resource Model

Specifying The Resource Model
If you are using route model binding and would like the resource controller’s methods to type-hint a model instance, you may use the –model option when generating the controller:

php artisan make:controller PhotoController --resource --model=Photo

Spoofing Form Methods
Since HTML forms can’t make PUT, PATCH, or DELETE requests, you will need to add a hidden _method field to spoof these HTTP verbs. The @method Blade directive can create this field for you:

<form action="/foo/bar" method="POST">
    @method('PUT')
</form>

Partial Resource Routes
When declaring a resource route, you may specify a subset of actions the controller should handle instead of the full set of default actions:

Route::resource('photos', 'PhotoController')->only([
    'index', 'show'
]);

Route::resource('photos', 'PhotoController')->except([
    'create', 'store', 'update', 'destroy'
]);

API Resource Routes
When declaring resource routes that will be consumed by APIs, you will commonly want to exclude routes that present HTML templates such as create and edit. For convenience, you may use the apiResource method to automatically exclude these two routes:

Route::apiResource('photos', 'PhotoController');

Route::apiResources([
    'photos' => 'PhotoController',
    'posts' => 'PostController'
]);

Naming Resource Routes
By default, all resource controller actions have a route name; however, you can override these names by passing a names array with your options:

Route::resource('photos', 'PhotoController')->names([
    'create' => 'photos.build'
]);

Naming Resource Route Parameters
By default, Route::resource will create the route parameters for your resource routes based on the “singularized” version of the resource name. You can easily override this on a per resource basis by using the parameters method. The array passed into the parameters method should be an associative array of resource names and parameter names:

Localizing Resource URIs
By default, Route::resource will create resource URIs using English verbs. If you need to localize the create and edit action verbs, you may use the Route::resourceVerbs method. This may be done in the boot method of your AppServiceProvider:

use Illuminate\Support\Facades\Route;

/**
 * Bootstrap any application services.
 *
 * @return void
 */
public function boot()
{
    Route::resourceVerbs([
        'create' => 'crear',
        'edit' => 'editar',
    ]);
}
Once the verbs have been customized, a resource route registration such as Route::resource('fotos', 'PhotoController') will produce the following URIs:

/fotos/crear

/fotos/{foto}/editar

Supplementing Resource Controllers
If you need to add additional routes to a resource controller beyond the default set of resource routes, you should define those routes before your call to Route::resource; otherwise, the routes defined by the resource method may unintentionally take precedence over your supplemental routes:

Route::get('photos/popular', 'PhotoController@method');

Route::resource('photos', 'PhotoController');

Method Injection
In addition to constructor injection, you may also type-hint dependencies on your controller’s methods. A common use-case for method injection is injecting the Illuminate\Http\Request instance into your controller methods:

namespace App\Http\Controllers;

use Illuminate\Http\Request;

class UserController extends Controller
{
    /**
     * Store a new user.
     *
     * @param  Request  $request
     * @return Response
     */
    public function store(Request $request)
    {
        $name = $request->name;

        //
    }
}

エンジニアが断捨離するとこうなる

最近、持ち物を断捨離しました。カッコは買値です。

-iphone(10万)
-apple watch(2万)
-金庫(忘れた、2万くらい)
-デスク(1万)
-スーツ全部(20万くらい?)
-Yシャツ全部(不明)
-ネクタイ全部(1万くらい)
-革靴(3万)
-ベルト(忘れた)
-プログラミング関係の本(不明)
-服、ジャケット、ビンテージジーンズ(不明)
-抽象画の絵画(忘れた)
-万年筆(5千円)
-名刺入れ(千円?)
-香水(数千円)

iphoneとApple watchは売った。普通に捨てようかなーと思ってたんだが、じゃんぱらがサクッと30分くらいで買い取ってくれました。
apple watch シリーズ1を2万で買って1年以上使って、バンドや本体など使用感がありましたが1万5千円で買い取り。お得感あるね。iphone 6Sは画面が割れてたので1万3千円くらい。両方ともケース、仕様書などはそろってました。箱を取っておくといいですね。
■じゃんぱら: http://www.janpara.co.jp/
HPページに参考価格が出ますが、商品の状態や付属品などによって値段が変わってくるので、実際にお店に持っていった方がいいと思います。見積りを出してくれるので、気に入らなければ、売らない、と伝えることもできます。

ネクタイはdunhill、Armani、Lanvinなどブランドものばっかりでしたが、費用対効果的に数千円の為に売るのめんどーなので捨てました。万年筆、絵も小銭にはなったのかもしれんけど、特にいいかーって感じで破棄。Pythonの機械学習などの本はamazonに中古で出品してもだいたい定価とほぼ同じ値段で売れますけど、これも手間を考えると、まーいいかなって感じ。
例えばこれ。中古3350円と新品3450円と、100円しか変わらない!これ、ほかの業界からみたら凄いよね。

金庫は一人では持てないくらい重すぎたので、業者呼んで1万5千円払って、机と一緒に処分してもらいました。
昔はお金払って不用品処分するのってかなり抵抗あった。3~4万くらい払って買ったのに、金払って処分って阿保ちやうか、もったいないし、普通に捨てればよくない、と思ってた。
でも最近は考え方が変わって、捨てた方がメリットが大きいと感じたら、金払ってでも処分した方が、長期的には利益になる、と思って、思い切って捨てました。
相見積とったけど、地域の即日対応の業者を選択。全国対応の業者は、050-XXXX-XXXXの電話番号で、かけると数十分後に折り返しかかってくる。値段は1万強で大して変わらない。

絵の価値ってのはよくわらないな~ 個展とか行っても、なんでこの絵がこの値段なのかさっぱりわからない。ぱっと見、いいなと思って買うんだけど、感性が違うから、ぱっと見た印象と値段が合わない。だから売り方も難しい。その曖昧さがいいのかもしれないけど、私には理解できん。昔、ドバイから絵を数十ドルで買って、1万円強で売ったりしてたけど、なんか、手間の割にはって感じで別に面白くないんだよね。

リストの中ではスーツが一番高い。1着10万のスーツがあるからね。エンジニアってスーツいらないけど、スーツ着る機会はありそう、と躊躇して、断捨離するのもこのリストの中では一番最後。しかも、スーツって、基本2万以上で売ってるくせに、aokiや青山など、スーツ小売店は下取りだけで、買取やってないんだね。下取りやって、割引券を渡しているだけ。これっておかしくない?価値の減り方が尋常ではない。aokiとかを見てると、2万のスーツも5万のスーツも10万のスーツも同じ扱いなんだ。しかも、みんなスーツ着てるくせに、スーツ買取業者って極端に少ない。悩んだけど、結局スーツ買取業者に買取りの見積もり取ってもらうことに。
Webフォームで、写真とスーツの詳細を入力すると、数営業日でメールにレスが届く。
なんか、ブランドの買取相場の理由が色々書かれていたが、見積結果は、じゃーん、2着が200~400円、2着が買取り不可。 ※ちなみに10万のスーツは、需要はあるけど値段がつかないって言われた。
は?? え、これ、なにかの冗談でしょ? 400円って。。どういう商売なんだろうこれ。
流石にこれはあかんと思って、オークションに出したら、サクサクっと1万7千円で売れた。そうだよね、俺の感覚はそんなにおかしくない、と少し安心。
それにしても、スーツ業界って闇が深いな。そういえば、ユニクロもカジュアルなジャケットは売ってますが、スーツには深く手を出してないですよね。柳井さんって、非常にロジカルな経営者なので、なんかあるんだろうなーこれ。そーいえば、1着2万円で、2着目千円の利益のカラクリが未だによーわからん。

ついでに書類も色々整理。Web系のドキュメントは大体ネットに落ちてるので、思い切って捨てることに。
世の中、紙の取引は減ってるのに、行政関係は未だに紙ベースが主流ですね。公共サービスはペーパレス化がかなり遅れている気がします。
ということで、大分整理されました。

断捨離まとめ
– デジタル関係は欲しい人に売れば、想像してた値段より売れる、他のものに較べて減損しにくい
– 同じジャンルの商品を大量に扱ってる人に価値を見てもらえば市場価格で売れる
– スーツや洋服は袖通したら価値が減る、今後高値で買う必要は全くない
– サイズが大きな家具類は捨てにくい、買い取ってもらうにも、持ち運びのハードルが高く、売り方もわからない

知識があるものは、価値がわかるけど、知識がないと価値がわからんってことか。

Laravel Basic conroller

Basic Controllers
Defining Controllers
Below is an example of a basic controller class. Note that the controller extends the base controller class included with Laravel. The base class provides a few convenience methods such as the middleware method, which may be used to attach middleware to controller actions:

namespace App\Http\Controllers;

use App\User;
use App\Http\Controllers\Controller;

class UserController extends Controller
{
    /**
     * Show the profile for the given user.
     *
     * @param  int  $id
     * @return View
     */
    public function show($id)
    {
        return view('user.profile', ['user' => User::findOrFail($id)]);
    }
}

You can define a route to this controller action like so:

Route::get('user/{id}', 'UserController@show');

UserControllerでは、user.profileを表示する

Now, when a request matches the specified route URI, the show method on the UserController class will be executed. Of course, the route parameters will also be passed to the method.

Controllers are not required to extend a base class. However, you will not have access to convenience features such as the middleware, validate, and dispatch methods.

Controllers & Namespaces
It is very important to note that we did not need to specify the full controller namespace when defining the controller route. Since the RouteServiceProvider loads your route files within a route group that contains the namespace, we only specified the portion of the class name that comes after the App\Http\Controllers portion of the namespace.

If you choose to nest your controllers deeper into the App\Http\Controllers directory, use the specific class name relative to the App\Http\Controllers root namespace. So, if your full controller class is App\Http\Controllers\Photos\AdminController, you should register routes to the controller like so:

Route::get('foo', 'Photos\AdminController@method');

Single Action Controllers
If you would like to define a controller that only handles a single action, you may place a single __invoke method on the controller:

namespace App\Http\Controllers;

use App\User;
use App\Http\Controllers\Controller;

class ShowProfile extends Controller
{
    /**
     * Show the profile for the given user.
     *
     * @param  int  $id
     * @return View
     */
    public function __invoke($id)
    {
        return view('user.profile', ['user' => User::findOrFail($id)]);
    }
}

When registering routes for single action controllers, you do not need to specify a method:

Route::get(‘user/{id}’, ‘ShowProfile’);
You may generate an invokable controller by using the –invokable option of the make:controller Artisan command:

php artisan make:controller ShowProfile –invokable
artisanコマンド

Controller Middleware
Middleware may be assigned to the controller’s routes in your route files:

Route::get('profile', 'UserController@show')->middleware('auth');

でたーmiddleware

lass UserController extends Controller
{
    /**
     * Instantiate a new controller instance.
     *
     * @return void
     */
    public function __construct()
    {
        $this->middleware('auth');

        $this->middleware('log')->only('index');

        $this->middleware('subscribed')->except('store');
    }
}

Controllers also allow you to register middleware using a Closure. This provides a convenient way to define a middleware for a single controller without defining an entire middleware class:

$this->middleware(function ($request, $next) {
    // ...

    return $next($request);
});

Laravel Controller

Introduction
Instead of defining all of your request handling logic as Closures in route files, you may wish to organize this behavior using Controller classes. Controllers can group related request handling logic into a single class. Controllers are stored in the app/Http/Controllers directory.

Laravel CSRF Protection

Laravel CSRF Protection
フォームやデータを扱うと、CSRF対策は必須になってくる。

Introduction
Laravel makes it easy to protect your application from cross-site request forgery (CSRF) attacks. Cross-site request forgeries are a type of malicious exploit whereby unauthorized commands are performed on behalf of an authenticated user.

Laravel automatically generates a CSRF “token” for each active user session managed by the application. This token is used to verify that the authenticated user is the one actually making the requests to the application.

Anytime you define a HTML form in your application, you should include a hidden CSRF token field in the form so that the CSRF protection middleware can validate the request. You may use the @csrf Blade directive to generate the token field:

<form method="POST" action="/profile">
    @csrf
    ...
</form>

CSRF Tokens & JavaScript
When building JavaScript driven applications, it is convenient to have your JavaScript HTTP library automatically attach the CSRF token to every outgoing request. By default, the resources/js/bootstrap.js file registers the value of the csrf-token meta tag with the Axios HTTP library. If you are not using this library, you will need to manually configure this behavior for your application.
jsでtokenか。確かに言われてみれば、できるでしょうね。でも、jsでやるメリットはあるのか。。

Excluding URIs From CSRF Protection
Sometimes you may wish to exclude a set of URIs from CSRF protection. For example, if you are using Stripe to process payments and are utilizing their webhook system, you will need to exclude your Stripe webhook handler route from CSRF protection since Stripe will not know what CSRF token to send to your routes.

online payment
https://stripe.com/jp
こんなん流行ってるんだ。知らんかった。

namespace App\Http\Middleware;

use Illuminate\Foundation\Http\Middleware\VerifyCsrfToken as Middleware;

class VerifyCsrfToken extends Middleware
{
    /**
     * The URIs that should be excluded from CSRF verification.
     *
     * @var array
     */
    protected $except = [
        'stripe/*',
        'http://example.com/foo/bar',
        'http://example.com/foo/*',
    ];
}

うーん
X-CSRF-TOKEN
In addition to checking for the CSRF token as a POST parameter, the VerifyCsrfToken middleware will also check for the X-CSRF-TOKEN request header. You could, for example, store the token in a HTML meta tag:

<meta name="csrf-token" content="{{ csrf_token() }}">

え、メタに入れんの?

Then, once you have created the meta tag, you can instruct a library like jQuery to automatically add the token to all request headers. This provides simple, convenient CSRF protection for your AJAX based applications:

$.ajaxSetup({
    headers: {
        'X-CSRF-TOKEN': $('meta[name="csrf-token"]').attr('content')
    }
});

By default, the resources/js/bootstrap.js file registers the value of the csrf-token meta tag with the Axios HTTP library. If you are not using this library, you will need to manually configure this behavior for your application.

X-XSRF-TOKEN
Laravel stores the current CSRF token in a XSRF-TOKEN cookie that is included with each response generated by the framework. You can use the cookie value to set the X-XSRF-TOKEN request header.

This cookie is primarily sent as a convenience since some JavaScript frameworks and libraries, like Angular and Axios, automatically place its value in the X-XSRF-TOKEN header.
おーなんだかなー

Laravel Before & After Middleware

Whether a middleware runs before or after a request depends on the middleware itself. For example, the following middleware would perform some task before the request is handled by the application:

namespace App\Http\Middleware;

use Closure;

class BeforeMiddleware
{
    public function handle($request, Closure $next)
    {
        // Perform action

        return $next($request);
    }
}

handleの関数でClosere $nextを渡しています。returnは$nextだけでよくわかりません。

However, this middleware would perform its task after the request is handled by the application:

namespace App\Http\Middleware;

use Closure;

class AfterMiddleware
{
    public function handle($request, Closure $next)
    {
        $response = $next($request);

        // Perform action

        return $response;
    }
}

冗長に書いてます。

Registering Middleware
Global Middleware
If you want a middleware to run during every HTTP request to your application, list the middleware class in the $middleware property of your app/Http/Kernel.php class.
どういうことだ。

Assigning Middleware To Routes
If you would like to assign middleware to specific routes, you should first assign the middleware a key in your app/Http/Kernel.php file. By default, the $routeMiddleware property of this class contains entries for the middleware included with Laravel. To add your own, append it to this list and assign it a key of your choosing:
middlewareを編集する際にはkernel.phpを見ろと。

namespace App\Http;

use Illuminate\Foundation\Http\Kernel as HttpKernel;

class Kernel extends HttpKernel
{
    /**
     * The application's global HTTP middleware stack.
     *
     * These middleware are run during every request to your application.
     *
     * @var array
     */
    protected $middleware = [
        \App\Http\Middleware\CheckForMaintenanceMode::class,
        \Illuminate\Foundation\Http\Middleware\ValidatePostSize::class,
        \App\Http\Middleware\TrimStrings::class,
        \Illuminate\Foundation\Http\Middleware\ConvertEmptyStringsToNull::class,
        \App\Http\Middleware\TrustProxies::class,
    ];

    /**
     * The application's route middleware groups.
     *
     * @var array
     */
    protected $middlewareGroups = [
        'web' => [
            \App\Http\Middleware\EncryptCookies::class,
            \Illuminate\Cookie\Middleware\AddQueuedCookiesToResponse::class,
            \Illuminate\Session\Middleware\StartSession::class,
            // \Illuminate\Session\Middleware\AuthenticateSession::class,
            \Illuminate\View\Middleware\ShareErrorsFromSession::class,
            \App\Http\Middleware\VerifyCsrfToken::class,
            \Illuminate\Routing\Middleware\SubstituteBindings::class,
        ],

        'api' => [
            'throttle:60,1',
            'bindings',
        ],
    ];

    /**
     * The application's route middleware.
     *
     * These middleware may be assigned to groups or used individually.
     *
     * @var array
     */
    protected $routeMiddleware = [
        'auth' => \App\Http\Middleware\Authenticate::class,
        'auth.basic' => \Illuminate\Auth\Middleware\AuthenticateWithBasicAuth::class,
        'bindings' => \Illuminate\Routing\Middleware\SubstituteBindings::class,
        'cache.headers' => \Illuminate\Http\Middleware\SetCacheHeaders::class,
        'can' => \Illuminate\Auth\Middleware\Authorize::class,
        'guest' => \App\Http\Middleware\RedirectIfAuthenticated::class,
        'signed' => \Illuminate\Routing\Middleware\ValidateSignature::class,
        'throttle' => \Illuminate\Routing\Middleware\ThrottleRequests::class,
        'verified' => \Illuminate\Auth\Middleware\EnsureEmailIsVerified::class,
    ];
}

ホントだ、書かれている内容が違う。
auth, auth.basic, binding, cache.headers, can, guest, signed, throttle, verified
canってなんだ? えらいシンプルだが。

Once the middleware has been defined in the HTTP kernel, you may use the middleware method to assign middleware to a route:

Route::get('admin/profile', function () {
    //
})->middleware('auth');

あー、kernelで定義すると、routingなどで使えるようになる。なるほど。

Route::get('/', function () {
    //
})->middleware('first', 'second');

When assigning middleware, you may also pass the fully qualified class name:
classのパスを書けば、使えるようになる。この辺はjavaなどと一緒ですな。

use App\Http\Middleware\CheckAge;

Route::get('admin/profile', function () {
    //
})->middleware(CheckAge::class);

Middleware Groups
Sometimes you may want to group several middleware under a single key to make them easier to assign to routes. You may do this using the $middlewareGroups property of your HTTP kernel.

Out of the box, Laravel comes with web and api middleware groups that contain common middleware you may want to apply to your web UI and API routes:

protected $middlewareGroups = [
    'web' => [
        \App\Http\Middleware\EncryptCookies::class,
        \Illuminate\Cookie\Middleware\AddQueuedCookiesToResponse::class,
        \Illuminate\Session\Middleware\StartSession::class,
        \Illuminate\View\Middleware\ShareErrorsFromSession::class,
        \App\Http\Middleware\VerifyCsrfToken::class,
        \Illuminate\Routing\Middleware\SubstituteBindings::class,
    ],

    'api' => [
        'throttle:60,1',
        'auth:api',
    ],
];

あれ、これはkernel.phpか。

Middleware groups may be assigned to routes and controller actions using the same syntax as individual middleware. Again, middleware groups make it more convenient to assign many middleware to a route at once:

Route::get('/', function () {
    //
})->middleware('web');

Route::group(['middleware' => ['web']], function () {
    //
});

Middleware Parameters
Middleware can also receive additional parameters. For example, if your application needs to verify that the authenticated user has a given “role” before performing a given action, you could create a CheckRole middleware that receives a role name as an additional argument.

Additional middleware parameters will be passed to the middleware after the $next argument:
大体パラメーターは使えますな。

namespace App\Http\Middleware;

use Closure;

class CheckRole
{
    /**
     * Handle the incoming request.
     *
     * @param  \Illuminate\Http\Request  $request
     * @param  \Closure  $next
     * @param  string  $role
     * @return mixed
     */
    public function handle($request, Closure $next, $role)
    {
        if (! $request->user()->hasRole($role)) {
            // Redirect...
        }

        return $next($request);
    }

}

Middleware parameters may be specified when defining the route by separating the middleware name and parameters with a :. Multiple parameters should be delimited by commas:

Route::put('post/{id}', function ($id) {
    //
})->middleware('role:editor');

Terminable Middleware
Sometimes a middleware may need to do some work after the HTTP response has been prepared. For example, the “session” middleware included with Laravel writes the session data to storage after the response has been fully prepared. If you define a terminate method on your middleware, it will automatically be called after the response is ready to be sent to the browser.

namespace Illuminate\Session\Middleware;

use Closure;

class StartSession
{
    public function handle($request, Closure $next)
    {
        return $next($request);
    }

    public function terminate($request, $response)
    {
        // Store the session data...
    }
}

Laravel Middleware

Middleware provide a convenient mechanism for filtering HTTP requests entering your application. For example, Laravel includes a middleware that verifies the user of your application is authenticated. If the user is not authenticated, the middleware will redirect the user to the login screen. However, if the user is authenticated, the middleware will allow the request to proceed further into the application.
authの仕組みです。

Of course, additional middleware can be written to perform a variety of tasks besides authentication. A CORS middleware might be responsible for adding the proper headers to all responses leaving your application. A logging middleware might log all incoming requests to your application.

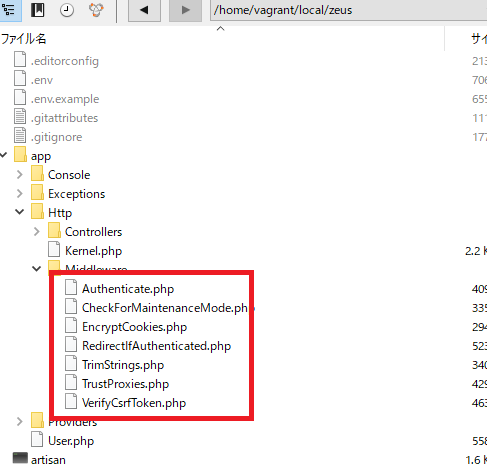
There are several middleware included in the Laravel framework, including middleware for authentication and CSRF protection. All of these middleware are located in the app/Http/Middleware directory.
app/Http/Middlewareのディレクトリを見てみましょう。

あ、なるほど、authenticate, checkformaintenanceMode, Encryptcookies, RedirectlfAuthenticated, TrimStrings, TrustProxies, VerifyCsrfTokenなどがあります。

つーか、Middlewareって基礎なんだ。。
Authenticate.phpの中身を見てみましょう。

namespace App\Http\Middleware;

use Illuminate\Auth\Middleware\Authenticate as Middleware;

class Authenticate extends Middleware
{
    /**
     * Get the path the user should be redirected to when they are not authenticated.
     *
     * @param  \Illuminate\Http\Request  $request
     * @return string
     */
    protected function redirectTo($request)
    {
        return route('login');
    }
}

loginにリダイレクトするって書いてるだけだ。

To create a new middleware, use the make:middleware Artisan command:

php artisan make:middleware CheckAge

This command will place a new CheckAge class within your app/Http/Middleware directory. In this middleware, we will only allow access to the route if the supplied age is greater than 200. Otherwise, we will redirect the users back to the home URI:

namespace App\Http\Middleware;

use Closure;

class CheckAge
{
/**
* Handle an incoming request.
*
* @param \Illuminate\Http\Request $request
* @param \Closure $next
* @return mixed
*/
public function handle($request, Closure $next)
{
if ($request->age <= 200) { return redirect('home'); } return $next($request); } [/code] As you can see, if the given age is less than or equal to 200, the middleware will return an HTTP redirect to the client; otherwise, the request will be passed further into the application. To pass the request deeper into the application (allowing the middleware to "pass"), call the $next callback with the $request. It's best to envision middleware as a series of "layers" HTTP requests must pass through before they hit your application. Each layer can examine the request and even reject it entirely. Tip!! All middleware are resolved via the service container, so you may type-hint any dependencies you need within a middleware's constructor.

laravel Route Model Binding

When injecting a model ID to a route or controller action, you will often query to retrieve the model that corresponds to that ID. Laravel route model binding provides a convenient way to automatically inject the model instances directly into your routes. For example, instead of injecting a user’s ID, you can inject the entire User model instance that matches the given ID.

Route::get('api/users/{user}', function (App\User $user) {
    return $user->email;
});

あーなんか集中力切れてきた。。

Customizing The Key Name
If you would like model binding to use a database column other than id when retrieving a given model class, you may override the getRouteKeyName method on the Eloquent model:

public function getRouteKeyName()
{
    return 'slug';
}

Explicit Binding
To register an explicit binding, use the router’s model method to specify the class for a given parameter. You should define your explicit model bindings in the boot method of the RouteServiceProvider class:
あ、なんか聞いたことあるぞ。

public function boot()
{
    parent::boot();

    Route::model('user', App\User::class);
}

Laravel Routing

さー楽しくなってきました。
なんかRoutingって面白いんだが、俺だけ?

Route::get('foo', function () {
    return 'Hello World';
});

/fooがきたらhello world!

All Laravel routes are defined in your route files, which are located in the routes directory. These files are automatically loaded by the framework. The routes/web.php file defines routes that are for your web interface. These routes are assigned the web middleware group, which provides features like session state and CSRF protection. The routes in routes/api.php are stateless and are assigned the api middleware group.

routes/web.phpが基本。中を見てみましょう。stringではなく、view(‘welcome’)です。

Route::get('/', function () {
    return view('welcome');
});

api.php

Route::middleware('auth:api')->get('/user', function (Request $request) {
    return $request->user();
});

Route::middlewareの意味が解ん。

channel.php

Broadcast::channel('App.User.{id}', function ($user, $id) {
    return (int) $user->id === (int) $id;
});

broadcastの意味が。。。

console.php

Artisan::command('inspire', function () {
    $this->comment(Inspiring::quote());
})->describe('Display an inspiring quote');

consoleに至ってはArtisanときたか。

userControllerをひっぱる場合

Route::get('/user', 'UserController@index');

あーこれこれ、やっときた。

Routes defined in the routes/api.php file are nested within a route group by the RouteServiceProvider. Within this group, the /api URI prefix is automatically applied so you do not need to manually apply it to every route in the file. You may modify the prefix and other route group options by modifying your RouteServiceProvider class.

Available Router Methods
The router allows you to register routes that respond to any HTTP verb:

Route::get($uri, $callback);
Route::post($uri, $callback);
Route::put($uri, $callback);
Route::patch($uri, $callback);
Route::delete($uri, $callback);
Route::options($uri, $callback);

putってなんだっけ?他はイメージできる。

Sometimes you may need to register a route that responds to multiple HTTP verbs. You may do so using the match method. Or, you may even register a route that responds to all HTTP verbs using the any method:

Route::match(['get', 'post'], '/', function () {
    //
});

Route::any('foo', function () {
    //
});

こんなのできんだーすげー

CSRF Protection
Any HTML forms pointing to POST, PUT, or DELETE routes that are defined in the web routes file should include a CSRF token field. Otherwise, the request will be rejected. You can read more about CSRF protection in the CSRF documentation:

<form method="POST" action="/profile">
    @csrf
    ...
</form>

確かlaravelはcsrfを自動でやってくれるんだっけ。

Redirect Routes
If you are defining a route that redirects to another URI, you may use the Route::redirect method. This method provides a convenient shortcut so that you do not have to define a full route or controller for performing a simple redirect:

Route::redirect('/here', '/there', 301);

routingのドキュメント読んでると、イメージが湧いてきた。
If your route only needs to return a view, you may use the Route::view method. Like the redirect method, this method provides a simple shortcut so that you do not have to define a full route or controller. The view method accepts a URI as its first argument and a view name as its second argument. In addition, you may provide an array of data to pass to the view as an optional third argument:

Route::view('/welcome', 'welcome');
Route::view('/welcome', 'welcome', ['name' => 'Taylor']);

Required Parameters
Of course, sometimes you will need to capture segments of the URI within your route. For example, you may need to capture a user’s ID from the URL. You may do so by defining route parameters:

Route::get('user/{id}', function ($id) {
    return 'User '.$id;
});

{id}は絶対使う。

Route::get('posts/{post}/comments/{comment}', function ($postId, $commentId) {
    //
});

Route parameters are always encased within {} braces and should consist of alphabetic characters, and may not contain a – character. Instead of using the – character, use an underscore (_). Route parameters are injected into route callbacks / controllers based on their order – the names of the callback / controller arguments do not matter.

Occasionally you may need to specify a route parameter, but make the presence of that route parameter optional. You may do so by placing a ? mark after the parameter name. Make sure to give the route’s corresponding variable a default value:

Route::get('user/{name?}', function ($name = null) {
    return $name;
});

Route::get('user/{name?}', function ($name = 'John') {
    return $name;
});

条件判定もできる模様

You may constrain the format of your route parameters using the where method on a route instance. The where method accepts the name of the parameter and a regular expression defining how the parameter should be constrained:

Route::get('user/{name}', function ($name) {
    //
})->where('name', '[A-Za-z]+');

Route::get('user/{id}', function ($id) {
    //
})->where('id', '[0-9]+');

Route::get('user/{id}/{name}', function ($id, $name) {
    //
})->where(['id' => '[0-9]+', 'name' => '[a-z]+']);

あーいいね、好きだわこれ。

Global Constraints
If you would like a route parameter to always be constrained by a given regular expression, you may use the pattern method. You should define these patterns in the boot method of your RouteServiceProvider:

/**
 * Define your route model bindings, pattern filters, etc.
 *
 * @return void
 */
public function boot()
{
    Route::pattern('id', '[0-9]+');

    parent::boot();
}
Route::get('user/{id}', function ($id) {
    // Only executed if {id} is numeric...
});

Named Routes
Named routes allow the convenient generation of URLs or redirects for specific routes. You may specify a name for a route by chaining the name method onto the route definition:
あれ、なにこれ。こんなのあったっけ。

Route::get('user/profile', function () {
    //
})->name('profile');
Route::get('user/profile', 'UserProfileController@show')->name('profile');

Generating URLs To Named Routes
Once you have assigned a name to a given route, you may use the route’s name when generating URLs or redirects via the global route function:

// Generating URLs...
$url = route('profile');

// Generating Redirects...
return redirect()->route('profile');

If the named route defines parameters, you may pass the parameters as the second argument to the route function. The given parameters will automatically be inserted into the URL in their correct positions:

Route::get('user/{id}/profile', function ($id) {
    //
})->name('profile');

$url = route('profile', ['id' => 1]);

Route groups allow you to share route attributes, such as middleware or namespaces, across a large number of routes without needing to define those attributes on each individual route. Shared attributes are specified in an array format as the first parameter to the Route::group method.

To assign middleware to all routes within a group, you may use the middleware method before defining the group. Middleware are executed in the order they are listed in the array:

Route::middleware(['first', 'second'])->group(function () {
    Route::get('/', function () {
        // Uses first & second Middleware
    });

    Route::get('user/profile', function () {
        // Uses first & second Middleware
    });
});

ほーmiddlewareだとgroupingですな。

Another common use-case for route groups is assigning the same PHP namespace to a group of controllers using the namespace method:
controllerのnamespaceで制御するのか。

Route::namespace('Admin')->group(function () {
    // Controllers Within The "App\Http\Controllers\Admin" Namespace
});

Remember, by default, the RouteServiceProvider includes your route files within a namespace group, allowing you to register controller routes without specifying the full App\Http\Controllers namespace prefix. So, you only need to specify the portion of the namespace that comes after the base App\Http\Controllers namespace.

Sub-Domain Routing
Route groups may also be used to handle sub-domain routing. Sub-domains may be assigned route parameters just like route URIs, allowing you to capture a portion of the sub-domain for usage in your route or controller. The sub-domain may be specified by calling the domain method before defining the group:
あれ、subdomainってDNS側の設定がいるんじゃなかったっけ?つまり、DNS側の設定をしておけば、routingで簡単にサブドメインにも適用できるってこと? これはちょっとやりたいです。

Route::domain('{account}.myapp.com')->group(function () {
    Route::get('user/{id}', function ($account, $id) {
        //
    });
});

Route Prefixes
The prefix method may be used to prefix each route in the group with a given URI. For example, you may want to prefix all route URIs within the group with admin:

Route::prefix('admin')->group(function () {
    Route::get('users', function () {
        // Matches The "/admin/users" URL
    });
});

あんまり使わないような。というかこれ、基礎!? 他のフレームワークに応用できるんかいな。

Route Name Prefixes
The name method may be used to prefix each route name in the group with a given string. For example, you may want to prefix all of the grouped route’s names with admin. The given string is prefixed to the route name exactly as it is specified, so we will be sure to provide the trailing . character in the prefix:

Route::name('admin.')->group(function () {
    Route::get('users', function () {
        // Route assigned name "admin.users"...
    })->name('users');
});