Apache virtualhostの書き方

/etc/httpd/conf/httpd.conf が大元となっており、/etc/httpd/conf.d/*.confを作成する。拡張子は.conf
個別のモジュールは /etc/httpd/conf.dや /etc/httpd/conf.modules.d に保存されている

<VitualHost *:80>
	ServerName any
	DocumentRoot /var/www/html
</VitualHost>
<VitualHost *:80>
	ServerName a.test
	DocumentRoot /var/www/html/site_a
</VitualHost>

– 文法テスト
apachectl configtest
– 再起動
systemctl restart httpd

/etc/httpd/conf/httpd.confを編集する方法もある

Listen 80
NameVirtualHost *:80

なるほど、設定項目を一つ一つ洗っていくしかないな。

systemdの*.serviceの書き方

ディレクトリ: /etc/systemd/system/*.service

[Unit]
Description=Load dump capture kernel
After=local-fs.target

[Service]
Type=oneshot
ExecStart=/opt/bin/run-kexect.sh
RemainAfterExit=yes

[Install]
WantedBy=multi-user.target

Unit, Service, Installのセクションから成り立ち、Unit, Installは共通的な設定内容、Serviceはサービスを実行するため

### Unitセクション
Description: ユニットの説明
After/Bifore: 指定したユニットの実行順番。Afiter=bar.serviceの場合、bar.serviceのstart-up処理が終わるまで実行しない
Requires/Wants: ユニットの依存関係の定義 Wants=bar.service など
その他: man 5 systemd.unit

### Serviceセクション
Type: Typeには以下の5つがあり、設定がなければsimpleがデフォルトで使用される
L simple, forking, oneshot, notify, dbus
ExecStart: 実行するコマンドラインを書く
RemainAfterExit: typeがoneshotの場合は、コマンド実行後もステータスをアクティブにする

### Installセクション
WantedBy/RequiredBy: systemctl enable xxxでユニットをenableした時に、.wants, .requiredにシンボリックリンクを作る
/etc/systemd/system/multi-user.target.wants/

なるほど

OSのユーザ作成

$ less /etc/passwd

vagrant:x:1000:1000::/home/vagrant:/bin/bash
ken:x:500:100::/home/ken:/bin/bash

ユーザ名: ken
パスワード: x
ユーザID: 500
グループID: 100
コメント:
ホームディレクトリ: /home/vagrant
ユーザが利用するシェル: /bin/bash

$ sudo useradd -u 2000 -g 2000 -m -s /bin/bash hpscript
-m は ユーザ名でホームディレクトリを作成
$ cat /etc/passwd

パスワード付与
$ sudo passwd hpscript

なるほどー 理解した

OSのグループ、ユーザー

Linuxでは複数のユーザが使用することを想定しているため、グループを作って、一括でまとめて管理できるようにしている。

### グループ一覧の確認
$ cat /etc/group
e.g.
linuxacademy:x:1001:student
グループ名: linuxacademy
パスワード: x(セキュリティ上表示しない)
グループ番号(GID): 1001
所属メンバー一覧: student

### グループを操作
groupaddコマンド: グループを追加
groupmodコマンド: グループを編集
groupdel: グループを削除

### グループにメンバーを追加・解除
usermodコマンド

### ファイルやディレクトリに対してグループのアクセス権を設定
chmodコマンド

### グループ作成
-g: グループIDを指定する
$ sudo groupadd -g 2000 hpscript

なるほどー 実際に手を動かして大分理解した。

EC2 RHEL8にpostgresqlを入れたい

コンソール上でRHEL8のEC2を起動する

$ ssh ec2-user@* -i ~/.ssh/*.pem
$ cat /etc/redhat-release
Red Hat Enterprise Linux release 8.5 (Ootpa)

### リポジトリの追加
$ sudo yum -y localinstall https://download.postgresql.org/pub/repos/yum/reporpms/EL-8-x86_64/pgdg-redhat-repo-latest.noarch.rpm
$ sudo yum -y install https://dl.fedoraproject.org/pub/epel/epel-release-latest-8.noarch.rpm
$ sudo yum -y install https://rpms.remirepo.net/enterprise/remi-release-8.rpm

### postgresqlインストール
$ yum install postgresql postgresql-server
– バージョン確認
$ rpm -qa | grep postgres
postgresql-server-10.19-1.module+el8.6.0+13642+78853f5a.x86_64
postgresql-10.19-1.module+el8.6.0+13642+78853f5a.x86_64
– アカウントが作成されていることを確認
$ cat /etc/passwd | grep postgres
postgres:x:26:26:PostgreSQL Server:/var/lib/pgsql:/bin/bash

### DBセットアップ
$ sudo su – postgres
$ postgresql-setup initdb

### 起動及び自動起動の設定
– プロセス確認
$ ps -ef | grep postgres
$ systemctl status postgresql -l –no-pager
$ sudo systemctl start postgresql
$ systemctl status postgresql -l –no-pager
$ sudo systemctl enable postgresql

### Postgresへログイン
$ su – postgres
$ sudo su – postgres
$ psql
postgres=#

OKKKKKKKKKKKK
postgresqlのバージョンが気になるので要確認

.htpasswdとは

Apacheで基本認証を行うためのユーザ/パスワードの作成/削除等を行うコマンド

BASIC認証のID/Passwordを格納するファイルのことね。OK

php_valueとは

php.iniのファイルをApacheで上書きする

使い方例

php_value auto_prepend_file /path/to/my_prepend.php
php_value memory_limit 512M

なるほど、面白いですね。

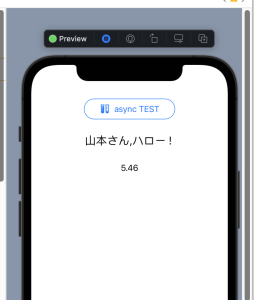
[Swift] 非同期処理の並行処理

async / awaitの組み合わせで非同期処理を行う

ContentView.swift

func getWho() async -> String {
    await Task.sleep(5 * 1000 * 1000 * 1000)
    return "山本さん"
}

func getMessage() async -> String {
    await Task.sleep(3 * 1000 * 1000 * 1000)
    return "ハロー"
}

class StopWatch: ObservableObject {
    
    @Published var elapsedTime: Double = 0.0
    private var timer = Timer()
    
    func start() {
        guard !timer.isValid else { return }
        self.elapsedTime = 0.0
        timer = Timer.scheduledTimer(withTimeInterval: 0.01, repeats: true) {
            _ in
            self.elapsedTime += 0.01
        }
    }
    
    func stop() {
        timer.invalidate()
    }
}

struct ContentView: View {
    
    @State var message:String = ""
    @ObservedObject var watch = StopWatch()
    
    var body: some View {
        VStack {
            Button(action: {
                Task {
                    watch.start()
                    message = "_ _ _"
                    
                    async let who = getWho()
                    async let msg = getMessage()
                    message = await who + "," + msg + " ! "
                    watch.stop()
                }
            }) {
                Label("async TEST", systemImage: "testtube.2")
                    .background(
                        Capsule()
                            .stroke(lineWidth: 1)
                            .frame(width: 180, height: 40)
                    )
            }.padding(30)
            Text("\(message)").font(.title2)
            let milliSeconds = Int((watch.elapsedTime) * 100)%100
            let seconds = Int(watch.elapsedTime)
            Text("\(seconds).\(milliSeconds)").padding()
            Spacer()
        }
    }
}

OK, もう一声

[Swift] 画像データを非同期処理で表示

複数の画像をダウンロードできたものから表示
AsyncImage, placeholder, List, LazyVGrid, NavigationView, NavigationLink

ContentView.swift

struct Photo: Identifiable {
    var id: URL{url}
    var url: URL
}

class PhotoSource {
    var photos: [Photo] = []
    init() {
        photos = makePhotos()
    }
}

extension PhotoSource {
    func makePhotos() -> [Photo] {
        let path = "https://oshige.xsrv.jp/samples/photos/"
        let photoNames: [String] = [
            "IMG_1159.jpg", "IMG_1326.jpg", "IMG_1384.jpg", "IMG_1475.jpg",
            "IMG_1476.jpg", "IMG_1478.jpg", "IMG_1635.jpg", "IMG_1643.jpg",
            "IMG_1739.jpg", "IMG_1840.jpg", "IMG_1889.jpg", "IMG_2233.jpg",
            "IMG_2325.jpg", "IMG_2406.jpg", "IMG_2408.jpg", "IMG_4008.jpg"
        ]
        
        var photos: [Photo] = []
        for name in photoNames {
            photos.append(Photo(url: URL(string: path + name)!))
        }
        return photos
    }
}

struct ContentView: View {
    
    private var myPhotoSource = PhotoSource()
    
    var body: some View {
        NavigationView {
            List(myPhotoSource.photos) {
                photo in
                
                AsyncImage(url: photo.url) {
                    image in
                    
                    image.resizable()
                        .aspectRatio(contentMode: .fit)
                } placeholder: {
                    Color.orange
                        .overlay(Image(systemName: "photo").scaleEffect(2.0))
                }
                .mask(RoundedRectangle(cornerRadius: 16))
                .frame(height: 160)
            }
            .navigationTitle("お気に入り")
        }
    }
}

なるほど、非同期というとJSって感じだが、Swiftでもあるのね。