[Node.js] aws-sdkでs3から複数jsonをdownloadして1つのjsonにまとめる

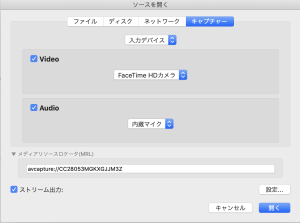
S3から複数のjsonをdownloadして、一つのjsonにまとめたい。
※後にgraphQLで出力する

objectを配列([])で宣言して、pushする

		var object = [];
		const s3Client = new AWS.S3({
				accessKeyId: 'fuga',
				secretAccessKey: 'hoge',
				region: 'ap-northeast-1'
			})
		
		function getObject(params){
			s3Client.getObject(params, function(err, data){
				if(err){
					console.log(err, err.stack);
				} else {
					object.push(JSON.parse(data.Body.toString()|| "null"));
					console.log(object)
					fs.writeFile('speech.json', JSON.stringify(object), function(err, result){
						if(err) console.log('error', err);
					});
				}
			})
		}

		const params1 = {
			Bucket: 'speech-dnn',
			Key: 'speech.json',
		}

		const params2 = {
			Bucket: 'speech-dnn',
			Key: 'speech2.json',
		}
		
		getObject(params1);
		getObject(params2);

$ node test.js
Server Now Running
$ node test.js
Server Now Running
[ { id: 1, text: ‘ 凄い技術ですね。\n’ } ]
[ { id: 1, text: ‘ 凄い技術ですね。\n’ }, { id: 2, text: ‘ びっくりしました。\n’ } ]
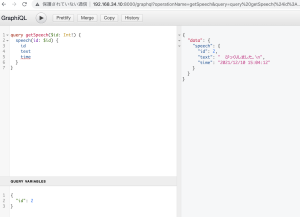
なるほど、これをgraphQLに入れる
※timeを追加
$ node server5.js
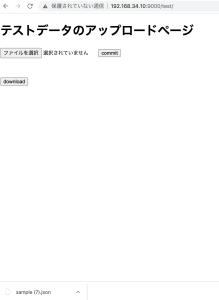
Express GraphQL Server Now Running On 192.168.34.10:8000/graphql
[ { id: 1, text: ‘ 凄い技術ですね。\n’, time: ‘2021/12/10 15:04:10’ } ]
[
{ id: 1, text: ‘ 凄い技術ですね。\n’, time: ‘2021/12/10 15:04:10’ },
{ id: 2, text: ‘ びっくりしました。\n’, time: ‘2021/12/10 15:04:12’ }

http://192.168.34.10:8000/graphql

OK、

[Go Revel] S3からファイルをDownloadする

まずHTMLとroutingを作ります。

    <button type=“button” onclick="location.href='/test/download'">download</button>
GET		/test 				  App.Test
GET     /test/download		  App.Download

続いてaws-sdk-goをget
$ go get -u github.com/aws/aws-sdk-go

最後にcontroller
app.go
L ファイルのリターンはc.RenderFileName(“${file_path}”, revel.Attachment)

import (
	"github.com/revel/revel"
	"os"
	"log"

	"github.com/aws/aws-sdk-go/aws"
	"github.com/aws/aws-sdk-go/aws/credentials"
	"github.com/aws/aws-sdk-go/aws/session"
	"github.com/aws/aws-sdk-go/service/s3"
	"github.com/aws/aws-sdk-go/service/s3/s3manager"
)
func (c App) Download() revel.Result {


	creds := credentials.NewStaticCredentials("${AWS_ACCESS_KEY_ID}","${AWS_SECRET_ACCESS_KEY}","")
	sess := session.Must(session.NewSession(&aws.Config{
		Credentials: creds,
		Region: aws.String("ap-northeast-1"),
	}))

	f, err := os.Create("public/tmp/sample.json")
	if err != nil {
		log.Fatal(err)
	}

	bucketName := "${bucketName}"
	objectKey := "${file}"

	downloader := s3manager.NewDownloader(sess)
	n, err := downloader.Download(f, &s3.GetObjectInput{
		Bucket: aws.String(bucketName),
		Key: aws.String(objectKey),
	})

	if err != nil {
		log.Fatal(err)
	}
	log.Printf("DownloadedSize: %d byte", n)


	return c.RenderFileName("public/tmp/sample.json", revel.Attachment)
}

動作テスト

OKOK, これで議事録機能はできたかな
ファイルパスのところを、/public/tmp/sample.json って書いてハマってしまったorz
さあ続いてKVS

[Python3] 保存している文章の最後の文章のみS3にupload

f.readlines()は1行ずつ
f.read()は全て

# -*- coding: utf-8 -*-
#! /usr/bin/python3

import boto3
import json
 
accesskey = ""
secretkey = ""
region = "ap-northeast-1"

f = open('2021-11-04.txt', 'r', encoding='UTF-8')

# data = f.read()
datalist = f.readlines()
for data in datalist:
	result = data

str = {
    "text":result,
}
 
with open("speech.json", "w") as f:
    json.dump(str, f, ensure_ascii=False)
 
  
s3 = boto3.client('s3', aws_access_key_id=accesskey, aws_secret_access_key= secretkey, region_name=region)
  
filename = "speech.json"
bucket_name = "speech-dnn"
  
s3.upload_file(filename,bucket_name,filename, ExtraArgs={'ACL':'public-read'})
print("upload {0}".format(filename))

{“text”: “今日イチの雄叫びとガッツポーズが此処まで聞こえてきます\n”}

良いね、あとはラズパイのcron設定

RaspberryPI4でAmazon Kinesis Video Streamに配信したい

まずラズパイでsudo apt-get updateとしたいが、エラーになる。以下のコマンドでupdate

$ sudo apt-get update –allow-releaseinfo-change

続いて、mac同様、c++のSDKをラズパイに入れていく
$ sudo apt-get install cmake m4 git build-essential
$ sudo apt-get install gstreamer1.0-plugins-good gstreamer1.0-plugins-bad gstreamer1.0-plugins-ugly gstreamer1.0-tools
$ sudo apt-get install gstreamer1.0-omx

$ git clone https://github.com/awslabs/amazon-kinesis-video-streams-producer-sdk-cpp.git
$ cd amazon-kinesis-video-streams-producer-sdk-cpp
$ mkdir build
$ cd build

$ cmake .. -DBUILD_DEPENDENCIES=OFF -DBUILD_GSTREAMER_PLUGIN=ON
$ make
$ cd ..
$ export GST_PLUGIN_PATH=`pwd`/build
$ export LD_LIBRARY_PATH=`pwd`/open-source/local/lib
$ gst-inspect-1.0 kvssink

インストラクションの通りにやってもエラーになることがあるので、適時インストールする

$ gst-device-monitor-1.0
$ gst-launch-1.0 rtspsrc location=rtsp://@224.0.0.1:1900 short-header=TRUE ! rtph264depay ! h264parse ! kvssink stream-name=MyKinesisVideoStream storage-size=128 access-key=”YourAccessKeyId” secret-key=”YourSecretAccessKey” aws-region=”ap-northeast-1″

これで接続できればOK

rtspではなく、ラズパイのカメラモジュールの映像を送ることもできるが、今、カメラモジュールは到着待ちなので、今日はテストのみ。

ほう、中々勉強になった。
OK、これからネットワークカメラの接続についてまとめる

[RTSP]macでKinesis Video Streamsを使う

$ git clone https://github.com/awslabs/amazon-kinesis-video-streams-producer-sdk-cpp.git
$ cd amazon-kinesis-video-streams-producer-sdk-cpp
$ mkdir build
$ cd build
$ brew link openssl –force
$ brew install pkg-config openssl cmake gstreamer gst-plugins-base gst-plugins-good gst-plugins-bad gst-plugins-ugly log4cplus gst-libav
$ make
$ export GST_PLUGIN_PATH=`pwd`/build
$ export LD_LIBRARY_PATH=`pwd`/open-source/local/lib
$ gst-inspect-1.0 kvssink

$ gst-device-monitor-1.0
Probing devices…

Device found:

name : FaceTime HD Camera
class : Video/Source
caps : video/x-raw(memory:GLMemory), width=1280, height=720, format=UYVY, framerate=[ 1/1, 30/1 ], texture-target=rectangle
video/x-raw, width=1280, height=720, format={ (string)UYVY, (string)YUY2, (string)NV12, (string)BGRA }, framerate=[ 1/1, 30/1 ]
properties:
device.api = avf
avf.unique_id = CC28053MGKXGJJM3Z
avf.model_id = “Apple\ Camera\ VendorID_0x106B\ ProductID_0x1570”
avf.has_flash = false
avf.has_torch = false
avf.manufacturer = “Apple\ Inc.”
gst-launch-1.0 avfvideosrc device-index=0 ! …

最後に、gst-launch-1.0 avfvideosrc device-index=0 と書いてあるので、これを使う

$ gst-launch-1.0 avfvideosrc device-index=0 ! videoconvert ! video/x-raw,format=I420,width=1280,height=720 ! vtenc_h264_hw allow-frame-reordering=FALSE realtime=TRUE max-keyframe-interval=45 bitrate=512 ! h264parse ! video/x-h264,stream-format=avc,alignment=au,profile=baseline ! kvssink stream-name=MyKinesisVideoStream storage-size=512 access-key=”YourAccessKeyId” secret-key=”YourSecretAccessKey” aws-region=”ap-northeast-1″

うおおおおおおおおおお
まじか、、、
sugeeeeeeeeeeee

[RTSP]Kinesis Video Streamsを使いたい

C++プロデューサーSDKをGStreamerプラグインとして使用する
ubuntu20.4にbuildする

$ git clone https://github.com/awslabs/amazon-kinesis-video-streams-producer-sdk-cpp.git
$ cd amazon-kinesis-video-streams-producer-sdk-cpp
$ mkdir build
$ sudo apt-get install libssl-dev libcurl4-openssl-dev liblog4cplus-dev libgstreamer1.0-dev libgstreamer-plugins-base1.0-dev gstreamer1.0-plugins-base-apps gstreamer1.0-plugins-bad gstreamer1.0-plugins-good gstreamer1.0-plugins-ugly gstreamer1.0-tools
$ cmake .. -DBUILD_DEPENDENCIES=OFF -DBUILD_GSTREAMER_PLUGIN=ON
$ make
// 省略
[ 97%] Built target gstkvssink
Scanning dependencies of target kvs_gstreamer_sample
[ 98%] Building CXX object CMakeFiles/kvs_gstreamer_sample.dir/samples/kvs_gstreamer_sample.cpp.o
[100%] Linking CXX executable kvs_gstreamer_sample
[100%] Built target kvs_gstreamer_sample

$ cd ..
$ export GST_PLUGIN_PATH=`pwd`/build
$ export LD_LIBRARY_PATH=`pwd`/open-source/local/lib

AWS IAMで、AmazonKinesisVideoStreamsFullAccessのユーザを作成し、access key, secret keyをコピー

$ gst-inspect-1.0 kvssink
$ gst-launch-1.0 autovideosrc ! videoconvert ! video/x-raw,format=I420,width=1280,height=720 ! vtenc_h264_hw allow-frame-reordering=FALSE realtime=TRUE max-keyframe-interval=45 bitrate=512 ! h264parse ! video/x-h264,stream-format=avc,alignment=au,profile=baseline ! kvssink stream-name=MyKinesisVideoStream storage-size=512 access-key=”YourAccessKeyId” secret-key=”YourSecretAccessKey” aws-region=”ap-northeast-1″

no element “vtenc_h264_hw”

OS xのみで使えるのでエラーになるとのこと
>@Raghava248 vtenc_h264_hw is a hardware codec which is available on OSx only. Please try your platform specific encoder or use a software encoder like x264
https://github.com/awslabs/amazon-kinesis-video-streams-producer-sdk-cpp/issues/138

[RTSP]VLCを使ってRTP配信を行いたい

macにvlcをdownloadします
https://vlc-media-player.jp.uptodown.com/mac/download

1. VLCを起動し、ファイル -> キャプチャーデバイスを開く

2. ストリーミングの設定
RTCで224.0.0.1でポートを1900に設定

### 受信側
稼働しているvlcとは別にもう一つのvlcを起動します

ファイル -> ネットワークを開く
rtp://@224.0.0.1:1900 を設定します

すると、rtpで受信できることがわかります

おおおおおおおおおおおおおおお
Sugeeeeeeeeeeeeeeeeee

RTSPでは224.0.0.0 ~ 239.255.255.255のアドレスを指定する

うん、これをAmazon Kinesis Video Streams で受信したい

RTSPとは

RTSPとは
-> Real Time Streaming Protocol
-> 映像、音声のリアルタイムなストリーミング配信を制御する為のプロトコル
-> ネットワークカメラがクライアント(NVR, VMS)に配信
*NVRはNetwork Video Recoderの略で録画システム
*VMSはVideo Management Softwareで映像を録画、管理、閲覧するソフトウェア

動画はTCP通信ではなく、UDP通信

### 記述
– 要求資源の位置は「rtsp://」を用いて、TCP554ポート(5554)

なるほど、RTSPの概要はわかりました。