Laravel Before & After Middleware

Whether a middleware runs before or after a request depends on the middleware itself. For example, the following middleware would perform some task before the request is handled by the application:

namespace App\Http\Middleware;

use Closure;

class BeforeMiddleware
{
    public function handle($request, Closure $next)
    {
        // Perform action

        return $next($request);
    }
}

handleの関数でClosere $nextを渡しています。returnは$nextだけでよくわかりません。

However, this middleware would perform its task after the request is handled by the application:

namespace App\Http\Middleware;

use Closure;

class AfterMiddleware
{
    public function handle($request, Closure $next)
    {
        $response = $next($request);

        // Perform action

        return $response;
    }
}

冗長に書いてます。

Registering Middleware
Global Middleware
If you want a middleware to run during every HTTP request to your application, list the middleware class in the $middleware property of your app/Http/Kernel.php class.
どういうことだ。

Assigning Middleware To Routes
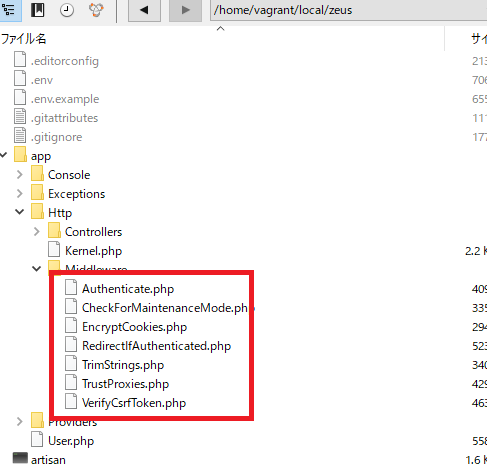
If you would like to assign middleware to specific routes, you should first assign the middleware a key in your app/Http/Kernel.php file. By default, the $routeMiddleware property of this class contains entries for the middleware included with Laravel. To add your own, append it to this list and assign it a key of your choosing:
middlewareを編集する際にはkernel.phpを見ろと。

namespace App\Http;

use Illuminate\Foundation\Http\Kernel as HttpKernel;

class Kernel extends HttpKernel
{
    /**
     * The application's global HTTP middleware stack.
     *
     * These middleware are run during every request to your application.
     *
     * @var array
     */
    protected $middleware = [
        \App\Http\Middleware\CheckForMaintenanceMode::class,
        \Illuminate\Foundation\Http\Middleware\ValidatePostSize::class,
        \App\Http\Middleware\TrimStrings::class,
        \Illuminate\Foundation\Http\Middleware\ConvertEmptyStringsToNull::class,
        \App\Http\Middleware\TrustProxies::class,
    ];

    /**
     * The application's route middleware groups.
     *
     * @var array
     */
    protected $middlewareGroups = [
        'web' => [
            \App\Http\Middleware\EncryptCookies::class,
            \Illuminate\Cookie\Middleware\AddQueuedCookiesToResponse::class,
            \Illuminate\Session\Middleware\StartSession::class,
            // \Illuminate\Session\Middleware\AuthenticateSession::class,
            \Illuminate\View\Middleware\ShareErrorsFromSession::class,
            \App\Http\Middleware\VerifyCsrfToken::class,
            \Illuminate\Routing\Middleware\SubstituteBindings::class,
        ],

        'api' => [
            'throttle:60,1',
            'bindings',
        ],
    ];

    /**
     * The application's route middleware.
     *
     * These middleware may be assigned to groups or used individually.
     *
     * @var array
     */
    protected $routeMiddleware = [
        'auth' => \App\Http\Middleware\Authenticate::class,
        'auth.basic' => \Illuminate\Auth\Middleware\AuthenticateWithBasicAuth::class,
        'bindings' => \Illuminate\Routing\Middleware\SubstituteBindings::class,
        'cache.headers' => \Illuminate\Http\Middleware\SetCacheHeaders::class,
        'can' => \Illuminate\Auth\Middleware\Authorize::class,
        'guest' => \App\Http\Middleware\RedirectIfAuthenticated::class,
        'signed' => \Illuminate\Routing\Middleware\ValidateSignature::class,
        'throttle' => \Illuminate\Routing\Middleware\ThrottleRequests::class,
        'verified' => \Illuminate\Auth\Middleware\EnsureEmailIsVerified::class,
    ];
}

ホントだ、書かれている内容が違う。
auth, auth.basic, binding, cache.headers, can, guest, signed, throttle, verified
canってなんだ? えらいシンプルだが。

Once the middleware has been defined in the HTTP kernel, you may use the middleware method to assign middleware to a route:

Route::get('admin/profile', function () {
    //
})->middleware('auth');

あー、kernelで定義すると、routingなどで使えるようになる。なるほど。

Route::get('/', function () {
    //
})->middleware('first', 'second');

When assigning middleware, you may also pass the fully qualified class name:
classのパスを書けば、使えるようになる。この辺はjavaなどと一緒ですな。

use App\Http\Middleware\CheckAge;

Route::get('admin/profile', function () {
    //
})->middleware(CheckAge::class);

Middleware Groups
Sometimes you may want to group several middleware under a single key to make them easier to assign to routes. You may do this using the $middlewareGroups property of your HTTP kernel.

Out of the box, Laravel comes with web and api middleware groups that contain common middleware you may want to apply to your web UI and API routes:

protected $middlewareGroups = [
    'web' => [
        \App\Http\Middleware\EncryptCookies::class,
        \Illuminate\Cookie\Middleware\AddQueuedCookiesToResponse::class,
        \Illuminate\Session\Middleware\StartSession::class,
        \Illuminate\View\Middleware\ShareErrorsFromSession::class,
        \App\Http\Middleware\VerifyCsrfToken::class,
        \Illuminate\Routing\Middleware\SubstituteBindings::class,
    ],

    'api' => [
        'throttle:60,1',
        'auth:api',
    ],
];

あれ、これはkernel.phpか。

Middleware groups may be assigned to routes and controller actions using the same syntax as individual middleware. Again, middleware groups make it more convenient to assign many middleware to a route at once:

Route::get('/', function () {
    //
})->middleware('web');

Route::group(['middleware' => ['web']], function () {
    //
});

Middleware Parameters
Middleware can also receive additional parameters. For example, if your application needs to verify that the authenticated user has a given “role” before performing a given action, you could create a CheckRole middleware that receives a role name as an additional argument.

Additional middleware parameters will be passed to the middleware after the $next argument:
大体パラメーターは使えますな。

namespace App\Http\Middleware;

use Closure;

class CheckRole
{
    /**
     * Handle the incoming request.
     *
     * @param  \Illuminate\Http\Request  $request
     * @param  \Closure  $next
     * @param  string  $role
     * @return mixed
     */
    public function handle($request, Closure $next, $role)
    {
        if (! $request->user()->hasRole($role)) {
            // Redirect...
        }

        return $next($request);
    }

}

Middleware parameters may be specified when defining the route by separating the middleware name and parameters with a :. Multiple parameters should be delimited by commas:

Route::put('post/{id}', function ($id) {
    //
})->middleware('role:editor');

Terminable Middleware
Sometimes a middleware may need to do some work after the HTTP response has been prepared. For example, the “session” middleware included with Laravel writes the session data to storage after the response has been fully prepared. If you define a terminate method on your middleware, it will automatically be called after the response is ready to be sent to the browser.

namespace Illuminate\Session\Middleware;

use Closure;

class StartSession
{
    public function handle($request, Closure $next)
    {
        return $next($request);
    }

    public function terminate($request, $response)
    {
        // Store the session data...
    }
}

Laravel Middleware

Middleware provide a convenient mechanism for filtering HTTP requests entering your application. For example, Laravel includes a middleware that verifies the user of your application is authenticated. If the user is not authenticated, the middleware will redirect the user to the login screen. However, if the user is authenticated, the middleware will allow the request to proceed further into the application.
authの仕組みです。

Of course, additional middleware can be written to perform a variety of tasks besides authentication. A CORS middleware might be responsible for adding the proper headers to all responses leaving your application. A logging middleware might log all incoming requests to your application.

There are several middleware included in the Laravel framework, including middleware for authentication and CSRF protection. All of these middleware are located in the app/Http/Middleware directory.
app/Http/Middlewareのディレクトリを見てみましょう。

あ、なるほど、authenticate, checkformaintenanceMode, Encryptcookies, RedirectlfAuthenticated, TrimStrings, TrustProxies, VerifyCsrfTokenなどがあります。

つーか、Middlewareって基礎なんだ。。
Authenticate.phpの中身を見てみましょう。

namespace App\Http\Middleware;

use Illuminate\Auth\Middleware\Authenticate as Middleware;

class Authenticate extends Middleware
{
    /**
     * Get the path the user should be redirected to when they are not authenticated.
     *
     * @param  \Illuminate\Http\Request  $request
     * @return string
     */
    protected function redirectTo($request)
    {
        return route('login');
    }
}

loginにリダイレクトするって書いてるだけだ。

To create a new middleware, use the make:middleware Artisan command:

php artisan make:middleware CheckAge

This command will place a new CheckAge class within your app/Http/Middleware directory. In this middleware, we will only allow access to the route if the supplied age is greater than 200. Otherwise, we will redirect the users back to the home URI:

namespace App\Http\Middleware;

use Closure;

class CheckAge
{
/**
* Handle an incoming request.
*
* @param \Illuminate\Http\Request $request
* @param \Closure $next
* @return mixed
*/
public function handle($request, Closure $next)
{
if ($request->age <= 200) { return redirect('home'); } return $next($request); } [/code] As you can see, if the given age is less than or equal to 200, the middleware will return an HTTP redirect to the client; otherwise, the request will be passed further into the application. To pass the request deeper into the application (allowing the middleware to "pass"), call the $next callback with the $request. It's best to envision middleware as a series of "layers" HTTP requests must pass through before they hit your application. Each layer can examine the request and even reject it entirely. Tip!! All middleware are resolved via the service container, so you may type-hint any dependencies you need within a middleware's constructor.

laravel Route Model Binding

When injecting a model ID to a route or controller action, you will often query to retrieve the model that corresponds to that ID. Laravel route model binding provides a convenient way to automatically inject the model instances directly into your routes. For example, instead of injecting a user’s ID, you can inject the entire User model instance that matches the given ID.

Route::get('api/users/{user}', function (App\User $user) {
    return $user->email;
});

あーなんか集中力切れてきた。。

Customizing The Key Name
If you would like model binding to use a database column other than id when retrieving a given model class, you may override the getRouteKeyName method on the Eloquent model:

public function getRouteKeyName()
{
    return 'slug';
}

Explicit Binding
To register an explicit binding, use the router’s model method to specify the class for a given parameter. You should define your explicit model bindings in the boot method of the RouteServiceProvider class:
あ、なんか聞いたことあるぞ。

public function boot()
{
    parent::boot();

    Route::model('user', App\User::class);
}

Laravel Routing

さー楽しくなってきました。
なんかRoutingって面白いんだが、俺だけ?

Route::get('foo', function () {
    return 'Hello World';
});

/fooがきたらhello world!

All Laravel routes are defined in your route files, which are located in the routes directory. These files are automatically loaded by the framework. The routes/web.php file defines routes that are for your web interface. These routes are assigned the web middleware group, which provides features like session state and CSRF protection. The routes in routes/api.php are stateless and are assigned the api middleware group.

routes/web.phpが基本。中を見てみましょう。stringではなく、view(‘welcome’)です。

Route::get('/', function () {
    return view('welcome');
});

api.php

Route::middleware('auth:api')->get('/user', function (Request $request) {
    return $request->user();
});

Route::middlewareの意味が解ん。

channel.php

Broadcast::channel('App.User.{id}', function ($user, $id) {
    return (int) $user->id === (int) $id;
});

broadcastの意味が。。。

console.php

Artisan::command('inspire', function () {
    $this->comment(Inspiring::quote());
})->describe('Display an inspiring quote');

consoleに至ってはArtisanときたか。

userControllerをひっぱる場合

Route::get('/user', 'UserController@index');

あーこれこれ、やっときた。

Routes defined in the routes/api.php file are nested within a route group by the RouteServiceProvider. Within this group, the /api URI prefix is automatically applied so you do not need to manually apply it to every route in the file. You may modify the prefix and other route group options by modifying your RouteServiceProvider class.

Available Router Methods
The router allows you to register routes that respond to any HTTP verb:

Route::get($uri, $callback);
Route::post($uri, $callback);
Route::put($uri, $callback);
Route::patch($uri, $callback);
Route::delete($uri, $callback);
Route::options($uri, $callback);

putってなんだっけ?他はイメージできる。

Sometimes you may need to register a route that responds to multiple HTTP verbs. You may do so using the match method. Or, you may even register a route that responds to all HTTP verbs using the any method:

Route::match(['get', 'post'], '/', function () {
    //
});

Route::any('foo', function () {
    //
});

こんなのできんだーすげー

CSRF Protection
Any HTML forms pointing to POST, PUT, or DELETE routes that are defined in the web routes file should include a CSRF token field. Otherwise, the request will be rejected. You can read more about CSRF protection in the CSRF documentation:

<form method="POST" action="/profile">
    @csrf
    ...
</form>

確かlaravelはcsrfを自動でやってくれるんだっけ。

Redirect Routes
If you are defining a route that redirects to another URI, you may use the Route::redirect method. This method provides a convenient shortcut so that you do not have to define a full route or controller for performing a simple redirect:

Route::redirect('/here', '/there', 301);

routingのドキュメント読んでると、イメージが湧いてきた。
If your route only needs to return a view, you may use the Route::view method. Like the redirect method, this method provides a simple shortcut so that you do not have to define a full route or controller. The view method accepts a URI as its first argument and a view name as its second argument. In addition, you may provide an array of data to pass to the view as an optional third argument:

Route::view('/welcome', 'welcome');
Route::view('/welcome', 'welcome', ['name' => 'Taylor']);

Required Parameters
Of course, sometimes you will need to capture segments of the URI within your route. For example, you may need to capture a user’s ID from the URL. You may do so by defining route parameters:

Route::get('user/{id}', function ($id) {
    return 'User '.$id;
});

{id}は絶対使う。

Route::get('posts/{post}/comments/{comment}', function ($postId, $commentId) {
    //
});

Route parameters are always encased within {} braces and should consist of alphabetic characters, and may not contain a – character. Instead of using the – character, use an underscore (_). Route parameters are injected into route callbacks / controllers based on their order – the names of the callback / controller arguments do not matter.

Occasionally you may need to specify a route parameter, but make the presence of that route parameter optional. You may do so by placing a ? mark after the parameter name. Make sure to give the route’s corresponding variable a default value:

Route::get('user/{name?}', function ($name = null) {
    return $name;
});

Route::get('user/{name?}', function ($name = 'John') {
    return $name;
});

条件判定もできる模様

You may constrain the format of your route parameters using the where method on a route instance. The where method accepts the name of the parameter and a regular expression defining how the parameter should be constrained:

Route::get('user/{name}', function ($name) {
    //
})->where('name', '[A-Za-z]+');

Route::get('user/{id}', function ($id) {
    //
})->where('id', '[0-9]+');

Route::get('user/{id}/{name}', function ($id, $name) {
    //
})->where(['id' => '[0-9]+', 'name' => '[a-z]+']);

あーいいね、好きだわこれ。

Global Constraints
If you would like a route parameter to always be constrained by a given regular expression, you may use the pattern method. You should define these patterns in the boot method of your RouteServiceProvider:

/**
 * Define your route model bindings, pattern filters, etc.
 *
 * @return void
 */
public function boot()
{
    Route::pattern('id', '[0-9]+');

    parent::boot();
}
Route::get('user/{id}', function ($id) {
    // Only executed if {id} is numeric...
});

Named Routes
Named routes allow the convenient generation of URLs or redirects for specific routes. You may specify a name for a route by chaining the name method onto the route definition:
あれ、なにこれ。こんなのあったっけ。

Route::get('user/profile', function () {
    //
})->name('profile');
Route::get('user/profile', 'UserProfileController@show')->name('profile');

Generating URLs To Named Routes
Once you have assigned a name to a given route, you may use the route’s name when generating URLs or redirects via the global route function:

// Generating URLs...
$url = route('profile');

// Generating Redirects...
return redirect()->route('profile');

If the named route defines parameters, you may pass the parameters as the second argument to the route function. The given parameters will automatically be inserted into the URL in their correct positions:

Route::get('user/{id}/profile', function ($id) {
    //
})->name('profile');

$url = route('profile', ['id' => 1]);

Route groups allow you to share route attributes, such as middleware or namespaces, across a large number of routes without needing to define those attributes on each individual route. Shared attributes are specified in an array format as the first parameter to the Route::group method.

To assign middleware to all routes within a group, you may use the middleware method before defining the group. Middleware are executed in the order they are listed in the array:

Route::middleware(['first', 'second'])->group(function () {
    Route::get('/', function () {
        // Uses first & second Middleware
    });

    Route::get('user/profile', function () {
        // Uses first & second Middleware
    });
});

ほーmiddlewareだとgroupingですな。

Another common use-case for route groups is assigning the same PHP namespace to a group of controllers using the namespace method:
controllerのnamespaceで制御するのか。

Route::namespace('Admin')->group(function () {
    // Controllers Within The "App\Http\Controllers\Admin" Namespace
});

Remember, by default, the RouteServiceProvider includes your route files within a namespace group, allowing you to register controller routes without specifying the full App\Http\Controllers namespace prefix. So, you only need to specify the portion of the namespace that comes after the base App\Http\Controllers namespace.

Sub-Domain Routing
Route groups may also be used to handle sub-domain routing. Sub-domains may be assigned route parameters just like route URIs, allowing you to capture a portion of the sub-domain for usage in your route or controller. The sub-domain may be specified by calling the domain method before defining the group:
あれ、subdomainってDNS側の設定がいるんじゃなかったっけ?つまり、DNS側の設定をしておけば、routingで簡単にサブドメインにも適用できるってこと? これはちょっとやりたいです。

Route::domain('{account}.myapp.com')->group(function () {
    Route::get('user/{id}', function ($account, $id) {
        //
    });
});

Route Prefixes
The prefix method may be used to prefix each route in the group with a given URI. For example, you may want to prefix all route URIs within the group with admin:

Route::prefix('admin')->group(function () {
    Route::get('users', function () {
        // Matches The "/admin/users" URL
    });
});

あんまり使わないような。というかこれ、基礎!? 他のフレームワークに応用できるんかいな。

Route Name Prefixes
The name method may be used to prefix each route name in the group with a given string. For example, you may want to prefix all of the grouped route’s names with admin. The given string is prefixed to the route name exactly as it is specified, so we will be sure to provide the trailing . character in the prefix:

Route::name('admin.')->group(function () {
    Route::get('users', function () {
        // Route assigned name "admin.users"...
    })->name('users');
});

Laravel contract

contractって契約。社会人になると契約って言葉の響きは重い。

Laravel’s Contracts are a set of interfaces that define the core services provided by the framework. For example, a Illuminate\Contracts\Queue\Queue contract defines the methods needed for queueing jobs, while the Illuminate\Contracts\Mail\Mailer contract defines the methods needed for sending e-mail.

Each contract has a corresponding implementation provided by the framework. For example, Laravel provides a queue implementation with a variety of drivers, and a mailer implementation that is powered by SwiftMailer.

All of the Laravel contracts live in their own GitHub repository. This provides a quick reference point for all available contracts, as well as a single, decoupled package that may be utilized by package developers.
laravelでいうcontractって、契約までいかず、約束事ってニュアンスの方が近そうだ。

Contracts Vs. Facades
Laravel’s facades and helper functions provide a simple way of utilizing Laravel’s services without needing to type-hint and resolve contracts out of the service container. In most cases, each facade has an equivalent contract.

Unlike facades, which do not require you to require them in your class’ constructor, contracts allow you to define explicit dependencies for your classes. Some developers prefer to explicitly define their dependencies in this way and therefore prefer to use contracts, while other developers enjoy the convenience of facades.

Tip!! Most applications will be fine regardless of whether you prefer facades or contracts. However, if you are building a package, you should strongly consider using contracts since they will be easier to test in a package context.

When To Use Contracts
As discussed elsewhere, much of the decision to use contracts or facades will come down to personal taste and the tastes of your development team. Both contracts and facades can be used to create robust, well-tested Laravel applications. As long as you are keeping your class’ responsibilities focused, you will notice very few practical differences between using contracts and facades.

However, you may still have several questions regarding contracts. For example, why use interfaces at all? Isn’t using interfaces more complicated? Let’s distill the reasons for using interfaces to the following headings: loose coupling and simplicity.
なんかfacadesとcontractが同列で扱われています。

Loose Coupling
First, let’s review some code that is tightly coupled to a cache implementation. Consider the following:
cacheってよくsample codeに出てくるなー

namespace App\Orders;

class Repository
{
    /**
     * The cache instance.
     */
    protected $cache;

    /**
     * Create a new repository instance.
     *
     * @param  \SomePackage\Cache\Memcached  $cache
     * @return void
     */
    public function __construct(\SomePackage\Cache\Memcached $cache)
    {
        $this->cache = $cache;
    }

    /**
     * Retrieve an Order by ID.
     *
     * @param  int  $id
     * @return Order
     */
    public function find($id)
    {
        if ($this->cache->has($id))    {
            //
        }
    }
}

In this class, the code is tightly coupled to a given cache implementation. It is tightly coupled because we are depending on a concrete Cache class from a package vendor. If the API of that package changes our code must change as well.

Likewise, if we want to replace our underlying cache technology (Memcached) with another technology (Redis), we again will have to modify our repository. Our repository should not have so much knowledge regarding who is providing them data or how they are providing it.

Instead of this approach, we can improve our code by depending on a simple, vendor agnostic interface:

namespace App\Orders;

use Illuminate\Contracts\Cache\Repository as Cache;

class Repository
{
    /**
     * The cache instance.
     */
    protected $cache;

    /**
     * Create a new repository instance.
     *
     * @param  Cache  $cache
     * @return void
     */
    public function __construct(Cache $cache)
    {
        $this->cache = $cache;
    }
}

Simplicity
When all of Laravel’s services are neatly defined within simple interfaces, it is very easy to determine the functionality offered by a given service. The contracts serve as succinct documentation to the framework’s features.

In addition, when you depend on simple interfaces, your code is easier to understand and maintain. Rather than tracking down which methods are available to you within a large, complicated class, you can refer to a simple, clean interface.
他のフレームワークを深く勉強してないから、例えばrailsやcakeと比べてlaravelがシンプルとはいいがたい。ディレクトリ構成は違う。controllerの書き方は、分かり易そうではある。

How To Use Contracts
So, how do you get an implementation of a contract? It’s actually quite simple.

Many types of classes in Laravel are resolved through the service container, including controllers, event listeners, middleware, queued jobs, and even route Closures. So, to get an implementation of a contract, you can just “type-hint” the interface in the constructor of the class being resolved.

For example, take a look at this event listener:

namespace App\Listeners;

use App\User;
use App\Events\OrderWasPlaced;
use Illuminate\Contracts\Redis\Database;

class CacheOrderInformation
{
    /**
     * The Redis database implementation.
     */
    protected $redis;

    /**
     * Create a new event handler instance.
     *
     * @param  Database  $redis
     * @return void
     */
    public function __construct(Database $redis)
    {
        $this->redis = $redis;
    }

    /**
     * Handle the event.
     *
     * @param  OrderWasPlaced  $event
     * @return void
     */
    public function handle(OrderWasPlaced $event)
    {
        //
    }
}

When the event listener is resolved, the service container will read the type-hints on the constructor of the class, and inject the appropriate value. To learn more about registering things in the service container, check out its documentation.

illuminateのcontractの中に更にilluminateが入ってるみたいだ。

Illuminate\Contracts\Auth\Access\Authorizable
Illuminate\Contracts\Auth\Access\Gate Gate
Illuminate\Contracts\Auth\Authenticatable
Illuminate\Contracts\Auth\CanResetPassword
Illuminate\Contracts\Auth\Factory Auth
Illuminate\Contracts\Auth\Guard Auth::guard()
Illuminate\Contracts\Auth\PasswordBroker Password::broker()
Illuminate\Contracts\Auth\PasswordBrokerFactory Password
Illuminate\Contracts\Auth\StatefulGuard
Illuminate\Contracts\Auth\SupportsBasicAuth
Illuminate\Contracts\Auth\UserProvider
Illuminate\Contracts\Bus\Dispatcher Bus
Illuminate\Contracts\Bus\QueueingDispatcher Bus::dispatchToQueue()
Illuminate\Contracts\Broadcasting\Factory Broadcast
Illuminate\Contracts\Broadcasting\Broadcaster Broadcast::connection()
Illuminate\Contracts\Broadcasting\ShouldBroadcast
Illuminate\Contracts\Broadcasting\ShouldBroadcastNow
Illuminate\Contracts\Cache\Factory Cache
Illuminate\Contracts\Cache\Lock
Illuminate\Contracts\Cache\LockProvider
Illuminate\Contracts\Cache\Repository Cache::driver()
Illuminate\Contracts\Cache\Store
Illuminate\Contracts\Config\Repository Config
Illuminate\Contracts\Console\Application
Illuminate\Contracts\Console\Kernel Artisan
Illuminate\Contracts\Container\Container App
Illuminate\Contracts\Cookie\Factory Cookie
Illuminate\Contracts\Cookie\QueueingFactory Cookie::queue()
Illuminate\Contracts\Database\ModelIdentifier
Illuminate\Contracts\Debug\ExceptionHandler
Illuminate\Contracts\Encryption\Encrypter Crypt
Illuminate\Contracts\Events\Dispatcher Event
Illuminate\Contracts\Filesystem\Cloud Storage::cloud()
Illuminate\Contracts\Filesystem\Factory Storage
Illuminate\Contracts\Filesystem\Filesystem Storage::disk()
Illuminate\Contracts\Foundation\Application App
Illuminate\Contracts\Hashing\Hasher Hash
Illuminate\Contracts\Http\Kernel
Illuminate\Contracts\Mail\MailQueue Mail::queue()
Illuminate\Contracts\Mail\Mailable
Illuminate\Contracts\Mail\Mailer Mail
Illuminate\Contracts\Notifications\Dispatcher Notification
Illuminate\Contracts\Notifications\Factory Notification
Illuminate\Contracts\Pagination\LengthAwarePaginator
Illuminate\Contracts\Pagination\Paginator
Illuminate\Contracts\Pipeline\Hub
Illuminate\Contracts\Pipeline\Pipeline
Illuminate\Contracts\Queue\EntityResolver
Illuminate\Contracts\Queue\Factory Queue
Illuminate\Contracts\Queue\Job
Illuminate\Contracts\Queue\Monitor Queue
Illuminate\Contracts\Queue\Queue Queue::connection()
Illuminate\Contracts\Queue\QueueableCollection
Illuminate\Contracts\Queue\QueueableEntity
Illuminate\Contracts\Queue\ShouldQueue
Illuminate\Contracts\Redis\Factory Redis
Illuminate\Contracts\Routing\BindingRegistrar Route
Illuminate\Contracts\Routing\Registrar Route
Illuminate\Contracts\Routing\ResponseFactory Response
Illuminate\Contracts\Routing\UrlGenerator URL
Illuminate\Contracts\Routing\UrlRoutable
Illuminate\Contracts\Session\Session Session::driver()
Illuminate\Contracts\Support\Arrayable
Illuminate\Contracts\Support\Htmlable
Illuminate\Contracts\Support\Jsonable
Illuminate\Contracts\Support\MessageBag
Illuminate\Contracts\Support\MessageProvider
Illuminate\Contracts\Support\Renderable
Illuminate\Contracts\Support\Responsable
Illuminate\Contracts\Translation\Loader
Illuminate\Contracts\Translation\Translator Lang
Illuminate\Contracts\Validation\Factory Validator
Illuminate\Contracts\Validation\ImplicitRule
Illuminate\Contracts\Validation\Rule
Illuminate\Contracts\Validation\ValidatesWhenResolved
Illuminate\Contracts\Validation\Validator Validator::make()
Illuminate\Contracts\View\Engine
Illuminate\Contracts\View\Factory View
Illuminate\Contracts\View\View View::make()

よし、いよいよ The Basic!

Facades

Facades…正面
また変な単語が出てきた。もーいい加減にしてくれ。

Introduction
Facades provide a “static” interface to classes that are available in the application’s service container. Laravel ships with many facades which provide access to almost all of Laravel’s features. Laravel facades serve as “static proxies” to underlying classes in the service container, providing the benefit of a terse, expressive syntax while maintaining more testability and flexibility than traditional static methods.

use Illuminate\Support\Facades\Cache;

Route::get('/cache', function () {
    return Cache::get('key');
});

Throughout the Laravel documentation, many of the examples will use facades to demonstrate various features of the framework.

When To Use Facades
Facades have many benefits. They provide a terse, memorable syntax that allows you to use Laravel’s features without remembering long class names that must be injected or configured manually. Furthermore, because of their unique usage of PHP’s dynamic methods, they are easy to test.

However, some care must be taken when using facades. The primary danger of facades is class scope creep. Since facades are so easy to use and do not require injection, it can be easy to let your classes continue to grow and use many facades in a single class. Using dependency injection, this potential is mitigated by the visual feedback a large constructor gives you that your class is growing too large. So, when using facades, pay special attention to the size of your class so that its scope of responsibility stays narrow.
なんだ、facadeがstatic interfaceってのはわかるが、イマイチわからんぞ。

use Illuminate\Support\Facades\Cache;

Route::get('/cache', function () {
    return Cache::get('key');
});

facadesの下層にchacheがある。
We can write the following test to verify that the Cache::get method was called with the argument we expected:

use Illuminate\Support\Facades\Cache;

/**
 * A basic functional test example.
 *
 * @return void
 */
public function testBasicExample()
{
    Cache::shouldReceive('get')
         ->with('key')
         ->andReturn('value');

    $this->visit('/cache')
         ->see('value');
}

basicといっても、テストしずらいなー

Facades Vs. Helper Functions
In addition to facades, Laravel includes a variety of “helper” functions which can perform common tasks like generating views, firing events, dispatching jobs, or sending HTTP responses. Many of these helper functions perform the same function as a corresponding facade. For example, this facade call and helper call are equivalent:

return View::make('profile');

return view('profile');

There is absolutely no practical difference between facades and helper functions. When using helper functions, you may still test them exactly as you would the corresponding facade. For example, given the following route:

Route::get('/cache', function () {
    return cache('key');
});

helperとfacadeは違うんだな。helperはlibraryみたいなもんだという認識います。
Under the hood, the cache helper is going to call the get method on the class underlying the Cache facade. So, even though we are using the helper function, we can write the following test to verify that the method was called with the argument we expected:
こちらはfacade

use Illuminate\Support\Facades\Cache;

/**
 * A basic functional test example.
 *
 * @return void
 */
public function testBasicExample()
{
    Cache::shouldReceive('get')
         ->with('key')
         ->andReturn('value');

    $this->visit('/cache')
         ->see('value');
}

How Facades Work
In a Laravel application, a facade is a class that provides access to an object from the container. The machinery that makes this work is in the Facade class. Laravel’s facades, and any custom facades you create, will extend the base Illuminate\Support\Facades\Facade class.

The Facade base class makes use of the __callStatic() magic-method to defer calls from your facade to an object resolved from the container. In the example below, a call is made to the Laravel cache system. By glancing at this code, one might assume that the static method get is being called on the Cache class:

namespace App\Http\Controllers;

use App\Http\Controllers\Controller;
use Illuminate\Support\Facades\Cache;

class UserController extends Controller
{
    /**
     * Show the profile for the given user.
     *
     * @param  int  $id
     * @return Response
     */
    public function showProfile($id)
    {
        $user = Cache::get('user:'.$id);

        return view('profile', ['user' => $user]);
    }
}

Notice that near the top of the file we are “importing” the Cache facade. This facade serves as a proxy to accessing the underlying implementation of the Illuminate\Contracts\Cache\Factory interface. Any calls we make using the facade will be passed to the underlying instance of Laravel’s cache service.

If we look at that Illuminate\Support\Facades\Cache class, you’ll see that there is no static method get:

class Cache extends Facade
{
    /**
     * Get the registered name of the component.
     *
     * @return string
     */
    protected static function getFacadeAccessor() { return 'cache'; }
}

Instead, the Cache facade extends the base Facade class and defines the method getFacadeAccessor(). This method’s job is to return the name of a service container binding. When a user references any static method on the Cache facade, Laravel resolves the cache binding from the service container and runs the requested method (in this case, get) against that object.

Real-Time Facades
Using real-time facades, you may treat any class in your application as if it were a facade. To illustrate how this can be used, let’s examine an alternative. For example, let’s assume our Podcast model has a publish method. However, in order to publish the podcast, we need to inject a Publisher instance:

namespace App;

use App\Contracts\Publisher;
use Illuminate\Database\Eloquent\Model;

class Podcast extends Model
{
    /**
     * Publish the podcast.
     *
     * @param  Publisher  $publisher
     * @return void
     */
    public function publish(Publisher $publisher)
    {
        $this->update(['publishing' => now()]);

        $publisher->publish($this);
    }
}

Injecting a publisher implementation into the method allows us to easily test the method in isolation since we can mock the injected publisher. However, it requires us to always pass a publisher instance each time we call the publish method. Using real-time facades, we can maintain the same testability while not being required to explicitly pass a Publisher instance. To generate a real-time facade, prefix the namespace of the imported class with Facades:

namespace App;

use Facades\App\Contracts\Publisher;
use Illuminate\Database\Eloquent\Model;

class Podcast extends Model
{
    /**
     * Publish the podcast.
     *
     * @return void
     */
    public function publish()
    {
        $this->update(['publishing' => now()]);

        Publisher::publish($this);
    }
}

Facades\App\Contracts なんてあったけ。
ところで、Illuminateって。。

あ、laravel/framework/src/illuminateの下に見つけた!
これ読みに行ってんのか~なるほどなるほど。

namespace Tests\Feature;

use App\Podcast;
use Tests\TestCase;
use Facades\App\Contracts\Publisher;
use Illuminate\Foundation\Testing\RefreshDatabase;

class PodcastTest extends TestCase
{
    use RefreshDatabase;

    /**
     * A test example.
     *
     * @return void
     */
    public function test_podcast_can_be_published()
    {
        $podcast = factory(Podcast::class)->create();

        Publisher::shouldReceive('publish')->once()->with($podcast);

        $podcast->publish();
    }
}

Below you will find every facade and its underlying class. This is a useful tool for quickly digging into the API documentation for a given facade root. The service container binding key is also included where applicable.

App Illuminate\Foundation\Application app
Artisan Illuminate\Contracts\Console\Kernel artisan
Auth Illuminate\Auth\AuthManager auth
Auth (Instance) Illuminate\Contracts\Auth\Guard auth.driver
Blade Illuminate\View\Compilers\BladeCompiler blade.compiler
Broadcast Illuminate\Contracts\Broadcasting\Factory
Broadcast (Instance) Illuminate\Contracts\Broadcasting\Broadcaster
Bus Illuminate\Contracts\Bus\Dispatcher
Cache Illuminate\Cache\CacheManager cache
Cache (Instance) Illuminate\Cache\Repository cache.store
Config Illuminate\Config\Repository config
Cookie Illuminate\Cookie\CookieJar cookie
Crypt Illuminate\Encryption\Encrypter encrypter
DB Illuminate\Database\DatabaseManager db
DB (Instance) Illuminate\Database\Connection db.connection
Event Illuminate\Events\Dispatcher events
File Illuminate\Filesystem\Filesystem files
Gate Illuminate\Contracts\Auth\Access\Gate
Hash Illuminate\Contracts\Hashing\Hasher hash
Lang Illuminate\Translation\Translator translator
Log Illuminate\Log\Logger log
Mail Illuminate\Mail\Mailer mailer
Notification Illuminate\Notifications\ChannelManager
Password Illuminate\Auth\Passwords\PasswordBrokerManager auth.password
Password (Instance) Illuminate\Auth\Passwords\PasswordBroker auth.password.broker
Queue Illuminate\Queue\QueueManager queue
Queue (Instance) Illuminate\Contracts\Queue\Queue queue.connection
Queue (Base Class) Illuminate\Queue\Queue
Redirect Illuminate\Routing\Redirector redirect
Redis Illuminate\Redis\RedisManager redis
Redis (Instance) Illuminate\Redis\Connections\Connection redis.connection
Request Illuminate\Http\Request request
Response Illuminate\Contracts\Routing\ResponseFactory
Response (Instance) Illuminate\Http\Response
Route Illuminate\Routing\Router router
Schema Illuminate\Database\Schema\Builder
Session Illuminate\Session\SessionManager session
Session (Instance) Illuminate\Session\Store session.store
Storage Illuminate\Filesystem\FilesystemManager filesystem
Storage (Instance) Illuminate\Contracts\Filesystem\Filesystem filesystem.disk
URL Illuminate\Routing\UrlGenerator url
Validator Illuminate\Validation\Factory validator
Validator (Instance) Illuminate\Validation\Validator
View Illuminate\View\Factory view
View (Instance) Illuminate\View\View

うわ、class読み込みまくってる。
vendorにロジックが全て詰まってるやんけ。つまり、config/appとかは、framework使う人向けで、laravel開発している人はvendorの方を作ってる。
うあーすげーな。

Laravel Service Providers

何?? まだあんのかよー、これ。気合の入れるところか。
Service providers are the central place of all Laravel application bootstrapping. Your own application, as well as all of Laravel’s core services are bootstrapped via service providers.

But, what do we mean by “bootstrapped”? In general, we mean registering things, including registering service container bindings, event listeners, middleware, and even routes. Service providers are the central place to configure your application.

If you open the config/app.php file included with Laravel, you will see a providers array. These are all of the service provider classes that will be loaded for your application. Of course, many of these are “deferred” providers, meaning they will not be loaded on every request, but only when the services they provide are actually needed.

In this overview you will learn how to write your own service providers and register them with your Laravel application.

config/app.phpのproviderを見てみます。

'providers' => [

        /*
         * Laravel Framework Service Providers...
         */
        Illuminate\Auth\AuthServiceProvider::class,
        Illuminate\Broadcasting\BroadcastServiceProvider::class,
        Illuminate\Bus\BusServiceProvider::class,
        Illuminate\Cache\CacheServiceProvider::class,
        Illuminate\Foundation\Providers\ConsoleSupportServiceProvider::class,
        Illuminate\Cookie\CookieServiceProvider::class,
        Illuminate\Database\DatabaseServiceProvider::class,
        Illuminate\Encryption\EncryptionServiceProvider::class,
        Illuminate\Filesystem\FilesystemServiceProvider::class,
        Illuminate\Foundation\Providers\FoundationServiceProvider::class,
        Illuminate\Hashing\HashServiceProvider::class,
        Illuminate\Mail\MailServiceProvider::class,
        Illuminate\Notifications\NotificationServiceProvider::class,
        Illuminate\Pagination\PaginationServiceProvider::class,
        Illuminate\Pipeline\PipelineServiceProvider::class,
        Illuminate\Queue\QueueServiceProvider::class,
        Illuminate\Redis\RedisServiceProvider::class,
        Illuminate\Auth\Passwords\PasswordResetServiceProvider::class,
        Illuminate\Session\SessionServiceProvider::class,
        Illuminate\Translation\TranslationServiceProvider::class,
        Illuminate\Validation\ValidationServiceProvider::class,
        Illuminate\View\ViewServiceProvider::class,

serviceproviderの前に名称があります。providerって、frameworkの機能みたいだ。主要な機能がそろってる。

providers contain a register and a boot method. Within the register method, you should only bind things into the service container. You should never attempt to register any event listeners, routes, or any other piece of functionality within the register method.

The Artisan CLI can generate a new provider via the make:provider command:

php artisan make:provider RiakServiceProvider

ほう、けっこーカスタマイズ自由ですな。

The Register Method
As mentioned previously, within the register method, you should only bind things into the service container. You should never attempt to register any event listeners, routes, or any other piece of functionality within the register method. Otherwise, you may accidentally use a service that is provided by a service provider which has not loaded yet.

Let’s take a look at a basic service provider. Within any of your service provider methods, you always have access to the $app property which provides access to the service container:
あれ、registerってログインじゃないよね。

namespace App\Providers;

use Riak\Connection;
use Illuminate\Support\ServiceProvider;

class RiakServiceProvider extends ServiceProvider
{
    /**
     * Register bindings in the container.
     *
     * @return void
     */
    public function register()
    {
        $this->app->singleton(Connection::class, function ($app) {
            return new Connection(config('riak'));
        });
    }
}

serviceProviderをextendsしている。なんだconfig(‘riak’)って?
This service provider only defines a register method, and uses that method to define an implementation of Riak\Connection in the service container. If you don’t understand how the service container works, check out its documentation
あ、そっか、config/app.phpでserviceproviderを定義してるんだ。なるほど! これはフレームワークの勉強にもなります。

The bindings And singletons Properties
If your service provider registers many simple bindings, you may wish to use the bindings and singletons properties instead of manually registering each container binding. When the service provider is loaded by the framework, it will automatically check for these properties and register their bindings:

namespace App\Providers;

use App\Contracts\ServerProvider;
use App\Contracts\DowntimeNotifier;
use Illuminate\Support\ServiceProvider;
use App\Services\PingdomDowntimeNotifier;
use App\Services\DigitalOceanServerProvider;

class AppServiceProvider extends ServiceProvider
{
    /**
     * All of the container bindings that should be registered.
     *
     * @var array
     */
    public $bindings = [
        ServerProvider::class => DigitalOceanServerProvider::class,
    ];

    /**
     * All of the container singletons that should be registered.
     *
     * @var array
     */
    public $singletons = [
        DowntimeNotifier::class => PingdomDowntimeNotifier::class,
    ];
}

別にserviceProviderを絞る意味が分からんのだが。まーいーか。

The Boot Method
So, what if we need to register a view composer within our service provider? This should be done within the boot method. This method is called after all other service providers have been registered, meaning you have access to all other services that have been registered by the framework:

namespace App\Providers;
use Illuminate\Support\ServiceProvider;
class ComposerServiceProvider extends ServiceProvider
{
    /**
     * Bootstrap any application services.
     *
     * @return void
     */
    public function boot()
    {
        view()->composer('view', function () {
            //
        });
    }
}

Boot Method Dependency Injection
You may type-hint dependencies for your service provider’s boot method. The service container will automatically inject any dependencies you need:

use Illuminate\Contracts\Routing\ResponseFactory;

public function boot(ResponseFactory $response)
{
    $response->macro('caps', function ($value) {
        //
    });
}

All service providers are registered in the config/app.php configuration file. This file contains a providers array where you can list the class names of your service providers. By default, a set of Laravel core service providers are listed in this array. These providers bootstrap the core Laravel components, such as the mailer, queue, cache, and others.

To register your provider, add it to the array:

'providers' => [
    // Other Service Providers

    App\Providers\ComposerServiceProvider::class,
],

あ、これ面白いね。このへん触りだしたら中級者です。素人ではない。

If your provider is only registering bindings in the service container, you may choose to defer its registration until one of the registered bindings is actually needed. Deferring the loading of such a provider will improve the performance of your application, since it is not loaded from the filesystem on every request.

Laravel compiles and stores a list of all of the services supplied by deferred service providers, along with the name of its service provider class. Then, only when you attempt to resolve one of these services does Laravel load the service provider.

To defer the loading of a provider, set the defer property to true and define a provides method. The provides method should return the service container bindings registered by the provider:

namespace App\Providers;
use Riak\Connection;
use Illuminate\Support\ServiceProvider;

class RiakServiceProvider extends ServiceProvider
{
    /**
     * Indicates if loading of the provider is deferred.
     *
     * @var bool
     */
    protected $defer = true;

    /**
     * Register the service provider.
     *
     * @return void
     */
    public function register()
    {
        $this->app->singleton(Connection::class, function ($app) {
            return new Connection($app['config']['riak']);
        });
    }

    /**
     * Get the services provided by the provider.
     *
     * @return array
     */
    public function provides()
    {
        return [Connection::class];
    }

}

Contextual Binding

Sometimes you may have two classes that utilize the same interface, but you wish to inject different implementations into each class. For example, two controllers may depend on different implementations of the Illuminate\Contracts\Filesystem\Filesystem contract. Laravel provides a simple, fluent interface for defining this behavior:

use Illuminate\Support\Facades\Storage;
use App\Http\Controllers\PhotoController;
use App\Http\Controllers\VideoController;
use Illuminate\Contracts\Filesystem\Filesystem;

$this->app->when(PhotoController::class)
          ->needs(Filesystem::class)
          ->give(function () {
              return Storage::disk('local');
          });

$this->app->when([VideoController::class, UploadController::class])
          ->needs(Filesystem::class)
          ->give(function () {
              return Storage::disk('s3');
          });

Tagging
Occasionally, you may need to resolve all of a certain “category” of binding. For example, perhaps you are building a report aggregator that receives an array of many different Report interface implementations. After registering the Report implementations, you can assign them a tag using the tag method:

$this->app->bind('SpeedReport', function () {
    //
});

$this->app->bind('MemoryReport', function () {
    //
});

$this->app->tag(['SpeedReport', 'MemoryReport'], 'reports');

Once the services have been tagged, you may easily resolve them all via the tagged method:

$this->app->bind('ReportAggregator', function ($app) {
    return new ReportAggregator($app->tagged('reports'));
});

Extending Bindings
The extend method allows the modification of resolved services. For example, when a service is resolved, you may run additional code to decorate or configure the service. The extend method accepts a Closure, which should return the modified service, as its only argument:

$this->app->extend(Service::class, function ($service) {
    return new DecoratedService($service);
});

なに、要するにmiddleware?

Resolving
The make Method
You may use the make method to resolve a class instance out of the container. The make method accepts the name of the class or interface you wish to resolve:

$api = $this->app->make('HelpSpot\API');

Automatic Injection
Alternatively, and importantly, you may “type-hint” the dependency in the constructor of a class that is resolved by the container, including controllers, event listeners, queue jobs, middleware, and more. In practice, this is how most of your objects should be resolved by the container.

For example, you may type-hint a repository defined by your application in a controller’s constructor. The repository will automatically be resolved and injected into the class:

<?php

namespace App\Http\Controllers;

use App\Users\Repository as UserRepository;

class UserController extends Controller
{
    /**
     * The user repository instance.
     */
    protected $users;

    /**
     * Create a new controller instance.
     *
     * @param  UserRepository  $users
     * @return void
     */
    public function __construct(UserRepository $users)
    {
        $this->users = $users;
    }

    /**
     * Show the user with the given ID.
     *
     * @param  int  $id
     * @return Response
     */
    public function show($id)
    {
        //
    }
}

Container Events
The service container fires an event each time it resolves an object. You may listen to this event using the resolving method:

$this->app->resolving(function ($object, $app) {
    // Called when container resolves object of any type...
});

$this->app->resolving(HelpSpot\API::class, function ($api, $app) {
    // Called when container resolves objects of type "HelpSpot\API"...
});

なんか、後半よくわかんなくなってきたw

Laravel Service Container

service containerって、dockerのこと!?
The Laravel service container is a powerful tool for managing class dependencies and performing dependency injection. Dependency injection is a fancy phrase that essentially means this: class dependencies are “injected” into the class via the constructor or, in some cases, “setter” methods.

Let’s look at a simple example:

<?php

namespace App\Http\Controllers;

use App\User;
use App\Repositories\UserRepository;
use App\Http\Controllers\Controller;

class UserController extends Controller
{
    /**
     * The user repository implementation.
     *
     * @var UserRepository
     */
    protected $users;

    /**
     * Create a new controller instance.
     *
     * @param  UserRepository  $users
     * @return void
     */
    public function __construct(UserRepository $users)
    {
        $this->users = $users;
    }

    /**
     * Show the profile for the given user.
     *
     * @param  int  $id
     * @return Response
     */
    public function show($id)
    {
        $user = $this->users->find($id);

        return view('user.profile', ['user' => $user]);
    }
}

class UserControllerなので、userControllerです。
protected $userなので、変数の$userはこのclass内のみ
$this->usersで$usersを定義
user.profileを表示

In this example, the UserController needs to retrieve users from a data source. So, we will inject a service that is able to retrieve users. In this context, our UserRepository most likely uses Eloquent to retrieve user information from the database. However, since the repository is injected, we are able to easily swap it out with another implementation. We are also able to easily “mock”, or create a dummy implementation of the UserRepository when testing our application.
retrieveは検索
Eloquent 雄弁
コンテナの理解は強力 って言ってる。早くいってよ、それ。

Binding Basics
Almost all of your service container bindings will be registered within service providers, so most of these examples will demonstrate using the container in that context.

Tip!! There is no need to bind classes into the container if they do not depend on any interfaces. The container does not need to be instructed on how to build these objects, since it can automatically resolve these objects using reflection.

Simple Bindings
Within a service provider, you always have access to the container via the $this->app property. We can register a binding using the bind method, passing the class or interface name that we wish to register along with a Closure that returns an instance of the class:

$this->app->bind('HelpSpot\API', function ($app) {
    return new HelpSpot\API($app->make('HttpClient'));
});

Binding A Singleton
The singleton method binds a class or interface into the container that should only be resolved one time. Once a singleton binding is resolved, the same object instance will be returned on subsequent calls into the container:

$this->app->singleton('HelpSpot\API', function ($app) {
    return new HelpSpot\API($app->make('HttpClient'));
});

Binding Instances
You may also bind an existing object instance into the container using the instance method. The given instance will always be returned on subsequent calls into the container:

$api = new HelpSpot\API(new HttpClient);

$this->app->instance('HelpSpot\API', $api);

Binding Primitives
Sometimes you may have a class that receives some injected classes, but also needs an injected primitive value such as an integer. You may easily use contextual binding to inject any value your class may need:

$this->app->when('App\Http\Controllers\UserController')
          ->needs('$variableName')
          ->give($value);

bindingってどれも$this->appだな。

A very powerful feature of the service container is its ability to bind an interface to a given implementation. For example, let’s assume we have an EventPusher interface and a RedisEventPusher implementation. Once we have coded our RedisEventPusher implementation of this interface, we can register it with the service container like so:
なんだ、bindingはよっぽど強力らしい。

$this->app->bind(
    'App\Contracts\EventPusher',
    'App\Services\RedisEventPusher'
);

This statement tells the container that it should inject the RedisEventPusher when a class needs an implementation of EventPusher. Now we can type-hint the EventPusher interface in a constructor, or any other location where dependencies are injected by the service container:

use App\Contracts\EventPusher;

/**
 * Create a new class instance.
 *
 * @param  EventPusher  $pusher
 * @return void
 */
public function __construct(EventPusher $pusher)
{
    $this->pusher = $pusher;
}

つーかなにこれ、laravelのclass覚えんのかよ。

Laravel Request Lifecycle

このへんはコーディングというより設計思想などか?

Introduction
When using any tool in the “real world”, you feel more confident if you understand how that tool works. Application development is no different. When you understand how your development tools function, you feel more comfortable and confident using them.

The goal of this document is to give you a good, high-level overview of how the Laravel framework works. By getting to know the overall framework better, everything feels less “magical” and you will be more confident building your applications. If you don’t understand all of the terms right away, don’t lose heart! Just try to get a basic grasp of what is going on, and your knowledge will grow as you explore other sections of the documentation

Lifecycle Overview
First Things
The entry point for all requests to a Laravel application is the public/index.php file. All requests are directed to this file by your web server (Apache / Nginx) configuration. The index.php file doesn’t contain much code. Rather, it is a starting point for loading the rest of the framework.

The index.php file loads the Composer generated autoloader definition, and then retrieves an instance of the Laravel application from bootstrap/app.php script. The first action taken by Laravel itself is to create an instance of the application / service container
/public/index.phpは公開ファイルです。

HTTP / Console Kernels
Next, the incoming request is sent to either the HTTP kernel or the console kernel, depending on the type of request that is entering the application. These two kernels serve as the central location that all requests flow through. For now, let’s just focus on the HTTP kernel, which is located in app/Http/Kernel.php.
kernel? よく出てくるけど。

middlewareの読み込みclassが記載されてます。

namespace App\Http;

use Illuminate\Foundation\Http\Kernel as HttpKernel;

class Kernel extends HttpKernel
{
    /**
     * The application's global HTTP middleware stack.
     *
     * These middleware are run during every request to your application.
     *
     * @var array
     */
    protected $middleware = [
        \App\Http\Middleware\CheckForMaintenanceMode::class,
        \Illuminate\Foundation\Http\Middleware\ValidatePostSize::class,
        \App\Http\Middleware\TrimStrings::class,
        \Illuminate\Foundation\Http\Middleware\ConvertEmptyStringsToNull::class,
        \App\Http\Middleware\TrustProxies::class,
    ];

    /**
     * The application's route middleware groups.
     *
     * @var array
     */
    protected $middlewareGroups = [
        'web' => [
            \App\Http\Middleware\EncryptCookies::class,
            \Illuminate\Cookie\Middleware\AddQueuedCookiesToResponse::class,
            \Illuminate\Session\Middleware\StartSession::class,
            // \Illuminate\Session\Middleware\AuthenticateSession::class,
            \Illuminate\View\Middleware\ShareErrorsFromSession::class,
            \App\Http\Middleware\VerifyCsrfToken::class,
            \Illuminate\Routing\Middleware\SubstituteBindings::class,
        ],

        'api' => [
            'throttle:60,1',
            'bindings',
        ],
    ];

    /**
     * The application's route middleware.
     *
     * These middleware may be assigned to groups or used individually.
     *
     * @var array
     */
    protected $routeMiddleware = [
        'auth' => \App\Http\Middleware\Authenticate::class,
        'auth.basic' => \Illuminate\Auth\Middleware\AuthenticateWithBasicAuth::class,
        'bindings' => \Illuminate\Routing\Middleware\SubstituteBindings::class,
        'cache.headers' => \Illuminate\Http\Middleware\SetCacheHeaders::class,
        'can' => \Illuminate\Auth\Middleware\Authorize::class,
        'guest' => \App\Http\Middleware\RedirectIfAuthenticated::class,
        'signed' => \Illuminate\Routing\Middleware\ValidateSignature::class,
        'throttle' => \Illuminate\Routing\Middleware\ThrottleRequests::class,
        'verified' => \Illuminate\Auth\Middleware\EnsureEmailIsVerified::class,
    ];
}

The HTTP kernel extends the Illuminate\Foundation\Http\Kernel class, which defines an array of bootstrappers that will be run before the request is executed. These bootstrappers configure error handling, configure logging, detect the application environment, and perform other tasks that need to be done before the request is actually handled.

The HTTP kernel also defines a list of HTTP middleware that all requests must pass through before being handled by the application. These middleware handle reading and writing the HTTP session, determining if the application is in maintenance mode, verifying the CSRF token, and more.

The method signature for the HTTP kernel’s handle method is quite simple: receive a Request and return a Response. Think of the Kernel as being a big black box that represents your entire application. Feed it HTTP requests and it will return HTTP responses.
なるほど、

Service Providers
One of the most important Kernel bootstrapping actions is loading the service providers for your application. All of the service providers for the application are configured in the config/app.php configuration file’s providers array. First, the register method will be called on all providers, then, once all providers have been registered, the boot method will be called.

Service providers are responsible for bootstrapping all of the framework’s various components, such as the database, queue, validation, and routing components. Since they bootstrap and configure every feature offered by the framework, service providers are the most important aspect of the entire Laravel bootstrap process

Dispatch Request
Once the application has been bootstrapped and all service providers have been registered, the Request will be handed off to the router for dispatching. The router will dispatch the request to a route or controller, as well as run any route specific middleware.

Focus On Service Providers
Service providers are truly the key to bootstrapping a Laravel application. The application instance is created, the service providers are registered, and the request is handed to the bootstrapped application. It’s really that simple!

Having a firm grasp of how a Laravel application is built and bootstrapped via service providers is very valuable. Of course, your application’s default service providers are stored in the app/Providers directory.

By default, the AppServiceProvider is fairly empty. This provider is a great place to add your application’s own bootstrapping and service container bindings. Of course, for large applications, you may wish to create several service providers, each with a more granular type of bootstrapping.