
[vagrant@localhost ~]$ cd cake
[vagrant@localhost cake]$ cd myblog
[vagrant@localhost myblog]$ bin/cake bake migration_snapshot Initial

Welcome to CakePHP v3.3.8 Console
---------------------------------------------------------------
App : src
Path: /home/vagrant/cake/myblog/src/
PHP : 5.6.27
---------------------------------------------------------------
[vagrant@localhost myblog]$ bin/cake migrations status
Welcome to CakePHP v3.3.8 Console

 Status  Migration ID    Migration Name
-----------------------------------------
     up  20161118150335  Initial
[vagrant@localhost myblog]$ bin/cake bake migration CreateComments post_id:integer body;string created modified

 Status  Migration ID    Migration Name
-----------------------------------------
     up  20161118150335  Initial
   down  20161118150459  CreateComments


[vagrant@localhost myblog]$ bin/cake migrations migrate
 Status  Migration ID    Migration Name
-----------------------------------------
     up  20161118150335  Initial
     up  20161118150459  CreateComments
delete post
index.ctp
<?php foreach($posts as $post) : ?>
<!-- <li><?= $this->Html->link($post->title, ['controller'=>'Post', 'action'=>'view',$post->id]); ?></li> -->
<li><?= $this->Html->link($post->title, ['action'=>'view',$post->id]); ?>
<?= $this->Html->link('[Edit]', ['action'=>'edit',$post->id],['class'=>'fs12']); ?>
<?=
$this->Form->postLink(
'[x]',
['action'=>'delete', $post->id],
['confirm'=>'Are you sure?', 'class'=>'fs12']
);
?>
</li>
<?php endforeach; ?>
PostsController.ctp
  public function delete($id = null)
  {
    $this->request->allowMethod(['post', 'delete']);
    $post = $this->Posts->get($id);
      if($this->Posts->delete($post)){
        $this->Flash->success('Delete Success!');
      } else {
        $this->Flash->error('Delete Error!');
      }
    return $this->redirect(['action'=>'index']);
  }
update post
PostController.php: editの関数を追記します。requestはpostにpatch, putを追加することが推奨されています。
  public function edit($id = null)
  {
    $post = $this->Posts->get($id);
    if ($this->request->is(['post', 'patch', 'put'])) {
      $post = $this->Posts->patchEntity($post, $this->request->data);
      if($this->Posts->save($post)){
        $this->Flash->success('Edit Success!');
        return $this->redirect(['action'=>'index']);
      } else {
        $this->Flash->error('Edit Error!');
      }
    }
    $this->set(compact('post'));
  }
edit.ctp: addと同じようにviewを作成します。buttonはUpdateになります。
<?php
$this->assign('title', 'Edit Post');
?>

<h1>
  <?= $this->Html->link('Back', ['action'=>'index'], ['class'=>['pull-right', 'fs12']]); ?>
  Edit Post
</h1>

<?= $this->Form->create($post); ?>
<?= $this->Form->input('title'); ?>
<?= $this->Form->input('body', ['row'=>'3']); ?>
<?= $this->Form->button('Update'); ?>

<?= $this->Form->end(); ?>
Flash helper
my_layout.ctp
<body>
    <?= $this->element('my_header'); ?>
    <?= $this->Flash->render();?>
    <div class="container">
        <?= $this->fetch('content') ?>
    </div>
</body>
Posts.Controller.php
  public function add()
  {
    $post = $this->Posts->newEntity();
    if ($this->request->is('post')) {
      $post = $this->Posts->patchEntity($post, $this->request->data);
      if($this->Posts->save($post)){
        $this->Flash->success('Add Success!');
        return $this->redirect(['action'=>'index']);
      } else {
        $this->Flash->error('Add Error!');
      }
    }
    $this->set(compact('post'));
  }
}
veiw ctpの書き方
コントローラーにメソッドを追加
<?php

// /posts/index
// /posts
// /(controller)/(action)/(options)

namespace App\Controller;

class PostsController extends AppController
{
  public function index()
  {
    $posts = $this->Posts->find('all');
      // ->order(['title' => 'DESC'])
      // ->limit(2)
      // ->where(['title like' => '%3']);
    $this->set('posts', $posts);
  }

  public function view($id = null)
  {
    $post = $this->Posts->get($id);
    $this->set(compact('post'));
  }
}
src->template->view.ctp
<?php
$this->assign('title', 'Blog Detail');
?>

<h1>
  <?= $this->Html->link('Back', ['action'=>'index'], ['class'=>['pull-right', 'fs12']]); ?>
  <?= h($post->title); ?>
</h1>

<p><?= nl2br(h($post->body)); ?></p>
Postの追加: NewEntity
<h1>
  <?= $this->Html->link('Add New', ['action'=>'add'], ['class'=>['pull-right', 'fs12']]); ?>
  Blog Posts
</h1>
  public function add()
  {
    $post = $this->Posts->newEntity();
    $this->set(compact('post'));
  }
Cakeのformヘルパー: src->template->view.ctp
<?= this->Form->create($post); ?>
<?= this->Form->input('title'); ?>
<?= this->Form->input('body', ['row'=>'3']); ?>
<?= this->Form->button('Add'); ?>

<?= this->Form->end(); ?>
データの入力
if ($this->request->is('post')){
      $post = $this->Posts->patchEntity($post, $this->request->data);
      $this->Posts->save($post);
      return $this->redirect(['action'=>'index']);
    }
validation:PostsTable.php
<?php

 namespace App\Model\Table;

 use Cake\ORM\Table;
 use Cake\Validation\Validator;

 class PostsTable extends Table
 {
   public function initialize(array $config)
   {
     $this->addBehavior('Timestamp');
   }
   public function validationDefault(Validator $validator)
   {
     $validator
       ->notEmpty('title')
       ->requirePresence('title')
       ->notEmpty('body')
       ->requirePresence('body')
       ->add('body', [
         'length' => [
           'rule' => ['minLength', 10],
           'message' => 'body length must be 10+'
         ]
       ]);
     return $validator;
   }
 }
PostsController
  public function add()
  {
    $post = $this->Posts->newEntity();
    if ($this->request->is('post')) {
      $post = $this->Posts->patchEntity($post, $this->request->data);
      if($this->Posts->save($post)){
        return $this->redirect(['action'=>'index']);
      } else {
      }
    }
    $this->set(compact('post'));
  }
}
Cakeコマンド
MVCを一気に作成するbakeコマンド
[vagrant@localhost myapp]$ bin/cake bake all posts
[vagrant@localhost myapp]$ bin/cake server -H 192.168.33.10 -p 8000
データベースの条件抽出
class PostsController extends AppController
{
  public function index()
  {
    $posts = $this->Posts->find('all')
      ->order(['title' => 'DESC'])
      ->limit(2)
      ->where(['title like' => '%3']);
    $this->set('posts', $posts);
  }
}
デフォルトレイアウト
src->Template->Layout->default.ctp
レイアウトのカスタマイズ
<!DOCTYPE html>
<html lang="ja">
<head>
    <?= $this->Html->charset() ?>
    <meta name="viewport" content="width=device-width, initial-scale=1.0">
    <title>
        <?= $cakeDescription ?>:
        <?= $this->fetch('title') ?>
    </title>
    <?= $this->Html->css('styles.css') ?>
</head>
<body>
    <div class="container">
        <?= $this->fetch('content') ?>
    </div>
</body>
</html>
PostsController.phpの編集
class PostsController extends AppController
{
  public function index()
  {
    $this->viewBuilder()->layout('my_layout');
    $posts = $this->Posts->find('all');
      // ->order(['title' => 'DESC'])
      // ->limit(2)
      // ->where(['title like' => '%3']);
    $this->set('posts', $posts);
  }
}
cssファイルはwebroot/cssにあります。
titleはindex.ctpに書くことが推奨されています。
<?php
$this->assign('title', 'blog Posts');
?>
パーツ
src->header->elementに書き込み、layoutに追記
<header>My Blog</header>
<body>
    <?= $this->element('my_header'); ?>
    <div class="container">
        <?= $this->fetch('content') ?>
    </div>
</body>
PostsController.phpはclass PostsController extends AppControllerと、AppControllerを継承しているので、AppControllerのpublic function initialize()に$this->viewBuilder()->layout(‘my_layout’);を書き込むこともあります。
リンクの張り方
HTMLヘルパー
<li><?= $this->Html->link($post->title, ['action'=>'view',$post->id]); ?></li>
URLヘルパー
<a href="<?= $this->Url->build(['action'=>'view', $post-id>]); ?>">
  <?= h(post->title); ?>
</a>
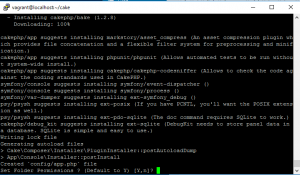
Cake.phpのインストール
Cakeは人気のあるphpのwebアプリケーションフレームワークです。centOSへのインストールは、まずcomposerをディレクトリに入れます。
curl -sS https://getcomposer.org/installer | php
次に、composerを使って、cakeをインストールしていきます。
公式サイトを参考にすると、エラーなくいけると思います。
http://book.cakephp.org/3.0/en/installation.html
[vagrant@localhost cake]$ php composer.phar create-project --prefer-dist cakephp/app myapp
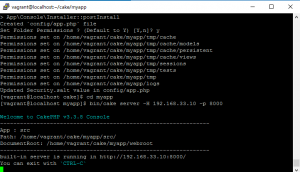
myappに移動し、コマンドラインからサーバーを立ち上げます。
[vagrant@localhost myapp]$ bin/cake server -H 192.168.33.10 -p 8000
以下のように表示されれば、OKです。
完了したら、configファイルのapp.phpよりDatasourcesを探し、データベースの接続を設定していきます。東京のtimezoneは’timezone’ => ‘+09:00’,です。
加えて、bootstrap.phpでもタイムゾーンを変更します。
date_default_timezone_set('Asiz/Tokyo');
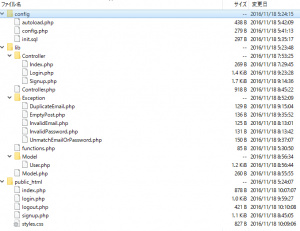
ログイン機能の実装
下のキャプチャのように、controller, model, viewにファイルを分けて作成しています。サインインデータはMysqlに格納して、ログイン時に呼び出して、判別しています。また、PostとGetでトークンの正誤判定も行っています。
controller.php
<?php
namespace MyApp;
class Controller {
private $_errors;
private $_values;
public function __construct(){
if(!isset($_SESSION['token'])){
$_SESSION['token'] = bin2hex(openssl_random_pseudo_bytes(16));
}
$this->_errors = new \stdClass();
$this->_values = new \stdClass();
}
protected function setValues($key, $value){
$this->_values->$key = $value;
}
public function getValues(){
return $this->_values;
}
protected function setErrors($key, $error){
$this->_errors->$key = $error;
}
public function getErrors($key){
return isset($this->_errors->$key) ? $this->_errors->$key : '';
}
protected function hasError(){
return !empty(get_object_vars($this->_errors));
}
protected function isLoggedIn() {
// $_SESSION['me']
return isset($_SESSION['me']) && !empty($_SESSION['me']);
}
public function me(){
return $this->isLoggedIn() ? $_SESSION['me'] : null;
}
}
facebook SDK with composer
composerを使ったfacebook sdk
https://developers.facebook.com/docs/php/gettingstarted
[vagrant@localhost facebook]$ curl -sS https://getcomposer.org/installer | php
All settings correct for using Composer
Downloading 1.2.2...

Composer successfully installed to: /home/vagrant/facebook/composer.phar
Use it: php composer.phar
続いて、composer.jsonを作成
{
  "require" : {
    "facebook/php-sdk-v4" : "~5.0"
  }
}
その後、php composer.phar installで完了です。
jsonにautoloadを追加
{
  "require" : {
    "facebook/php-sdk-v4" : "~5.0"
  },
  "autoload":{
    "psr-4": {
      "MyApp\\": "lib/"
    }
  }
}
コマンドライン
[vagrant@localhost facebook]$ php composer.phar dump-autoload
twitter bot
まう、開発環境にcomposerをインストールします。
curl -sS https://getcomposer.org/installer | php
続いてtwitteroauthを入れます。
[vagrant@localhost bot]$ php composer.phar require abraham/twitteroauth
twitteroauthのHPに沿って、PHPを書いていきます。なお、 CONSUMER_KEY, CONSUMER_SECRET, ACCESS_TOKEN, ACCESS_TOKEN_SECRETはtwitter developersのmy appから取得する必要があります。
https://twitteroauth.com/
<?php

require_once(__DIR__ . '/config.php');

// package
// -Composer

use Abraham\TwitterOAuth\TwitterOAuth;

$connection = new TwitterOAuth(
  CONSUMER_KEY,
  CONSUMER_SECRET,
  ACCESS_TOKEN,
  ACCESS_TOKEN_SECRET);
// $content = $connection->get("account/verify_credentials");
$content = $connection->get("statuses/home_timeline", ['count'=>3]);

var_dump($content);
crontabで指定した日時につぶやきをセットすることができます。