<?php
/* html特殊文字をエスケープする関数 */
function h($str) {
return htmlspecialchars($str, ENT_QUOTES, 'utf-8');
}
// xhtmlとしてブラウザに認識させる
//(ie8以下はサポート対象外)
header('Content-Type: application/xhtml+xml; charset=utf-8');
try {
// データベースに接続
$pdo = new PDO(
'mysql:host=localhost;dbname=test;charset=utf8',
'root',
'',
[
PDO::ATTR_EMULATE_PREPARES => false,
PDO::ATTR_ERRMODE => PDO::ERRMODE_EXCEPTION,
PDO::ATTR_DEFAULT_FETCH_MODE => PDO::FETCH_ASSOC,
]
);
/* アップロードがあったとき */
if (isset($_FILES['upfile']['error']) && is_int($_FILES['upfile']['error'])){
// バッファリングを開始
ob_start();
try {
// $_FILES['upfile']['error']の値を確認
switch ($_FILES['upfile']['error']){
case UPLOAD_ERR_OK: // ok
break;
case UPLOAD_ERR_NO_FILE:
throw new RuntimeException('ファイルが選択されていません', 400);
case UPLOAD_ERR_INI_SIZE:
case UPLOAD_ERR_FORM_SIZE:
throw new RuntimeException('ファイルサイズが大きすぎます', 400);
default:
throw new RuntimeException('その他のエラーが発生しました', 500);
}
// $_FILES['upfile']['mime']の値はブラウザ側で偽装可能なので
// MIMEタイプを自前でチェックする
if (!$info = getimagesize($_FILES['upfile']['tmp_name'])){
throw new RuntimeException('有効な画像ファイルを指定してください', 400);
}
if (!in_array($info[2], [IMAGETYPE_GIF, IMAGETYPE_JPEG, IMAGETYPE_PNG], true)){
throw new RuntimeException('未対応の画像形式です', 400);
}
// サムネイルをバッファに出力
$create = str_replace('/', 'createfrom', $info['mime']);
$output = str_replace('/', '', $info['mime']);
if ($info[0] >= $inf0[1]){
$dst_w = 120;
$dst_h = ceil(120 * $info[1] / max($info[0], 1));
} else {
$dst_w = ceil(120 * $info[0] / max($info[1], 1));
$dst_h = 120;
}
if (!$src = @$create($_FILES['upfile']['tmp_name'])){
throw new RuntimeException('画像リソースの生成に失敗しました', 500);
}
$dst = imagecreatetruecolor($dst_w, $dst_h);
imagecopyresampled($dst, $src, 0, 0, 0, 0, $dst_w, $dst_h, $info[0], $info[1]);
$output($dst);
imagedestroy($src);
imagedestroy($dst);
// INSERT処理
$stmt = $pdo->prepare('INSERT INTO image(name,type,raw_data,thumb_data,date) VALUES(?,?,?,?,?)');
$stmt->execute([
$_FILES['upfile']['name'],
$info[2],
file_get_contents($_FILES['upfile']['tmp_name']),
ob_get_clean(),
(new DateTime('now', new DateTimeZone('Asia/Tokyo')))->format('Y-m-d H:i:s'),
]);
$msgs[] = ['green', 'ファイルは正常にアップロードされました'];
} catch (RuntimeException $e){
while(ob_get_level()){
ob_end_clean();
}
http_response_code($e instanceof PDOException ? 500 : $e->getCode());
$msgs[] = ['red', $e->geteMessage()];
}
} elseif (isset($_GET['id'])){
try {
$stmt = $pdo->prepare('SELECT type, raw_data FROM iamge WHERE id = ? LIMIT 1');
$stmt->bindValue(1, $_GET['id'], PDO::PARAM_INT);
$stmt->execute();
if (!$row = $stmt->fetch()){
throw new RuntimeException('該当する画像は存在しません', 404);
}
header('X-Content-Type-Options: nosniff');
header('Content-Type: ' . image_type_to_mime_type($row['type']));
echo $row['raw_data'];
exit;
} catch (RuntimeException $e){
http_response_code($e instanceof PDOException ? 500 : $e->getCode());
$msgs[] = ['red', $e->getMessage()];
}
}
$rows = $pdo->query('SELECT id,name,type,thumb_data,data From image ORDER BY date DESC')->fetchAll();
} catch(PDOException $e){
http_response_code(500);
$msgs[] = ['red', $e->getMessage()];
}
?>
<!doctype html>
<html xmlns="http://www.w3.org/1999/xhtml">
<head>
<title>画像アップロード</title>
<style><![CDATA[
fieldset { margin: 10px; }
legend { font-size: 12px; }
img {
border: none;
float: left;
}
]]></style>
</head>
<body>
<form enctype="multipart/form-data" method="post" action="">
<fieldset>
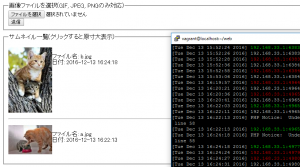
<legend>画像ファイルを選択(GIF, JPEG, PNGのみ対応)</legend>
<input type="file" name="upfile" /><br>
<input type="submit" value="送信" />
</fieldset>
</form>
<?php if (!empty($msgs)): ?>
<fieldset>
<legend>メッセージ</legend>
<?php foreach ($msgs as $msg): ?>
<ul>
<li style="color:<?=h($msg[0])?>;"><?=h($msg[1])?></li>
</ul>
<?php endforeach; ?>
</fieldset>
<?php endif; ?>
<?php if (!empty($rows)): ?>
<fieldset>
<legend>サムネイル一覧(クリックすると原寸大表示)</legend>
<?php foreach ($rows as $i => $row): ?>
<?php if ($i): ?>
<hr />
<?php endif; ?>
<p>
<?=sprintf(
'<a href="?id=%d"><img src="data:%s;base64,%s" alt="%s" /></a>',
$row['id'],
image_type_to_mime_type($row['type']),
base64_encode($row['thumb_data']),
h($row['name'])
)?><br>
ファイル名: <?=h($row['name'])?><br />
日付: <?=h($row['date'])?><br clear="all">
</p>
<?php endforeach; ?>
</fieldset>
<?php endif; ?>
</body>
</html>