絶対、もっとうまく書ける筈なんだが。。。
foreach ($cursor as $document) {
// var_dump($document);
$pv[] = $document->date;
$cookie[] = $document->cookie;
$session[] = $document->session;
if(!is_null($document->referrer)){
$avgtime[] = $document->avgtime;
}
if(!is_null($document->referrer)){
$referrer[] = $document->referrer;
}
$visit[] = $document->visit;
$access[] = substr($document->date, 11, 2);
}
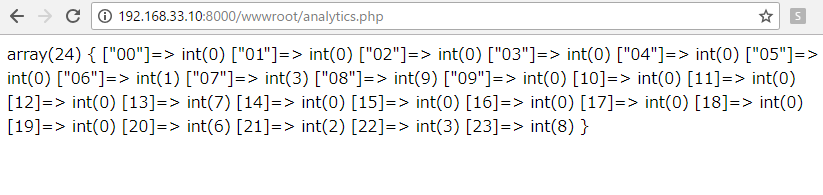
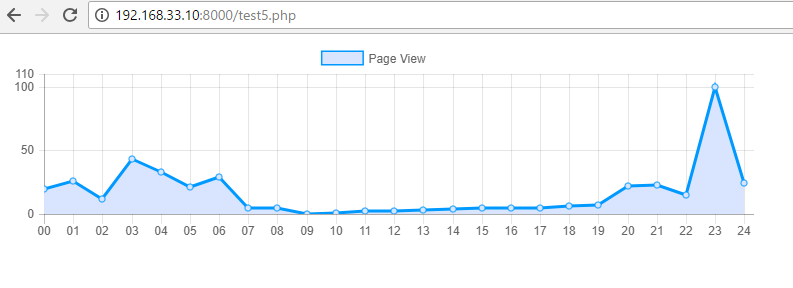
$line = array("00"=>0,"01"=>0, "02"=>0,"03"=>0,"04"=>0,"05"=>0,"06"=>0,"07"=>0,"08"=>0,"09"=>0,"10"=>0,"11"=>0,"12"=>0,"13"=>0,"14"=>0,"15"=>0,"16"=>0,"17"=>0,"18"=>0,"19"=>0,"20"=>0,"21"=>0,"22"=>0,"23"=>0);
foreach($access as $value){switch($value){case '00':$line['00'] ++;break;case '01':$line['01'] ++;break;case '02':$line['02'] ++;break;case '03':$line['03'] ++;break;case '04':$line['04'] ++;break;case '05':$line['05'] ++;break;case '06':$line['06'] ++;break;case '07':$line['07'] ++;break;case '08':$line['08'] ++;break;case '08':$line['08'] ++;break;case '10':$line['10'] ++;break;case '11':$line['11'] ++;break;case '12':$line['12'] ++;break;case '13':$line['13'] ++;break;case '14':$line['14'] ++;break;case '15':$line['15'] ++;break;case '16':$line['16'] ++;break;case '17':$line['17'] ++;break;case '18':$line['18'] ++;break;case '19':$line['19'] ++;break;case '20':$line['20'] ++;break;case '21':$line['21'] ++;break;case '22':$line['22'] ++;break;case '23':$line['23'] ++;break;}}
var_dump($line);
悔しいですね。