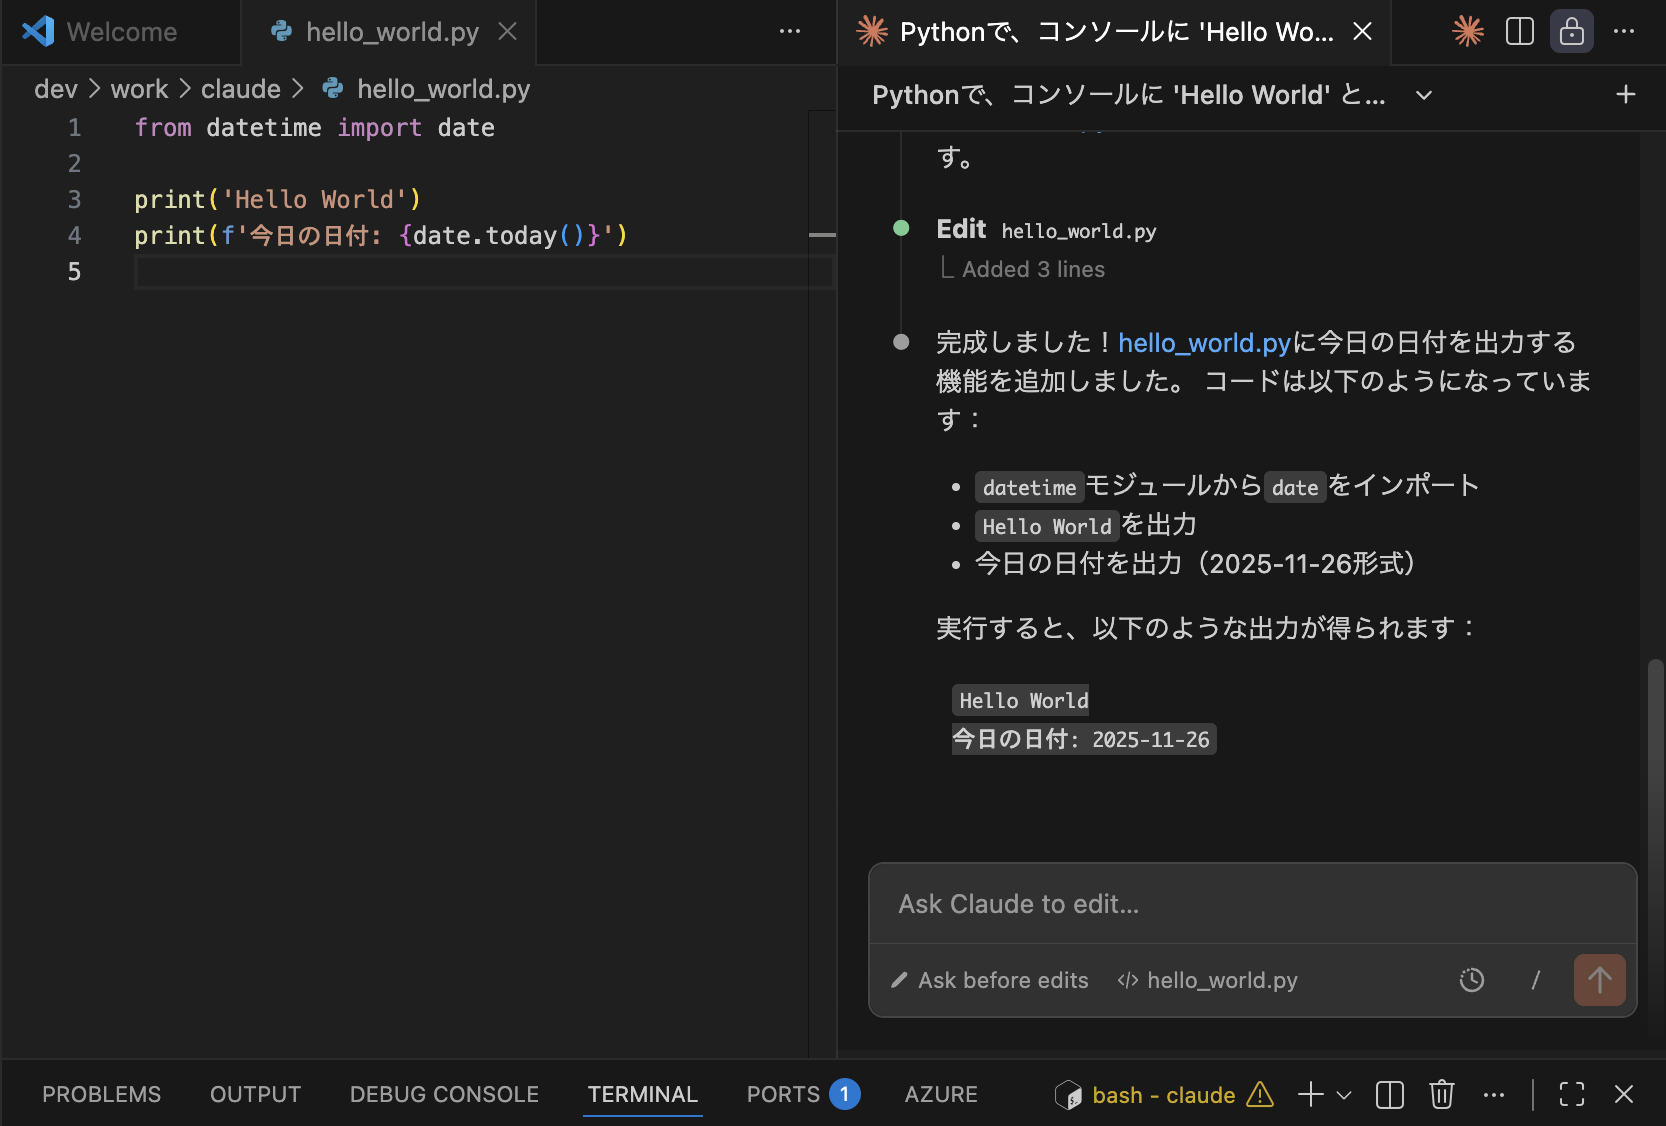
Claude Codeにコードを生成させる
VS Codeの画面左側にあるClaudeアイコンをクリックして、Claude Codeのサイドバーを開きます。
サイドバー下部のチャット入力欄に、次のプロンプトを入力します。
「Pythonで、コンソールに ‘Hello World’ と出力するコードを書いてください。」

なるほど、こういうことか!
随机应变 ABCD: Always Be Coding and … : хороший
Claude Codeにコードを生成させる
VS Codeの画面左側にあるClaudeアイコンをクリックして、Claude Codeのサイドバーを開きます。
サイドバー下部のチャット入力欄に、次のプロンプトを入力します。
「Pythonで、コンソールに ‘Hello World’ と出力するコードを書いてください。」

なるほど、こういうことか!
PyTorchとは一言で?
“AIモデルを作るための、プログラミング用の工具セット”
ニューラルネットワークを作る
訓練(train)する
GPUで高速計算する
推論(inference)する
こういった処理を 簡単に・速く実装できる のが PyTorch。
🧠 PyTorch がよく使われる理由(特徴)
① 直感的で書きやすい(Pythonらしい書き味)
コードが自然でシンプル。
数学より「書きながら理解できる」スタイル。
例)テンソルを作る:
import torch
x = torch.tensor([1.0, 2.0, 3.0])
② 自動で微分(自動微分)ができる
ニューラルネットの学習に必要な“勾配”を
勝手に計算してくれる仕組みがあります。
x = torch.tensor(2.0, requires_grad=True)
y = x**2
y.backward()
print(x.grad) # 4 が自動で計算される
③ GPUを簡単に使える(高速)
AI学習は重い処理ですが、
PyTorchは GPU を簡単に使えます。
device = “cuda” if torch.cuda.is_available() else “cpu”
x = torch.randn(1000, 1000).to(device)
④ 研究コミュニティに強い
論文
最新モデル
サンプルコード
多くがまず PyTorch で公開されるため、
最新AIに触れたい人に必須。
⑤ 大規模AIモデルと相性がよい
ChatGPT などの LLM(大規模言語モデル)も
裏側で PyTorch を使っている場合が多い。
📦 PyTorchでできることの例
画像分類(猫 / 犬を判定)
物体検出(人・車を検出)
音声認識
文章生成(GPT系)
翻訳モデル
音声合成(TTS)
3Dモデル生成
動画AI
AIのほぼすべての分野に使える万能ツールです。
🏗 PyTorch の基本構造
PyTorch はざっくりこの5つでできています:
Tensor(テンソル)
→ 画像・音声・テキストなど全データの“入れ物”
Autograd(自動微分)
→ 学習に必要な勾配を自動計算
nn(ニューラルネットワーク)
→ 層(Layer)を作る
optim(最適化)
→ 重みを更新して学習
dataloader
→ データを読み込んで学習に渡す
import torch
import torch.nn as nn
import torch.optim as optim

# 1. モデル
model = nn.Linear(1, 1)

# 2. 損失関数
criterion = nn.MSELoss()

# 3. 最適化
optimizer = optim.SGD(model.parameters(), lr=0.01)

# 4. 学習ループ
for _ in range(100):
    x = torch.tensor([[1.0]])
    y = torch.tensor([[2.0]])

    pred = model(x)
    loss = criterion(pred, y)

    optimizer.zero_grad()
    loss.backward()
    optimizer.step()

print(model.weight, model.bias)
1. サンプリング周波数(Sampling Rate)
1秒間に「音を何回測るか」
を表す数字。
例:
サンプリング周波数 何を意味する? 用途
16,000 Hz (16kHz) 1秒に16,000回測る 音声AI・電話
22,050 Hz 1秒に22,050回測る 一般的なTTS
44,100 Hz (44.1kHz) CD音質 音楽・高音質TTS
2. ビット深度(Bit Depth)
1回の測定で、音の強さを何段階で記録するか
例:
ビット深度 段階数 特徴
16bit 65,536段階 CD音質・一般的
24bit 16,777,216段階 スタジオ品質
32bit 約40億段階 研究・高音質合成
TTSではどう使われる?
用途 サンプリング周波数 ビット深度
音声AI(STT/TTS) 16kHz 16bit
高音質TTS(商用) 22kHz〜48kHz 16bit or 24bit
音楽/歌声合成 44.1kHz or 48kHz 24bit
LLM の 合成データ生成(Synthetic Data Generation) と
自己学習(Self-learning / Self-Improvement) は、
近年の LLM 開発の中で最も重要な技術の一つ
. 合成データ生成とは?(Synthetic Data)
簡単に言うと:
LLM が 自分自身で学習用データ(QA・文章・会話など)を作る 技術です。
🎯 なぜ重要なのか?
人間がデータを作ると コストが高い
高品質な人間教師データ(instruction data)が不足している
誤解や偏りがない、LLM学習に最適化されたデータが必要
そこで LLMが自分でデータを生成 → それをまた学習に使う
という循環が作られています。
自己学習(Self-learning / Self-Training)とは?
LLM が “自分で作ったデータ” を使って、さらに賢くなる仕組み
以下のようなプロセスです:
① 既存LLM(Teacher)がデータを生成(合成データ)
② 新しいLLM(Student)がそれを学習
③ Student が Teacher に近づいたり追い越したりする
④ Student を Teacher として活用 → また合成データ生成
これは Self-Play(自己対戦) や Self-Supervision(自己教師) とも呼ばれます。
合成データ生成の代表的な方法
① Self-Instruct(セルフ・インストラクト)
LLM が自分に「学習するタスク」を作り出す。
例:
「役立つ指示文を20個作って、それぞれ適切な回答を生成して」
→ 指示(instruction)と回答(output)のペアが大量にできる
→ これを学習すると ChatGPT のような「指示に強いモデル」が作れる
Google・Meta・Stability・OpenAI が使う一般的手法。
Reject Sampling(不良回答の排除)
LLM に複数回答を出させ、
「良い回答だけを採用し、悪い回答は捨てる」仕組み。
例:
Model → A案, B案, C案 を生成
Judge(別モデル or 同じモデル)が評価
AとCは不採用、Bだけ学習に使う
→ これにより合成データの品質が爆上がりする
最新の GPT-4o/DeepSeek にも使われている。
Self-Rewarding(自分で評価して学習)
モデル自身が回答の良し悪しを評価し、そのスコアを使って学習する。
OpenAI の研究
“Self-Rewarding Language Models”(2024)
で注目された方式。
Distillation(蒸留)
教師(Teacher)モデル → 弟子(Student)モデルへ知識を移す。
❶ Teacher で大量の合成データを生成
❷ Student がそれを学習
❸ 小型モデルでも高性能に!
例:
LLaMA → Mistral
GPT-4 → GPT-4o mini
Gemini Pro → Gemini Flash
from openai import OpenAI
client = OpenAI()

tasks = [
    "AI とは何か小学生にもわかるように説明してください。",
    "営業メールを丁寧な文体に書き直してください。",
    "Python のデコレーターを例付きで解説してください。"
]

synthetic_dataset = []

for task in tasks:
    res = client.chat.completions.create(
        model="gpt-4o-mini",
        messages=[{"role": "user", "content": task}]
    )
    answer = res.choices[0].message.content
    synthetic_dataset.append({"instruction": task, "output": answer})

print(synthetic_dataset)
. 合成データは実務でどう使われる?
✔ ① 社内チャットボットの学習データ生成
例:
社内規定の QA を権威ある文書から合成
人間が 1ヶ月かかる1000問データを数分で生成
✔ ② カスタマーサポートの学習データ
FAQ → 指示文化 → 例文生成 → 自動生成
✔ ③ 特定業界に特化した LLM の構築(金融・法律・医療)
✔ ④ 小型モデルの強化(LLM distillation)
⚠️ 6. 合成データの注意点
問題 説明
幻覚(hallucination) LLM が嘘を生成し、それを学習すると悪循環
バイアス 教師モデルの偏見や癖がそのままコピーされる
権利問題 合成データでも、元の学習データに依存する
→ 解決法:Reject Sampling、Human-in-the-loop、評価基準導入
🧠 7. 自己学習が今後どう進化する?
現在の最先端:
✔ Self-Play × 合成データ × Reasoning(推論強化)
OpenAI o1 モデル系(深い推論)
DeepSeek-R1(自己学習で強化)
Google Gemini 2.0(マルチステップ推論)
未来像は…
🧩 AI が 自分で作った問題 → 自分で解き → 自分で改善
という 完全自律型学習 に近づくこと。
manifest.yaml
name: "agent_strategy_demo"
description: "Sample Agent Strategy plugin with Function Calling"
version: "1.0.0"

tools:
- name: "calculator"
description: "Perform basic math operations"
parameters:
type: object
properties:
expression:
type: string
description: "Math expression to evaluate"
required: ["expression"]

agent_strategy:
entry: agent_strategy.py:SampleAgentStrategy
agent_strategy.py
from dify_plugin import AgentStrategy

class SampleAgentStrategy(AgentStrategy):
def run(self, llm_response, tools):
"""
llm_response: dict (may contain tool call request)
tools: dict of tools defined in manifest
"""
# If model requests a tool execution
if "tool" in llm_response:
tool_name = llm_response["tool"]["name"]
tool_args = llm_response["tool"]["arguments"]

tool = tools.get(tool_name)
if tool is None:
return {
"type": "message",
"content": f"Tool '{tool_name}' not found."
}

result = tool.run(**tool_args)
return {
"type": "tool_result",
"tool_name": tool_name,
"result": result
}

# Regular text response
return {
"type": "message",
"content": llm_response.get("content", "")
}
calclator.py
from dify_plugin import Tool

class CalculatorTool(Tool):
def run(self, expression: str):
try:
result = eval(expression)
return {"result": result}
except Exception as e:
return {"error": str(e)}
まず、Difyのツールで「カスタムツールを作成する」画面
### カスタムツールを作成
OpenAI json schema
{
  "openapi": "3.0.0",
  "info": {
    "title": "Postman Echo Test Tool",
    "version": "v1.0.0",
    "description": "Postman Echoの/getエンドポイントを使って、パラメータを渡してテストするためのツールです。送信したパラメータがレスポンスに含まれて返ってきます。"
  },
  "servers": [
    {
      "url": "https://postman-echo.com"
    }
  ],
  "paths": {
    "/get": {
      "get": {
        "operationId": "echoGetData",
        "summary": "指定したクエリパラメータを付けてGETリクエストを送信します。",
        "parameters": [
          {
            "name": "message",
            "in": "query",
            "required": true,
            "schema": {
              "type": "string",
              "description": "APIに送りたいメッセージ(例:Hello Dify Test)"
            }
          }
        ],
        "responses": {
          "200": {
            "description": "成功。送信されたパラメータが確認できます。"
          }
        }
      }
    }
  }
}
テスト出力
{“args”: {“message”: “testです。”}, “headers”: {“host”: “postman-echo.com”, “accept”: “*/*”, “accept-encoding”: “gzip, br”, “x-forwarded-proto”: “https”, “traceparent”: “00-9e12edb5cab8bd6636404a653b1715c7-7b44fd7d72a90d90-00”, “baggage”: “sentry-environment=production,sentry-public_key=c0bcc0e36783694f41e4fb1e6a3efea9,sentry-trace_id=cd5aed1beb774af0a190db512449113f,sentry-sample_rate=0.0,sentry-sampled=false,sentry-sample_rand=0.743119”, “sentry-trace”: “cd5aed1beb774af0a190db512449113f-9e0d41f50b19024e-0”, “user-agent”: “python-httpx/0.27.2”}, “url”: “https://postman-echo.com/get?message=test%E3%81%A7%E3%81%99%E3%80%82”}
カスタムツールとFuctionCallingは仕組み的には似ているけど、実装方法がまるきり異なる…
AIアプリを使う価値を1分で伝える構成
0:00〜0:05 オープニング(問題提起)
視聴者の“共通の困りごと”を一言で刺す。
「日々の作業、時間が足りない…」
「資料作りやまとめ作業に追われてませんか?」
「動画編集・文章作成が苦手…」
👉 視聴者の現状(Before)を短く提示
0:05〜0:15 AIが解決する世界を提示(ベネフィット)
AIアプリを使うと“どう変わるのか”を先に出す。
「AIなら、数分であなたの作業を自動化できます」
「文章作成も、動画編集も、リサーチも一気に時短」
「あなたがすべきは“指示するだけ”」
👉 AIで得られる未来(After)を提示
0:15〜0:40 具体的価値(3点)
1分動画の核。価値は必ず「3つ」に絞ると伝わりやすい。
① 時間を圧倒的に短縮
例:1時間の作業 → 5分
レポート作成 → 自動要約
動画の企画 → AIが提案
② 誰でもクオリティUP
プロ品質の画像、動画、文章
企画・構成もアシスト
ミスが減る
③ すぐ使える・難しくない
テンプレを選ぶだけ
スマホ1台でOK
指示文(プロンプト)もサポート
👉 “難しそう”という不安の解消が重要
0:40〜0:50 実際の使い方(超シンプル)
操作画面(またはイメージ)を見せながら:
「やりたいことを入力」
「テンプレを選ぶ」
「AIが数秒で提案」
👉 操作ステップは3つ以内が鉄則
0:50〜1:00 クロージング(誘導)
目的に合わせて文言を変えます。
結果を強調して締める
「1日30分の時短を、今日から。」
「AIを使う人と使わない人の差は開く一方です。」
行動を促す(CTA)
「今すぐ無料で試せます」
「概要欄からダウンロードできます」
🎁 1分用 まとめテンプレ(そのまま使える)
① 「毎日の作業、時間が足りない…そんな悩みありませんか?」
② 「AIアプリなら、その作業を数分で自動化できます。」
③ 「価値は3つ。
1. 圧倒的な時短
2. プロ並みのクオリティ
3. すぐ使える簡単さ」
④ 「指示を入れるだけで、動画、文章、企画、デザインまで自動生成。」
⑤ 「仕事も作業も、もっと自由に。AIはもう“誰でも使える相棒”。」
⑥ 「今日から始めてみませんか?概要欄からどうぞ。」

Unit Test(Kotlin ロジックのテスト)サンプル
■ 例:足し算関数のテスト
(src/main/java/…/Calculator.kt)
class Calculator {
    fun add(a: Int, b: Int): Int = a + b
}
import org.junit.Assert.assertEquals
import org.junit.Test

class CalculatorTest {

    @Test
    fun `add should return correct sum`() {
        val calculator = Calculator()
        val result = calculator.add(2, 3)

        assertEquals(5, result)
    }
}
import androidx.compose.material3.Text
import androidx.compose.runtime.Composable

@Composable
fun Greeting(name: String) {
    Text(text = "Hello, $name!")
}
import androidx.compose.ui.test.*
import androidx.compose.ui.test.junit4.createComposeRule
import org.junit.Rule
import org.junit.Test

class GreetingTest {

    @get:Rule
    val composeTestRule = createComposeRule()

    @Test
    fun greeting_displaysCorrectText() {
        composeTestRule.setContent {
            Greeting("Android")
        }

        composeTestRule
            .onNodeWithText("Hello, Android!")
            .assertIsDisplayed()
    }
}
@Composable
fun CounterScreen() {
    var count = remember { mutableStateOf(0) }

    Column {
        Text("Count: ${count.value}")
        Button(onClick = { count.value++ }) {
            Text("Add")
        }
    }
}
@Test
fun counter_incrementsWhenButtonClicked() {
    composeTestRule.setContent {
        CounterScreen()
    }

    // 初期表示チェック
    composeTestRule
        .onNodeWithText("Count: 0")
        .assertIsDisplayed()

    // ボタンクリック
    composeTestRule
        .onNodeWithText("Add")
        .performClick()

    // 更新後表示チェック
    composeTestRule
        .onNodeWithText("Count: 1")
        .assertIsDisplayed()
}
SwiftUI タブバー付きマルチページ構成
import SwiftUI

struct ContentView: View {
    var body: some View {
        TabView {

            HomeView()
                .tabItem {
                    Label("ホーム", systemImage: "house")
                }

            SearchView()
                .tabItem {
                    Label("検索", systemImage: "magnifyingglass")
                }

            SettingsView()
                .tabItem {
                    Label("設定", systemImage: "gearshape")
                }
        }
    }
}
HomeView
import SwiftUI

struct HomeView: View {
    var body: some View {
        NavigationView {
            VStack(spacing: 20) {
                Text("ホーム画面")
                    .font(.largeTitle)

                NavigationLink("詳細ページへ") {
                    DetailView()
                }
                .padding()
            }
            .navigationTitle("Home")
        }
    }
}
SearchView.swift
import SwiftUI

struct SearchView: View {
    @State private var keyword = ""

    var body: some View {
        VStack(spacing: 20) {
            Text("検索ページ")
                .font(.largeTitle)

            TextField("キーワードを入力", text: $keyword)
                .textFieldStyle(RoundedBorderTextFieldStyle())
                .padding()

            Text("検索ワード: \(keyword)")
        }
        .padding()
    }
}
SettingsView.swift
import SwiftUI

struct SettingsView: View {
    var body: some View {
        VStack(spacing: 20) {
            Text("設定ページ")
                .font(.largeTitle)

            Toggle("通知をオンにする", isOn: .constant(true))
                .padding()
        }
        .padding()
    }
}
DetailView.swift
import SwiftUI

struct DetailView: View {
    var body: some View {
        VStack(spacing: 20) {
            Text("詳細ページ")
                .font(.title)
        }
        .padding()
    }
}