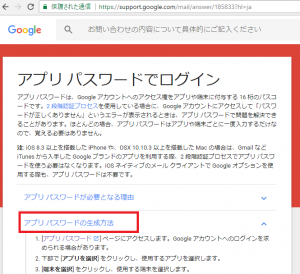
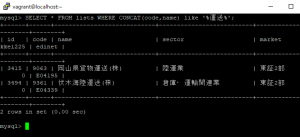
phpでmp3ファイルを送信する

コードは、画像送信と全く同じ

mb_language("Japanese");
mb_internal_encoding("UTF-8");

$to = "ほげほげ@gmail.com";
$subject = "Just the Way You Are";

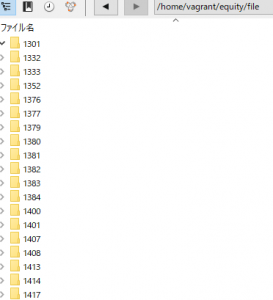
$filepath = "test.mp3";
$mime_type = "application/octet-stream";

$boundary = "__BOUNDARY__";

$additional_headers = "Content-Type: multipart/mixed;boundary=\"".$boundary."\"\n";
$message = "--" . $boundary . "\n";
$message .= "Content-Type: text/plain; charset=\"ISO-2022-JP\"\n\n";
$message .= "When I see your face
ありのままの君が
愛おしいよ
Just the way you Are\n";
$message .="--" . $boundary . "\n";
$message .="Content-Type:". $mime_type . "; name=\"" .basename($filepath) . "\"\n";
$message .="Content-Disposition: attachment; filename=\"" .basename($filepath) ."\"\n";
$message .="Content-Transfer-Encoding: base64\n";
$message .= "\n";
$message .= chunk_split(base64_encode(file_get_contents($filepath)))."\n";
$message .="--" . $boundary . "--";
 
mb_send_mail($to, $subject, $message, $additional_headers);

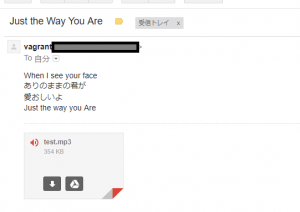
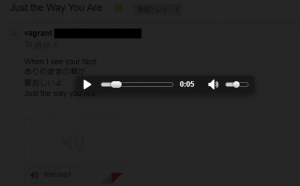
Gmailだと、そのままブラウザ上で聞けますね。さすが~

あ、hotmailもいけますね。
※yahooさん(yahoo mail)はダウンロードしないとダメなようですね^^

phpで画像をメール送信する

まず、gif画像を用意

添付ファイルのcontent typeは application/octet-stream で良いようです。

mb_language("Japanese");
mb_internal_encoding("UTF-8");

$to = "hoge@gmail.com";
$subject = "Just the Way You Are";

$filepath = "guitar.gif";
$mime_type = "application/octet-stream";

$boundary = "__BOUNDARY__";

$additional_headers = "Content-Type: multipart/mixed;boundary=\"".$boundary."\"\n";
$message = "--" . $boundary . "\n";
$message .= "Content-Type: text/plain; charset=\"ISO-2022-JP\"\n\n";
$message .= "When I see your face
ありのままの君が
愛おしいよ
Just the way you Are\n";
$message .="--" . $boundary . "\n";
$message .="Content-Type:". $mime_type . "; name=\"" .basename($filepath) . "\"\n";
$message .="Content-Disposition: attachment; filename=\"" .basename($filepath) ."\"\n";
$message .="Content-Transfer-Encoding: base64\n";
$message .= "\n";
$message .= chunk_split(base64_encode(file_get_contents($filepath)))."\n";
$message .="--" . $boundary . "--";
 
mb_send_mail($to, $subject, $message, $additional_headers);

おおおお!これやべー

感動した!

phpでメール送信

Bruno Marsでも送ってみましょう。

headerの箇所はpostfixで設定されているため、削除

$to = "hoge@gmail.com";
$subject = "Just the Way You Are";
$message = "Oh, her eyes, her eyes make the stars look like they're not shinin'
Her hair, her hair falls perfectly without her trying
She's so beautiful and I tell her everyday";
// $headers = "From: ";
 
mail($to, $subject, $message);

届いています。

いいですね~♪♪♪

では、Atsushiのカバーでいってみましょう。

$subject = "Just the Way You Are";
$message = "When I see your face
ありのままの君が
愛おしいよ
Just the way you Are";
// $headers = "From: ";
 
mail($to, $subject, $message);

あれ?文字化けせずに届いてますね。ぬぬ。

mb_send_mailでも問題なく送信できます。

mb_language("Japanese");
mb_internal_encoding("UTF-8");
$to = "hoge@gmail.com";

$subject = "Just the Way You Are";
$message = "When I see your face
ありのままの君が
愛おしいよ
Just the way you Are";
// $headers = "From: ";
 
mb_send_mail($to, $subject, $message);

vagrant・centosからsendmailでメールを送信する

まず完成版から

vagrantのコマンドラインで以下のように打ちます

[vagrant@localhost postfix]$ sendmail myaccount@gmail.com
Subject: test
test content
.

自分のgmailアカウント
vagrantからのメールが届いてますね。

ここまで来るのに5~6時間かかりました。。。

まず、postfixをインストール後、

sudo yum -y install cyrus-sasl-md5 cyrus-sasl-plain

そして、/etc/postfix/main.cfファイルの編集

# 116行目 inet_interfaces = localhostを編集
inet_interfaces = all

# 119行目 inet_protocols = allを編集
inet_protocols = ipv4

# 318行目 以下追加
relayhost = [smtp.gmail.com]:587
smtp_use_tls = yes
smtp_sasl_auth_enable = yes
smtp_sasl_password_maps = hash:/etc/postfix/sasl_passwd
smtp_sasl_tls_security_options = noanonymous
smtp_sasl_mechanism_filter = plain
smtp_sasl_security_options = noanonymous
smtp_tls_CApath = /etc/pki/tls/certs/ca-bundle.crt

因みに、main.cfの「318行目」は末尾ではありませんのでご注意を。

続いて、16桁のGmailのアプリパスワードを生成します。
https://secuirty.google.com/settings/security/apppasswords

その後、/etc/postfix/に、sasl_passwdファイルをvimで作成します。パスワードはつくったアプリパスワードを入力。

[smtp.gmail.com]:587 example@gmail.com:app_password(16桁)

ここで、passwordにgmailの普通のパスワードを入れると、authentification errorになるのでご注意。

その後、postfixのディレクトリからコマンドラインで

postmap sasl_passwd

として、sasl_passwd.dbを作成します。

そして

sudo service postfix restart

また、gmailの設定で、安全性の低いアプリ(失礼な!)の設定を変更する必要があります。

これでsendmailが使えるようになります。あて先は、gmail以外でもOKです。送信元がvagrantになってました。カッコいい!

[vagrant@localhost postfix]$ sendmail myaccount@gmail.com
Subject: test
test content
.

受信されてないようでしたらログを確認。

sudo cat /var/log/maillog

smtp結構複雑ですね。
別のvagrant環境立ち上げて試すなど、迷走しまくってました。。。

sudo yum -y install postfix

postfixを入れます。

  更新                    : 2:postfix-2.6.6-8.el6.x86_64                    1/2
  整理中                  : 2:postfix-2.6.6-6.el6_7.1.x86_64                2/2
  Verifying               : 2:postfix-2.6.6-8.el6.x86_64                    1/2
  Verifying               : 2:postfix-2.6.6-6.el6_7.1.x86_64                2/2

更新:
  postfix.x86_64 2:2.6.6-8.el6

完了しました!
[vagrant@localhost /]$ sudo alternatives --config mta

2 プログラムがあり 'mta' を提供します。

  選択       コマンド
-----------------------------------------------
   1           /usr/sbin/sendmail.postfix
*+ 2           /usr/sbin/sendmail.sendmail

Enter を押して現在の選択 [+] を保持するか、選択番号を入力します:1
[vagrant@localhost /]$ sudo chkconfig --add postfix
[vagrant@localhost /]$ sudo chkconfig postfix on
[vagrant@localhost /]$ chkconfig --list postfix
postfix         0:off   1:off   2:on    3:on    4:on    5:on    6:off

vagrantでのsendmail

SMTPサーバーはメールを相手のメールサーバーまで届けるサーバー

PHPで以下のように書いて

$to = "hoge@gmail.com";
$subject = "TEST MAIL";
$message = "Hello!\r\nThis is TEST MAIL.";
$headers = "From: hoge@hoge.com";
 
mail($to, $subject, $message, $headers);

echo "finish!";

以下のようにエラーが出たので

sendmail: fatal: parameter inet_interfaces: no local interface found for ::1

/etc/hostsを修正し

[vagrant@localhost mail]$ vi /etc/hosts
127.0.0.1   localhost localhost.localdomain localhost4 localhost4.localdomain4
#::1         localhost localhost.localdomain localhost6 localhost6.localdomain6

それでも全然finishしないので、SMTPサーバーを調べていたら、
>Postfix 2.10.1 ゲストOS上で稼働するMTA(SMTP)サーバー
>Dovecot 2.2.10 ゲストOS上で稼働するPOP3,IMAPサーバー
なるほど、Postfixをインストールしないといけないのね。

iptablesとは

iptables とは、Linux に実装されたパケットフィルタリング型のファイアウォール機能
ファイヤーウォールは本読むと絶対でてきますよね。

さて、iptable
etc/sysconfig/にある

ip6tables-config
iptables-config

機能
1.パケットフィルタリング
送られてきたパケットを検査して設定した条件に該当する場合、設定したアクション(通過、遮断、転送)を実行

2.アドレス変換
送られてきたパケットを検査して設定した条件に該当する場合、パケットの宛先アドレスや送信元アドレスを別のアドレスに書き換え

テーブル
filter パケットのフィルタリングに使用
nat アドレス変換に使用
mangle パケットをNAT以外の目的で置き換えるときに使用

チェイン
INPUT 入力(受信)パケットのチェイン
OUTPUT 出力(送信)パケットのチェイン
FORWARD 転送パケットのチェイン
PREROUTING 受信時に変換するチェイン
POSTROUTING 送信時に変換するチェイン

IPv4とIPv6
IPv6の特徴
-グローバルIPアドレスの数が多い
-セキュリティ機能を標準で装備している
-エンドユーザーの設定が簡単

なるほど、ここまで来たか

mysqlで複数カラムを検索

以下で可能。

SELECT * FROM tablename WHERE CONCAT(col1,col2) like '%query%';

例:
SELECT * FROM lists WHERE CONCAT(code,name) like ‘%運送%’;

例2:
SELECT * FROM lists WHERE CONCAT(code,name) like ‘%95%’;

例えば、検索クエリが複数の場合
以下だと、emptyで返ってきます。

SELECT * FROM lists WHERE CONCAT(code,name) like '%三菱 化学%';

ワードを二つに分けて、ANDで繋げます。

SELECT * FROM lists WHERE CONCAT(code,name) like '%三菱%' AND CONCAT(code,name) LIKE '%化学%';

以下のように返ってきます。

フォルダがなければフォルダを作成する

mkdirでフォルダを作成、コマンドラインと同じです。

$dir = "file/test";
if(!file_exists($dir)){
	mkdir($dir, 0777);
}

出来てますね。

では、約4000個フォルダを作ってみます。

$time_start = microtime(true);

$dsn = "mysql:dbname=equity;host=localhost";
$user = "hoge";
$password = "hogehoge";
try {
    $dbh = new PDO($dsn, $user, $password);
} catch (PDOException $e){
    print('connection failed:'.$e->getMessage());
} 

$sql = "select code from lists";
$stmt = $dbh->query($sql);
while($result = $stmt->fetch(PDO::FETCH_ASSOC)){
		$code_list[] = $result["code"];
}

foreach($code_list as $value){

	$dir = "file/".$value."";
	if(!file_exists($dir)){
		mkdir($dir, 0777);
	}
}

$time = microtime(true) - $time_start;
echo "{$time}秒";

はや!

訪問者のアクセスログ(ip)を取得する

cookieのvalueはGAっぽくします。KeyはAccessLogLDとのことでALID。

$min = 100000000;
$max = 999999999;
$value = "GA1." .rand($min, $max).".".rand($min, $max);

$valueは以下のようになります。
GA1.835471614.729296551

テキストファイルに書き込むので、brではなく\nをつかいます。

$min = 100000000;
$max = 999999999;
$value = "GA1." .rand($min, $max).".".rand($min, $max);

if(empty($_COOKIE['ALID'])){
	$time=date("Y/m/d H:i:s");
	$ip = $_SERVER['REMOTE_ADDR'];
	$hostname = @gethostbyaddr($ip);
	$log = $time ." ".$ip." ".$hostname."\n";

	$fp =@fopen('log.txt','a') or die("ファイルを取得できません");
		if(flock($fp,LOCK_EX)){
			fwrite($fp,$log);
		}
		flock($fp, LOCK_UN);
setcookie("ALID",$value, time()+1);
}

log.txt
2018/03/18 19:21:55 192.168.33.1 192.168.33.1

以下のように書くと、最新のデータが一番上にきます。

$content = file_get_contents('log.txt');
	$fp =@fopen('log.txt','w') or die("ファイルを取得できません");
		if(flock($fp,LOCK_EX)){
			fwrite($fp,$log.$content);
		}
		flock($fp, LOCK_UN);

log.txtで取得するログの数を制限したい場合は、fgetsで1行ずつ読み込めばOKですね。

$limit = 10;

echo $content;
$min = 100000000;
$max = 999999999;
$value = "GA1." .rand($min, $max).".".rand($min, $max);

if(empty($_COOKIE['ALID'])){
	$time=date("Y/m/d H:i:s");
	$ip = $_SERVER['REMOTE_ADDR'];
	$hostname = @gethostbyaddr($ip);
	$log = $time ." ".$ip." ".$hostname."\n";

    $fp = fopen('log.txt', 'r');
	for($i=0;$i <$limit;$i++){
		$content .= fgets($fp);
	}
	fclose($fp);

	$fp =@fopen('log.txt','w') or die("ファイルを取得できません");
		if(flock($fp,LOCK_EX)){
			rewind($fp);
			fwrite($fp,$log.$content);
		}
		flock($fp, LOCK_UN);
setcookie("ALID",$value, time()+1);
}

2018/03/18 20:25:06 192.168.33.1 192.168.33.1
2018/03/18 20:25:00 192.168.33.1 192.168.33.1
2018/03/18 20:24:59 192.168.33.1 192.168.33.1
2018/03/18 20:24:57 192.168.33.1 192.168.33.1
2018/03/18 20:24:53 192.168.33.1 192.168.33.1
2018/03/18 20:24:28 192.168.33.1 192.168.33.1
2018/03/18 20:23:26 192.168.33.1 192.168.33.1
2018/03/18 20:23:18 192.168.33.1 192.168.33.1
2018/03/18 20:23:13 192.168.33.1 192.168.33.1
2018/03/18 20:22:14 192.168.33.1 192.168.33.1
2018/03/18 20:21:45 192.168.33.1 192.168.33.1