Capistranoの仕組みを理解する

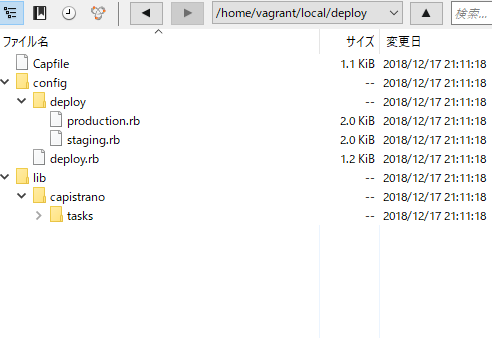
まず、deploy のディレクトリに移動します。
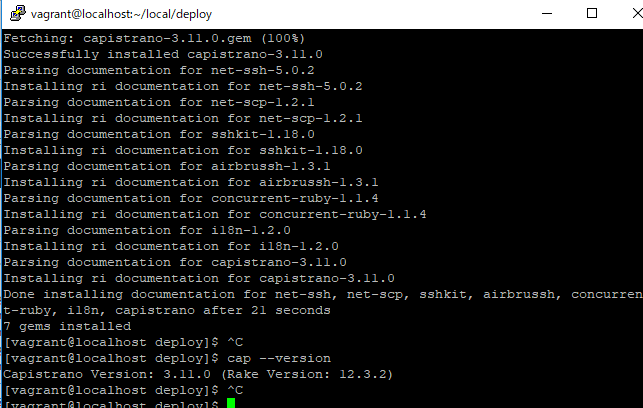
cap install でcapistanoのファイルをインストールします
[vagrant@localhost deploy]$ cap install
mkdir -p config/deploy
create config/deploy.rb
create config/deploy/staging.rb
create config/deploy/production.rb
mkdir -p lib/capistrano/tasks
create Capfile
Capified

こんな感じでファイルが作られます。

config/deploy.rb

# config valid for current version and patch releases of Capistrano
lock "~> 3.11.0"

set :application, "my_app_name"
set :repo_url, "git@example.com:me/my_repo.git"

# Default branch is :master
# ask :branch, `git rev-parse --abbrev-ref HEAD`.chomp

# Default deploy_to directory is /var/www/my_app_name
# set :deploy_to, "/var/www/my_app_name"

# Default value for :format is :airbrussh.
# set :format, :airbrussh

# You can configure the Airbrussh format using :format_options.
# These are the defaults.
# set :format_options, command_output: true, log_file: "log/capistrano.log", color: :auto, truncate: :auto

# Default value for :pty is false
# set :pty, true

# Default value for :linked_files is []
# append :linked_files, "config/database.yml"

# Default value for linked_dirs is []
# append :linked_dirs, "log", "tmp/pids", "tmp/cache", "tmp/sockets", "public/system"

# Default value for default_env is {}
# set :default_env, { path: "/opt/ruby/bin:$PATH" }

# Default value for local_user is ENV['USER']
# set :local_user, -> { `git config user.name`.chomp }

# Default value for keep_releases is 5
# set :keep_releases, 5

# Uncomment the following to require manually verifying the host key before first deploy.
# set :ssh_options, verify_host_key: :secure

set:application, set :repo_urlでgitのレポジトリを書く

CentOSにCapistranoをinstall

1. rubyが入っているかバージョン確認

[vagrant@localhost ~]$ ruby -v
ruby 2.3.1p112 (2016-04-26 revision 54768) [x86_64-linux]

2. 続いてcapistranoが入っているか確認

[vagrant@localhost ~]$ cap --version
-bash: cap: コマンドが見つかりません

3. Capistranoをinstall
gem install capistrano とします。
[vagrant@localhost deploy]$ gem install capistrano
Fetching: net-ssh-5.0.2.gem (100%)
Successfully installed net-ssh-5.0.2
Fetching: net-scp-1.2.1.gem (100%)
Successfully installed net-scp-1.2.1
Fetching: sshkit-1.18.0.gem (100%)
Successfully installed sshkit-1.18.0
Fetching: airbrussh-1.3.1.gem (100%)
Successfully installed airbrussh-1.3.1
Fetching: concurrent-ruby-1.1.4.gem (100%)
Successfully installed concurrent-ruby-1.1.4
Fetching: i18n-1.2.0.gem (100%)

HEADS UP! i18n 1.1 changed fallbacks to exclude default locale.
But that may break your application.

Please check your Rails app for ‘config.i18n.fallbacks = true’.
If you’re using I18n 1.1.x and Rails (< 6.0), this should be 'config.i18n.fallbacks = [I18n.default_locale]'. If not, fallbacks will be broken in your app by I18n 1.1.x. For more info see: https://github.com/svenfuchs/i18n/releases/tag/v1.1.0 Successfully installed i18n-1.2.0 Fetching: capistrano-3.11.0.gem (100%) Successfully installed capistrano-3.11.0 Parsing documentation for net-ssh-5.0.2 Installing ri documentation for net-ssh-5.0.2 Parsing documentation for net-scp-1.2.1 Installing ri documentation for net-scp-1.2.1 Parsing documentation for sshkit-1.18.0 Installing ri documentation for sshkit-1.18.0 Parsing documentation for airbrussh-1.3.1 Installing ri documentation for airbrussh-1.3.1 Parsing documentation for concurrent-ruby-1.1.4 Installing ri documentation for concurrent-ruby-1.1.4 Parsing documentation for i18n-1.2.0 Installing ri documentation for i18n-1.2.0 Parsing documentation for capistrano-3.11.0 Installing ri documentation for capistrano-3.11.0 Done installing documentation for net-ssh, net-scp, sshkit, airbrussh, concurrent-ruby, i18n, capistrano after 21 seconds 7 gems installed
4. Capistranoのバージョン確認
[vagrant@localhost deploy]$ cap –version
Capistrano Version: 3.11.0 (Rake Version: 12.3.2)

OAuth2.0 の仕組みとrfc

OAuth2.0って何??

OAuthは権限の認可を行うオープンスタンダード
OAuth2.0の4種類のロール
1.resource owner(リソースオーナー) ※エンドユーザーとも
2.resource server(リソースサーバー)
3.client(クライアント)
4.authorization server(認可サーバー)

WebserverA (エンドユーザー)からwebserverB(client)にアクセスすることを許可する
Aの信任を得た認可サーバーからBに対するアクセストークンを発行してもらい、Bにアクセストークンを渡す
Bのパスワードを入力せずに、Bの一部の権限だと実行することが重要

githubに公開鍵を登録して確認する方法

まず、ローカルのコマンドラインで、ssh-keygen -t rsaとして、公開鍵(id_rsa.pub)、秘密鍵(id_rsa)を作ります。

Github personal settingsのSSH and GPG keysにアクセスします。
https://github.com/settings/keys

右上のNew SSH Keyを押下。

title:公開鍵(id_rsa.pub)の名前を入れる。拡張子のpubは必要ないので、id_rsaのみ
Key:公開鍵の中身を入れます。

ssh -T git@github.comで接続確認
ローカルから、ssh -T git@github.comと打ち込みます。

>ssh -T git@github.com
Enter passphrase for key 'C:\Users\hoge/.ssh/id_rsa':
Hi githubix! You've successfully authenticated, but GitHub does not provide shell access.

You’ve successfully authenticatedと表示されればOK
簡単でしょ?

Could not open a connection to your authentication agent.

linuxにログインして、ssh-add -lと打つと、「Could not open a connection to your authentication agent.」と返ってくる。

agrant@precise64:~$ ssh-add -l
Could not open a connection to your authentication agent.

どうやらssh-agentが起動していない模様。eval ‘ssh-agent’と打つ。evalはシェルを実行

vagrant@precise64:~$ eval ‘ssh-agent’
SSH_AUTH_SOCK=/tmp/ssh-GxTXywae1697/agent.1697; export SSH_AUTH_SOCK;
SSH_AGENT_PID=1698; export SSH_AGENT_PID;
echo Agent pid 1698;

ssh-agent: 必要な時に秘密鍵を渡してくれる

再度、ssh-add -lと打つ

vagrant@precise64:~$ ssh-add -l
Could not open a connection to your authentication agent.

なにいいいいいいいいいいいいいいいいい

eval `ssh-agent -s`とする

vagrant@precise64:~$ eval `ssh-agent -s`
Agent pid 1708
vagrant@precise64:~$ ssh-add -l
The agent has no identities.

ひゃほおおおおおおおおおお

Linuxのssh-add コマンドとは何か?

ssh-addって何?

ssh-add: 認証エージェントに秘密鍵(id_rsa)を登録すること。
引数なしで実行された場合、~/.ssh/id_rsaが追加される。
秘密鍵(id_rsa)を読み込んだ後、ssh-addはそれに対応する情報を、秘密鍵のファイル名にサフィックス-cert.pubを追加したファイルから読み込もうとする。

秘密鍵の登録状況の確認

ssh-add -l

秘密鍵の確認

ssh-add hoge/fuga

ssh-keygenとは

ssh-keygenコマンドとは何か?

ssh-keygenコマンドは、sshで利用する認証用の鍵を生成・管理・変換するコマンド
sshプロトコルバージョン1のRSA鍵、sshプロトコルバージョン2のRSA鍵、DSA鍵が生成できる。

sshプロトコルのバージョンには2つある。
sshバージョン1 特許を持つ数種の暗号化アルゴリズムを使用し、通信ストリームに侵入者のデータ挿入を認める脆弱性
sshバージョン2 Red Hat Enterprise Linuxのopen sshセットはsshバージョン2を使用 鍵交換アルゴリズムを改良しており、バージョン2が推奨されている
RSA暗号とは 桁数が大きい合成数の素因数分解問題が困難であることを安全性の根拠とした公開鍵暗号の一つ
公開鍵:平文に暗号をかけるための鍵
秘密鍵:暗号文を元の平文に戻す為の鍵

ssh-keygenでは、公開鍵、暗号鍵両方つくる。

公開鍵認証の仕組み
事前にローカル側で作成した公開鍵を、ログイン先のサーバーに登録する。登録された公開鍵に対応した秘密鍵を持っているローカルから接続ができる。

実際に作ってみましょう
>ssh-keygen -t rsa
Generating public/private rsa key pair.
Enter file in which to save the key (C:\Users\user/.ssh/id_rsa):
Enter passphrase (empty for no passphrase):
Enter same passphrase again:
Your identification has been saved in C:\Users\user/.ssh/id_rsa.
Your public key has been saved in C:\Users\user/.ssh/id_rsa.pub.
The key fingerprint is:
hogehoge user@DESKTOP-7QL099V
The key’s randomart image is:
+—[RSA 2048]—-+
|B*oo. |
|E*.o. |
|%.* .+ |
|**.o=.o |
| ooo.= S |
| =.o.. |
| o.*.* . |
| ..o *.+ |
| .. o. .. |
+—-[SHA256]—–+

.sshにid_rsa(秘密鍵:暗号文を元の平文に戻す為の鍵)、id_rsa.pub(公開鍵:平文に暗号をかけるための鍵)ができている。
公開鍵認証による接続は、このid_rsa.pub(公開鍵)をリモート先に置いて、id_rsa(秘密鍵)で開けてログインする。

リモート先の「~/.ssh/authorized_keys」に公開鍵を登録する
vagrantの場合だと、/home/vagrant 配下の/.ssh/authorized_keysが既に生成されている。

公開鍵の中身(authorized_keys/p)を見てみる
vagrantのauthorized_keys

ssh-rsa AAAAB3NzaC1yc2EAAAADAQABAAABAQCwr/w9xN1wmHFNM3VCcf9wH9LRSLWxrE1tuQTRjp2VO//dmwwJZShapE+1/ylGt8QGnZSBNQqVPa/mOy9AZ47xOvnT9OXoKVinM3hASv02g+DsV5pUWujW6ToGXiW3CRtGvmDRMDpCs4ENBpxO82C3f7SavaqIiM3Wkrl5hYDJL0JkLKq8kcrDmDDAt3s1ZdkMt1255rXEGhDkHetdHFBw4ue7swumJ423tZShHRRQxzKEbUw44nBAvBAehogehoge vagrant

ssh-keygen -t rsaで作成した公開鍵(github_rsa.pub)

ssh-rsa AAAAB3NzaC1yc2EAAAADAQABAAABAQDRvyk/aNTrWKq/U5h7B2gA2dSmrsy7ngAgatv0PPq15XYR7oxFtlJQ8rqhbI9yA7P3zzE1d6SQGsWi/RXYTI/4hGhm6gmItBmOs4YKFdwTH0FqMtIZQ7UwJ/I5bY7tt+SWAJJhg3hQuVAPtzU80PJhDEiw1SY/ZxIfTMdfDqIb6fIIB/yZxZycMno9wBQlE9lgPRGqCr7dENH80Ua99QTb+VLy9AF6XbYQHRdH+KZ4drFOFWTVyzDoGZiazpmguBZdmpxyhogehoge user@DESKTOP-hogehoge

基本的に一緒だ!最後のvagrant, user@DESKTOP-hogehogeがusernameかな?

chmod 600 ~/.ssh/authorized_keys で、パーミッションを追加

やべー、公開鍵認証を理解した俺、かっけー

vagrantのnetworking: ポートフォワーディング

host machineへのアクセスへのオプションです。
まず、公式ドキュメントを見ましょう。
Vagrant Networking

Prot Forwarding:ポートフォワーディング
ポートフォワーディング:インターネットから特定のポート番号宛てに届いたパケットを、あらかじめ設定しておいたLAN側の機器に転送する機能

現状
localのvagrant rootディレクトリにファイルを置きます。

ブラウザでipをたたくと、jpegが反映されています。

port forwardingを追加

Vagrant.configure("2") do |config|
  config.vm.box = "hashicorp/precise64"
  config.vm.provision :shell, path: "bootstrap.sh"
  config.vm.network "private_network", ip: "192.168.33.10"
  config.vm.network :forwarded_port, guest:80, host: 4567
end

vagrant reload
http://127.0.0.1:4567/test.jpeg でたたく

上手くいってるっぽいです。
大体vagrantの基礎はこの辺で良いかな~

vagrantでprovisioning

provisioningとはリソースを提供できるように配置すること。
公式:Provisioning

あれ、若干初心者の域を超えてきてるか?全然意識してなかったが。。

まず、shell scriptを作ります。
bootstrap.shとします。

shellを書く

#!/usr/bin/env bash

apt-get update
apt-get install -y apache2
if ! [ -L /var/www ]; then
	rm -rf /var/www
	ln -fs /vagrant /var/www
fi

apt-get -> linuxでパッケージをインストール/アップデートする
-y -> yesを省略
-L -> ファイルがありシンボリックであれば真
-r -> ファイルがあり読み取り可能であれば真
-f -> ファイルがあり通常のファイルであれば真
-s -> ファイルがありサイズが0より大きければ真
ln -> link

vagrant fileでshellを読み込み
config.vm.provisionで shellを追記します。

  config.vm.box = "hashicorp/precise64"
  config.vm.provision :shell, path: "bootstrap.sh"

>vagrant reload
>vagrant ssh
>wget -qO- 127.0.0.1

あれ、なんか上手くいってない。。ああああああああああああああああああああああああ
provisonを実行するには、vagrant provisionだ

>vagrant provision
>vagran ssh
vagrant@precise64:~$ wget -qO- 127.0.0.1


  Index of /


Index of /

[ICO]NameLast modifiedSizeDescription

[   ]Vagrantfile15-Dec-2018 23:53 3.1K 
[TXT]bootstrap.sh16-Dec-2018 00:06 152  
[   ]foo15-Dec-2018 13:40 0  

Apache/2.2.22 (Ubuntu) Server at 127.0.0.1 Port 80
vagrant@precise64:~$

きたーーーーーーーーーーーーーーーーーーーー

vagrantでSynced Folder(共有フォルダ)の設定

Synced Foldersの意味がわかりませんでしたが、どうやら、共有フォルダのようです。
例に習って公式ドキュメントを見てみましょう。
Synced Folders

By using synced folders, Vagrant will automatically sync your files to and from the guest machine.
ローカルのフォルダとvmで共有できるそうだ!

え、何だって?

共有って凄くない!?

By default, Vagrant shares your project directory (remember, that is the one with the Vagrantfile) to the /vagrant directory in your guest machine.
ん?ローカルのvagrant upしたディレクトリと、home/vagrantが一緒?

vagrant@precise64:/home$ ls
vagrant
vagrant@precise64:/home$ cd vagrant
vagrant@precise64:~$ ls
postinstall.sh

postinstall.sh しかないよ。

vagrant@precise64:~$ ls /vagrant
Vagrantfile

topに戻ります。

vagrant@precise64:/$ ls
bin   etc         lib         media  proc  sbin     sys  vagrant
boot  home        lib64       mnt    root  selinux  tmp  var
dev   initrd.img  lost+found  opt    run   srv      usr  vmlinuz
vagrant@precise64:/$ cd vagrant
vagrant@precise64:/vagrant$ ls
Vagrantfile

ああああああああ、なるほど! vagrantフォルダと共有されてる!!!!!!!!!!!!!!

vagrant@precise64:/vagrant$ touch foo
vagrant@precise64:/vagrant$ ls
foo  Vagrantfile


これはすげー ビビった。