MySQLのIndexを理解しよう

まずテーブルを作ります。
mysql> create database user;
Query OK, 1 row affected (0.09 sec)

mysql> use user;
Database changed

mysql> create table `user`(
-> `id` int(11) not null auto_increment,
-> `name` varchar(255) not null,
-> `email` varchar(255) not null,
-> `password` varchar(255) not null,
-> `created` datetime not null,
-> `modified` timestamp NOT NULL DEFAULT CURRENT_TIMESTAMP ON UPDATE CURRENT_TIMESTAMP,
-> `deleted` datetime DEFAULT null,
-> PRIMARY KEY(`id`)
-> ) ENGINE=InnoDB DEFAULT CHARSET=utf8
-> ;
Query OK, 0 rows affected (0.48 sec)

# ストアドプロシージャ
DELIMITER //
CREATE PROCEDURE testInsert(IN max INT)
    BEGIN
    DECLARE cnt INT Default 1;
        simple_loop: LOOP
            INSERT INTO user(name, email, password, created) VALUES (CONCAT('user', cnt), concat('test', cnt, '@test.com'), concat('test_password', cnt), NOW());
            SET cnt = cnt+1;
            If cnt=max THEN
                LEAVE simple_loop;
            END IF;
        END LOOP simple_loop;
    END //

   ## インサート
   CALL testInsert(10000000);

   ## ストアドプロシージャーの削除
   DROP PROCEDURE testInsert;

ストアドプロシージャーって何?

mysql のindex

selectでwhereを使うときに早くなるのはわかるのだが、仕組みがよくわからない。
add indexでindexを追加する、ということで

mysql> describe items;
+———+———+——+—–+———+—————-+
| Field | Type | Null | Key | Default | Extra |
+———+———+——+—–+———+—————-+
| item_id | int(11) | NO | PRI | NULL | auto_increment |
| name | text | YES | | NULL | |
| price | int(11) | YES | | NULL | |
+———+———+——+—–+———+—————-+
3 rows in set (0.00 sec)

mysql> alter table items add index idx_hoge(name(5));
Query OK, 0 rows affected (0.49 sec)
Records: 0 Duplicates: 0 Warnings: 0

mysql> describe items;
+———+———+——+—–+———+—————-+
| Field | Type | Null | Key | Default | Extra |
+———+———+——+—–+———+—————-+
| item_id | int(11) | NO | PRI | NULL | auto_increment |
| name | text | YES | MUL | NULL | |
| price | int(11) | YES | | NULL | |
+———+———+——+—–+———+—————-+
3 rows in set (0.00 sec)

mysql> explain select * from items;
+—-+————-+——-+——+—————+——+———+——+——+——-+
| id | select_type | table | type | possible_keys | key | key_len | ref | rows | Extra |
+—-+————-+——-+——+—————+——+———+——+——+——-+
| 1 | SIMPLE | items | ALL | NULL | NULL | NULL | NULL | 3 | NULL |
+—-+————-+——-+——+—————+——+———+——+——+——-+
1 row in set (0.00 sec)

あれ?
>INDEXを作成すると、データテーブルとは別に検索用に最適化された状態でデータが保存
データ型そのものを変えるとは違う? どういうことだ?

>基本的にはデータ構造に対してというより
>そのテーブルに走るSQLに対応してINDEXは設定します。
データ構造は変わらない。つまり、indexを張った後も、
mysql> describe items;
+———+———+——+—–+———+—————-+
| Field | Type | Null | Key | Default | Extra |
+———+———+——+—–+———+—————-+
| item_id | int(11) | NO | PRI | NULL | auto_increment |
| name | text | YES | MUL | NULL | |
| price | int(11) | YES | | NULL | |
+———+———+——+—–+———+—————-+
3 rows in set (0.00 sec)

name のkeyがmulになっているが。。

mysql> explain select name from hogehoge where hoge > 20000;
+—-+————-+———-+——+—————+——+———+——+——+————-+
| id | select_type | table | type | possible_keys | key | key_len | ref | rows | Extra |
+—-+————-+———-+——+—————+——+———+——+——+————-+
| 1 | SIMPLE | hoge | ALL | NULL | NULL | NULL | NULL | 67 | Using where |
+—-+————-+———-+——+—————+——+———+——+——+————-+
1 row in set (0.00 sec)

んん、なんか全然意味が分からない。
とりえあずindexはカラムに対して貼るってことはわかった。

MySQL EXPLAIN

What is an EXPLAIN statement?
EXPLAIN is a statement for obtaining information about execution plan of SQL. The execution plan is the result of MySQL’s decision as to which index (or table scan without index) will process the query.

mysql> select * from items;
+———+———+——-+
| item_id | name | price |
+———+———+——-+
| 1 | U+1F363 | NULL |
+———+———+——-+
1 row in set (0.06 sec)

mysql> explain select * from items;
+—-+————-+——-+——+—————+——+———+——+——+——-+
| id | select_type | table | type | possible_keys | key | key_len | ref | rows | Extra |
+—-+————-+——-+——+—————+——+———+——+——+——-+
| 1 | SIMPLE | items | ALL | NULL | NULL | NULL | NULL | 3 | NULL |
+—-+————-+——-+——+—————+——+———+——+——+——-+
1 row in set (0.00 sec)

select_typeはクエリの種類を表すものであり、ズバリツリーの構造にそのまま反映される。
クエリの種類とはJOIN、サブクエリ、UNIONおよびそれらの組み合わせ。

idは実行順番を表す

Betternet Unlimited Free VPN Proxy

Chromeのブラウザアクセス時に、ipアドレスを変更することができるChrome Extension.
ユーザー数が100万人って、思ったより少ない気がしますが、まず入れてみましょう。

Chromeに追加したら、接続します。

うーん、なんか上手くいかないな。

env command

The env command sets an environment variable and executes a program.

option
– 0 : Make the end of the displayed line not a new line but a byte with a value of 0.
– i : Run the program without envrionment variables.
– u : variable name if the specified variable name is in the list of environment variables, delete it.

[vagrant@localhost ~]$ env
HOSTNAME=localhost.localdomain
NVM_CD_FLAGS=
PYENV_ROOT=/home/vagrant/.pyenv
TERM=xterm
SHELL=/bin/bash
HISTSIZE=1000
SSH_CLIENT=192.168.35.1 63549 22
SSH_TTY=/dev/pts/0
NVM_DIR=/home/vagrant/.nvm
USER=vagrant
LS_COLORS=rs=0:di=01;34:ln=01;36:mh=00:pi=40;33:so=01;35:do=01;35:bd=40;33;01:cd=40;33;01:or=40;31;01:mi=01;05;37;41:su=37;41:sg=30;43:ca=30;41:tw=30;42:ow=34;42:st=37;44:ex=01;32:*.tar=01;31:*.tgz=01;31:*.arj=01;31:*.taz=01;31:*.lzh=01;31:*.lzma=01;31:*.tlz=01;31:*.txz=01;31:*.zip=01;31:*.z=01;31:*.Z=01;31:*.dz=01;31:*.gz=01;31:*.lz=01;31:*.xz=01;31:*.bz2=01;31:*.tbz=01;31:*.tbz2=01;31:*.bz=01;31:*.tz=01;31:*.deb=01;31:*.rpm=01;31:*.jar=01;31:*.rar=01;31:*.ace=01;31:*.zoo=01;31:*.cpio=01;31:*.7z=01;31:*.rz=01;31:*.jpg=01;35:*.jpeg=01;35:*.gif=01;35:*.bmp=01;35:*.pbm=01;35:*.pgm=01;35:*.ppm=01;35:*.tga=01;35:*.xbm=01;35:*.xpm=01;35:*.tif=01;35:*.tiff=01;35:*.png=01;35:*.svg=01;35:*.svgz=01;35:*.mng=01;35:*.pcx=01;35:*.mov=01;35:*.mpg=01;35:*.mpeg=01;35:*.m2v=01;35:*.mkv=01;35:*.ogm=01;35:*.mp4=01;35:*.m4v=01;35:*.mp4v=01;35:*.vob=01;35:*.qt=01;35:*.nuv=01;35:*.wmv=01;35:*.asf=01;35:*.rm=01;35:*.rmvb=01;35:*.flc=01;35:*.avi=01;35:*.fli=01;35:*.flv=01;35:*.gl=01;35:*.dl=01;35:*.xcf=01;35:*.xwd=01;35:*.yuv=01;35:*.cgm=01;35:*.emf=01;35:*.axv=01;35:*.anx=01;35:*.ogv=01;35:*.ogx=01;35:*.aac=01;36:*.au=01;36:*.flac=01;36:*.mid=01;36:*.midi=01;36:*.mka=01;36:*.mp3=01;36:*.mpc=01;36:*.ogg=01;36:*.ra=01;36:*.wav=01;36:*.axa=01;36:*.oga=01;36:*.spx=01;36:*.xspf=01;36:
PYENV_VIRTUALENV_INIT=1
MAIL=/var/spool/mail/vagrant
PATH=/home/vagrant/.nvm/versions/node/v10.12.0/bin:/home/vagrant/.pyenv/plugins/pyenv-virtualenv/shims:/home/vagrant/.pyenv/shims:/home/vagrant/.pyenv/bin:/home/vagrant/.rbenv/shims:/home/vagrant/.rbenv/bin:/usr/local/bin:/bin:/usr/bin:/usr/local/sbin:/usr/sbin:/sbin:/home/vagrant/bin
PWD=/home/vagrant
LANG=ja_JP.UTF-8
RBENV_SHELL=bash
HISTCONTROL=ignoredups
PYENV_SHELL=bash
SHLVL=1
HOME=/home/vagrant
LOGNAME=vagrant
SSH_CONNECTION=192.168.35.1 63549 192.168.35.10 22
NVM_BIN=/home/vagrant/.nvm/versions/node/v10.12.0/bin
LESSOPEN=||/usr/bin/lesspipe.sh %s
G_BROKEN_FILENAMES=1
_=/bin/env

puppeteerを入れよう

$ npm install –save puppeteer

main.js

const puppeteer = require('puppeteer');
const url = 'http://www.google.co.jp';

(async function(){
	const browser = await puppeteer.launch();
	const page = await browser.newPage();
	const response = await page.goto(url);

	await browser.close();
})();

[vagrant@localhost ~]$ node main.js
(node:9969) UnhandledPromiseRejectionWarning: Error: Failed to launch chrome!
/home/vagrant/node_modules/puppeteer/.local-chromium/linux-662092/chrome-linux/chrome: error while loading shared libraries: libXss.so.1: cannot open shared object file: No such file or directory

TROUBLESHOOTING: https://github.com/GoogleChrome/puppeteer/blob/master/docs/troubleshooting.md

at onClose (/home/vagrant/node_modules/puppeteer/lib/Launcher.js:342:14)
at Interface.helper.addEventListener (/home/vagrant/node_modules/puppeteer/lib/Launcher.js:331:50)
at Interface.emit (events.js:187:15)
at Interface.close (readline.js:379:8)
at Socket.onend (readline.js:157:10)
at Socket.emit (events.js:187:15)
at endReadableNT (_stream_readable.js:1094:12)
at process._tickCallback (internal/process/next_tick.js:63:19)
(node:9969) UnhandledPromiseRejectionWarning: Unhandled promise rejection. This error originated either by throwing inside of an async function without a catch block, or by rejecting a promise which was not handled with .catch(). (rejection id: 1)
(node:9969) [DEP0018] DeprecationWarning: Unhandled promise rejections are deprecated. In the future, promise rejections that are not handled will terminate the Node.js process with a non-zero exit code.

あれれ

node.js, npmバージョンアップ

[vagrant@localhost ~]$ nvm install v10.12.0
Downloading and installing node v10.12.0…
Downloading https://nodejs.org/dist/v10.12.0/node-v10.12.0-linux-x64.tar.xz…
######################################################################## 100.0%
Computing checksum with sha256sum
Checksums matched!
Now using node v10.12.0 (npm v6.4.1)
[vagrant@localhost ~]$ nvm use v10.12.0
Now using node v10.12.0 (npm v6.4.1)

[vagrant@localhost ~]$ node -v
v10.12.0
[vagrant@localhost ~]$ npm -v
6.4.1

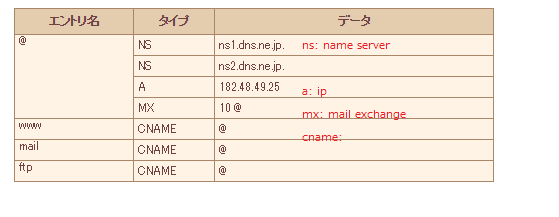
DNSのAレコードとCNAMEレコードの違い?

The DNS name server holds the correspondence bewteen domain names and host names and IP addresses as a databases. The data processed by this database is called a “resource record”.

The structure and format of this database and resource record depend on the DNS server. The most famous DNS server software “BIND” holds a database called “zone file” as a text file. In BIND, resource records such as correspondence between host name and IP addresses are described in zone files.

– A
– CNAME
– MX (mail exchange)
– NS (name server)
– SOA (start of authority)

The correspondence bewteen domain names and IP addresses does not have to be one to one. Multiple IP addresses can be associated with one domain name. In this case, plurality of IP addresses will be described in one A record.

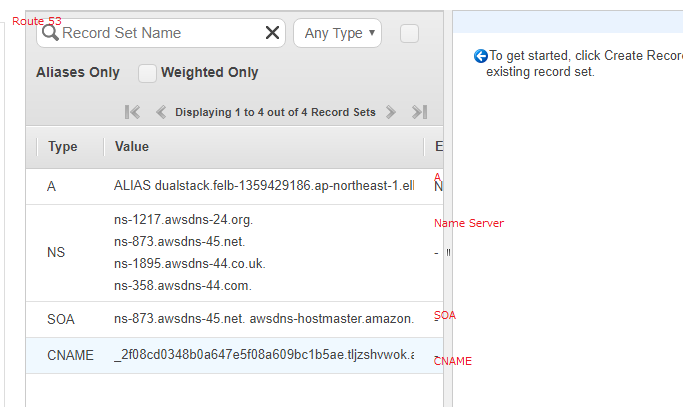
AWS Route 53

AWSの場合、Aレコードがipアドレスではありませんね。Name Serverも.org, .net, co.uk, comの4つが登録されています。

EtherVPN

EtherVPNってなに?

> SoftEther VPN (“SoftEther” は 「ソフトウェアによるイーサネット」を意味します) は、世界中で最も強力で使用が簡単な、複数 VPN プロトコルに対応した VPN ソフトウェアの 1 つです。SoftEther VPN は Windows、Linux、Mac、FreeBSD および Solaris 上で動作します。

>リモートアクセス VPN と 拠点間接続 VPN を簡単に構築できます。
>HTTP プロトコルを用いて SSL-VPN を伝送するため、NAT やファイアウォールを通過 できます。
>大変画期的な VPN over ICMP および VPN over DNS 機能。
なるほど、VPN接続ってことか。よりセキュアな接続をしたい時などに使いたいってことかしらね。

stopPropagation();

$(document).on('dragover dragenter dragend drag drop', function(e){
	e.stopPropagation();
	e.preventDefault();
});

> stopPropagation
> 親要素への伝播をキャンセルする。
ん?