digでmainnetのdnsseed.bluematt.meを叩く。
2つ目の項目”59″はTTL。CNAMEはあだ名みたいなことで、dnsseed.bluematt.me = x1.dnsseed.bluematt.me
下のIPがアクティブノードの接続先。
こうやってみると、DNSシードのレスポンスはアクティブノードのIPのみってことになる。
dnsseed.bluematt.me.	3599	IN	CNAME	x1.dnsseed.bluematt.me.
x1.dnsseed.bluematt.me.	59	IN	A	193.111.156.2
x1.dnsseed.bluematt.me.	59	IN	A	40.115.137.28
x1.dnsseed.bluematt.me.	59	IN	A	199.188.207.22
x1.dnsseed.bluematt.me.	59	IN	A	51.154.60.34
x1.dnsseed.bluematt.me.	59	IN	A	185.233.186.20
x1.dnsseed.bluematt.me.	59	IN	A	84.59.243.22
x1.dnsseed.bluematt.me.	59	IN	A	151.228.87.150
x1.dnsseed.bluematt.me.	59	IN	A	125.236.215.133
x1.dnsseed.bluematt.me.	59	IN	A	91.204.149.5
x1.dnsseed.bluematt.me.	59	IN	A	182.239.237.53
x1.dnsseed.bluematt.me.	59	IN	A	159.138.87.18
x1.dnsseed.bluematt.me.	59	IN	A	94.68.239.149
x1.dnsseed.bluematt.me.	59	IN	A	96.31.1.212
x1.dnsseed.bluematt.me.	59	IN	A	185.83.110.53
x1.dnsseed.bluematt.me.	59	IN	A	193.58.196.212
x1.dnsseed.bluematt.me.	59	IN	A	203.132.95.10
x1.dnsseed.bluematt.me.	59	IN	A	92.65.24.209
x1.dnsseed.bluematt.me.	59	IN	A	80.111.142.213
x1.dnsseed.bluematt.me.	59	IN	A	88.212.44.33
x1.dnsseed.bluematt.me.	59	IN	A	93.175.204.121
x1.dnsseed.bluematt.me.	59	IN	A	193.112.93.235
mainnetの、dnsseed.bitcoin.dashjr.orgの方もみてみます。あれ、dnsseed.bluematt.meとdnsseed.bitcoin.dashjr.orgだと、登録されているアクティブノードのIPが異なりますね。
dnsseed.bitcoin.dashjr.org. 429	IN	A	67.80.165.100
dnsseed.bitcoin.dashjr.org. 429	IN	A	37.187.122.82
dnsseed.bitcoin.dashjr.org. 429	IN	A	90.187.75.113
dnsseed.bitcoin.dashjr.org. 429	IN	A	155.138.208.87
dnsseed.bitcoin.dashjr.org. 429	IN	A	84.255.244.61
dnsseed.bitcoin.dashjr.org. 429	IN	A	85.214.38.87
dnsseed.bitcoin.dashjr.org. 429	IN	A	95.179.221.214
dnsseed.bitcoin.dashjr.org. 429	IN	A	173.249.0.235
dnsseed.bitcoin.dashjr.org. 429	IN	A	185.107.83.55
dnsseed.bitcoin.dashjr.org. 429	IN	A	139.162.7.9
dnsseed.bitcoin.dashjr.org. 429	IN	A	178.63.40.164
dnsseed.bitcoin.dashjr.org. 429	IN	A	96.241.146.239
dnsseed.bitcoin.dashjr.org. 429	IN	A	73.93.12.65
dnsseed.bitcoin.dashjr.org. 429	IN	A	119.17.151.61
dnsseed.bitcoin.dashjr.org. 429	IN	A	34.244.231.62
dnsseed.bitcoin.dashjr.org. 429	IN	A	94.112.167.129
dnsseed.bitcoin.dashjr.org. 429	IN	A	155.138.235.87
dnsseed.bitcoin.dashjr.org. 429	IN	A	199.247.18.168
dnsseed.bitcoin.dashjr.org. 429	IN	A	45.16.103.141
dnsseed.bitcoin.dashjr.org. 429	IN	A	5.135.159.65
dnsseed.bitcoin.dashjr.org. 429	IN	A	89.47.217.222
dnsseed.bitcoin.dashjr.org. 429	IN	A	185.25.48.148
dnsseed.bitcoin.dashjr.org. 429	IN	A	35.209.163.61
bluemattの方のipをjsonファイルに書き換えてみます。
{
	"ip": ["193.111.156.2", "40.115.137.28", "199.188.207.22", "51.154.60.34", "185.233.186.20", "84.59.243.22", "151.228.87.150", "125.236.215.133", "91.204.149.5", "182.239.237.53"]
}
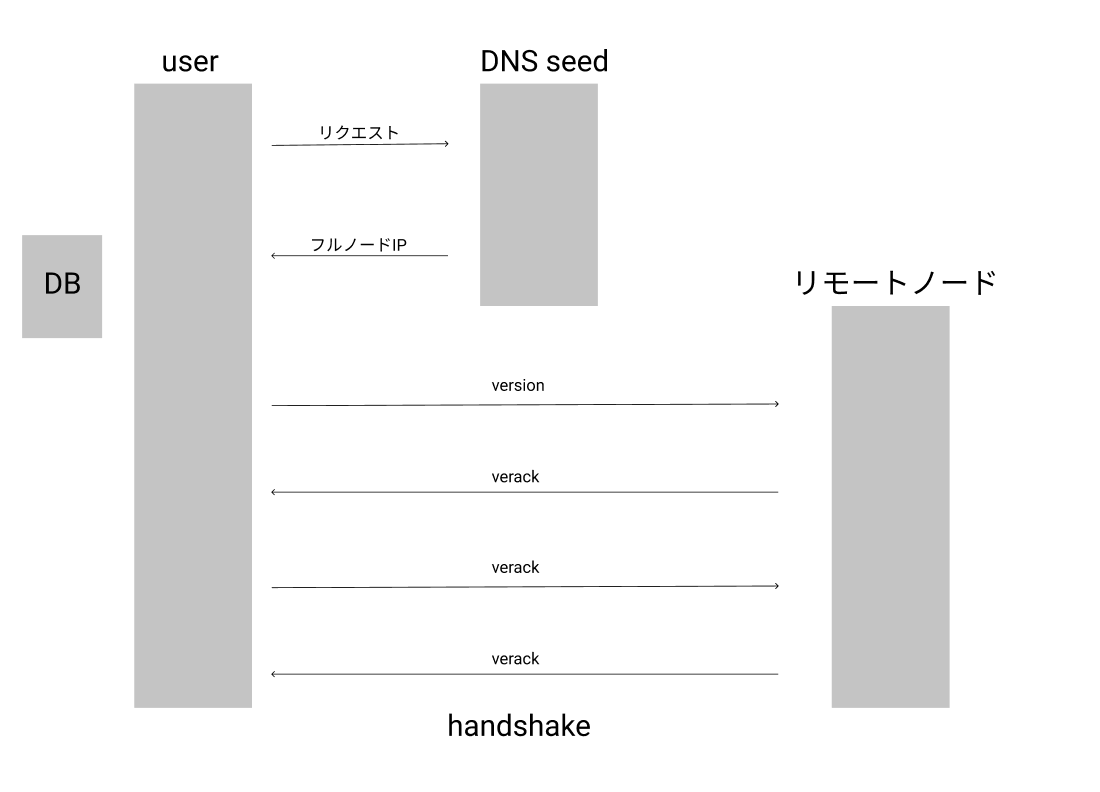
Bitcoin Coreはノード情報をディスク上のDBに保存って仕組みでしたね。
あれ、ディスクのDBってどういうこと?ubuntuだったら、postgresってこと?