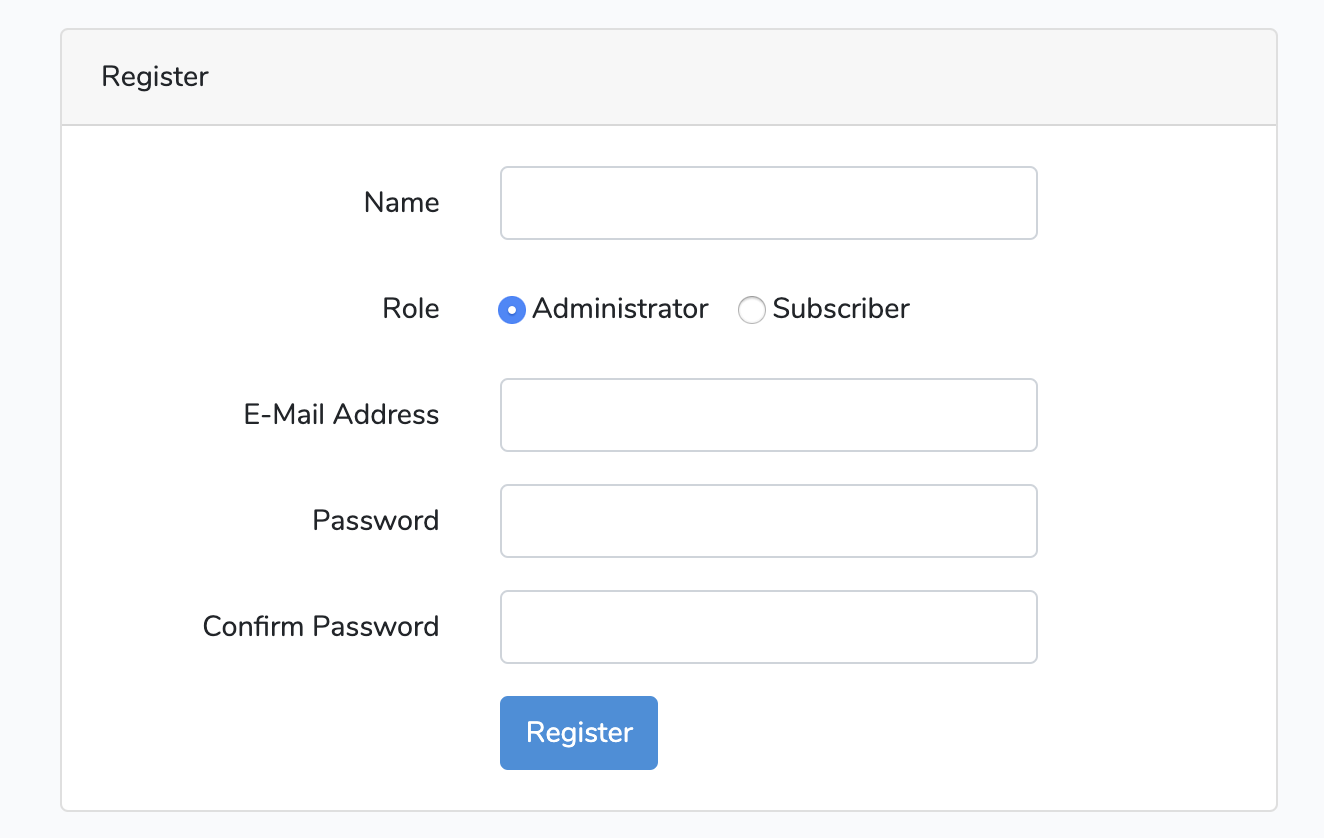
React.js 3

camelcaseでclassを書くこともできる。

<script type="text/babel">
        (() =>{

            ReactDOM.render(
                <div className="box"></div>,
                document.getElementById('root')
            );
    })();
    </script>

inlineもok

<script type="text/babel">
        (() =>{

            ReactDOM.render(
                <div style={{width:150, height:100, backgroundColor:'blue'}}></div>,
                document.getElementById('root')
            );
    })();
    </script>

onClick

<script type="text/babel">
        (() =>{

            function showMessage(){
                alert('this is alert!');
        }

            ReactDOM.render(
                <div style={{width:150, height:100, backgroundColor:'blue'}} onClick={showMessage}></div>,
                document.getElementById('root')
            );
    })();
    </script>

うぉ、なんかすげー疲れた。。
あれ、今の所は、レンダリングやalertなど特段JSで処理できることばかりだから、React.jsを使う場面がいまいち想像つかないぞ。。

React.js 2

JSXで渡せるのは一つだけ。
XMLベースのため、hrなど閉じタグのないタグはエラーになる。

<div id="root"></div> <!-- 部品を表示 -->
    <script type="text/babel">
        (() =>{
            const name = "yamada";
            ReactDOM.render(
                <p>React, {name.toUpperCase()}</p>, document.getElementById('root')
            );
    })();
    </script>

React, YAMADA

複数の要素を渡す場合は、親要素で囲う

<!DOCTYPE html>
<html lang="en">
<head>
    <meta charset="UTF-8">
    <title>React</title>
    <script src="https://unpkg.com/react@16/umd/react.production.min.js"></script>
    <script src="https://unpkg.com/react-dom@16/umd/react-dom.production.min.js"></script>
    <script src="https://unpkg.com/@babel/standalone/babel.min.js"></script>
    <link rel="stylesheet" href="css/styles.css">
</head>
<body>
    <div id="root"></div> <!-- 部品を表示 -->
    <script type="text/babel">
        (() =>{
            const name = "Yamada";
            ReactDOM.render(
                <div>
                    <p>React, {name.toUpperCase()}</p>
                    <p>{name.toLowerCase()}</p>
                </div>,
                document.getElementById('root')
            );
    })();
    </script>
</body>
</html>

React, YAMADA
yamada

React.js 1

– ユーザインタラクティブな画面をシンプルに構築
https://ja.reactjs.org/

– ES6:JavaScriptの新しい規格

– react developer toolsをchromeに入れる

あれ、atomと同じマークだ。atomってelectron&github開発だよね、確か。

– CDNはtutorialから取得
https://raw.githubusercontent.com/reactjs/reactjs.org/master/static/html/single-file-example.html

    <script src="https://unpkg.com/react@16/umd/react.development.js"></script>
    <script src="https://unpkg.com/react-dom@16/umd/react-dom.development.js"></script>
    <script src="https://unpkg.com/@babel/standalone/babel.min.js"></script>
<!DOCTYPE html>
<html lang="en">
<head>
    <meta charset="UTF-8">
    <title>React</title>
    <script src="https://unpkg.com/react@16/umd/react.production.min.js"></script>
    <script src="https://unpkg.com/react-dom@16/umd/react-dom.production.min.js"></script>
    <script src="https://unpkg.com/@babel/standalone/babel.min.js"></script>
    <link rel="stylesheet" href="css/styles.css">
</head>
<body>
    <div id="root"></div> <!-- 部品を表示 -->
    <script type="text/babel">
        (() =>{
            ReactDOM.render(
                <p>React</p>, document.getElementById('root')
            );
    })();
    </script>
</body>
</html>

React.jsとは

React.jsはUIのパーツを作るためのライブラリ
FacebookがOSSとして公開 https://github.com/facebook/react

idに○○を指定して、部品を動かす、などの際に使用する。

<html>
    <body>
        <div id="hogehoge"></div>
    </body>
</html>

Elemental UI

– ボタン、テキストが大量にあり、入力内容を即座に表示するような部品に活きる
 - 電卓、カレンダーなど
– jQueryのように、アニメーションが得意ではない
– Facebook, Instagram, Yahoo, Atomなどが導入
– Backbone.jsやAngular.jsとも併用可能
– 通常はJSXを使うが、自動コンパイルされる
– npm react-toolsによるJSXビルドの方法もある

React.jsのファイルを読み込む

<script src="http://fb.me/react-0.13.3.js"></script>
<script src="http://fb.me/JSXTransformer-0.13.3.js"></script>

sample

<html>
    <head>
        <script src="http://fb.me/react-0.13.3.js"></script>
        <script src="http://fb.me/JSXTransformer-0.13.3.js"></script>
    </head>
    <body>
        <div id="app"></div>

        <script type="text/jsx">
            var Test = React.createClass({
            render: function(){
            return (
                <p>This is React Test!</p>
            );
        }
        });

        var m = React.render(<Test />, document.getElementById('app'));
        </script>
    </body>
</html>

vue.js vs react.js


reactの基本は知っておく必要があるかもだが、vue.jsの方が強いな。

.editorconfigとは?

EditorConfigとは?
-> インデントや文字コード、改行コードなどコーディングスタイルに関するエディタの設定を異なるエディタ間で共有する規格

laravel5.8のdefault EditorConfig

root = true

[*]
charset = utf-8
end_of_line = lf
insert_final_newline = true
indent_style = space
indent_size = 4
trim_trailing_whitespace = true

[*.md]
trim_trailing_whitespace = false

[*.yml]
indent_size = 2

indentは4になってますね。

sublimeのeditorConfig
https://github.com/sindresorhus/editorconfig-sublime#readme
-for support
root
indent_style
indent_size
end_of_line
charset
trim_trailing_whitespace
insert_final_newline

[shift]+[command]+[p]でinstall packageを選択

EditorConfigインストール

ドキュメントルートに.editorconfigのファイルを作成し、コーディングするとタグ等が自動整形される。
すげーーーーーーーー、採用!

フロントエンドのアーキテクチャを考える

フロントエンドをどうするか?というと抽象的なので、言い方を変えると、どの技術を採用するか?
時代の潮流に合わせるのは鉄板か?

フレームワーク
– 第一候補 Vue.js
– 第二候補 React, Typescript
– 補欠 Angular, coffee

CSS周り
– Sass + Gulp

ライブラリー
– jQuery

命名規則
– BEM

コードフォーマッタ
– Prettier

構文チェック
– ESLint

グラフィック
– Fabric.js, three.js

その他
– Babel, Webpack
– コーディングガイドライン作成、コンポーネント一覧作成

こんなところか。
最低限、GAFAは見ておこう。

Google

- Experience with and passion for user-interface design.
- Knowledge of web libraries and frameworks such as AngularJS, Polymer, Closure or Backbone.
- Demonstrated sense of web design and attuned to the fundamentals of user experience, including accessibility.

Apple

-Experience with MongoDB and Node.JS
-Data visualization with D3.js or other framework
-Proficient understanding of client-side scripting and Javascript frameworks, including React, Typescript, Bootstrap, NPM

Facebook

- 3+ years of JavaScript experience, including concepts like asynchronous programming, closures, types, and ES6. Experience with React is a bonus
- Aware of but not reliant on object oriented frameworks (Prototype JS, MooTools, Dojo, etc.)

Amazon

- Strong knowledge of web technologies including: HTML5/CSS3/JavaScript, XML, JSON, React/Angular, web and server programming
- Passion to design and develop intuitive user interfaces

うーん、どこもUIへのpassionって書いてるなーww
node.js, react/angular、ES6は入れておいた方が良さそう。

ヤフー

React + Redux
TypeScript
Redux-thunk
Redux-first-router
Storybook
Jest
styled-jsx(Sassを書けるようにプラグイン入れてる)
Node.js

メルカリ

TypeScript, React.js, Next.js, Redux etc
Circle CI, GitHub, Slack, JIRA, Crowi, Spinnaker

Reduxも必須だな。
頭蒸発しそうだ。。

httpd24-tools conflicts with httpd-tools-2.2.34-1.15.amzn1.x86_64

playbook.ymlでyum installを書きます。

---
- hosts: all
  sudo: yes
  tasks:
    - name: Install a list of packages
      yum:
        name:
          - httpd24
          - php71
	  - mysql56-server
          - php71-mysqlnd
        state: present
    - name: start apache and enabled
      service: name=httpd state=started enabled=yes

fatal: [192.168.33.10]: FAILED! => {“changed”: false, “msg”: “Error: httpd24-tools conflicts with httpd-tools-2.2.34-1.15.amzn1.x86_64\n”, “rc”: 1, “results”: [“Loaded plugins: priorities, update-motd, upgrade-helper\nResolving Dependencies\n–> Running transaction check\n—> Package httpd24.x86_64 0:2.4.27-3.73.amzn1 will be installed\n–> Processing Dependency: httpd24-tools = 2.4.27-3.73.amzn1 for package: httpd24-2.4.27-3.73.amzn1.x86_64\n—> Package mysql56-server.x86_64 0:5.6.37-1.26.amzn1 will be installed\n–> Processing Dependency: mysql56-common(x86-64) = 5.6.37-1.26.amzn1 for package: mysql56-server-5.6.37-1.26.amzn1.x86_64\n–> Processing Dependency: mysql56-errmsg(x86-64) = 5.6.37-1.26.amzn1 for package: mysql56-server-5.6.37-1.26.amzn1.x86_64\n–> ….

httpd24とhttpd-tools-2.2.34がconflictとなっているようです。
勘違いしていたのが、php71を入れると、httpdがインストールされるので、httpd24は削除します。

PLAY [all] *********************************************************************

TASK [Gathering Facts] *********************************************************
ok: [192.168.33.10]

TASK [Install a list of packages] **********************************************
ok: [192.168.33.10]

TASK [start apache and enabled] ************************************************
changed: [192.168.33.10]

PLAY RECAP *********************************************************************
192.168.33.10 : ok=3 changed=1 unreachable=0 failed=0

OK!
ただ、playbook.ymlがどんどん増えていくんだが、これでいいのか?

yum installをansibleにまとめたい

ドキュメントに書いても良いが、やはりansibleでまとめたい。

hosts

192.168.33.10

ansible.cnf

[defaults]
hostfile =./hosts

playbook.yml

---
- hosts: all
  sudo: yes
  tasks:
    - name: install apache
      yum: name=httpd state=latest
    - name: start apache and enabled
      service: name=httpd state=started enabled=yes

[vagrant@localhost ansible]$ ansible-playbook playbook.yml –connection=local
[DEPRECATION WARNING]: [defaults]hostfile option, The key is misleading as it
can also be a list of hosts, a directory or a list of paths , use [defaults]
inventory=/path/to/file|dir instead. This feature will be removed in version
2.8. Deprecation warnings can be disabled by setting deprecation_warnings=False
in ansible.cfg.
[DEPRECATION WARNING]: Instead of sudo/sudo_user, use become/become_user and
make sure become_method is ‘sudo’ (default). This feature will be removed in
version 2.6. Deprecation warnings can be disabled by setting
deprecation_warnings=False in ansible.cfg.

PLAY [all] *********************************************************************

TASK [Gathering Facts] *********************************************************
ok: [192.168.33.10]

TASK [install apache] **********************************************************
changed: [192.168.33.10]

TASK [start apache and enabled] ************************************************
changed: [192.168.33.10]

PLAY RECAP *********************************************************************
192.168.33.10 : ok=3 changed=2 unreachable=0 failed=0

ansibleのyum moduleのページを見てみましょう。
https://docs.ansible.com/ansible/latest/modules/yum_module.html#yum-module

- name: Install a list of packages
  yum:
    name:
      - nginx
      - postgresql
      - postgresql-server
    state: present

なるほど、これで、middlewareを追加していけば良いのかな。

awslinuxにgit最新をインストール

yum installだとgit 1.7.1が入り、テンションだだ下がりなので、最新のgitをgzファイルからインストールします。

# git install
# 依存ライブラリインストール
$ sudo yum -y install gcc curl-devel expat-devel gettext-devel openssl-devel zlib-devel perl-ExtUtils-MakeMaker autoconf

# インストール場所に移動
$ cd /usr/local/src/

# ダウンロード対象を確認(https://mirrors.edge.kernel.org/pub/software/scm/git/)
# 今回は git-2.19.2.tar.gzを使う
$ sudo wget https://mirrors.edge.kernel.org/pub/software/scm/git/git-2.19.2.tar.gz

# ファイル解凍
$ sudo tar xzvf git-2.12.2.tar.gz

# 不要ファイル削除
$ sudo rm -rf git-2.19.2.tar.gz

# 移動してmake
$ cd git-2.19.2
$ sudo make prefix=/usr/local all
$ sudo make prefix=/usr/local install

# git version確認
$ git –version
git version 2.19.2

ふぅ

vagrantでamazon linuxの環境構築

virtual box, vagrantをダウンロード&インストールします。

# ディレクトリ作成
$ mkdir awslinux
$ cd awslinux

# vagrant init
$ vagrant init mvbcoding/awslinux
$ ls
Vagrantfile

vagrantfileのポートフォワーディングのコメントアウト削除

  # Create a private network, which allows host-only access to the machine
  # using a specific IP.
  config.vm.network "private_network", ip: "192.168.33.10"

# 少し時間がかかります
$ vagrant up

$ vagrant status
Current machine states:

default running (virtualbox)

The VM is running. To stop this VM, you can run `vagrant halt` to
shut it down forcefully, or you can run `vagrant suspend` to simply
suspend the virtual machine. In either case, to restart it again,
simply run `vagrant up`.

# ssh接続
mac:awslinux mac$ vagrant ssh

__| __|_ )
_| ( / Amazon Linux AMI
___|\___|___|

https://aws.amazon.com/amazon-linux-ami/2017.03-release-notes/
29 package(s) needed for security, out of 38 available
Run “sudo yum update” to apply all updates.
Amazon Linux version 2018.03 is available.
[vagrant@localhost ~]$

きゃー