レンズとは?
-> 光を屈折させるガラスやプラスチックで作られた薄い部品
-> レンズそのものだけでなく、ピント調整や光の量を調整する部品も合わせたレンズシステム全体を指すことが多い
-> 光の通り方をコンピュータで計算し、最適な像ができるよう設計している
-> ピント合わせはレンズの全部または一部を前後させる
-> ヘリコイド、カムなどがある
-> レンズにはフィルムやセンサーに届く光の量を調節する仕組みもあり、「しぼり」という
-> 凹レンズは近視、凸レンズは遠視。凸凹レンズは通常組み合わせる
レンズの材質、大きさ、厚み、曲面の具合、レンズの組み合わせなどによって、レンズを通過する光はさまざまに変化する
### オートフォーカス
– 距離を測るには三角測量という方法が使われる。これは、一つの辺の長さと二つの頂点の角度が決まれば、三角形が定まる、という原理に基づく
– ファインダーから被写体を覗き、カメラの中にある小さな鏡をAが映るように回転させる
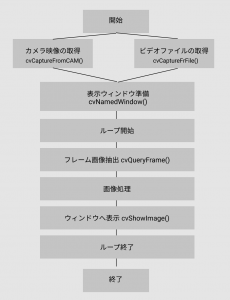
– デジカメでは、コントラスト検出方式というピント合わせ技術が用いられる
センサに写る像を調べながらレンズを前後に動かし、最もコントラストが高くなる位置にレンズを止める仕組み
多くのデジカメでは、ピントを調べる場所をいくつも用意して、ピントの合い方を計算して調整している
– 位相差検出式のオートフォーカスも一般的
### しぼりとシャッター
– 完全に開いてから完全に閉じるまでの露出時間をシャッタースピードという
– しぼりは感光材料に一度に当たる光の量を調整する仕組み
### レンズ
– センサーサイズや構造により焦点距離やレンズが異なる
### 材質
プリズムやハーフミラーなど光を透過させる光学ガラス、ミラーに使われる基板ガラス、屈折率や波長分散が細分化されるレンズ用ガラスに分けられる
アクロマティックレンズは屈折率の波長分散の小さいガラスと波長分散の大きいガラスを組み合わせることで、色収差を補正している
レンズ設計 例
焦点距離:200mm
イメージサークル:φ43.2(像高21.6mm)
Fナンバー:5.6
レンズ全長(第1面~像面):180mm以下
レンズ枚数:4枚以下
バックフォーカス:45mm以上
F値は小さいほどボケを活かした撮影が得意
### レンズの種類
(1)ズームレンズ
ズームできる範囲によってレンズの種類が分かれている
(2)単焦点レンズ
撮れる距離が決まっている
美しいボケ味を出したり暗い場所が得意
### 写す範囲
焦点距離によって「広角レンズ(35mm以下)」「標準レンズ(50mm前後)」「望遠レンズ(200mm以上)」に分類できる
「○○mm」の数字が大きいほど被写体に近づいたようになる
「18-55mm」など二つの数字が書いてあるのがズームレンズ
被写体との距離が決まっているシステムの場合は、その焦点距離に合わせたレンズを設計すれば良さそうですね。
CVで、ジェスチャ認識など被写体が動く想定の場合は、精度を上げるには被写体が動くから、ピントを合わせる必要がある。
んん、ちょっと待てよ。
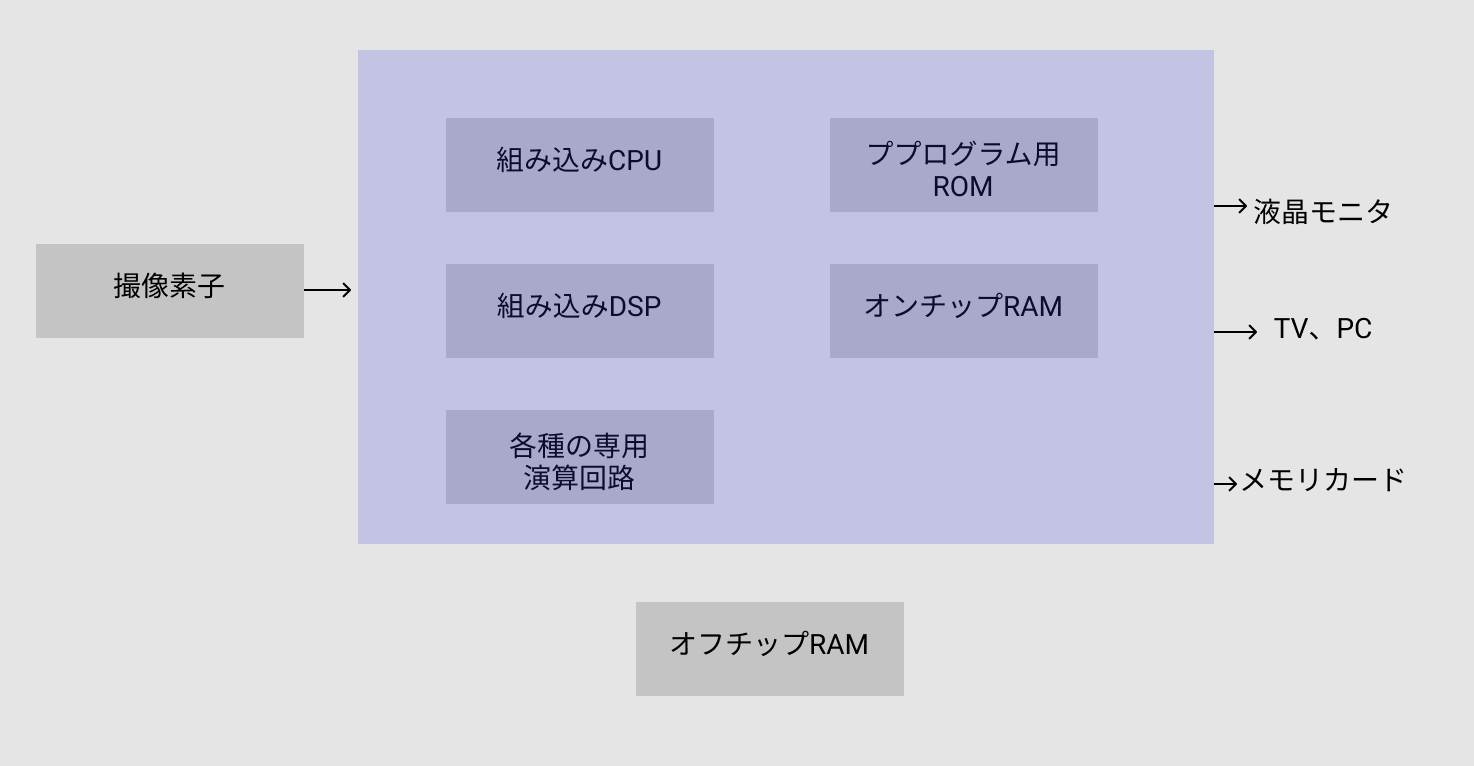
イメージセンサーで光電変換を行ってるわけだけど、凹レンズの制御は自動でできるってこと?
あれ、こう考えると、画像処理のアルゴリズムだけでなく、レンズの設計の問題も出てくる??