auth_userは、id, password, last_login, is_super, username, first_name, last_name, email, is_staff, is_active, date_joinedです。
permissionはidで管理してますね。
mysql> show tables;
+—————————-+
| Tables_in_myapp |
+—————————-+
| auth_group |
| auth_group_permissions |
| auth_permission |
| auth_user |
| auth_user_groups |
| auth_user_user_permissions |
| django_admin_log |
| django_content_type |
| django_migrations |
| django_session |
| myapp_friend |
+—————————-+
11 rows in set (0.00 sec)
mysql> describe auth_user;
+————–+————–+——+—–+———+—————-+
| Field | Type | Null | Key | Default | Extra |
+————–+————–+——+—–+———+—————-+
| id | int(11) | NO | PRI | NULL | auto_increment |
| password | varchar(128) | NO | | NULL | |
| last_login | datetime(6) | YES | | NULL | |
| is_superuser | tinyint(1) | NO | | NULL | |
| username | varchar(150) | NO | UNI | NULL | |
| first_name | varchar(30) | NO | | NULL | |
| last_name | varchar(150) | NO | | NULL | |
| email | varchar(254) | NO | | NULL | |
| is_staff | tinyint(1) | NO | | NULL | |
| is_active | tinyint(1) | NO | | NULL | |
| date_joined | datetime(6) | NO | | NULL | |
+————–+————–+——+—–+———+—————-+
11 rows in set (0.00 sec)
mysql> describe auth_group;
+——-+————–+——+—–+———+—————-+
| Field | Type | Null | Key | Default | Extra |
+——-+————–+——+—–+———+—————-+
| id | int(11) | NO | PRI | NULL | auto_increment |
| name | varchar(150) | NO | UNI | NULL | |
+——-+————–+——+—–+———+—————-+
2 rows in set (0.00 sec)
mysql> describe auth_group_permissions;
+—————+———+——+—–+———+—————-+
| Field | Type | Null | Key | Default | Extra |
+—————+———+——+—–+———+—————-+
| id | int(11) | NO | PRI | NULL | auto_increment |
| group_id | int(11) | NO | MUL | NULL | |
| permission_id | int(11) | NO | MUL | NULL | |
+—————+———+——+—–+———+—————-+
3 rows in set (0.00 sec)
mysql> describe auth_permission;
+—————–+————–+——+—–+———+—————-+
| Field | Type | Null | Key | Default | Extra |
+—————–+————–+——+—–+———+—————-+
| id | int(11) | NO | PRI | NULL | auto_increment |
| name | varchar(255) | NO | | NULL | |
| content_type_id | int(11) | NO | MUL | NULL | |
| codename | varchar(100) | NO | | NULL | |
+—————–+————–+——+—–+———+—————-+
4 rows in set (0.00 sec)
mysql> describe auth_user_groups;
+———-+———+——+—–+———+—————-+
| Field | Type | Null | Key | Default | Extra |
+———-+———+——+—–+———+—————-+
| id | int(11) | NO | PRI | NULL | auto_increment |
| user_id | int(11) | NO | MUL | NULL | |
| group_id | int(11) | NO | MUL | NULL | |
+———-+———+——+—–+———+—————-+
3 rows in set (0.00 sec)
mysql> describe auth_user_user_permissions;
+—————+———+——+—–+———+—————-+
| Field | Type | Null | Key | Default | Extra |
+—————+———+——+—–+———+—————-+
| id | int(11) | NO | PRI | NULL | auto_increment |
| user_id | int(11) | NO | MUL | NULL | |
| permission_id | int(11) | NO | MUL | NULL | |
+—————+———+——+—–+———+—————-+
3 rows in set (0.00 sec)
mysql> describe django_admin_log;
+—————–+———————-+——+—–+———+—————-+
| Field | Type | Null | Key | Default | Extra |
+—————–+———————-+——+—–+———+—————-+
| id | int(11) | NO | PRI | NULL | auto_increment |
| action_time | datetime(6) | NO | | NULL | |
| object_id | longtext | YES | | NULL | |
| object_repr | varchar(200) | NO | | NULL | |
| action_flag | smallint(5) unsigned | NO | | NULL | |
| change_message | longtext | NO | | NULL | |
| content_type_id | int(11) | YES | MUL | NULL | |
| user_id | int(11) | NO | MUL | NULL | |
+—————–+———————-+——+—–+———+—————-+
8 rows in set (0.00 sec)
mysql> describe django_content_type;
+———–+————–+——+—–+———+—————-+
| Field | Type | Null | Key | Default | Extra |
+———–+————–+——+—–+———+—————-+
| id | int(11) | NO | PRI | NULL | auto_increment |
| app_label | varchar(100) | NO | MUL | NULL | |
| model | varchar(100) | NO | | NULL | |
+———–+————–+——+—–+———+—————-+
3 rows in set (0.00 sec)
mysql> describe django_migrations;
+———+————–+——+—–+———+—————-+
| Field | Type | Null | Key | Default | Extra |
+———+————–+——+—–+———+—————-+
| id | int(11) | NO | PRI | NULL | auto_increment |
| app | varchar(255) | NO | | NULL | |
| name | varchar(255) | NO | | NULL | |
| applied | datetime(6) | NO | | NULL | |
+———+————–+——+—–+———+—————-+
4 rows in set (0.00 sec)
mysql> describe django_session;
+————–+————-+——+—–+———+——-+
| Field | Type | Null | Key | Default | Extra |
+————–+————-+——+—–+———+——-+
| session_key | varchar(40) | NO | PRI | NULL | |
| session_data | longtext | NO | | NULL | |
| expire_date | datetime(6) | NO | MUL | NULL | |
+————–+————-+——+—–+———+——-+
3 rows in set (0.00 sec)
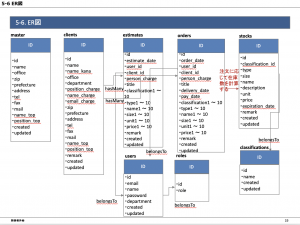
ER図で関係性を書きます。間違いに気づいたら修正。
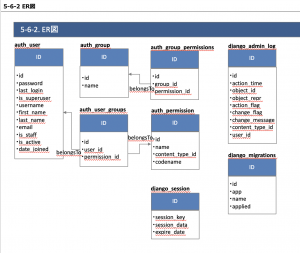
ユーザごとのパーミッションとグループのパーミッションがあります。
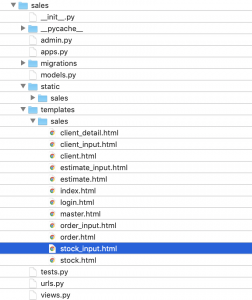
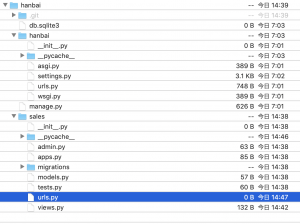
auth_userなどのマイグレーションファイルがmigrationフォルダにないから、どうやってカラムを修正するのかよくわかりませんが、django_migrationsを見てみます。
mysql> select * from django_migrations;
+—-+————–+——————————————+—————————-+
| id | app | name | applied |
+—-+————–+——————————————+—————————-+
| 1 | contenttypes | 0001_initial | 2020-08-22 13:08:21.814641 |
| 2 | auth | 0001_initial | 2020-08-22 13:08:22.311463 |
| 3 | admin | 0001_initial | 2020-08-22 13:08:23.937696 |
| 4 | admin | 0002_logentry_remove_auto_add | 2020-08-22 13:08:24.302298 |
| 5 | admin | 0003_logentry_add_action_flag_choices | 2020-08-22 13:08:24.312982 |
| 6 | contenttypes | 0002_remove_content_type_name | 2020-08-22 13:08:24.561732 |
| 7 | auth | 0002_alter_permission_name_max_length | 2020-08-22 13:08:24.586026 |
| 8 | auth | 0003_alter_user_email_max_length | 2020-08-22 13:08:24.613153 |
| 9 | auth | 0004_alter_user_username_opts | 2020-08-22 13:08:24.630056 |
| 10 | auth | 0005_alter_user_last_login_null | 2020-08-22 13:08:24.754862 |
| 11 | auth | 0006_require_contenttypes_0002 | 2020-08-22 13:08:24.762768 |
| 12 | auth | 0007_alter_validators_add_error_messages | 2020-08-22 13:08:24.779663 |
| 13 | auth | 0008_alter_user_username_max_length | 2020-08-22 13:08:24.800110 |
| 14 | auth | 0009_alter_user_last_name_max_length | 2020-08-22 13:08:24.828577 |
| 15 | auth | 0010_alter_group_name_max_length | 2020-08-22 13:08:24.856540 |
| 16 | auth | 0011_update_proxy_permissions | 2020-08-22 13:08:24.870114 |
| 17 | sessions | 0001_initial | 2020-08-22 13:08:24.943481 |
| 18 | myapp | 0001_initial | 2020-08-22 13:18:22.321078 |
+—-+————–+——————————————+—————————-+
18 rows in set (0.00 sec)
ここはちょっと本屋行って再確認するかな。