jpg: Chrome, Edge, Firefox, IE, Opera, Safari
L .jpg, .jpeg, .jfif, .pjpeg, .pjp
・フルカラー1670万色を表現できる
・非可逆圧縮の画像形式
・背景の透過は行えない
png: Chrome, Edge, Firefox, IE, Opera, Safari
L .png
・フルカラー1670万色を表現できる
・可逆圧縮の画像形式
・背景透過も可能
GIF: Chrome, Edge, Firefox, IE, Opera, Safari
L .gif
・単純な画像やアニメーションに適している
webp: Chrome, Edge, Firefox, Opera, Safari
L .webp
・画像とアニメーションの両方に最適
・WebP は PNG や JPEG よりもはるかに優れた圧縮を提供し、より高い色深度、アニメーションフレーム、透明度などに対応
TIFF: Safari ※webでは非推奨
L .tif, .tiff
・高い解像度が必要な場合に用いられる
BMP: Chrome, Edge, Firefox, IE, Opera, Safari ※webでは非推奨
L .bmp
・Microsoft Windowsのために作られた画像形式
・圧縮処理がされていない大きい画像
SVG: Chrome, Edge, Firefox, IE, Opera, Safari
L .svg
・ベクター画像形式
・異なる大きさで正確に描画する必要があるユーザーインターフェース要素、アイコン、図などに最適
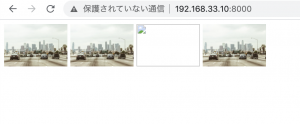
jpg, webp, tiff, bmpで表示
	<img src="img/test.jpg" width="120px" height="80px">
	<img src="img/test.webp" width="120px" height="80px">
	<img src="img/test.tiff" width="120px" height="80px">
	<img src="img/test.bmp" width="120px" height="80px">
tiffはsafariでないと表示されないです。