TensorFlowとは

– TensorFlowとは、Googleがオープンソースで公開している機械学習ライブラリ
– 大規模な数値計算を行うライブラリ

ubuntu20.04にtensorflowを入れていきます。

$ cat /etc/os-release
NAME=”Ubuntu”
VERSION=”20.04.1 LTS (Focal Fossa)”
$ sudo apt update
$ pip3 install –upgrade tensorflow
Collecting tensorflow
Downloading tensorflow-2.3.1-cp38-cp38-manylinux2010_x86_64.whl (320.5 MB)
|████████████████████████████████| 320.5 MB 18.5 MB/s eta 0:00:01Killed

gpuサポートの問題かな。。。別の方法で試してみる。

$ sudo apt install nvidia-cuda-toolkit

。。。
メモリ不足かな。
swapメモリを増やしてもう一度やってみる。

音声認識を実装したい

Web Speech APIを使いたいと思う

<!DOCTYPE html>
<html lang="en">
<head>
	<meta charset="UTF-8">
	<title>Document</title>
	<meta name="viewport" content="width=device-width, initial-scale=1, shrink-to-fit=no">
    <link rel="stylesheet" href="https://maxcdn.bootstrapcdn.com/bootstrap/4.0.0-beta.2/css/bootstrap.min.css">
</head>
<body>
	<h1 class="text-center h1">Web Speech API</h1>
	<div id="content">
		<input type="textarea" id="q" name="q" size=60>
		<input type="button" value="Click to Speak" onclick="recognition.start()">

	</div>
	<script src="https://code.jquery.com/jquery-3.2.1.slim.min.js"></script>
    <script src="https://cdnjs.cloudflare.com/ajax/libs/popper.js/1.12.3/umd/popper.min.js"></script>
    <script src="https://maxcdn.bootstrapcdn.com/bootstrap/4.0.0-beta.2/js/bootstrap.min.js"></script>
	<script>
		let recognition = new webkitSpeechRecognition();
		recognition.onresult = function(event) {
			if (event.results.length > 0){
				q.value = event.results[0][0].transcript;
			}
		}
	</script>
</body>
</html>

なんやこれは、、、 ここもコモディティ化されとんのか。。。

防犯カメラの仕組み

### 防犯カメラの種類
– ネットワークカメラ(IPカメラ)
L 無線LANや有線LANなどのネットワークの接続機能を持っており、ネットワークを通じて映像を確認できる。
L 本体にSDカードを入れて録画することができる

– Webカメラ
L 一般的に録画機能を持たず、USB接続してメッセージソフトで利用する。安価。

– 防犯カメラ
L 主な用途は防犯、防災、計測・記録

### カメラの形
– ドーム型、バレット型、ボックス型、パンチルトズーム型

### 録画機
カメラ映像を録画する機械のことをDVRという

ネットワークカメラ、IPカメラは無線LANで接続できる。一方、防犯カメラは同軸ケーブル、ビデオケーブルで接続する。いずれも電源は必要。

なるほど、ラズパイじゃなくても良かったのか。まあいいか。

[Laravel8.16.0] bootstrapでpaginationが崩れて表示される時

controller

public function show(){
        $products = DB::table('products')->Paginate(4);
        return view('admin.show', compact('products'));
    }

views

@foreach($products as $product)
	<p>{{ $product->name}}</p>
	@endforeach

	{{-- Pagination --}}
	<div class="d-flex justify-content-center">
            {!! $products->links() !!}
    </div>

は? 何これ?

app/Providers/AppServiceProvider.php

use Illuminate\Pagination\Paginator;
    public function boot()
    {
        //
        Paginator::useBootstrap();
    }

Ok, I think we got keep going men!

Mailgunで送信ドメインをカスタマイズしたい

Sending -> Domains -> Add new domain

テスト用として試したいだけなので、ドメインは「お名前.com」で取得してもうすぐ期限が切れそうな「free-engineer.work」を使いたいと思う。

「mg.free-engineer.work」で入力する。

すると、
「1. Go to your DNS provider」と表示される。
続いて、
TXT, MX, CNAMEを入力していきます。

Once you make the above DNS changes it can take 24-48hrs for those changes to propagate. We will email you to let you know once your domain is verified.

反映までに結構時間がかかりそうなので、それまで別のことをしたいと思う。

[Laravel8.16.0] Mailgunを実装する

$ composer require guzzlehttp/guzzle

env

MAIL_DRIVER=mailgun
MAIL_HOST=smtp.mailgun.org
MAIL_PORT=587
MAIL_USERNAME=postmaster@sandbox*.mailgun.org
MAIL_PASSWORD=*
MAIL_ENCRYPTION=tls
MAIL_FROM_ADDRESS=null
MAIL_FROM_NAME="${APP_NAME}"

config/mail.php
-> 特に変更なし

config/service.php

'mailgun' => [
        'domain' => env('*'),
        'secret' => env('*'),
        'endpoint' => env('MAILGUN_ENDPOINT', 'api.mailgun.net'),
    ],

来た! なんか色々戸惑ったけど、OK

sandbox.mgsend.net経由でもそんなに目立って悪くないように思うが、mailgunのドメイン設定もやりたい。
というか、腹減ったー 飯食うの忘れてた。

[PHP 7.4.11] Mailgunでメール送信

前提: mailgunにアカウントを登録しておく

$ composer require mailgun/mailgun-php kriswallsmith/buzz nyholm/psr7

require 'vendor/autoload.php';
use Mailgun\Mailgun;

$mgClient = Mailgun::create('${api key}');
$domain = "sandbox*.mailgun.org";

$result = $mgClient->messages()->send($domain, array(
    'from'    => 'info@hpscript.com',
    'to'      => '*@gmail.com',
    'subject' => 'Hello',
    'text'    => 'Testing some Mailgun awesomness!'
));

まじかよ。Github通りにやると上手くいく。

mailgun/mailgun-php だけでなく、kriswallsmith/buzz、nyholm/psr7もインストールしないと動かないから注意が必要。

OK、これをLaravelに実装する。

[Laravel8.16.0] Mailtrapでメール送信

$ composer require guzzlehttp/guzzle

config/mail.php

    'from' => [
        'address' => env('MAIL_FROM_ADDRESS', 'test@hpscript.com'),
        'name' => env('MAIL_FROM_NAME', 'Hpscript'),
    ],

.env

MAIL_MAILER=smtp
MAIL_HOST=smtp.mailtrap.io
MAIL_PORT=2525
MAIL_USERNAME=${userName}
MAIL_PASSWORD=${password}
MAIL_ENCRYPTION=tls
MAIL_FROM_ADDRESS=null
MAIL_FROM_NAME="${APP_NAME}"

$ php artisan make:mail TestMail
app/Mail/TestMail.php

    public function build()
    {
        return $this
                ->from("test@hpscript")
                ->subject("test send")
                ->view('email.test');
    }

resources/views/email/test.blade.php

test mail body

$ php artisan make:controller –resource MailController

Route

Route::get('/mail', [App\Http\Controllers\MailController::class, 'index']);

app/Http/Controllers/MailController.php

use Illuminate\Support\Facades\Mail;
use App\Mail\TestMail;

public function index()
    {
        //
        Mail::to('test@example.com')
        ->send(new TestMail());
    }

mailtrapはいいけど、実際に送れないと意味ない。
メール設計書を作成して、mailgunを使っていきます。

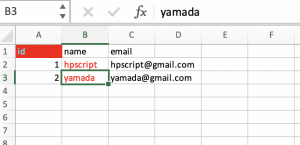
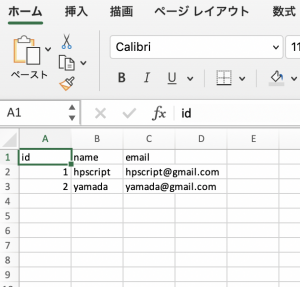
[Laravel8.16.0] CSVをimportする

1.fopenして、fputcsvで作成する手法。

public function csv(){
        $ary = [
            ["山田", "12", "O",""],
            ["田中", "20", "A",""],
            ["吉田", "18", "AB",""],
            ["伊藤", "19", "B", "エンジニア"]
        ]; 

        foreach($ary as $key => $value){
             array_splice($ary[$key], 1, 0, "");
        }

        $column = ["名前", "無記入", "年齢", "血液型", "備考"];
        array_unshift($ary, $column);

        $filename = "hogehoge.csv";
        $f = fopen($filename, "w");
        stream_filter_prepend($f,'convert.iconv.utf-8/cp932');
        if($f) {
            foreach($ary as $line){
                fputcsv($f, $line);
            }
        }
        header('Content-Type: application/octet-stream');
        header('Content-Length: '.filesize($filename));
        header('Content-Disposition: attachment; filename=hogehoge.csv');

        readfile($filename);
    }

2. StreamedResponseを使う書き方

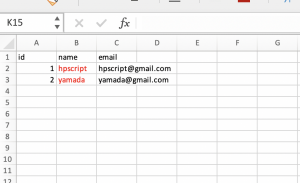
public function csv(){
        $data = User::all(); 
        $response = new StreamedResponse(function() use($data){
                $stream = fopen('php://output', 'w');
                stream_filter_prepend($stream, 'convert.iconv.utf-8/cp932//TRANSLIT');
                fputcsv($stream, ['id','name','email',]);
                foreach($data as $user){
                     fputcsv($stream, [$user['id'],$user['name'],$user['email'],]);
                }
                fclose($stream);
        });
        $response->headers->set('Content-Type', 'application/octet-stream');
        $response->headers->set('Content-Disposition', 'attachment; filename="user.csv"');
        return $response;
    }

やってることは一緒なんだけど、StreamedResponseの方が良い。

[Laravel8.16.0] バッチ処理を実装する

$ php artisan make:command TestBatch

-> app/Console/Commands に TestBatch.phpが出来ます。

protected $signature = 'batch:test';

    /**
     * The console command description.
     *
     * @var string
     */
    protected $description = 'Command description';

    /**
     * Create a new command instance.
     *
     * @return void
     */
    public function __construct()
    {
        parent::__construct();
    }

    /**
     * Execute the console command.
     *
     * @return int
     */
    public function handle()
    {
        echo "hello";
    }

$ php artisan list
batch
batch:test Command description

$ php artisan batch:test
hello

あとはsudo vi /etc/crontab で、$ php artisan batch:testを実行すればいいだけ。
そうだ、思い出した。