いよいよショッピングカートを作っていきます。
$ python3 manage.py startapp cart
setting.py
INSTALLED_APPS = [
    'shop',
    'search',
    'cart',
    // 省略
]
// 省略
        'DIRS': [os.path.join(BASE_DIR, 'shop', 'templates/'), os.path.join(BASE_DIR, 'search', 'templates/'), os.path.join(BASE_DIR, 'cart', 'templates/')],
cart/models.py
from django.db import models
from shop.models import Product

class Cart(models.Model):
	cart_id = models.CharField(max_length=250, blank=True)
	date_added = models.DateField(auto_now_add=True)

	class Meta:
		db_table = 'Cart'
		ordering = ['date_added']

	def __str__(self):
		return self.cart_id

class CartItem(models.Model):
	product = models.ForeignKey(Product, on_delete=models.CASCADE)
	cart = models.ForeignKey(Cart, on_delete=models.CASCADE)
	quantity = models.IntegerField()
	active = models.BooleanField(default=True)

	class Meta:
		db_table = 'CartItem'

	def sub_total(self):
		return self.product.price * self.quantity

	def __str__(self):
		return self.product.name
$ python3 manage.py makemigrations cart
$ python3 manage.py migrate
cart/urls.py
from django.urls import path
from . import views

app_name = 'cart'

urlpatterns = [
	path('', views.cart_detail, name='cart_detail'),
]
urls.py
urlpatterns = [
    path('admin/', admin.site.urls),
    path('shop/', include('shop.urls')),
    path('search/', include('search.urls')),
    path('cart/', include('cart.urls')),
]
cart/views.py
L session.session_keyでセッションの値を取得する
from django.shortcuts import render, redirect
from .models import Cart, CartItem
from django.core.exceptions import ObjectDoesNotExist

def _cart_id(request):
	cart = request.session.session_key
	if not cart:
		cart = request.session.create()
	return cart

def cart_detail(request, total=0, counter=0, cart_items = None):
	try:
		cart = Cart.objects.get(cart_id=_cart_id(request))
		cart_items = CartItem.objects.filter(cart=cart, active=True)
		for cart_item in cart_items:
			total += (cart_item.product.price * cart_item.quantity)
			counter += cart_item.quantity
	except ObjectDoesNotExist:
		pass

	return render(request, 'cart/cart.html', dict(cart_items = cart_items, total = total, counter = counter))
cart/template/cart/cart.html
{% extends "base.html" %}
{% load static %}
{% block metadescription %}
This is the shopping cart page.. Proceed to review your items and place the order.
{% endblock %}
{% block title %}
Cart - Various Product Store
{% endblock %}
{% block content %}
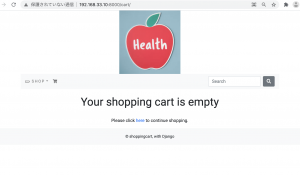
{% if not cart_items %}
<div>
<div class="text-center">
<br>
<h1 class="text center my_title">Your shopping cart is empty</h1>
<br>
<p class="text-center">
Please click <a href="{% url 'shop:all_product' %}">here</a> to continue shopping.
</p>
</div>
</div>
{% else %}
<div>
<div class="text-center">
<br>
<h1 class="text-center my_title">
Your shopping cart
</h1>
</div>
<br>
</div>
<div class="row mx-auto">
<div class="col-12 col-sm-12 col-lg-6 text-center">
<table class="table my_custom_table">
<thread class="my_custom_thread">
<tr>
<th colspan="5">
Your items
</th>
</tr>
</thread>
<tbody>
{% for cart_item in cart_items %}
<tr>
<td><a href="cart_item.product.get_absolute_url"><img src="{{cart_item.product.image.url}}" alt="" class="float-left rounded custom_image"></a></td>
<td class="text-left">
{{cart_item.product.name}}
<br>
SKU: {{cart_item.product.id}}
<br>
Unit Price: ${{cart_item.product.price}}
<br>
Qty: {{cart_item.quantity}} x ${{cart_item.product.price}}
</td>
<td>
${{cart_item.sub_total}}
</td>
{% if cart_item.quantity < cart_item.product.stock %}
<td>
<a href="{% url 'cart:add_cart' cart_item.product.id %}" class="custom_a"><i class="fas fa-plus-circle custom_icon"></i></a>
<a href="" class="custom_a"><i class="fas fa-minus-circle custom_icon"></a>
<a href="" class="custom_item"><i class="far fa-trash-alt"></a>
</td>
{% else %}
<td>
<a href="" class="custom_a"><i class="fas fa-minus-circle custom_icon"></a>
<a href="" class="custom_item"><i class="far fa-trash-alt"></i></a>
</td>
<td></td>
{% endif %}
</tr>
{% endfor %}
</tbody>
</table>
</div>
<div class="col-12 col-sm-12 col-lg-6 text-center">
<table class="table my_custom_table">
<thread class="my_custom_thead">
<tr>
<th>
Checkout
</th>
</tr>
</thread>
<tbody>
<tr>
<td>
Please review your shopping cart item before proceeding with the order payment.
</td>
</tr>
<tr>
<td class="text-left">
Your total is: <strong>${{total}}</strong>
</td>
</tr>
</tbody>
</table>
<div class="mx-auto">
<a href="{% url 'shop:all_product' %}" class="btn-secondary btn-block my_custom_button">Continue Shopping</a>
</div>
</div>
</div>
{% endif %}
{% endblock %}
models.py
from shop.models import Product

def add_cart(request, Product_id):
	product = Product.objects.get(id=product_id)
	try:
		cart = Cart.objects.get(cart_id=_cart_id(request))
	except Cart.DoesNotExist:
		cart = Cart.objects.create(
				cart_id = _cart_id(request)
			)
		cart.save()
	try:
		cart_item = CartItem.objects.get(product=product, cart=cart)
		cart_item.quantity += 1
		cart_item.save()
	except CartItem.DoesNotExist:
		cart_item = CartItem.objects.create(
				product = product,
				quantity = 1,
				cart = cart
			)
		cart_item.save()
	return redirect('cart:cart_detail')
urls.py
urlpatterns = [
	path('add/<int:product_id>/', views.add_cart, name='add_cart'),
	path('', views.cart_detail, name='cart_detail'),
]
product_detail.html
<a class="btn btn-secondary" href="{% url 'cart:add_cart' product.id %}">Add to Cart</a>

cart/views.py
def cart_remove(request, product_id):
	cart = Cart.objects.get(cart_id=_cart_id(request))
	product = get_object_or_404(Product, id=product_id)
	cart_item = CartItem.objects.get(product=product, cart=cart)
	if cart_item.quantity > 1:
		cart_item.quantity -= 1
		cart_item.save()
	else:
		cart_item.delete()
	return redirect('cart:cart_detail')

def full_remove(request, product_id):
	cart = Cart.objects.get(cart_id=_cart_id(request))
	product = get_object_or_404(Product, id=product_id)
	cart_item = CartItem.objects.get(product=product, cart=cart)
	cart_item.delete()
	return redirect('cart:cart_detail')
urls.py
app_name = 'cart'

urlpatterns = [
	path('add/<int:product_id>/', views.add_cart, name='add_cart'),
	path('', views.cart_detail, name='cart_detail'),
	path('remove/<int:product_id>/', views.cart_remove, name='cart_remove'),
	path('full_remove/<int:product_id>/', views.full_remove, name='full_remove')
]
cart/context_processors.py
from .models import Cart, CartItem
from .views import _cart_id

def counter(request):
	item_count = 0
	if 'admin' in request.path:
		return {}
	else:
		try:
			cart = Cart.objects.filter(cart_id=_cart_id(request))
			cart_items = CartItem.objects.all().filter(cart=cart[:1])
			for cart_item in cart_items:
				item_count += cart_item.quantity
		except Cart.DoesNotExist:
			item_count = 0
	return dict(item_count = item_count)
settings.py
            'context_processors': [
                'django.template.context_processors.debug',
                'django.template.context_processors.request',
                'django.contrib.auth.context_processors.auth',
                'django.contrib.messages.context_processors.messages',
                'cart.context_processors.counter',
            ],
navbar.html
			{% if item_count > 0 %}
			<li class="nav-item">
				<a class="nav-link" href="{% url 'cart:cart_detail' %}">({{item_count}})</a>
			</li>
			{% endif %}
cart.html
						{% if cart_item.quantity < cart_item.product.stock %}
						<td>
							<a href="{% url 'cart:add_cart' cart_item.product.id %}" class="custom_a"><i class="fas fa-plus-circle custom_icon"></i></a>

							<a href="{% url 'cart:cart_remove' cart_item.product.id %}" class="custom_a"><i class="fas fa-minus-circle custom_icon"></a>

							<a href="{% url 'cart:full_remove' cart_item.product.id %}" class="custom_item"><i class="far fa-trash-alt"></a>
						</td>
						{% else %}
						<td>
							<a href="{% url 'cart:cart_remove' cart_item.product.id %}" class="custom_a"><i class="fas fa-minus-circle custom_icon"></a>

							<a href="{% url 'cart:full_remove' cart_item.product.id %}" class="custom_item"><i class="far fa-trash-alt"></i></a>
						</td>
						<td></td>
						{% endif %}

なるほど、ただこれだと、ログアウトした時の処理などが入ってないから、完成には遠いな。Libraryはないのかしら?