– カメラが起動し撮影できる
– SNSなどでシェアできる
カメラの起動はUIImagePickerControllerクラス、Coordinatorを使う
delegateメソッドを使って撮影後の写真を画面に表示できる
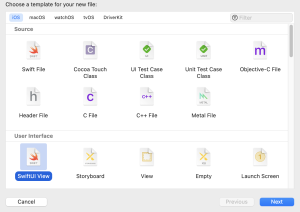
ContentView.swift, ImagePickerView.swift, ActivityView.swiftを作成する
UIKitはiOS開発に中核となるコントロール群
ImagePickerView.swiftを作成
L UIKitは自動的にimportされている
L 写真と撮影画面を閉じるフラグ設定
L UIImageは画像を管理するクラス、 Coordinator機能を利用する
import SwiftUI

struct ImagePickerView: UIViewControllerRepresentable {
    @Binding var isShowSheet: Bool

    @Binding var captureImage: UIImage?
}
coordinator class追加
class Coordinator: NSObject,
                UINavigationControllerDelegate,
                       UIImagePickerControllerDelegate {

        let parent: ImagePickerView

        init(_ parent: ImagePickerView){
            self.parent = parent
        }

        func imagePickerController(
            _ picker: UIImagePickerController,
            didFinishPickingMediaWithInfo info:
            [UIImagePickerController.InfoKey : Any]){

            if let originalImage =
                info[UIImagePickerController.InfoKey.originalImage]
                as? UIImage {
                parent.captureImage = originalImage
                }
                parent.isShowSheet = false
            }

        func imagePickerControllerDidCancel(
            _ picker: UIImagePickerController) {
                parent.isShowSheet = false
            }
    }
UIImagePickerController.InfoKey.originalImageでカメラで撮影した写真が取得できる
### Coordinator classとUIViewControllerRepresentable
    func makeUIViewController (
        context: UIViewControllerRepresentableContext<ImagePickerView>) ->
    UIImagePickerController {

        let myImagePickerController = UIImagePickerController()
        myImagePickerController.sourceType = .camera
        myImagePickerController.delegate = context.coordinator
        return myImagePickerController
    }

    func updateUIViewController(
        _ uiViewController: UIImagePickerController,
        context: UIViewControllerRepresentableContext<ImagePickerView>){

        }
カメラを使用するときにはカメラの動きを指示するオプションを設定する
プロパティは sourceType, mediaType, cameraDevice, cameraFlashModeなどがある
delegateとは、あるクラスで行いたい処理の一部を他のクラスに任せたり、任せた処理を指定したクラスに通知する仕組み
protocolから処理を依頼されるクラスがある
### カメラの起動処理
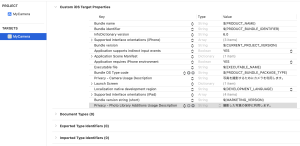
カメラのプロパティを設定する行を追加
Privacy – Camera Usage Description : 写真を撮影するためにカメラを利用します。
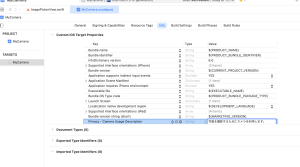
プロパティリストはアプリの稼働に必要な設定情報を管理
### カメラ起動処理
struct ContentView: View {
    var body: some View {
        VStack {
            Spacer()
            Button(action: {
                if UIImagePickerController.isSourceTypeAvailable(.camera){
                    print("カメラは使用できます")
                } else {
                    print("カメラは使用できません")
                }
            }){
                Text("カメラを起動する")
                    .frame(maxWidth: .infinity)
                    .frame(height: 50)
                    .multilineTextAlignment(.center)
                    .background(Color.blue)
                    .foregroundColor(Color.white)
            }
        }
    }
}
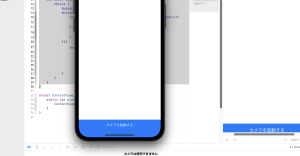
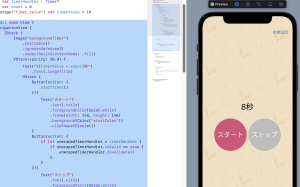
### カメラを起動して撮影
@State var captureImage: UIImage? = nil
@State var isShowSheet = false

// 省略

            Spacer()
            if let unwrapCaptureImage = captureImage {

                Image(uiImage: unwrapCaptureImage)
                    .resizable()
                    .aspectRatio(contentMode: .fit)
            }
// 省略
            Button(action: {
                if UIImagePickerController.isSourceTypeAvailable(.camera){
                    print("カメラは使用できます")
                    isShowSheet = true
                } else {
                    print("カメラは使用できません")
                }
            }){
                Text("カメラを起動する")
                    .frame(maxWidth: .infinity)
                    .frame(height: 50)
                    .multilineTextAlignment(.center)
                    .background(Color.blue)
                    .foregroundColor(Color.white)
            }
// 省略
            .sheet(isPresented: $isShowSheet){
                ImagePickerView(
                    isShowSheet: $isShowSheet,
                    captureImage: $captureImage)
            }
カメラは覚えることが多いが、アプリで一番面白そうな分野ではある