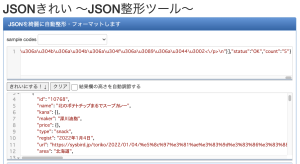
お菓子の虜 web APIの情報を使ってiOSで表示する
お菓子の虜 Web API
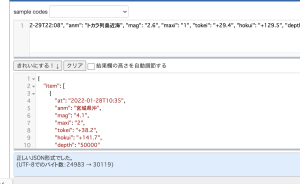
e.g.: https://www.sysbird.jp/webapi/?apikey=guest&keyword=%E3%82%AB%E3%83%AC%E3%83%BC%E5%91%B3&format=json
https://www.sysbird.jp/webapi/?apikey=guest&keyword=%E3%82%AB%E3%83%AC%E3%83%BC%E5%91%B3&format=json&max=10
request parameters: id, type, year, keyword, max, order
response: status, count, item(id, name, maker, price, type, regist, url, image, comment)
@StateObject, @State, @Bindingを学ぶ
検索画面はContentView.swiftで一覧表示処理、OkashiData.swiftでカスタムクラスで実装
OkashiData.swift
L StructではObservableOjectは利用できない、 classで定義する必要がある
L ObservableOjectはカスタムクラス内でデータの状態を管理するために利用
class OkashiData: ObservableObject {

    func searchOkashi(keyword: String) async {
        print(keyword)
    }
}
Taskは一連の流れを処理する
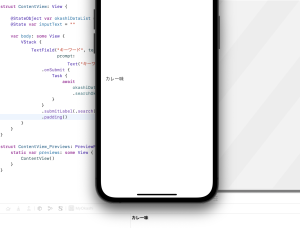
ContentView.swift
struct ContentView: View {

    @StateObject var okashiDataList = OkashiData()
    @State var inputText = ""

    var body: some View {
        VStack {
            TextField("キーワード", text: $inputText,
                      prompt: Text("キーワードを入力してください。"))
                .onSubmit {
                    Task {
                        await okashiDataList.searchOkashi(keyword: inputText)
                    }
                }
                .submitLabel(.search)
                .padding()
        }
    }
}
WebAPIのリクエストURLを組み立てる
OkashiData.swift
    func searchOkashi(keyword: String) async {
        print(keyword)

        guard let keyword_encode = keyword.addingPercentEncoding(withAllowedCharacters: .urlQueryAllowed) else {
            return
        }

        guard let req_url = URL(string:
            "https://www.sysbird.jp/webapi/?apikey=guest&format=json&keyword=\(keyword_encode)&max=10&order=r") else {
            return
        }
        print(req_url)
    }
レスポンスデータ(JSON)を記憶する構造体
L Itemとすることで複数の構造体を保持できる配列として保存
L ?を付与してnilを許容するオプショナル型として宣言する
    struct ResultJson: Codable {
        struct Item: Codable {
            let name: String?
            let url: URL?
            let image: URL?
        }
        let item: [Item]?
    }
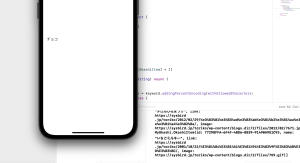
URLSessionでデータをダウンロード
URLSession.sharedで簡素に実行
        do {
            let(data, _) = try await URLSession.shared.data(from: req_url)

            let decoder = JSONDecoder()
            let json = try decoder.decode(ResultJson.self, from: data)

            print(json)
        } catch {
            print("エラーが出ました")
        }
最近のiOSはマルチコアプロセッサが搭載されている
### 取得したデータをListで一覧表示
Itemの構造体を作成し、List表示
L Identifiableに準拠すると、一意に識別できる型として定義できる
L uuidを用いてランダムな一意の値を生成
import SwiftUI
import UIKit

struct OkashiItem: Identifiable {
    let id = UUID()
    let name: String
    let link: URL
    let image: URL
}
@StateObject、ObservableObjectを使用すると@Publishedを使用できる
プロパティラッパーはプロパティをラップして機能を追加する
            guard let items = json.item else {return}

            DispatchQueue.main.async {
                self.okashiList.removeAll()
            }

            for item in items {
                if let name = item.name,
                   let link = item.url,
                   let image = item.image {
                   let okashi = OkashiItem(name: name, link: link, image: image)
                    DispatchQueue.main.async {
                        self.okashiList.append(okashi)
                    }
                }
            }
            print(self.okashiList)
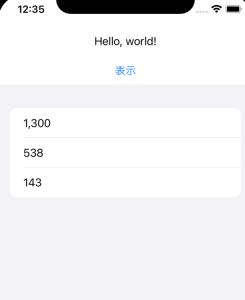
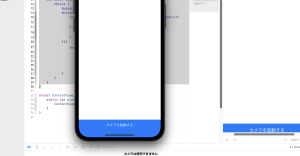
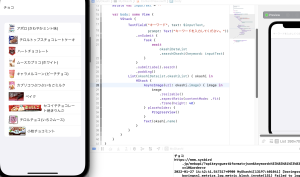
### リストで一覧表示
    var body: some View {
        VStack {
            TextField("キーワード", text: $inputText,
                      prompt: Text("キーワードを入力してください。"))
                .onSubmit {
                    Task {
                        await okashiDataList.searchOkashi(keyword: inputText)
                    }
                }
                .submitLabel(.search)
                .padding()
            List(okashiDataList.okashiList) { okashi in
                HStack {
                    AsyncImage(url: okashi.image) { image in
                        image
                            .resizable()
                            .aspectRatio(contentMode: .fit)
                            .frame(height: 40)
                    } placeholder: {
                        ProgressView()
                    }
                    Text(okashi.name)
                }
            }
        }
    }
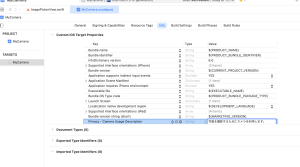
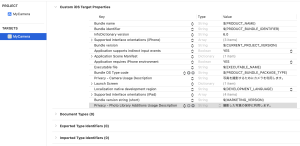
### Webページの表示
SFSafariViewControllerでWebページを表示
SafariView.swift
L SafariServicesでアプリの中でsafariを起動する
import SafariServices

struct SafariView: UIViewControllerRepresentable {

    var url: URL

    func makeUIViewController(context: Context) -> SFSafariViewController {
        return SFSafariViewController(url: url)
    }

    func updateUIViewController(_ uiViewController: SFSafariViewController, context: Context){

    }
}
struct ContentView: View {

    @StateObject var okashiDataList = OkashiData()
    @State var inputText = ""
    @State var showSafari = false

    var body: some View {
        VStack {
            TextField("キーワード", text: $inputText,
                      prompt: Text("キーワードを入力してください。"))
                .onSubmit {
                    Task {
                        await okashiDataList.searchOkashi(keyword: inputText)
                    }
                }
                .submitLabel(.search)
                .padding()
            List(okashiDataList.okashiList) { okashi in

                Button(action: {
                    showSafari.toggle()
                }){
                    HStack {
                        AsyncImage(url: okashi.image) { image in
                            image
                                .resizable()
                                .aspectRatio(contentMode: .fit)
                                .frame(height: 40)
                        } placeholder: {
                            ProgressView()
                        }
                        Text(okashi.name)
                    }
                }
            }
        }
    }
}
これは凄い