Content-TypeはHTTPレスポンスヘッダに付与する属性
text/plain, text/html, application/json, application/pdfなど
### X-Content-Type-Options:nosniffとは?
ファイルの内容をContent-Type属性から判断してとお願いできる。
phpの場合
header("X-Content-Type-Options: nosniff");
なるほどー やりおる
随机应变 ABCD: Always Be Coding and … : хороший

Content-TypeはHTTPレスポンスヘッダに付与する属性
text/plain, text/html, application/json, application/pdfなど
### X-Content-Type-Options:nosniffとは?
ファイルの内容をContent-Type属性から判断してとお願いできる。
phpの場合
header("X-Content-Type-Options: nosniff");
なるほどー やりおる
### VPN概要
– 内部ネットワークあどれすは通常インターネットからDNSの名前解決ができない
– 接続先がプライベートアドレスを使っている場合もインターネットを介して接続できない
– 誰でも内部ネットワークに通信できるとセキュリティ上問題
— VPNだと認証後に接続先ネットワークと直接接続されているように使うことができる
— VPNはファイヤーウォールと一緒、個別に構築する場合はDMZに配置する
– 専用線は第三者がアクセスできないので通信の盗聴を予防できる
– VPNであれば既存の公衆回線を利用できる
– 離れた場所にあるネットワークに対し、同じLANにいるようなアクセスが実現できる
### トンネリング
元々のパケットにインターネットで使われるIPアドレスを追加することでインターネットでルーティングできるようになる。受信側では、追加されたIPアドレスを外して送信先のIPアドレスと通信
パケットにアドレス等を追加することをカプセル化と言う
データの暗号化には共通鍵暗号方式がよく使われる(DES, 3DES, RC4, AES, RSAなど)
### VPN接続の認証や共通鍵作成
ID, Passwordハッシュが使われる。MD5, SHA1, SHA2等が使われる
データ等をハッシュを利用してMAC値を生成(HMACと言う)
閉域網はインターネットとは分離隔離された形で閉域網を構築している
なるほどー、閉域網かあ
$feed = file_get_contents('https://developer.apple.com/news/rss/news.rss');
$rss = simplexml_load_string($feed);

$i=0;
foreach($rss->channel->item as $item) {
	if($i < 10) {
		$date = $item->pubDate;
		$title = $item->title;
		$description = strip_tags($item->description);
		$description = substr($description, 0, 150) . "...";
		echo $date . "\n";
		echo $title . "\n";
		echo $description . "\n\n";
	}
	$i++;
}
$ php index.php
Tue, 15 Feb 2022 10:00:46 PST
Enable Family Sharing for your subscriptions
Family Sharing helps people share access to eligible auto-renewable subscriptions with up to five iCloud family members across their Apple devices. Yo…
Tue, 08 Feb 2022 08:40:52 PST
Get ready for App Store sessions
Connect with Apple experts through online sessions February 15 to March 29 to learn about the latest App Store features and get your questions answere…
Thu, 03 Feb 2022 22:35:55 PST
Additional details available for dating apps in the Netherlands
Throughout its history, Apple’s App Store has helped drive innovation in the Netherlands. Today, the iOS app economy supports over 184,000 Dutch job…
Tue, 01 Feb 2022 12:18:13 PST
Updated Apple Developer certificates now available
As a reminder, the intermediate certificate updates are now available for the Apple Push Notification service (APNs) and Developer ID.Apple Worldwide …
Wed, 26 Jan 2022 13:32:49 PST
Apple Search Ads now supports custom product pages
With custom product pages, you can create up to 35 additional versions of your App Store product page to showcase different app features, content, or …
Tue, 25 Jan 2022 16:27:41 PST
New App Store Connect API capabilities now available
The App Store Connect API now offers greater flexibility to automate and customize workflows for your app. With these new capabilities, you can create…
Sat, 22 Jan 2022 09:28:08 PST
Deadline for in-app purchase and account deletion requirements extended
In order to provide more time for you to update your apps, we’ve changed the following requirement deadlines to June 30, 2022.Online group event in-…
Thu, 20 Jan 2022 14:18:26 PST
Custom offer codes for subscriptions now available
Now it’s even easier to acquire, retain, and win back subscribers. In addition to one-time-use codes, you can now create custom codes in App Store Con…
Wed, 19 Jan 2022 07:00:24 PST
Explore the latest videos
Discover how you can add support for in-app events, develop for Apple Watch, learn about Metal for A15, and more.
これをメールでcronで送るか…

ほう
Button("Place Order"){
	Task {
		await placeOrder()
	}
}

func placeOrder() async {
	guard let encoded = try? JSONEncoder().encode(order) else {
		print("Failed to encode order")
		return
	}

	let url = URL(string: "https://hoge.com")!
	var request = URLRequest(url: url)
	request.setValue("application/json", forHTTPHeaderField: "Content-Type")
	request.httpMethod = "POST"

	do {
		let (data, _) = try await URLSession.shared.upload(for: request, from: encoded)
	} catch {
		print("Checkout failed.")
	}
}
どのようにデータをPOSTしているのか、なんとなくイメージはついた。
ああああ、Swiftやらなきゃあああああああああああああ
どうしよう、これ。。。
特定のページを開くというマクロ
Sub workbook_open()
	ActiveSheet.Hyperlinks.Add(Anchor:=Range("A1"),_
	Address:="",
	_TextToDisplay:="解説ページへ!").Follow
End Sub
上記のように、添付ファイルにマクロを仕込み、ユーザが開封したらマクロが起動する。
WannaCryの例だと、WindowsのMS17-010という脆弱性があるサーバー・パソコンで感染を広げる。この脆弱性は、ファイル共有のしくみ(SMBv1と呼ばれる通信プロトコル)にあり、プリンターの共有やファイル共有で使われている。これが残った状態で、かつインターネットに特定の条件の下で接続したままでいると、外部からの攻撃で侵入されてWannaCryに感染してしまう。
なるほどー
$ sudo docker run –rm php:8.0-rc php -v
$ echo “ index.php
$ docker run –rm -p 8000:80 -v `pwd`:/var/www/html php:8.0-rc-apache
declare(strict_types=1);

$f = function(int|string $v){
	var_dump($v);
};

$f(100);
$f("abc");
$f(true);
declare(strict_types=1);

final class User {
	public function __construct(
		public int $id,
		private string $name,
	){}
}

var_dump(new User(1, 'Foo'));
ふむー
putでファイルを転送し、getでファイルを取得する
### コマンドラインでSFTP接続する方法
$ sftp ubuntu@***.**.**.**
sftp> put sample.txt
Uploading sample.txt to /home/ubuntu/sample.txt
sample.txt 100%
### シェルでSFTPする方法
test.shにファイルの転送、取得を書いて、sample.shにftp接続する際のパスワードを書きます。
$ chmod +x test.sh
$ chmod +x sample.sh
test.sh
sftp ubuntu@***.**.***.** << END
get nodesource_setup.sh
put sample.txt
quit
END
sample.sh
#!/bin/bash
expect -c "
  set timeout 3
  spawn ./test.sh
  expect \"ubuntu@***.**.***.**'s password:\"
  send \"hogehoge\n\"
  interact
"
$ ./sample.sh
spawn ./test.sh
ubuntu@***.**.***.**’s password:
Connected to ***.**.***.**.
sftp> get nodesource_setup.sh
Fetching /home/ubuntu/nodesource_setup.sh to nodesource_setup.sh
/home/ubuntu/nodesource_setup.sh 100% 14KB 345.7KB/s 00:00
sftp> put sample.txt
Uploading sample.txt to /home/ubuntu/sample.txt
sample.txt 100% 4 0.3KB/s 00:00
sftp> quit
ほう、これがやりたかった。
sftp ubuntu@hoge.com としてもできるが、passwordの入力は同じか…
AWSが提供する専用接続サービスで、ユーザのネットワーク環境からAWSまでインターネットを経由せずプライベートな接続を確立することができる。
ユーザがAWSのパートナー設備に用意された相互接続ポイント(AWS Direct Connectロケーション)と間接的に接続する
「安定性」「セキュリティ」「コスト」
HULFTとは、ファイルという形になった情報を転送し、その情報を転送する際に発生する前後の処理を統合的に扱うためのソフトウェア
→ TPC SYN (TCP接続を確立する際にクライアントから送られるパケット)
← TCP SYN+ACK(接続を受け入れる際にはACKフラグが一緒になったSYN/ACKパケットで応答する。TCPの3way handshake)
→ TPC ACK
→ 配信情報を送信
← 応答
→ ファイルデータ送信(小分けにしてデータを送信)
← 受信済みデータ量返信
→ TPC FIN
← TCP FIN+ACK
→ TPC ACK
TCP接続確立後、配信側で必要に応じてコード変換、圧縮、暗号化などの前処理が行われる
配信側は前処理が終わったファイルをTCP接続で集信側に送信
集信側は、暗号化されたデータの複合、圧縮されたデータの解凍、コード変換などの処理を必要に応じて行う
ファイル転送終了後、TCP接続が切断され、HULFT配信が終了する
ファイル転送前処理: ファイル入力、コード返還(各種汎用機で使われている文字コードに対応)、圧縮(ランレングス法に似た圧縮とDeflate圧縮の2種類)、暗号化(HULFT暗号、C4S暗号、AES)、転送の順番で配信が行われる
※メモリ上で行われるため、前後処理のための中間ファイル等は生成されない
hulftのistall
# pwd
/usr/local/HULFT/insttmp
# ./installer
インストールの開始
シリアル番号とプロダクトキーの入力
利用期間ライセンスキー
インストール方法の選択
トレースログ出力方式の選択
インストール条件の確認
インストールの終了
環境変数の設定
実行モジュール格納ディレクトリの設定
L HULFTの実行モジュールがある、実行モジュール格納ディレクトリをシェルの環境変数に設定します。環境変数名は、「HULEXEP」です。この環境変数を設定することにより、HULFTが実行するプログラムのPATHを自動的に検索できます。また、このディレクトリをPATHに設定することにより、HULFTの実行モジュールがあるディレクトリ以外からもHULFTを起動できます。
# HULEXEP=/usr/local/HULFT/bin
# export HULEXEP
# PATH=/usr/local/HULFT/bin:$PATH
# export PATH
環境設定ファイル格納ディレクトリの設定
L HULFTが使用する環境設定ファイルのある、環境設定ファイル格納ディレクトリをシェルの環境変数に設定します
環境変数の確認
# echo $HULPATH
/usr/local/HULFT/etc
# echo $HULEXEP
/usr/local/HULFT/bin
# echo $PATH (sh系の場合)
/usr/local/HULFT/bin:/usr/local/bin:/bin:/usr/bin:/usr/sbin ..
配信処理を行うためには、配信デーモンを起動する必要があります。
# hulsndd
集信デーモンの起動
L 集信処理を行うためには、集信デーモンを起動する必要があります。
# hulrcvd
要求受付デーモンの起動
L 相手からの要求を受け付けるためには、要求受付デーモンを起動する必要があります。
HULFTの起動確認
L 各デーモン起動コマンド入力後、以下のコマンドなどによりプロセスの状態を確認します。
# hulsndd
# hulrcvd
# hulobsd
# ps -ef | grep hul
root 21207 1 0 22:49:30 ? 0:00 hulrcvd
root 21205 1 0 22:49:26 ? 0:00 hulsndd
root 21209 1 0 22:49:32 ? 0:00 hulobsd
管理情報の登録
L HULFTでは配信側と集信側に同一のファイルIDを指定します。ファイルIDは50文字以内の英数字で指定します。ファイルIDに関連付けられた管理情報を元にファイル転送を行います。ファイルIDは1ファイルごとに配信側(配信管理情報)および集信側(集信管理情報)に登録する必要があります。
配信要求(配信側起動のファイル転送)
L 配信要求は転送するファイルを持つ側からの起動でファイル転送を行う場合に使用します。
履歴の確認(配信側起動のファイル転送)
送信要求(集信側起動のファイル転送)
要求状態の確認(集信側起動のファイル転送)
L「送信要求(集信側起動のファイル転送)」で行ったファイル転送の結果を確認します。配信側ホストには配信履歴が表示され、集信側ホストには集信履歴が表示されます。
FTP接続の場合はファイルの整合性チェックまで行わない
HULFTが何やってるかは大体わかった。
AWS OpsWorkとは?
Chef(Rubyで記述)やPuppet(manufestで記述)のマネージド型インスタンスを利用できるようになる構成管理サービス
Cloudformationと異なり、アプリケーション周りのリソースに限られる
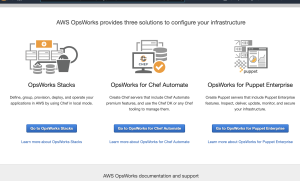
Add Stackで始めてみます。
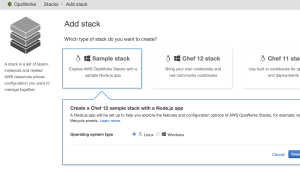
IAMでopsworksのfullaccessの権限を付与したroleを作成し、add stackとする。
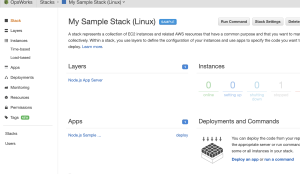
My Sample Stackが出来ているのがわかる。
Statusがstopedなので、startをrequestする。
なるほど、簡易化されているのか…
これも何となくわかったわ