$ sudo apt update
$ sudo apt install redis-server
$ sudo systemctl enable redis-server
$ sudo systemctl start redis-server
$ redis-cli ping
Vagrantfile
config.vm.network "forwarded_port", guest: 6379, host: 6379 # 追加
うまくいかんな…
随机应变 ABCD: Always Be Coding and … : хороший

$ sudo apt update
$ sudo apt install redis-server
$ sudo systemctl enable redis-server
$ sudo systemctl start redis-server
$ redis-cli ping
Vagrantfile
config.vm.network "forwarded_port", guest: 6379, host: 6379 # 追加
うまくいかんな…
MainViewModel.kt
import androidx.lifecycle.ViewModel
import androidx.lifecycle.viewModelScope
import kotlinx.coroutines.delay
import kotlinx.coroutines.flow.MutableStateFlow
import kotlinx.coroutines.flow.StateFlow
import kotlinx.coroutines.launch

class MainViewModel : ViewModel() {
    private val _counter = MutableStateFlow(0)
    val counter: StateFlow<Int> = _counter

    fun startCounting() {
        viewModelScope.launch {
            for (i in 1..10) {
                delay(1000) // 1秒待つ
                _counter.value = i
            }
        }
    }
}
package com.example.myapplicationcoroutine

import android.os.Bundle
import androidx.activity.ComponentActivity
import androidx.activity.compose.setContent
import androidx.activity.enableEdgeToEdge
import androidx.activity.viewModels
import androidx.lifecycle.lifecycleScope
import kotlinx.coroutines.flow.collectLatest
import kotlinx.coroutines.launch
import android.widget.Button
import android.widget.TextView
import androidx.compose.foundation.layout.fillMaxSize
import androidx.compose.foundation.layout.padding
import androidx.compose.material3.Scaffold
import androidx.compose.material3.Text
import androidx.compose.runtime.Composable
import androidx.compose.ui.Modifier
import androidx.compose.ui.tooling.preview.Preview
import com.example.myapplicationcoroutine.ui.theme.MyApplicationCoroutineTheme

class MainActivity : ComponentActivity() {

    private val viewModel: MainViewModel by viewModels()

    override fun onCreate(savedInstanceState: Bundle?) {
        super.onCreate(savedInstanceState)
        setContentView(R.layout.activity_main)

        val counterTextView = findViewById<TextView>(R.id.counterTextView)
        val startButton = findViewById<Button>(R.id.startButton)

        // ボタンを押すとカウントスタート
        startButton.setOnClickListener {
            viewModel.startCounting()
        }

        // Flowを監視してUI更新
        lifecycleScope.launch {
            viewModel.counter.collectLatest { value ->
                counterTextView.text = "カウント: $value"
            }
        }
    }
}
<?xml version="1.0" encoding="utf-8"?>
<LinearLayout
    xmlns:android="http://schemas.android.com/apk/res/android"
    android:layout_width="match_parent"
    android:layout_height="match_parent"
    android:orientation="vertical"
    android:gravity="center"
    android:padding="16dp">

    <TextView
        android:id="@+id/counterTextView"
        android:layout_width="wrap_content"
        android:layout_height="wrap_content"
        android:text="カウント: 0"
        android:textSize="24sp"
        android:layout_marginBottom="24dp"/>

    <Button
        android:id="@+id/startButton"
        android:layout_width="wrap_content"
        android:layout_height="wrap_content"
        android:text="カウント開始"/>
</LinearLayout>
UsersDefaultsとはiOS や macOS アプリで ちょっとしたデータを簡単に保存できる仕組み です。
使い所
ユーザー名やメールアドレス
設定(ダークモードON/OFF、通知ON/OFFなど)
チュートリアルを見たかどうか
ちょっとしたリスト(お気に入りのIDなど)
struct ContentView: View {
@State private var userMessage: String = ""
@State private var aiReply: String = ""
@State private var items: [String] = UserDefaults.standard.stringArray(forKey: "items") ?? ["りんご", "バナナ", "みかん"]
var body: some View {
NavigationView {
VStack(spacing: 20) {
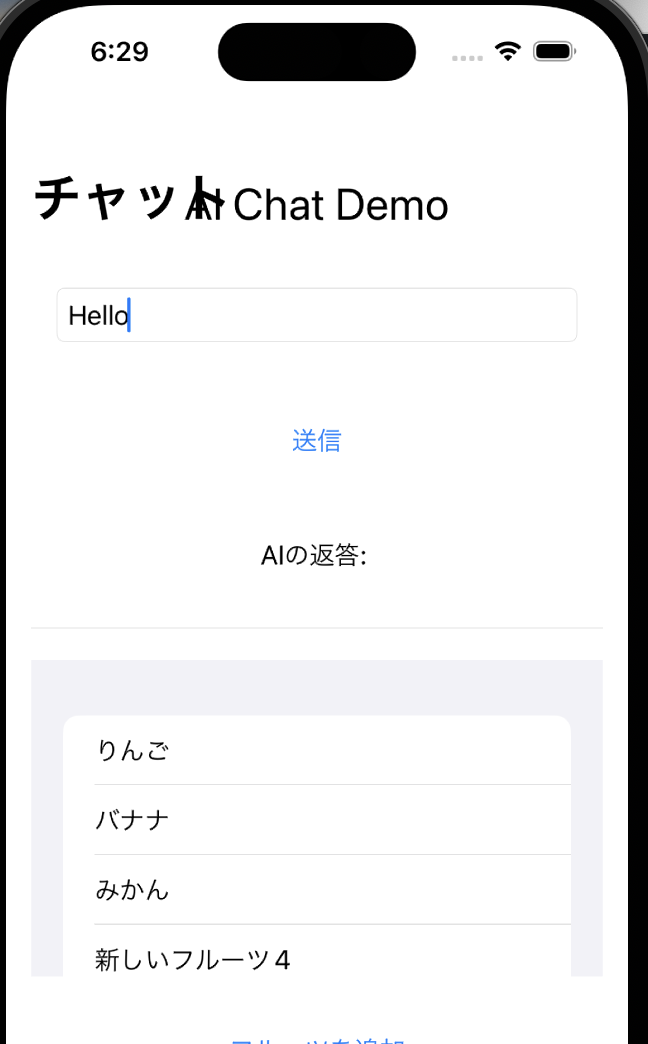
Text("AI Chat Demo")
.font(.title)
TextField("メッセージを入力", text: $userMessage)
.textFieldStyle(RoundedBorderTextFieldStyle())
.padding()
Button("送信") {
sendMessage()
}
.padding()
Text("AIの返答: \(aiReply)")
.padding()
Divider()
List {
ForEach(items, id:\.self) { item in
Text(item)
}
.onDelete(perform: deleteItem)
.onMove(perform: moveItem)
}
.frame(height: 200)
Button("フルーツを追加") {
addItem()
}
.padding()
Spacer()
NavigationLink(destination: ImageViewPage()) {
Text("画像ページへ移動")
.foregroundColor(.white)
.padding()
.background(Color.blue)
.cornerRadius(8)
}
NavigationLink(destination: VideoViewPage()) {
Text("動画ページへ移動")
.foregroundColor(.white)
.padding()
.background(Color.green)
.cornerRadius(8)
}
// NavigationLink(destination: CounterPage()) {
// Text("カウンターページへ")
// .foregroundColor(.white)
// .padding()
// .background(Color.green)
// .cornerRadius(8)
// }
}
.padding()
.navigationTitle("チャット")
}
}
func saveItems() {
UserDefaults.standard.set(items, forKey: "items")
}
func addItem() {
items.append("新しいフルーツ\(items.count + 1)")
saveItems()
}
func deleteItem(at offsets: IndexSet) {
items.remove(atOffsets: offsets)
saveItems()
}
func moveItem(from source: IndexSet, to destination: Int) {
items.move(fromOffsets: source, toOffset: destination)
saveItems()
}
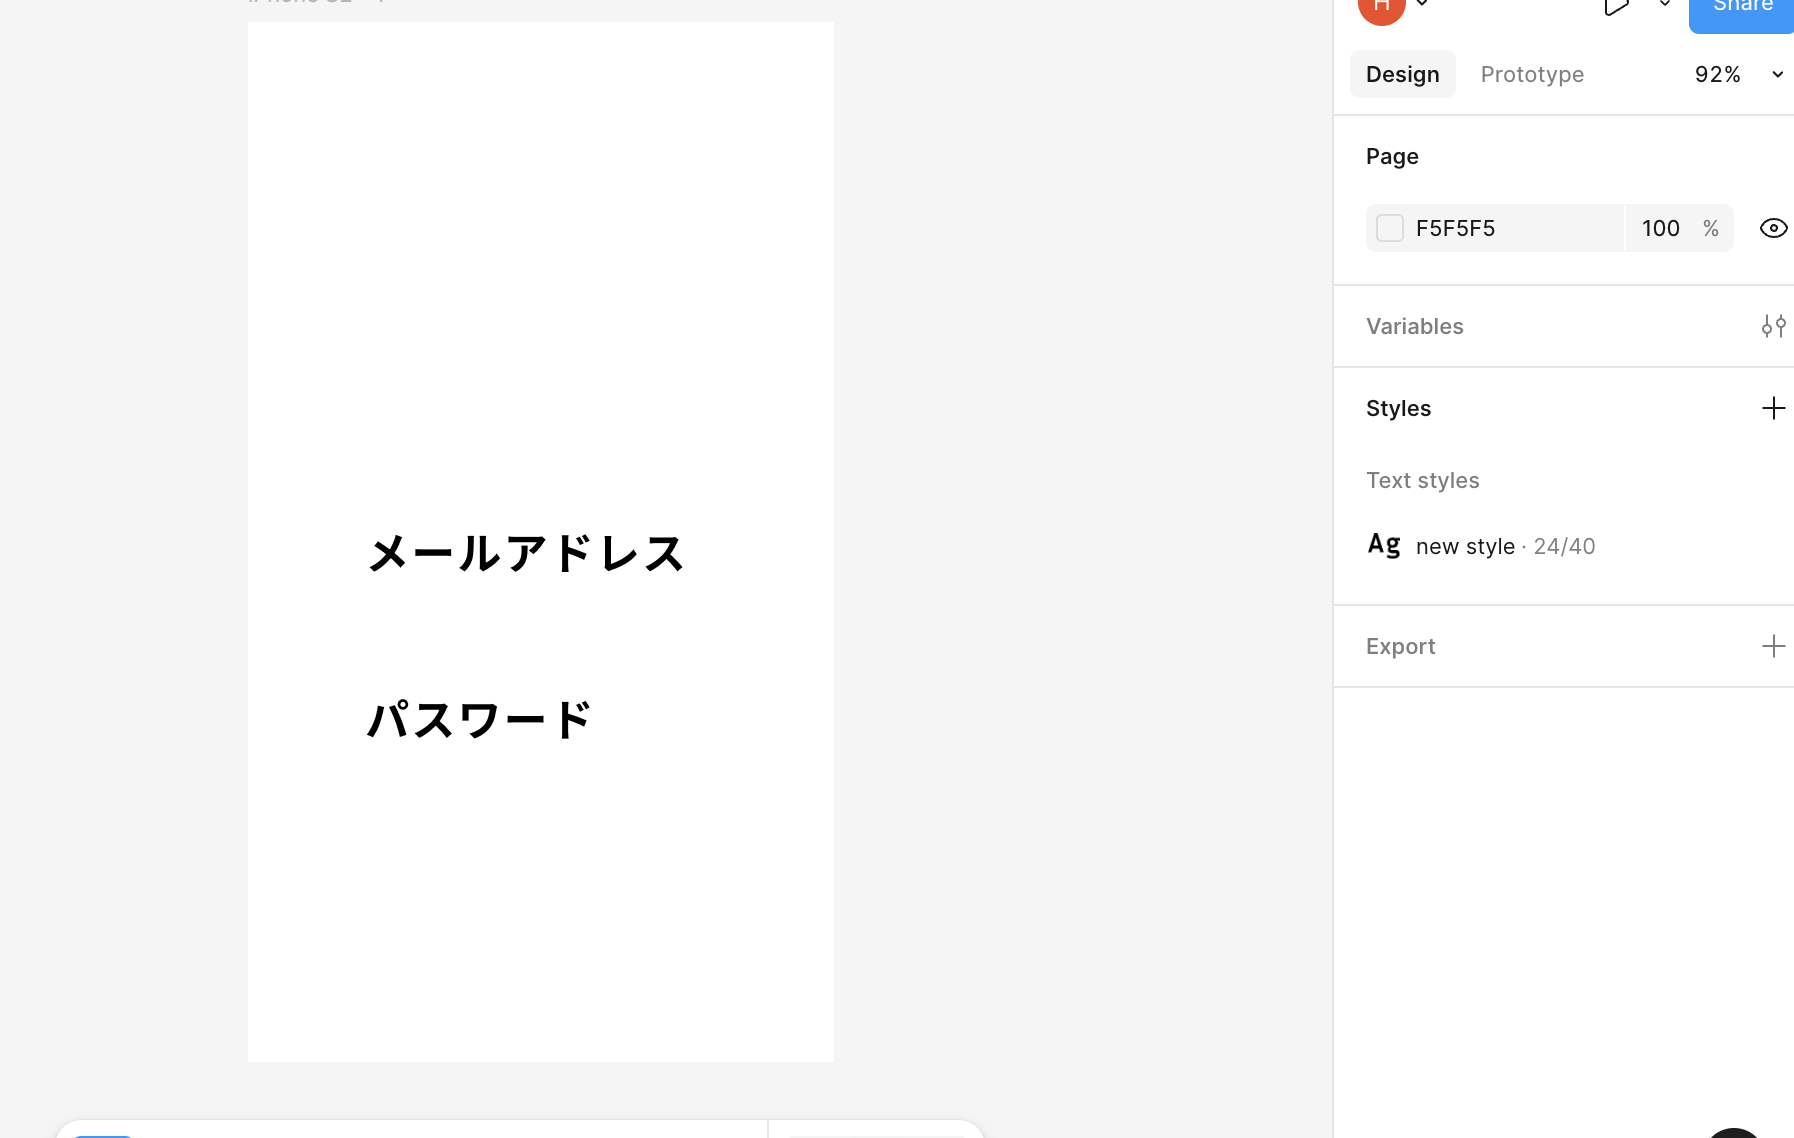
左ツールバーの Text (T) を選択
画面にクリックして文字入力(例:「メールアドレス」)
ステップ2:文字の属性を変更
右パネルの Text セクションで変更可能:
Font family:フォントの種類
Weight:太さ(Regular, Bold, etc.)
Size:フォントサイズ
Line height:行の高さ
Letter spacing:文字間隔
Text decoration:下線・打ち消し線など
毎日5~10分でも変わりそうやな
# 前準備
### jsonデータ生成
ライブドアニュースコーパスをDL
ダウンロード(通常テキスト):ldcc-20140209.tar.gz
### コーパスの取り込み
import json
import datetime
from typing import List, Dict
from pathlib import Path
import random

CORPUS_DIR = './livedoor-corpus'  # ライブドアコーパスをここにおく
QDRANT_JSON = 'livedoor.json'
SAMPLE_TEXT_LEN: int = 500  # ドキュメントを500文字でトランケート


def read_document(path: Path) -> Dict[str, str]:
    """1ドキュメントの処理"""
    with open(path, 'r') as f:
        lines: List[any] = f.readlines(SAMPLE_TEXT_LEN)
        lines = list(map(lambda x: x.rstrip(), lines))

        d = datetime.datetime.strptime(lines[1], "%Y-%m-%dT%H:%M:%S%z")
        created_at = int(round(d.timestamp()))  # 数値(UNIXエポックタイプ)に変換

        return {
            "url": lines[0],
            "publisher": path.parts[1],  # ['livedoor-corpus', 'it-life-hack', 'it-life-hack-12345.txt']
            "created_at": created_at,
            "body": ' '.join(lines[2:])  # 初めの2行をスキップし、各行をスペースで連結し、1行にする。
        }


def load_dataset_from_livedoor_files() -> (List[List[float]], List[str]):
    # NB. exclude LICENSE.txt, README.txt, CHANGES.txt
    corpus: List[Path] = list(Path(CORPUS_DIR).rglob('*-*.txt'))
    random.shuffle(corpus)  # 記事をシャッフルします

    with open(QDRANT_JSON, 'w') as fp:
        for x in corpus:
            doc: Dict[str, str] = read_document(x)
            json.dump(doc, fp)  # 1行分
            fp.write('\n')


if __name__ == '__main__':
    load_dataset_from_livedoor_files()
$ python3 corpus.py
$ ls
corpus.py livedoor-corpus livedoor.json
このlivedoor.jsonをGoogle collaboで使います。
### Google colabo
!pip install -U ginza spacy
!pip install -U numpy pandas ja_ginza
colaboで文章をベクトル化 … 約10分
import numpy as np
import pandas as pd
import spacy
# from multiprocessing import Pool, cpu_count  <- マルチプロセス関連は不要

# GiNZAモデルのロード (インストールが完了している前提)
try:
    nlp: spacy.Language = spacy.load('ja_ginza', exclude=["tagger", "parser", "ner", "lemmatizer", "textcat", "custom"])
    print("✅ GiNZAモデルのロードに成功しました。")
except OSError:
    print("❌ GiNZAモデルが見つかりません。再度インストール手順を確認してください。")
    # ここでエラーになる場合は、!pip install -U ginza を実行してください。

QDRANT_NPY = 'vectors-livedoor-ginza.npy'  # 出力ファイル名

def f(x):
    # NaNやNone値のチェック (エラー回避のため)
    if pd.isna(x):
        # 空のベクトルを返す、または処理をスキップ
        return np.zeros(nlp.vocab.vectors_length)

    doc: spacy.tokens.doc.Doc = nlp(x)  # GiNZAでベクトル化
    return doc.vector

def main():
    try:
        df = pd.read_json('livedoor.json', lines=True)
    except FileNotFoundError:
        print("❌ livedoor.json が見つかりません。ファイルが /content/ にアップロードされているか確認してください。")
        return

    print("\nデータフレームの先頭5行:")
    print(df.head())
    print(f"\n合計 {len(df)} 件の文書をベクトル化中... (シングルプロセス)")

    # 修正箇所: df.body.apply(f) を使用してシングルプロセスでベクトル化
    vectors_list = df.body.apply(f).tolist()

    print("ベクトル化完了。NumPyファイルに保存中...")

    # リストをNumPy配列に変換して保存
    vectors_array = np.array(vectors_list)
    np.save(QDRANT_NPY, vectors_array, allow_pickle=False)

    print(f"\n========================================================")
    print(f"✅ 保存完了: {QDRANT_NPY}")
    print(f"配列の形状 (Shape): {vectors_array.shape}")
    print(f"========================================================")

# 処理の実行
main()
vectors-livedoor-ginza.npy ができます。
### Qdrantの使い方
### docker pull
$ sudo docker pull qdrant/qdrant
$ sudo docker run -p 6333:6333 \
-v $(pwd)/qdrant_storage:/qdrant/storage \
qdrant/qdrant
_ _
__ _ __| |_ __ __ _ _ __ | |_
/ _` |/ _` | ‘__/ _` | ‘_ \| __|
| (_| | (_| | | | (_| | | | | |_
\__, |\__,_|_| \__,_|_| |_|\__|
|_|
Version: 1.15.4, build: 20db14f8
Access web UI at http://localhost:6333/dashboard
2025-09-27T03:10:37.414937Z INFO storage::content_manager::consensus::persistent: Initializing new raft state at ./storage/raft_state.json
2025-09-27T03:10:37.427278Z INFO qdrant: Distributed mode disabled
2025-09-27T03:10:37.428004Z INFO qdrant: Telemetry reporting enabled, id: 4ab6c13b-1d33-4b1f-ac4a-baff31ff55ad
2025-09-27T03:10:37.460847Z INFO qdrant::actix: TLS disabled for REST API
2025-09-27T03:10:37.463591Z INFO qdrant::actix: Qdrant HTTP listening on 6333
2025-09-27T03:10:37.465943Z INFO actix_server::builder: starting 1 workers
2025-09-27T03:10:37.466167Z INFO actix_server::server: Actix runtime found; starting in Actix runtime
2025-09-27T03:10:37.466216Z INFO actix_server::server: starting service: “actix-web-service-0.0.0.0:6333”, workers: 1, listening on: 0.0.0.0:6333
2025-09-27T03:10:37.467991Z INFO qdrant::tonic: Qdrant gRPC listening on 6334
2025-09-27T03:10:37.468111Z INFO qdrant::tonic: TLS disabled for gRPC API
### SDKインストール
$ pip3 install qdrant-client
### Qdrantの説明
– コレクション: RDBテーブル
– ポイント: RDBレコード ポイントには、ペイロード(Payload)と呼ばれるメタ情報も一緒に登録できる。メタ情報はフィルター検索に使用する。
### コレクションの作成
from qdrant_client import QdrantClient
from qdrant_client.http.models import VectorParams, Distance
collection_name = 'livedoor'
qdrant_client = QdrantClient(host='localhost', port=6333)

qdrant_client.recreate_collection(
        collection_name=collection_name,
        vectors_config=VectorParams(size=300, distance=Distance.COSINE) # GiNZAは300次元
    )
### コレクションの確認
from qdrant_client import QdrantClient

# Qdrantクライアントを起動中のDockerコンテナに接続
qdrant_client = QdrantClient(host='localhost', port=6333)

# 存在する全てのコレクション名を取得
collections = qdrant_client.get_collections()
collection_names = [c.name for c in collections.collections]

print("====================================")
print("✅ Qdrantに存在するコレクション:")

if 'livedoor' in collection_names:
    print(f"   [O] 'livedoor' コレクションが見つかりました。")

    # 詳細情報の取得でエラーが出るため、シンプルな情報に修正
    collection_info = qdrant_client.get_collection(collection_name='livedoor')
    print(f"   - ステータス: {collection_info.status.value}")
    print(f"   - ポイント数: {collection_info.points_count} (現在は0のはずです)")
else:
    print("   [X] 'livedoor' コレクションは見つかりませんでした。")
    print(f"   現在存在するコレクション: {collection_names}")
print("====================================")
$ python3 check_collection.py
====================================
✅ Qdrantに存在するコレクション:
[O] ‘livedoor’ コレクションが見つかりました。
– ステータス: green
– ポイント数: 0 (現在は0のはずです)
====================================
### upload
import json
import numpy as np
import pandas as pd
from qdrant_client import QdrantClient

# =========================================================================
# 1. 補助関数の定義 (JSONファイルの読み込み用)
# livedoor.jsonには不要なキーが含まれている可能性があるため、
# 必要なキーだけを抽出する目的の関数です。
# =========================================================================
def hook(obj):
    """
    JSONオブジェクトから必要なペイロードデータのみを抽出するフック関数。
    """
    if 'body' in obj:
        # 必要なキー(本文、タイトル、カテゴリ)を抽出して返す
        return {
            "title": obj.get("title", ""),
            "body": obj.get("body", ""),
            "category": obj.get("category", "")
        }
    return obj

# =========================================================================
# 2. メイン処理
# =========================================================================
def main():
    # 接続情報
    collection_name = 'livedoor'
    qdrant_client = QdrantClient(host='localhost', port=6333)

    # データの読み込み
    try:
        # ベクトルデータの読み込み
        vectors = np.load('./vectors-livedoor-ginza.npy')

        # JSONファイルの読み込みとペイロードの準備
        print("JSONファイルを読み込んでペイロードを準備中...")
        docs = []
        with open('./livedoor.json', 'r', encoding='utf-8') as fd:
            # 各行(一つのJSONオブジェクト)を読み込み、hook関数で必要なキーを抽出
            for line in fd:
                docs.append(json.loads(line, object_hook=hook))

        print(f"✅ 読み込み完了。ベクトル数: {vectors.shape[0]}、文書数: {len(docs)}")

    except FileNotFoundError as e:
        print(f"❌ ファイルが見つかりません: {e.filename}")
        print("ファイル(livedoor.json, vectors-livedoor-ginza.npy)が同じディレクトリにあるか確認してください。")
        return

    # コレクションへのアップロード
    print("Qdrantコレクションにデータをアップロード中...")
    qdrant_client.upload_collection(
        collection_name=collection_name, # コレクション名
        vectors=vectors, # ベクトルデータ (NumPy配列)
        payload=iter(docs), # ペイロードデータ (ジェネレータまたはイテレータ)
        ids=None,  # IDの自動発番
        batch_size=256  # バッチサイズ
    )
    print("✅ データアップロード完了。")

    # 最終確認
    collection_info = qdrant_client.get_collection(collection_name='livedoor')
    print(f"最終ポイント数: {collection_info.points_count}")

# スクリプトの実行
if __name__ == "__main__":
    main()
$ python3 upload_data.py
JSONファイルを読み込んでペイロードを準備中…
✅ 読み込み完了。ベクトル数: 7367、文書数: 7367
Qdrantコレクションにデータをアップロード中…
✅ データアップロード完了。
最終ポイント数: 7367
$ pip3 install spacy ginza
import numpy as np
import spacy
from qdrant_client import QdrantClient
from qdrant_client.http.models import ScoredPoint

# =========================================================================
# 1. 初期設定とモデルロード
# =========================================================================
# ベクトル化に使用したモデルと同じものをロード
# 以前のステップでインストールが完了していることを前提とします
try:
    nlp: spacy.Language = spacy.load('ja_ginza', exclude=["tagger", "parser", "ner", "lemmatizer", "textcat", "custom"])
    print("✅ GiNZAモデルのロードに成功しました。")
except OSError:
    print("❌ GiNZAモデルが見つかりません。")
    exit() # 処理を中断

# Qdrant接続情報
collection_name = 'livedoor'
qdrant_client = QdrantClient(host='localhost', port=6333)

# 検索クエリ
QUERY_TEXT = "男磨きの動画を見ています"

# =========================================================================
# 2. クエリテキストのベクトル化
# =========================================================================
def get_vector_from_text(text: str) -> np.ndarray:
    """
    GiNZAを使用してテキストをベクトルに変換します。
    """
    doc: spacy.tokens.doc.Doc = nlp(text)
    # GiNZAのdoc.vectorはNumPy配列を返します
    return doc.vector

# =========================================================================
# 3. Qdrantでの検索実行
# =========================================================================
def main():
    print(f"\n========================================================")
    print(f"🔍 検索クエリ: {QUERY_TEXT}")
    print(f"========================================================")

    # クエリテキストをベクトルに変換
    query_vector = get_vector_from_text(QUERY_TEXT)

    # Qdrantで検索を実行
    hits = qdrant_client.search(
        collection_name=collection_name,
        query_vector=query_vector, # ベクトル化したクエリー
        query_filter=None,
        with_payload=True, # レスポンスにペイロードを含める
        limit=5 # 上位5件を取得
    )

    # 検索結果の表示
    print("\n[検索結果 - 上位 5件]")
    if not hits:
        print("類似記事は見つかりませんでした。")
        return

    for i, hit in enumerate(hits):
        h: ScoredPoint = hit
        # ペイロードからタイトルと本文を取得
        title = h.payload.get('title', 'N/A')
        body_snippet = h.payload.get('body', 'N/A')[:100] + '...' # 本文は先頭100文字を抜粋

        print(f"--- 順位 {i+1} (スコア: {h.score:.4f}) ---")
        print(f"タイトル: {title}")
        print(f"本文抜粋: {body_snippet}")

# スクリプトの実行
if __name__ == "__main__":
    main()
import numpy as np
import spacy
from qdrant_client import QdrantClient
from qdrant_client.http.models import ScoredPoint

# =========================================================================
# 1. 初期設定とモデルロード
# =========================================================================
# ベクトル化に使用したモデルと同じものをロード
# 以前のステップでインストールが完了していることを前提とします
try:
    nlp: spacy.Language = spacy.load('ja_ginza', exclude=["tagger", "parser", "ner", "lemmatizer", "textcat", "custom"])
    print("✅ GiNZAモデルのロードに成功しました。")
except OSError:
    print("❌ GiNZAモデルが見つかりません。")
    exit() # 処理を中断

# Qdrant接続情報
collection_name = 'livedoor'
qdrant_client = QdrantClient(host='localhost', port=6333)

# 検索クエリ
QUERY_TEXT = "野球情報が知りたい"

# =========================================================================
# 2. クエリテキストのベクトル化
# =========================================================================
def get_vector_from_text(text: str) -> np.ndarray:
    """
    GiNZAを使用してテキストをベクトルに変換します。
    """
    doc: spacy.tokens.doc.Doc = nlp(text)
    # GiNZAのdoc.vectorはNumPy配列を返します
    return doc.vector

# =========================================================================
# 3. Qdrantでの検索実行
# =========================================================================
def main():
    print(f"\n========================================================")
    print(f"🔍 検索クエリ: {QUERY_TEXT}")
    print(f"========================================================")

    # クエリテキストをベクトルに変換
    query_vector = get_vector_from_text(QUERY_TEXT)

    # Qdrantで検索を実行
    hits = qdrant_client.search(
        collection_name=collection_name,
        query_vector=query_vector, # ベクトル化したクエリー
        query_filter=None,
        with_payload=True, # レスポンスにペイロードを含める
        limit=5 # 上位5件を取得
    )

    # 検索結果の表示
    print("\n[検索結果 - 上位 5件]")
    if not hits:
        print("類似記事は見つかりませんでした。")
        return

    for i, hit in enumerate(hits):
        h: ScoredPoint = hit
        # ペイロードからタイトルと本文を取得
        title = h.payload.get('title', 'N/A')
        body_snippet = h.payload.get('body', 'N/A')[:100] + '...' # 本文は先頭100文字を抜粋

        print(f"--- 順位 {i+1} (スコア: {h.score:.4f}) ---")
        print(f"タイトル: {title}")
        print(f"本文抜粋: {body_snippet}")

# スクリプトの実行
if __name__ == "__main__":
    main()
Qdrant公式サイト: https://qdrant.tech/
## Qdrantとは
オープンソースのベクトルデータベース
Rust製
クライアントはPython SDK, REST API, gRPCで接続できる
Qdrant自体は文章をベクトルにする機能はない、ベクトルを比較する機能だけになる
## ベクトル検索
セマンティック検索という方法があり、ドキュメント全体の意味を考慮する
ドキュメントをベクトルで表現することをembeddingという
ベクトルとベクトルを比較することで、ドキュメントの類似性を検証することができる(コサイン類似度, ベクトルとベクトルの類似度の尺度) …
bertなどの事前学習モデルでfine tuneもできるようになってきた
総当たりでベクトルを比較すると計算量が膨大になるため、精度を犠牲にして高速化している
### ベクトル検索の手順
– ベクトルデータの準備 (ニュースコーパス)
– コーパスをディクショナリ登録(json)
– コーパスのベクトル変換(GiNZA)
– Qdrantサーバ起動(docker)
– コレクションの作成
– ドキュメントを登録
– 類似ドキュメントの検索
ベクトルデータの準備とベクトル変換のところが肝になりそう
class UserViewModel (private val repository: UserRepository) : ViewModel() {

    val users: LiveData<List<User>> = repository.users.asLiveData()

    fun refreshUsers() {
        val users: LiveData<List<User>> = repository.asLiveData()

        fun refreshUsers() {
            viewModelScope.launch {
                repository.fetchUsersFromApi()
            }
        }
    }
}
class UserRepository(
    private val apiService: ApiService,
    private val userDao: UserDao
) {
    val users: Flow<List<User>> = userDao.getAllUsers()

    suspend fun fetchUsersFromApi() {
        try {
            val usersFromApi = apiService.getUsers()
            userDao.insertUsers(usersFromApi)
        } catch(e: Exception) {
            // error handling
        }
    }
}
無料のブラウザツールだと、音楽などで、音声とインストラメントを分離することはできるようなのですが、二人が喋っていて、片方の音声に分離することができなかったので、Pythonで実行します。
前準備として、以下の手配が必要
1) ffmpeg, pyannote.audio のインストール
2) Hugging Faceでのaccess token発行(read)およびモデル利用のaccept
3) Hugging Faceでのaccess tokenをコードのHUGGINGFACE_TOKENに埋め込み
4) python3 speaker_separation.py の実行
import subprocess
from pyannote.audio import Pipeline
from pydub import AudioSegment
import os
from collections import defaultdict

# ===== 設定 =====
mp4_file = "video.mp4"
wav_file = "conversation.wav"
output_file = "main_speaker_only.wav"

HUGGINGFACE_TOKEN = "****"  # Hugging Face token

# ===== WAV変換 =====
if os.path.exists(wav_file):
    os.remove(wav_file)

subprocess.run([
    "ffmpeg", "-y", "-i", mp4_file,
    "-vn", "-acodec", "pcm_s16le", "-ar", "16000", "-ac", "1",
    wav_file
], check=True)

# ===== 話者分離 =====
pipeline = Pipeline.from_pretrained(
    "pyannote/speaker-diarization-3.1",
    use_auth_token=HUGGINGFACE_TOKEN
)

diarization = pipeline(wav_file)

# ===== 各話者の合計発話時間を計算 =====
speaker_durations = defaultdict(float)
for turn, _, speaker in diarization.itertracks(yield_label=True):
    speaker_durations[speaker] += turn.end - turn.start

# 発話時間が最も長い話者を自動選択
target_speaker = max(speaker_durations, key=speaker_durations.get)
print("選択された話者:", target_speaker)

# ===== その話者だけ抽出 =====
audio = AudioSegment.from_wav(wav_file)
speaker_segments = [
    audio[int(turn.start * 1000): int(turn.end * 1000)]
    for turn, _, speaker in diarization.itertracks(yield_label=True)
    if speaker == target_speaker
]

if speaker_segments:
    speaker_audio = sum(speaker_segments)
    speaker_audio.export(output_file, format="wav")
    print(f"✅ 保存しました: {output_file}")
else:
    print("⚠️ 対象話者の音声が見つかりませんでした")
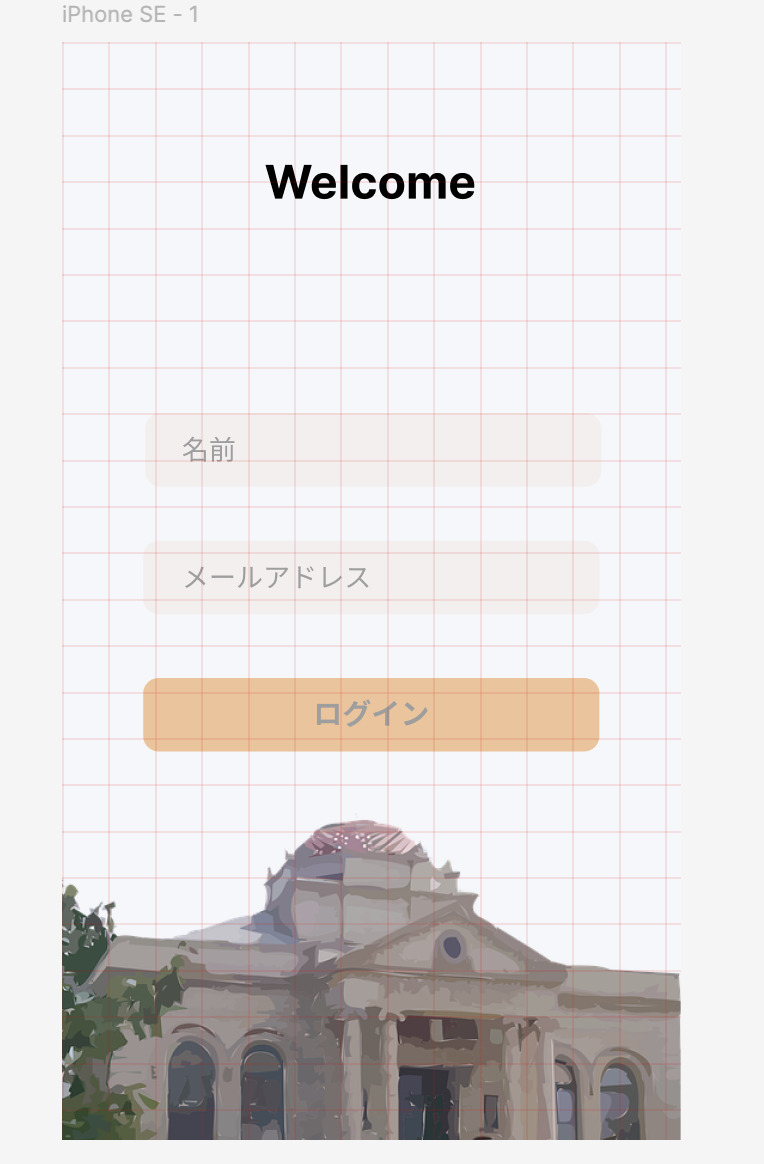
グリッドの配置
@State private var items: [String] = ["りんご", "バナナ", "みかん"]

var body: some View {
        NavigationView {
            VStack(spacing: 20) {
                Text("AI Chat Demo")
                    .font(.title)

                TextField("メッセージを入力", text: $userMessage)
                    .textFieldStyle(RoundedBorderTextFieldStyle())
                    .padding()

                Button("送信") {
                    sendMessage()
                }
                .padding()

                Text("AIの返答: \(aiReply)")
                    .padding()

                Divider()

                List {
                    ForEach(items, id:\.self) { item in
                        Text(item)
                    }
                    .onDelete(perform: deleteItem)
                    .onMove(perform: moveItem)
                }
                .frame(height: 200)

                Button("フルーツを追加") {
                    addItem()
                }
                .padding()

                Spacer()

                NavigationLink(destination: ImageViewPage()) {
                    Text("画像ページへ移動")
                        .foregroundColor(.white)
                        .padding()
                        .background(Color.blue)
                        .cornerRadius(8)
                }
                NavigationLink(destination: VideoViewPage()) {
                    Text("動画ページへ移動")
                        .foregroundColor(.white)
                        .padding()
                        .background(Color.green)
                        .cornerRadius(8)
                }
//                NavigationLink(destination: CounterPage()) {
//                    Text("カウンターページへ")
//                        .foregroundColor(.white)
//                        .padding()
//                        .background(Color.green)
//                        .cornerRadius(8)
//                }
            }
            .padding()
            .navigationTitle("チャット")
        }
    }

    func addItem() {
        items.append("新しいフルーツ\(items.count + 1)")
    }

    func deleteItem(at offsets: IndexSet) {
        items.remove(atOffsets: offsets)
    }

    func moveItem(from source: IndexSet, to destination: Int) {
        items.move(fromOffsets: source, toOffset: destination)
    }
    func sendMessage() {
viewでのforeachはある程度想像がつきますね。