現在、EC2を1台立てて、そこにALBをつけている状態です。

integrated service で create accelerator
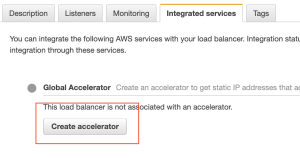
そうするとipが二つ発行され、いずれのIPからもアクセスできる様になる。
なるほどね。
随机应变 ABCD: Always Be Coding and … : хороший

現在、EC2を1台立てて、そこにALBをつけている状態です。
integrated service で create accelerator
そうするとipが二つ発行され、いずれのIPからもアクセスできる様になる。
なるほどね。
BGPとは、複数の独立したネットワークを接続したTCP/IPネットワークにおいて、ネットワーク間の経路情報を通信機器間で交換する手順を定めたプロトコル(通信規約)の一つ。
BGPは異なるAS間を結ぶ境界上のルータ同士がAS単位の経路情報(自ASが他のどのASと繋がっているか等)を交換するeBGP(exterior BGP)と、AS内のルータ間でAS間経路の情報を交換するiBGP(interior BGP)で構成される。
ルーティングプロトコルにはIGBとEGPがある
1. 同じ縄張りの中で情報交換: IGP
2. 縄張りを跨いで情報交換: EGP … EGPの中にBGPルータがある(Border Gateway Protocol)
### AS(Autonomous System)
共通のポリシーや同じ管理下で運用されているルータやネットワークの集合体を意味する
各AS内では独立したIGPやポリシーが運用されている
ASを識別するための番号がAS番号 JPNICが割り当ての代行を行なっている
16ビット(1~65535)の数字を用いる
### BGPルータ
BGPはASの経路交換のパス
通常は短いものを最短ルートとして使用する
### BGPの仕組み
2台のルータ間でTCP(ポート番号179)による接続を行い経路情報を交換
隣接ルータをネイバー、ピアと呼ぶ
1対1のセッションを確立し、その上でBGPの基本情報、お互いのルータが知っている経路情報を交換
ルーティングテーブルが更新された場合は、経路情報を交換
KEEPALIVEメッセージをアナウンスしあうことでルータの生存確認を行う
### パス属性
ORIGIN
AS_PATH(ASパス)
NEXT_HOP
MULTI_EXIT_DISC
LOCAL_PREF
ATOMIC_AGGREGATE
AGGREGATOR
COMMUNITY
Amazon EC2(1台目) -> Amazon EFS(NFSマウント) -> Amazon EC2(2台名)
### EFSとは
マネージドサービス
一部で障害が起きたとしても、NFSが利用できなくなったり、NFSに保存したデータが消失したりすることを防止することができる
ストレージ容量は保存するファイルサイズ合計によって自動的に伸縮する
### 料金体制
標準ストレージクラスと低頻度アクセスストレージクラスの2つのストレージが用意されている
### S3との違い
ファイルストレージというタイプのストレージでOSでマウント可能なファイルシステム
S3はHTTPSなどでアクセス可能なエンドポイントを提供する
### demo
IAMでAmazonS3FullAccess, AmazonVPCReadOnlyAccess, AmazonEC2ReadonlyAccessを付与
$ ssh -i “~/.ssh/HOGEHOGE” -p xxxxx USER@FQDN
$ aws configure
$ cat .aws/config
[default]
output = json
region = ap-northeast-1
$ aws ec2 describe-vpcs
### NFSの作成
$ aws efs create-file-system –creation-token my-file-system
{
“SizeInBytes”: {
“ValueInIA”: 0,
“ValueInStandard”: 0,
“Value”: 0
},
“FileSystemArn”: “arn:aws:elasticfilesystem:ap-northeast-1:*:file-system/fs-*”,
“ThroughputMode”: “bursting”,
“CreationToken”: “my-file-system”,
“Encrypted”: false,
“Tags”: [],
“CreationTime”: 1646730547.0,
“PerformanceMode”: “generalPurpose”,
“FileSystemId”: “fs-*”,
“NumberOfMountTargets”: 0,
“LifeCycleState”: “creating”,
“OwnerId”: “*”
}
FileSystemIDをメモっておく
### mount target
aws efs create-mount-target –file-system-id ${filesystemId} –subnet-id ${submnetId} –security-groups ${sgId}
{
“MountTargetId”: “”,
“VpcId”: “”,
“AvailabilityZoneId”: “apne1-az1”,
“NetworkInterfaceId”: “eni-*”,
“FileSystemId”: “fs-*”,
“AvailabilityZoneName”: “ap-northeast-1c”,
“LifeCycleState”: “creating”,
“SubnetId”: “subnet-*”,
“OwnerId”: “*”,
“IpAddress”: “*”
}
### package インストール
$ sudo yum install -y nfs-utils
$ sudo mkdir ~/efs
$ sudo mount -t nfs4 -o nfsvers=4.1,rsize=1048576,wsize=1048576,hard,timeo=600,retrans=2,noresvport fs-*.efs.ap-northeast-1.amazonaws.com:/ ~/efs
$ sudo sh -c ‘echo “Hello Amazon EFS” > /home/ec2-user/efs/test’
なるほどー、冗長化してもEFSでマウントして同じものを見るのか…
仕組みは理解した
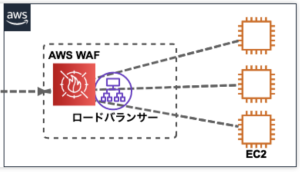
WAFとは? … ALBまたはCloudFrontのオプションの様な形で動作する
### どのルールグループを使うか
ALBやCloudFrontに適用するには、WebACL(Web Access Control List)という単位になる
このWebACLにどの様なアクセスを不正アクセスとみなすかルールを適用する
※基本的には既に用意されたルールセットから選択する。組み合わせることも可能
※WCUは合計キャパシティが1500まで
パターン1) AWSマネージドルール・ルールグループ
コアルールセット
管理者保護
即知の不正な入力
SQLデータベース
Linux OS
POSIX OS
Windows OS
PHPアプリケーション
WorPressアプリケーション
PHPアプリケーション
WordPressアプリケーション
AmazonIPレピュテーション
匿名IPリスト
パターン2) AWS以外のマネージドサービス
パターン30 AWS WAFセキュリティオートメーション
ブロックするIPアドレスなど
パターン4) WafCharm
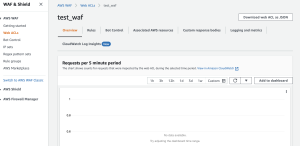
実際にコンソール画面から試してみる
なるほど、ALBにattachできるのね。
AWS Direct Connect接続するには一般的にプロバイダーを介して契約することが多い
### 回線帯域
– 帯域保証
— 契約した帯域分はスピードが出る
– ベストエフォート
– 常に最高効率で通信が行われる訳ではないが値段が安い
### Direct Connect接続型
– 専有型
— DXポートを自社のAWSアカウント上で予約して、そのポートへプロバイダーから繋いでもらうプラン
— 接続単位での提供
– ホスト型
– 1Gbpsも使わない場合など、契約プロバイダーが予めDXポートを繋いでいるプラン
– 接続単位での提供(ただし作れるVIFは一つのみ)
- 仮想インタフェース単位での提供
### Direct Connect料金
– AWSへ支払うもの
— DXポート料金
— DXポートを介して通信した分の通信料金
– データセンターやプロバイダーに支払う費用
— 構内配線費用
— 契約プロバイダーへのサービス料金
なるほどー 契約形態はわかったが、仕組みがようわからん…
### CloudWatch Logsの主な機能
– インスタンスやサービスログの蓄積
– ログのモニタリング
– ログのフィルタリング
– ログデータのアーカイブ
– ログデータの分析
– ログのアラート化
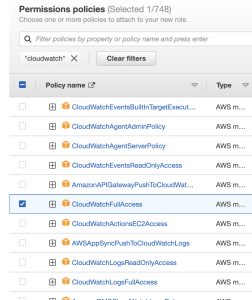
### IAMロールの作成
AWS Service -> EC2 -> Add Permissionで “CloudWatchLogsFullAccess” をつける -> role nameはそのまま”CloudWatchLogsFullAccess” にする
### roleをattach
Modify IAM roleで作成した”CloudWatchLogsFullAccess”をroleにつける
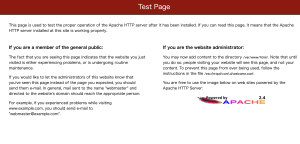
sshログインしてapache2を入れる
$ sudo yum install httpd
$ sudo systemctl start httpd
$ sudo systemctl status httpd
$ sudo systemctl enable httpd
$ sudo systemctl is-enabled httpd
$ httpd -v
public ipを叩き、ipが入っていることを確認
cloudwatch logsエージェントインストール
$ sudo yum install -y awslogs
/etc/awslogs/awscli.confがconfファイル。us-east-1になっているので、ap-northeast-1に変更する
$ sudo cat /etc/awslogs/awscli.conf
[plugins]
cwlogs = cwlogs
[default]
region = us-east-1
[plugins]
cwlogs = cwlogs
[default]
region = ap-northeast-1
$ sudo cat /etc/awslogs/awslogs.conf
[/var/log/messages]
datetime_format = %b %d %H:%M:%S
file = /var/log/messages
buffer_duration = 5000
log_stream_name = {instance_id}
initial_position = start_of_file
log_group_name = /var/log/messages
fileで対象となるログファイルを指定する
buffer_duration: ログイベントのバッチ期間
apacheエラーログを追加
[Apache_AccessLog]
log_group_name = TestSV_Apache
log_stream_name = {instance_id}_accesslog
file = /etc/httpd/logs/access_log
datetime_format = %a %b %d %H:%M:%S %Y
initial_position = start_of_file
buffer_duration = 5000

[Apache_ErrorLog]
log_group_name = TestSV_Apache
log_stream_name = {instance_id}_errorlog
file = /etc/httpd/logs/error_log
datetime_format = %a %b %d %H:%M:%S %Y
initial_position = start_of_file
buffer_duration = 5000
amazon linux2 amiの場合
$ sudo systemctl start awslogsd
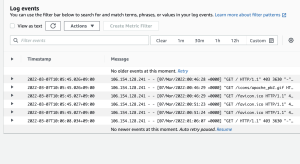
CloudWatch Logsで確認するとログが出力されている
なるほど、これをS3に転送するのね
なんか凄いことになってるな
CloudWatch基本事項
– Namespace
– Metrics
– Time stamps
– Dimensions
– Statics
– Alarms
### Namespace
複数のメトリクスをまとめてコンテナ(箱)で管理する概念
異なる名前空間のメトリクスは相互に切り離されている
### Metrics
ある時間ごとのデータポイントのセット
作成されたリージョンのみ存在
メトリクスの保持期間がある
### Time stamps
メトリクスデータポイントの必須情報
### dimension
メトリクスを一意に識別する名前/値のペア
### Statistics
指定した期間のメトリクスデータの集計
### Alarms
指定した期間の単一のメトリクスを監視
### アラームの作成
CloudWatchの画面でアラーム作成
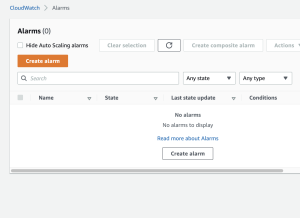
Metrics Name, Image ID, Statistic, Periodを選択
うむ、中々素晴らしいですね。
CloudWatchとは?
-> AWSのリソースやアプリケーション、オンプレミスのサーバをモニタリングするためのマネージドサービス
-> 監視そのももの機能以外にアラーム通知、イベント検知、可視化などの機能がある
### CloudWatchメトリクス
メトリクスとは、システムのパフォーマンスに関するデータ
監視対象のリソースからメトリクスを収集することで監視を行う
CloudWatchメトリクスでは、まず名前空間という単位でグループ化される
その中でディメンション(=名前と値)の組み合わせごとにグループ化される
※統計、期間、ディメンション、標準メトリクス
### CloudWatch Logs
ログファイルの監視と保存を担う機能
AWSサービスやオンプレミスサーバからエージェント経由でログメッセージをCloudWatchエンドポイントに転送することでログデータの保存が出来る。ログデータは保存期間として1日~永久保存を選択できる
ロググループというログのグループ単位があり、その中にログストリームというグループの単位があり、その中にログイベントが保存
Kinesis Data Streams, Kinesis Data Firehose, Lambdaに配信できる
S3に保存するとコストを抑えられる
### CloudWatch Event
AWSリソースの状態が変化した場合にアクションを実行できる
アラームの設定
– 対象のメトリックス
– 統計方法: 平均、最大、合計などの中から適切な統計方法を選択
– 期間: 何分単位に1回メトリクスを評価するのか設定
### CloudWatch Dashboard
複数のログやメトリクスを一つの画面で確認することができる
実際に、CloudWatchメトリクス、CloudWatch Logs, CloudWatch Alarms、CloudWatch Eventを一つずつ使ってみないとわからんな…
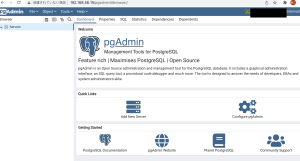
pgAdminとは?
-> PostgreSQLの管理ツールの一つで、ネットワークを通じて遠隔のデータベースサーバをGUIで管理することができる
### Ubuntu20.04にpgadminのインストール
0. 既にpsql v14が入っている状態
$ psql -V
psql (PostgreSQL) 14.2 (Ubuntu 14.2-1.pgdg20.04+1)
1. リポジトリの設定
$ sudo curl https://www.pgadmin.org/static/packages_pgadmin_org.pub | sudo apt-key add
$ sudo sh -c ‘echo “deb https://ftp.postgresql.org/pub/pgadmin/pgadmin4/apt/$(lsb_release -cs) pgadmin4 main” > /etc/apt/sources.list.d/pgadmin4.list && apt update’
2. pgAdminインストール
$ sudo apt install pgadmin4
3. メールアドレスとパスワードの登録
$ sudo /usr/pgadmin4/bin/setup-web.sh
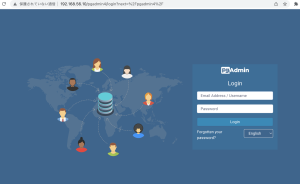
4. プラウザから起動
http://192.168.56.10/pgadmin4
なるほどー、少し理解した。
標準出力とは、コンピュータ上で実行されているプログラムが、特に何も指定されていない場合に標準的に利用するデータ出力先。コンピュータの出力装置やOSが提供するデータ出力機能・経路などを指し、多くのシステムではディスプレイ装置による利用者への文字表示が標準出力に設定されている。
標準エラー出力もある。
$ cp -v test.txt test_cp.txt
‘test.txt’ -> ‘test_cp.txt’
上記は入力元・出力先を指定している。
標準出力とは、コマンド/アプリ側で入力元・出力先を明示することなく使用できる入力・出力のこと
### 3種類の標準
– 入力…標準入力の1系統
– 出力…標準出力、標準エラーの2系統
標準入力…加工対象のデータの入力元や、ユーザからのパラメータ入力受付用(cpでの上書き確認のy/n)
標準出力…加工済みデータの出力先や、ログ、メッセージ等情報出力用
標準エラー…確認メッセージや警告、エラーといった情報の出力用
### アプリ使用者の立場として
– シェルでコマンド実行
– デフォルト
– リダイレクト・パイプライン
なんか分かったような分かってないような