不正侵入を検知・防御するシステム
IDS・IPSではファイアウォールでは実現できない対策が可能
IDSはIntrusion Detection Systemの略で、ネットワークに対して不正なアクセスがないかをリアルタイムでチェックして、疑わしい内容があれば管理者へ通知を行う
### ネットワーク型
ネットワーク型はネットワーク上に設置し、パケットを監視する
### ホスト型
監視対象のサーバなどにインストールして使われるタイプ
### シグネチャ型とアノマリ型
シグネチャ型は、異常なアクセスのパターンを予め登録しておき、通信内容とそれが一致すれば不正と判断する検知方法
アノマリ型とはシグネチャ型と反対で、正常なアクセスパターンを事前に登録しておき、登録済のパターンと大きく異なるアクセスを見つけた場合は不正と判断する手法。
### IDS/IPSの効果
DoS攻撃、Synフラッド攻撃などに有効
ファイアウォールでは異常と検知されないものでも、パケットの内容からIDS/IPSでは検知が可能
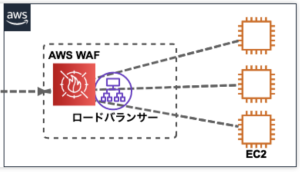
### WAF(Web Application Firewall)
WAFはWeb Applicationに特化しているが、IPSはサーバ・ネットワーク全体
IDS/IPSはパケットの中身までチェックする
### Linuxで使えるホスト型IDS
Tripwire
http://www.tripwire.org/
$ sudo apt -y install tripwire
なんかすごいな
### WorkLoadSecurity
Trend Microの製品
$ sudo dpkg -i
開始: /etc/init.d/ds_agent start
停止: /etc/init.d/ds_agent stop
リセット: /etc/init.d/ds_agent reset
再起動: /etc/init.d/ds_agent restart
表示ステータス: svcs -a | grep ds_agent
なるほどな、インフラのこと、完全に見誤ってたわ
これは凄いわ