「いつ」「誰が」「何を」したのか記録するサービス
セキュリティグループの設定やデバイスの登録など管理イベント
S3バケットの操作などアクティビティ
90日間は無料
Event Historyで確認できる
なるほど、90日無料だけど、きちんとした運用にするなら保存した方が良さそうだな…
随机应变 ABCD: Always Be Coding and … : хороший

「いつ」「誰が」「何を」したのか記録するサービス
セキュリティグループの設定やデバイスの登録など管理イベント
S3バケットの操作などアクティビティ
90日間は無料
Event Historyで確認できる
なるほど、90日無料だけど、きちんとした運用にするなら保存した方が良さそうだな…
1. まずコンテナを起動
$ sudo docker run -dit –name myphp -p 8080:80 myphpimage
http://192.168.56.10:8080/
2. コンテナIDを確認
$ sudo docker ps
CONTAINER ID IMAGE COMMAND CREATED STATUS PORTS NAMES
090665612e7b myphpimage “/bin/sh -c ‘/usr/sb…” 5 minutes ago Up 5 minutes 0.0.0.0:8080->80/tcp, :::8080->80/tcp myphp
3. ログを確認
$ sudo docker logs -f 090665612e7b
AH00558: apache2: Could not reliably determine the server’s fully qualified domain name, using 172.17.0.2. Set the ‘ServerName’ directive globally to suppress this message
あれ…??? 違うimageでやってみます。
$ sudo docker build . -t myhttpd
$ sudo docker images;
$ sudo docker run -dit –name myhttpd -p 8080:80 myhttpd
$ sudo docker ps
$ sudo docker logs -f 6e69ac1678b5
AH00558: httpd: Could not reliably determine the server’s fully qualified domain name, using 172.17.0.2. Set the ‘ServerName’ directive globally to suppress this message
AH00558: httpd: Could not reliably determine the server’s fully qualified domain name, using 172.17.0.2. Set the ‘ServerName’ directive globally to suppress this message
[Sun Mar 27 06:02:28.200386 2022] [mpm_event:notice] [pid 1:tid 139803119992128] AH00489: Apache/2.4.53 (Unix) configured — resuming normal operations
[Sun Mar 27 06:02:28.201876 2022] [core:notice] [pid 1:tid 139803119992128] AH00094: Command line: ‘httpd -D FOREGROUND’
192.168.56.1 – – [27/Mar/2022:06:02:31 +0000] “GET / HTTP/1.1” 200 213
192.168.56.1 – – [27/Mar/2022:06:03:01 +0000] “GET / HTTP/1.1” 304 –
192.168.56.1 – – [27/Mar/2022:06:03:53 +0000] “-” 408 –
$ docker logs -f ${コンテナID} で出力するのか
### アクセスログのみ表示したい時
$ sudo docker logs 6e69ac1678b5 -f 2>/dev/null
-> 2はエラーログで、/dev/nullは非表示
### エラーログのみ表示したい時
$ sudo docker logs 6e69ac1678b5 -f 1>/dev/null
Dockerのログはコンテナの標準出力(1), 標準エラー出力(2)に書き込まれた内容を表示する
phpのエラーログ
php.iniを以下の様に変更する
error_log = /dev/stderr
[/php]
なるほどー すげー 少しずつ理解できてきた^^
stages:
  - build
  - test

build_job1:
  stage: build
  script:
    - echo "this is develop"
  only:
    refs:
      - develop

build_job2:
  stage: build
  script:
    - echo "this is master"
  only:
    refs:
      - master

test_job:
  stage: test
  script:
    - echo "test"
$ git push -u origin develop
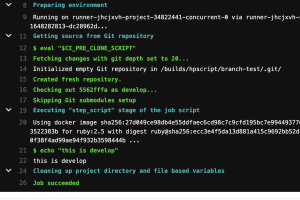
なるほどー
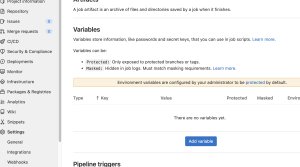
Project の setting -> CI/CD -> variableでAWSのcredentialを設定する
AWS_ACCESS_KEY_ID
AWS_SECRET_ACCESS_KEY
AWS_DEFAULT_REGION
.gitlab-ci.yml
stages:
  - dev
  - deploy

# GitLab Container Repositoryにpush
build-job:
  stage: dev
  image: docker:latest
  services:
    - docker:dind
  before_script:
    - docker login -u gitlab-ci-token -p $CI_JOB_TOKEN $CI_REGISTRY
  script:
    - docker build --pull -t $CI_REGISTRY_IMAGE:$CI_COMMIT_SHA .
    - docker push $CI_REGISTRY_IMAGE:$CI_COMMIT_SHA

# GitLab Container RepositoryのimageをECRにpush
deploy-job:
  stage: deploy
  image: docker:latest
  services:
    - docker:dind
  before_script:
    - docker login -u gitlab-ci-token -p $CI_JOB_TOKEN $CI_REGISTRY
    - docker pull $CI_REGISTRY_IMAGE:$CI_COMMIT_SHA
    - docker tag $CI_REGISTRY_IMAGE:$CI_COMMIT_SHA $ECR_REPOSITORY_NAME:$CI_COMMIT_SHA
    - docker logout
    - apk add --update py-pip
    - pip install awscli
    - aws configure set aws_access_key_id $AWS_ACCESS_KEY_ID
    - aws configure set aws_secret_access_key $AWS_SECRET_ACCESS_KEY
    - aws configure set region $AWS_DEFAULT_REGION
    - aws ecr get-login-password --region ap-northeast-1 | docker login --username AWS --password-stdin $ECR_REPOSITORY
  script:
    - docker push $ECR_REPOSITORY_NAME:$CI_COMMIT_SHA
なるほどー
中々面白い
ARTIFACT_DOWNLOAD_ATTEMPTS 8.15 1.9 実行ジョブのアーティファクトのダウンロード試行回数
CI all 0.4 CI環境で実行されていることを示します
CI_COMMIT_REF_NAME 9.0 all そのプロジェクトがビルドされているブランチ名かタグ名
CI_COMMIT_REF_SLUG 9.0 all $CI_COMMIT_REF_NAME を小文字化して 63バイトに短縮化 0-9 と a-z 以外は – に置換されます。先頭と末尾には – を使いません。URL、ホスト名、ドメイン名で使用できます。
CI_COMMIT_SHA 9.0 all ビルド中のプロジェクトのコミットリビジョン
CI_COMMIT_BEFORE_SHA 11.2 all プッシュリクエスト直前の最新コミットID
CI_COMMIT_TAG 9.0 0.5 コミットタグ名。ビルド中のタグのみ表示されます。
CI_COMMIT_MESSAGE 10.8 all コミットメッセージ全文
CI_COMMIT_TITLE 10.8 all コミットタイトル – コミットメッセージの最初の一行
CI_COMMIT_DESCRIPTION 10.8 all コミット詳細: タイトル行が100文字よりも短い場合の最初の一行を除いたメッセージです;それ以外の場合は全文です。
CI_CONFIG_PATH 9.4 0.5 CI設定ファイルのパス。デフォルトは .gitlab-ci.yml
CI_DEBUG_TRACE all 1.7 debug tracing が有効かどうか
CI_DEPLOY_USER 10.8 all GitLab Deploy Token の認証ユーザー名、プロジェクトが1つだけ関連付けられている場合にのみ出力
CI_DEPLOY_PASSWORD 10.8 all GitLab Deploy Tokenの認証パスワード、プロジェクトが一つだけ関連付けられている場合にのみ出力
CI_DISPOSABLE_ENVIRONMENT all 10.1 このジョブが使い捨てな環境で実行される場合にのみフラグを示します。 (この環境は、このジョブでのみ生成されるもので、実行後に削除もしくは破壊されるものです – shell と ssh を除く全てです ). この環境が使い捨ての場合、trueにセットされます。それ以外の場合は未定義です。
CI_ENVIRONMENT_NAME 8.15 all このジョブの環境名
CI_ENVIRONMENT_SLUG 8.15 all 環境名の簡易バージョン、DNS名やURL、Kubernetesのラベルなどに適しています。
CI_ENVIRONMENT_URL 9.3 all このジョブ環境のURL
CI_JOB_ID 9.0 all GitLab CI が内部的に利用する現在のジョブのユニークID
CI_JOB_MANUAL 8.12 all ジョブが手動実行されているかどうかを示すフラグ
CI_JOB_NAME 9.0 0.5 .gitlab-ci.yml で定義されているジョブ名
CI_JOB_STAGE 9.0 0.5 .gitlab-ci.yml で定義されているステージ名
CI_JOB_TOKEN 9.0 1.2 GitLab コンテナーレジストリで使える認証用トークン
CI_MERGE_REQUEST_ID 11.6 all pipelines for merge requests の場合のマージリクエストのID
CI_MERGE_REQUEST_IID 11.6 all pipelines for merge requests の場合のマージリクエストのIID
CI_MERGE_REQUEST_REF_PATH 11.6 all pipelines for merge requests の場合のマージリクエストのrefパス. (e.g. refs/merge-requests/1/head)
CI_MERGE_REQUEST_PROJECT_ID 11.6 all pipelines for merge requests の場合のマージリクエストのプロジェクトID
CI_MERGE_REQUEST_PROJECT_PATH 11.6 all pipelines for merge requests の場合のマージリクエストのプロジェクトパス (e.g. namespace/awesome-project)
CI_MERGE_REQUEST_PROJECT_URL 11.6 all pipelines for merge requests の場合のマージリクエストのプロジェクトのURL (e.g. http://192.168.10.15:3000/namespace/awesome-project)
CI_MERGE_REQUEST_TARGET_BRANCH_NAME 11.6 all pipelines for merge requests の場合のマージリクエストのターゲットブランチ名
CI_MERGE_REQUEST_SOURCE_PROJECT_ID 11.6 all pipelines for merge requests の場合のマージリクエストの元プロジェクトのID
CI_MERGE_REQUEST_SOURCE_PROJECT_PATH 11.6 all pipelines for merge requests の場合のマージリクエストの元プロジェクトのパス
CI_MERGE_REQUEST_SOURCE_PROJECT_URL 11.6 all pipelines for merge requests の場合のマージリクエストの元プロジェクトのURL
CI_MERGE_REQUEST_SOURCE_BRANCH_NAME 11.6 all pipelines for merge requests の場合のマージリクエストのソースブランチ名
CI_NODE_INDEX 11.5 all ジョブセット内のジョブのインデックス。ジョブが並列になっていない場合は、この変数はセットされません。
CI_NODE_TOTAL 11.5 all ジョブが並列実行のトータルインスタンス数。ジョブが並列になっていない場合は、この変数は1にセットされます。
CI_JOB_URL 11.1 0.5 実行ジョブ詳細のURL
CI_REPOSITORY_URL 9.0 all クローンするGitリポジトリのURL
CI_RUNNER_DESCRIPTION 8.10 0.5 GitLabに保存されているRunnerの説明
CI_RUNNER_ID 8.10 0.5 使われているランナーのユニークID
CI_RUNNER_TAGS 8.10 0.5 定義済みランナータグ
CI_RUNNER_VERSION all 10.6 実行中のジョブのGitLab ランナーのバージョン
CI_RUNNER_REVISION all 10.6 実行中のジョブのGitLab ランナーのリビジョン
CI_RUNNER_EXECUTABLE_ARCH all 10.6 GitLab ランナーの実行ファイルのOS/アーキテクチャ (これは実行環境と同じではないことに注意)
CI_PIPELINE_ID 8.10 0.5 GitLab CIが内部的に使用する現在のパイプラインのユニークID
CI_PIPELINE_TRIGGERED all all ジョブがtriggeredであるかを示しているフラグ
CI_PIPELINE_SOURCE 10.0 all このパイプラインのソース: push, web, trigger, schedule, api, external のどれか。9.5より前に作成されたパイプラインは不明です。
CI_PROJECT_DIR all all ジョブが実行されるリポジトリーがクローンされたフルパス
CI_PROJECT_ID all all GitLab CIが内部的に利用する現在のプロジェクトのユニークID
CI_PROJECT_NAME 8.10 0.5 現在ビルド中のプロジェクト名 (実際にはプロジェクトフォルダー名)
CI_PROJECT_NAMESPACE 8.10 0.5 現在ビルド中のプロジェクトネームスペース名 (ユーザー名かグループ名)
CI_PROJECT_PATH 8.10 0.5 ネームスペース付きのプロジェクト名
CI_PROJECT_PATH_SLUG 9.3 all $CI_PROJECT_PATH の 0-9 and a-z 以外を – に変換して、小文字にした。ドメイン名やURLからに利用できる。
CI_PROJECT_URL 8.10 0.5 プロジェクトにアクセスするHTTPアドレス
CI_REGISTRY 8.10 0.5 コンテナーレジストリが有効な場合、GitLab’s Container Registry のURLを返す
CI_REGISTRY_IMAGE 8.10 0.5 このプロジェクトでコンテナーレジストリが有効な場合、プロジェクトに紐付けられたレジストリのアドレスを返す
CI_REGISTRY_PASSWORD 9.0 all GitLab Container Registry にコンテナーをプッシュするときに使うパスワード
CI_REGISTRY_USER 9.0 all GitLab Container Registry にコンテナーをプッシュするときに使うユーザー名
CI_SERVER all all ジョブがCI環境で実行されていることを示す
CI_SERVER_NAME all all ジョブを調整するCIサーバー名
CI_SERVER_REVISION all all ジョブをスケジューリングする GitLab revision
CI_SERVER_VERSION all all ジョブをスケジューリングする GitLab version
CI_SERVER_VERSION_MAJOR 11.4 all GitLab コンポーネントのメジャーバージョン
CI_SERVER_VERSION_MINOR 11.4 all GitLab コンポーネントのマイナーバージョン
CI_SERVER_VERSION_PATCH 11.4 all GitLab コンポーネントのパッチバージョン
CI_SHARED_ENVIRONMENT all 10.1 ジョブが共有環境(shell や ssh のようなCI実行をまたいでいる)で実行されていることを示す。環境が共有されている場合は、trueに設定、そうでない場合設定されません。
GET_SOURCES_ATTEMPTS 8.15 1.9 このジョブ実行中のソース取得試行回数
GITLAB_CI all all GitLab CI環境で実行されていることを示す
GITLAB_USER_ID 8.12 all ジョブを開始した人のID
GITLAB_USER_EMAIL 8.12 all ジョブを開始した人のメールアドレス
GITLAB_USER_LOGIN 10.0 all ジョブを開始した人のログインユーザー名
GITLAB_USER_NAME 10.0 all ジョブを開始した人の実名
RESTORE_CACHE_ATTEMPTS 8.15 1.9 ジョブ実行中のキャッシュのリストア試行回数
https://qiita.com/ynott/items/4c5085b4cd6221bb71c5
なるほど、ここまではわかった。
次は、gitlabからECRへのpush
GitLab Token
– Personal Access tokens
— GitLab API, GitLab repository, GitLab registry
– OAuth2 token
— OAuth2 ProviderとしてOAuth認証
– Impersonation tokens
— Personal access tokensの特殊な形
– Project access tokens
— Project単位のPersonal access tokens
– Deploy tokens
— git clone及びGitLab管理下のpackageとcontainer registryへのpush/pullを可能にする
– Deploy keys
— repositoryのread-onlyまたはread-writeのみ可能とする
– projectのowner/maintainerが発行可能でcloneしてくるのに有用
– Runner registration token
— GitLabRunnerをGitLab側に登録する際に認証するためのtoken
— CI/CDのjobを実行するRunnerを紐付ける
– Runner authentication token
— GitLabRunnerの認証登録後にRunnerが入ったホストに登録されるtoken
— config.toml内に自動登録される
– CI/CD Job token
— CI/CD job実行時のAPI利用の際に認証に使用される一時的なtoken
— job内でrepositoryをclone, pushなどをする際に、CI_JOB_TOKENとして予め環境変数に定義されているものを即座に利用可能
なるほど
docker login -u gitlab-ci-token -p $CI_JOB_TOKEN $CI_REGISTRY
これだと、gitlab-ci-tokenはCI/CD job tokenのことか
dindとは docker in dockerの略
なるほどー、何かのコマンドかと思った…
GitLab Runner: GitLabでコミットを検知してGitLab Runnerがジョブを実行、ジョブの結果がGitLabから確認できる
### Shared RunnersとSpecific Runners
Shared Runnersはプロジェクトを跨いで共有、Specific Runnerはプロジェクトに紐づけて専用利用
### Executer
ジョブの実行形式
Shell, Docker, Docker Machine, Parallels, VirtualBox, SSH, Kubernetes
-> shellであればGitLab Runnerがインストールされたホスト上でBash等のShellベースでジョブを実行
### パイプライン
パイプライン方式でジョブを実行する
image: python:3.6.5
variables:
  S3_BUCKET: デプロイに使うS3バケット
  AWS_DEFAULT_REGION: ap-northeast-1
unittest:
  stage: test
  script:
    - pip install pytest
    - pip install -r requirements.txt
    - python -m pytest tests/ -v

deploy:
  stage: deploy
  script:
    - pip install awscli
    - pip install -r requirements.txt -t hello_world/build/
    - cd hello_world/*.py hello_world/build/
    - aws cloudformation package --template-file template.yaml --output-template-file output.yaml --s3-bucket ${S3_BUCKET}
    - aws cloudformation deploy --template-file output.yaml --stack-name demo --capabilities CAPABILITY_IAM
重要なのはdeployのところか
なるほど、testも理解しておかないとあかんな…
devブランチにpushされたら…
masterブランチにpushされたら… など設定できる
– service: 対象のジョブ実行中に起動するDockerイメージ, scriptsを実行するためのDockerイメージ servicesで指定されたコンテナはimagesで指定されたコンテナとは別で起動
– only: 対象ジョブの実行を特定のブランチや特定のタグがプッシュされた時に限定することがd系る
– artifact: ジョブの成果物としてジョブを跨いで共有できる
– when: ジョブを実行するタイミング
L on_success, on_failure, always, on_failure
– environment: 対象のジョブがどの環境へデプロイを行うのか定義できる
なるほど、そろそろ実際にやってみるか
stage: パイプラインを制御するためのもので、job毎に使用できるステージを定義するもの。dependenciesとセットになる同じステージのjobは並行で実行される
artifacts: 成果物のパスを指定。特定のjobから成果物をDLできる。後続のjobで引き継がせることができる。ディレクトリのみ。
image: sample.gitlab.com/vagrant/sample/app
stages:
  - test
  - build_static
rspec:
  stage: test
  services:
    - mysql:5.7
  variables:
    MYSQL_DATABASE: sample_test
    MYSQL_ROOT_PASSWORD: mysql_strong_password
  before_script:
    - "echo \"install: --no-document\" > ~/.gemrc"
    - "echo \"update: --no-document\" > ~/.gemrc"
    - bundle install --jobs=4
    - buncle exec rake db:setup RAILS_ENV=test
    - buncle exec rake db:migrate RAILS_ENV=test
  script:
    - bundle exec rspec
  artifacts:
    paths:
      - coverage/

pages:
  stage: build_static
  dependencies:
    - rspec
  script:
    - my coverage/ public/
  artifacts:
    paths:
      - public
    only:
      - master
どのようなjobを実行するか設計 -> jobの集合体をstage
commitするとjobが実行される
build, test, docker_build
stages:
  - build
  - test
  - docker_build

# 全ジョブの前処理
before_script:
  - chmod +x ./gradlew
  - export GRADLE_USER_HOME=`pwd`/.gradlew

# 実行するジョブ
build:
  stage: build
  image: java:openjdk-8u111-jdk-alpine
  script:
    - ./gradlew assemble
  artifacts:
    name: "${CI_PROJECT_NAME}_${CI_COMMIT_REF_NAME}"
    paths:
      - build/libs/*.jar

test:
  stage: test
  image: java:openjdk-8u111-jdk-alpine
  script:
    - ./gradlew test sonarqube -PsonarBranch=$CI_COMMIT_REF_NAME -PsonarHostUrl=$SONAR_HOST_UR+

docker_build:
  stage: docker_build
  image: docker:18.03
  script:
    - docker login -u "gitlab-ci-token" -p "$CI_JOB_TOKEN" $CI_REGISTRY
    - docker build --build-arg JAR_FILE=$(find ./build/libs/ -name "sample*.jar") -t "$CI_REGISTRY_IMAGE:$CI_COMMIT_REF_NAME" ./
    - docker push "$CI_REGISTRY_IMAGE:$CI_COMMIT_REF_NAME"
うーん、なるほど、少しずつって感じやな
### Services: コンテナイメージを複数扱う
servicesというキーワードを用いると、ベースイメージと接続可能なコンテナを定義できる
servies:
  - postgres:latest
variables:
  POSTGRES_DB: custom_db
  POSTGRES_USER: ucstom_user
  POSTGRES_PASSWORD: custom_password
### Anchors
test1:
  stage: test
  image: python:latest
  before_script:
    - pipenv install --dev --system
  script:
    - pytest test1

test2:
  state: test
  image: python:latest
  before_script:
    - pipenv install --dev --system
  script:
    - pytest test2
.test_template: &test_definition
  state: test
  image: python:latest
  before_script:
    - pipenv install --dev --system

test1:
  <<: *test_definition
  script:
    - pytest test1

test2:
  <<: *test_definition
  script:
    - pytest test2
### 用意されているGitlab変数
build:
  stage: build
  image: docker:latest
  services:
    - docker:dind
  before_script:
    - docker login -u gitlab-ci-token -p $CI_JOB_TOKEN $CI_REGISTRY
  script:
    - docker build --pull -t $CI_REGISTRY_IMAGE:$CI_COMMIT_TAG .
    - docker push $CI_REGISTRY_IMAGE:$CI_COMMIT_TAG .
  only:
    - tags
### only and except
tagがpushされた時のみ
only:
– tags
ブランチがpushされた時は実行しない
except:
– master
あれ、Dockerfileではなく、gitlab.ymlにimageを書くの?