$ sudo docker run –name mysql000ex7 -dit -e MYSQL_ROOT_PASSWORD=myrootpass mysql
mysql root passwordの使い方も理解できるようになってきました。
随机应变 ABCD: Always Be Coding and … : хороший

$ sudo docker run –name mysql000ex7 -dit -e MYSQL_ROOT_PASSWORD=myrootpass mysql
mysql root passwordの使い方も理解できるようになってきました。
$ sudo docker run –name apa000ex1 -d httpd
$ sudo docker ps
$ sudo docker stop apa000ex1
$ sudo docker rm apa000ex1
### apache
apacheは80ポートで待ち構えている
$ sudo docker run –name apa000ex2 -d -p 8080:80 httpd
$ sudo docker stop apa000ex2
$ sudo docker rm apa000ex2
うーん、apacheは少し慣れてきた。
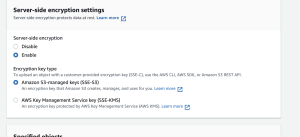
### S3バケットのデータ保護
S3はデータセンターのディスクに書き込むときにデータをオブジェクトレベルで暗号化し、ユーザーがデータにアクセスするときに復号する。
### 暗号化の種類
### SSE-S3
S3が管理するキーによるサーバ側の暗号化
SSE-S3を使用すると、オブジェクトは一意のキーで暗号化される
AES-256を使用して暗号化する
### SSE-KMS
AWS KMSに保存されているカスタマーキー(CMK)によるサーバー側の暗号化
### SSE-C
ユーザが指定したキーによるサーバ側の暗号化(SSE-C)
### クライアント側の暗号化
S3に送る前にデータを暗号化
AWS Encryption SDKを使用すると暗号化を容易に実装可能
なるほど、少しずつ理解してきた
トリガーイベント: S3へのファイル投入 ※management console上で操作する
def lambda_handler(event, context):
    print("Lambdaが呼ばれました!")
    input_bucket = event['Records'][0]['s3']['bucket']['name']
    input_key = event['Records'][0]['s3']['object']['key']
    print("bucket =", input_bucket)
    print("key =", input_key)
testして、Deploy, cloudwatch logsで挙動を確認
import boto3

s3 = boto3.client('s3')

def read_file(bucket_name, file):
    response = s3.get_object(Bucket=bucket_name, Key=file_key)
    return response[u'Body'].read().decode('utf-8')

def upload_file(bucket_name, file_key, bytes):
    out_s3 = boto3.resource('s3')
    s3Obj = out_s3.Object(bucket_name, file_key)
    res = s3Obj.put(Body = bytes)
    return res

def lambda_handler(event, context):
    print("Lambdaが呼ばれました!")
    input_bucket = event['Records'][0]['s3']['bucket']['name']
    input_key = event['Records'][0]['s3']['object']['key']
    print("bucket =", input_bucket)
    print("key =", input_key)

text = read_file(input_bucket, input_key)
output_key = "outputs/" + input_key
upload_file(input_bucket, output_key, bytes(text, 'UTF-8'))
なるほど、lamdbaの基本機能はなんとなく理解した
dockerを立てる
terraform {
	required_providers {
		docker = {
			source = "kreuzwerker/docker"
			version = "~> 2.15.0"
		}
	}
}

provider "docker" {}

resource "docker_image" "nginx" {
	name = "nginx:lastest"
	keep_locally = false
}

resource "docker_container" "nginx" {
	image = docker_image.nginx.latest
	name = "tutorial"
	ports {
		internal = 80
		external = 8080
	}
}
terraform {
	required_providers {
		aws = {
			source = "hashicorp/aws"
			version = "~> 3.0"
		}
	}
}

provider "aws" {
	profile = "default"
	region = "ap-northeast-1"
}

resource "aws_instance" "app_server" {
	ami = "ami-0e60b6d05dc38ff11"
	instance_type = "t2.micro"
	tags = {
		"Name" = "ec2-1115"
	}
}
なるほどー lambdaを勉強しないと駄目だなー
$ terraform version
Terraform v1.1.8
$ touch main.tf
main.tf
provider "aws" {
	access_key = "ACCESS_KEY_HERE"
	secret_key = "SECRET_KEY_HERE"
	region = "ap-northeast-1"
}

resource "aws_vpc" "myVPC" {
	cidr_block = "10.1.0.0/16"
	instance_tenancy = "default"
	enable_dns_support = "true"
	enable_dns_hostname = "false"
	tags {
		Name = "myVPC"
	}
}

resource "aws_internet_gateway" "myGW" {
	vpc_id = "${aws_vpc.myVPC.id}"
	depends_on = "${aws_vpc.myVPC}"
}

variable "images" {
	default = {
		ap-northeast1 = "ami-cbf90ecb"
		ap-southeast1 = "ami-68d8e93a"
		ap-southeast2 = "ami-fd9cecc7"
	}
}
なるほど、あとはlambdaのバッチのところか…
WafCharmは、世界中のwebに対する攻撃パターンをAIによって学習し、AWS WAF/Azure WAFのルールを最適化させるWAF自動運用サービス
月額5000円~
サイバーセキュリティクラウド社が提供
なるほどー
リージョンはある地域を示しており、複数のAZ(アベイラビリティゾーン)で構成
AZはデータセンター
東京リージョンは4つのAZから構成されているため、複数のAZを併用するマルチAZ構成を採っていれば、複数データセンターにまたがる冗長構成になるため、あるAZで障害が発生しても、システムが致命的な影響を受ける可能性を低くできる。
リージョン障害: リージョンに対して1つのインスタンスとして配置される場合などで障害が起きた場合、リージョン全体に影響を受ける
なるほど、AZ構成と、リージョン障害に備えることは別物なのね。
<!DOCTYPE html>
<html lang="en">
<head>
	<meta charset="UTF-8">
	<meta name="viewport" content="width=device-width, initial-scale=1.0">
	<title>Document</title>
</head>
<body>
	Hello, <?php echo "Hpscript"; ?>!
</body>
</html>
### Smartyとは
テンプレートエンジン
高速コンパイルは一度だけ行われる
変更があったテンプレートファイルのみ再コンパイル
簡単に独自関数や変数の修飾子を作成できる
エンジン自体がカスタマイズできる
プラグイン機能も備えている
$ curl -sS https://getcomposer.org/installer | php
$ php composer.phar require smarty/smarty
index.php
<?php

require_once "vendor/autoload.php";
$smarty = new Smarty();
$smarty->setTemplateDir('templates')->setCacheDir('cache');
$smarty->display('index.tpl');
?>
template/index.tpl
{config_load file="test.conf" section="setup"}
{assign var="food" value="親子丼"}

<!DOCTYPE html>
<html lang="ja">
<head>
  <meta charset="UTF-8">
  <meta name="viewport" content="width=device-width, initial-scale=1.0">
  <meta http-equiv="X-UA-Compatible" content="ie=edge">
  <title></title>
</head>
<body style="background:{#grayBgColor#};">

<h1></h1>
<p><b>うまい店</b>教えて</p>
{$smarty.version}
</body>
</html>
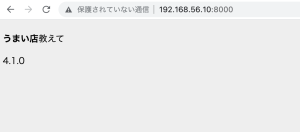
なるほど、テンプレートエンジンの話か
tarとはtape archiveの略
複数ファイルを一つにまとめて格納するアーカイブ(書庫)ファイルの形式の一つ
同形式のファイルの操作を行うためのUNIX系OS標準のコマンドおよびプログラムの名前