@Binding, @Published, @ObservedObject, @StateObject, @EnvironmentObject
変数のバインディング、オブジェクトの共有を行う
### 変数を別のビューの変数と紐づけて使う
– 紐付けて使う変数を @Binding で宣言する
struct ContentView: View {
    @State var isChecked_person1: Bool = false

    var body: some View {
        HStack {
            Text("担当者1のチェック")
            PersonCheckMark(isChecked: $isChecked_person1)
        }
    }
}

struct PersonCheckMark: View {
    @Binding var isChecked: Bool

    var body: some View {
        Button(action: {
            isChecked.toggle()
        }) {
            Image(systemName: isChecked ? "person.fill.checkmark" : "person")
                .foregroundColor(isChecked ? .blue : .gray)
                .scaleEffect(2.0)
                .frame(width: 40, height: 40)
        }
    }
}
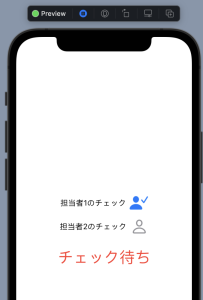
### チェック担当者を2人に増やす
struct ContentView: View {
    @State var isChecked_person1: Bool = false
    @State var isChecked_person2: Bool = false

    var body: some View {
        VStack {
            HStack {
                Text("担当者1のチェック")
                PersonCheckMark(isChecked: $isChecked_person1)
            }
            HStack {
                Text("担当者2のチェック")
                PersonCheckMark(isChecked: $isChecked_person2)
            }
            Group {
                if isChecked_person1 && isChecked_person2 {
                    Text("全員チェック済み").foregroundColor(.blue)
                } else {
                    Text("チェック待ち").foregroundColor(.red)
                }
            }
            .font(.largeTitle)
            .padding(.top)
        }

    }
}
ほう、