この記事ではCakePHP4.*のチュートリアルを行います。
1. composerのcurl
2. cakephpのインストール
3. build in serverを起動
4. configディレクトリの.envファイルの編集
5. envファイルの読み込み(コメントアウト解除)
6. データベースの設定
7. migrationファイルの作成
8. 管理画面ファイルをbakeで作成
9. バリデーションの作成
10. 管理画面のルーターの設定
11. 一般ユーザ用のファイル作成
12. Viewファイル作成
13. ユーザ管理機能作成(認証機能)
14. ユーザバリデーション機能追加
15. ユーザー認証機能の実装(authenticationプラグイン)
16. 管理画面レイアウトの作成

$ curl -sS https://getcomposer.org/installer | php
$ php composer.phar create-project –prefer-dist cakephp/app:4.* blog
$ cd blog
$ bin/cake server -H 0.0.0.0
4. configディレクトリの.envファイルの編集
/config/.env
export APP_NAME="MyBlog"
export DEBUG="true"
export APP_ENCODING="UTF-8"
export APP_DEFAULT_LOCALE="ja_JP"
export APP_DEFAULT_TIMEZONE="Asia/Tokyo"
export SECURITY_SALT="3mPhHebbrC9cTH7Kjg9MU5d_bXuBXcUUyGRbgJHe"
5. envファイルの読み込み(コメントアウト解除)
/config/.bootstrap.php
if (!env('APP_NAME') && file_exists(CONFIG . '.env')) {
    $dotenv = new \josegonzalez\Dotenv\Loader([CONFIG . '.env']);
    $dotenv->parse()
        ->putenv()
        ->toEnv()
        ->toServer();
}
6. データベースの設定
/config/app_local.php
use Cake\Database\Driver\Postgres;
// 省略
    'Datasources' => [
        'default' => [
            'driver' => Postgres::class,
            'host' => 'localhost',
            /*
             * CakePHP will use the default DB port based on the driver selected
             * MySQL on MAMP uses port 8889, MAMP users will want to uncomment
             * the following line and set the port accordingly
             */
            //'port' => 'non_standard_port_number',

            'username' => 'hoge',
            'password' => 'fuga',

            'database' => 'test',
            /*
             * If not using the default 'public' schema with the PostgreSQL driver
             * set it here.
             */
            //'schema' => 'myapp',

            /*
             * You can use a DSN string to set the entire configuration
             */
            'url' => env('DATABASE_URL', null),
        ],
7. migrationファイルの作成
$ bin/cake bake migration CreatePosts
/config/Migrations/20230104050535_CreatePosts.php
    public function change(): void
    {
        $table = $this->table('posts');
        $table->addColumn('title', 'string', [
            'limit' => 150,
            'null' => false,
        ])
        ->addColumn('description', 'text', [
            'limit' => 255,
        ])
        ->addColumn('body', 'text')
        ->addColumn('published', 'boolean', [
            'default' => false,
        ])
        ->addColumn('created', 'datetime')
        ->addColumn('modified', 'datetime')
        ->create();
    }
$ bin/cake migrations migrate
8. 管理画面ファイルをbakeで作成
model, controller, viewを作成することができる
$ bin/cake bake model posts
$ bin/cake bake controller posts –prefix admin
$ bin/cake bake template posts –prefix admin
※ –prefix admin はadminディレクトリに作成するという意味合い
9. バリデーションの作成
src/Model/Table/PostsTable.php
    public function validationDefault(Validator $validator): Validator
    {
        $validator
            ->integer('id')
            ->allowEmptyString('id', null, 'create');

        $validator
            ->scalar('title')
            ->maxLength('title', 150, '150文字以内で入力してください')
            ->minLength('title', 5, '5文字以上で入力してください')
            ->requirePresence('title', 'create')
            ->notEmptyString('title', 'タイトルは必ず入力してください');

        $validator
            ->scalar('description')
            ->maxLength('description', 255, '150文字以上で入力してください。')
            ->allowEmptyString('description');

        $validator
            ->scalar('body')
            ->allowEmptyString('body');

        $validator
            ->boolean('published')
            ->allowEmptyString('published');

        return $validator;
    }
10. 管理画面のルーターの設定
/config/routes.php
use Cake\Routing\Router;
//..
        Router::prefix('admin', function ($routes) {
            $routes->fallbacks('DashedRoute');
            $routes->connect('/', ['controller' => 'Posts', 'action' => 'index']);
        });
11. 一般ユーザ用のファイル作成
$ bin/cake bake controller posts
src/Controller/PostsController.php
class PostsController extends AppController
{
    public $paginate = [
        'limit' => 10,
        'order' => [
            'Posts.created' => 'desc'
        ]
    ];

    public function index()
    {
        $posts = $this->paginate($this->Posts->findByPublished(1));

        $this->set(compact('posts'));
    }

    public function view($id = null)
    {
        $post = $this->Posts->get($id, [
            'conditions' => ['published' => 1],
        ]);

        $this->set('post', $post);
    }
}
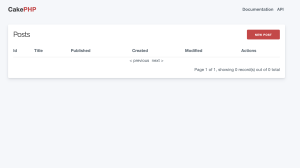
12. Viewファイル作成
templates/Posts/index.php
<div class="content">
	<?php foreach ($posts as $post): ?>
		<p>投稿日:<time><?= h($post->created->i18nFormat('YYYY/MM/dd HH:mm:ss')) ?></time></p>
		<h3 style="margin-bottom:0"><?= h($post->title) ?></h3>
		<?= $this->Text->autoParagrahp(h($post->description)); ?>
		<br>
		<?= $this->Html->link('記事を読む', ['action'=> 'view', $post->id], ['class'=> 'button']) ?>
		<hr>
	<?php endforeach; ?>
    <div class="paginator">
        <ul class="pagination">
            <?= $this->Paginator->first('<< 最初') ?>
            <?= $this->Paginator->prev('< 前へ') ?>
            <?= $this->Paginator->numbers() ?>
            <?= $this->Paginator->next('次へ >') ?>
            <?= $this->Paginator->last('最後 >>') ?>
        </ul>
    </div>
</div>
templates/Posts/view.php
<div class="posts view content">
	<?= h($post->created->il8nformat('YYYY/MM/dd HH:mm:ss')) ?>
    <h2><?= h($post->title) ?></h2>
    <?= $this->Text->autoParagraph(h($post->body)); ?>
    <hr>
    <?= $this->Html->link('一覧へ戻る', ['action'=>'index'], ['class'=>'button']) ?>
</div>
/config/routes.php
        // $builder->connect('/', ['controller' => 'Pages', 'action' => 'display', 'home']);
        $builder->connect('/', ['controller' => 'Posts', 'action' => 'index']);
13. ユーザ管理機能作成(認証機能)
$ bin/cake bake migration CreateUsers
/config/Migrations/20230104084657_CreateUsers.php
    public function change(): void
    {
        $table = $this->table('users');
        $table->addColumn('username', 'string', [
                'default' => null,
                'limit' => 50,
                'null' => false,
            ])
            ->addColumn('password', 'string', [
                'default' => null,
                'limit' => 255,
                'null' => false,
            ])
            ->addColumn('created', 'datetime')
            ->addColumn('modified', 'datetime')
            ->create();
    }
$ bin/cake migrations migrate
$ bin/cake bake model users
$ bin/cake bake controller users –prefix admin
$ bin/cake bake template users –prefix admin
ユーザエンティティにハッシュ化を追加
src/Model/Entity/User.php
use Cake\Auth\DefaultPasswordHasher;
class User extends Entity
{
    protected $_accessible = [
        'username' => true,
        'password' => true,
        'created' => true,
        'modified' => true,
    ];

    protected $_hidden = [
        'password',
    ];

    protected function _setPassword(string $password) : ?string {
        if (strlen($password) > 0) {
            return (new DefaultPasswordHasher())->hash($password);
        }
    }
}
14. ユーザバリデーション機能追加
src/Model/Table/UsersTable.php
    public function validationDefault(Validator $validator): Validator
    {
        $validator
            ->integer('id')
            ->allowEmptyString('id', null, 'create');

        $validator
            ->scalar('username')
            ->maxLength('username', 50)
            ->requirePresence('username', 'create')
            ->notEmptyString('username', 'ユーザ名は必ず入力してください');

        $validator
            ->scalar('password')
            ->maxLength('password', 255)
            ->requirePresence('password', 'create')
            ->notEmptyString('password', 'パスワードは必ず入力してください');

        return $validator;
    }
15. ユーザー認証機能の実装(authenticationプラグイン)
$ sudo cp composer.phar blog/
$ cd blog
$ php composer.phar require cakephp/authentication:^2.0
src/Application.php
use Authentication\AuthenticationService;
use Authentication\AuthenticationServiceInterface;
use Authentication\AuthenticationServiceProviderInterface;
use Authentication\Middleware\AuthenticationMiddleware;
use Psr\Http\Message\ServerRequestInterface;

    public function getAuthenticationService(ServerRequestInterface $request):AuthenticationServiceInterface {

        $authenticationService = new AuthenticationService([
            'unauthenticatedRedirect' => '/admin/users/login',
            'queryParam' => 'redirect',
        ]);

        $authenticationService->loadIdentifier('Authentication.Password',[
            'fields' => [
                'username' => 'username',
                'password' => 'password',
            ]
        ]);

        $authenticationService->loadAuthenticator('Authentication.Session');
        $authenticationService->loadAuthenticator('Authentication.Form', [
            'fields' => [
                'username' => 'username',
                'password' => 'password',
            ],
            'loginUrl' => '/admin/users/login',
        ]);

        return $authenticationService;
    }
src/Controller/Admin/AdminController.php
namespace App\Controller\Admin;

use Cake\Controller\Controller;

class AdminController extends Controller {

	public function initialize(): void {
		parent::initialize();

		$this->loadComponent('RequestHandler');
		$this->loadComponent('Flash');
		$this->loadComponent('Authentication.Authentication');
	}
}
src/Controller/Admin/PostsController.php
use App\Controller\Admin\AdminController;

class PostsController extends AdminController{
//..
}
src/Controller/Admin/UsersController.php
use App\Controller\Admin\AdminController;

    public function login(){
        $this->request->allowMethod(['get', 'post']);
        $result = $this->Authentication->getResult();

        if($result->isValid()){
            return $this->redirect('/admin');
        }
        if($this->request->is('post') && !$request->isValid()){
            $this->Flash->error('ユーザ名かパスワードが正しくありません');
        }
    }

    public function logout(){
        $result = $this->Authentication->getResult();
        if($result->isValid()){
            $this->Authentication->logout();
            return $this->redirect(['controller'=> 'Users', 'action' => 'login']);
        }
    }
16. 管理画面レイアウトの作成
src/Controller/Admin/UsersController.php
<!DOCTYPE html>
<html>
<head>
    <?= $this->Html->charset() ?>
    <meta name="viewport" content="width=device-width, initial-scale=1">
    <title>Controle Panel</title>
    <?= $this->Html->meta('icon') ?>
    <link href="https://fonts.googleapis.com/css?family=Raleway:400,700" rel="stylesheet">
    <link rel="stylesheet" href="https://cdn.jsdelivr.net/npm/normalize.css@8.0.1/normalize.css">
    <?= $this->Html->css('milligram.min.css') ?>
    <?= $this->Html->css('cake.css') ?>
    <?= $this->fetch('meta') ?>
    <?= $this->fetch('css') ?>
    <?= $this->fetch('script') ?>
</head>
<body>
    <nav class="top-nav">
        <div class="top-nav-title">
            <a href="/admin/">Control Panel</a>
        </div>
        <div class="top-nav-links">
            <a href="/admin/users/logout">ログアウト</a>
        </div>
    </nav>
    <main class="main">
        <div class="container">
            <?= $this->Flash->render() ?>
            <?= $this->fetch('content') ?>
        </div>
    </main>
    <footer>
    </footer>
</body>
なるほど、なかなかボリュームがありますな。

![[商品価格に関しましては、リンクが作成された時点と現時点で情報が変更されている場合がございます。]](https://hbb.afl.rakuten.co.jp/hgb/0c6f36f5.23c4a3ee.0c6f36f6.89a5bdc9/?me_id=1213310&item_id=16373700&pc=https%3A%2F%2Fthumbnail.image.rakuten.co.jp%2F%400_mall%2Fbook%2Fcabinet%2F7497%2F9784777517497.jpg%3F_ex%3D240x240&s=240x240&t=picttext "[商品価格に関しましては、リンクが作成された時点と現時点で情報が変更されている場合がございます。]")

![[商品価格に関しましては、リンクが作成された時点と現時点で情報が変更されている場合がございます。]](https://hbb.afl.rakuten.co.jp/hgb/0c6f36f5.23c4a3ee.0c6f36f6.89a5bdc9/?me_id=1213310&item_id=20705968&pc=https%3A%2F%2Fthumbnail.image.rakuten.co.jp%2F%400_mall%2Fbook%2Fcabinet%2F7852%2F9784815607852_1_5.jpg%3F_ex%3D240x240&s=240x240&t=picttext "[商品価格に関しましては、リンクが作成された時点と現時点で情報が変更されている場合がございます。]")