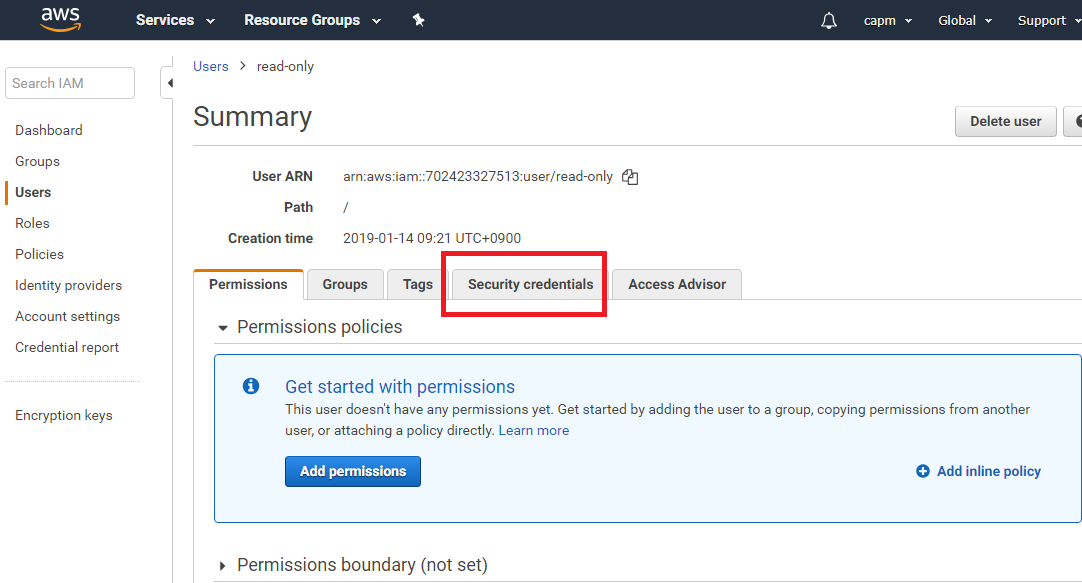
AWS health check

Health check function checks whether the load balancer and the target server are connected. It check every certain time whether we can see the website via load balancer.

For AWS, it is judged whether it can access the health check URL set on the console screen. It is OK if the HTTP status 200 is returned from the URL. If inadvertent 404 comes back, even if you access the URL set by the load balancer, the the site will not displayed.

It seems that it becomes OutOfService somewhat when restarting the EC2 instance in the state attached to the ELB. Also, as it is said that 200 should be returned by health check, if you do not do BASIC certification naturally, it will be OutOfService. 401 error comes back. If you are using ELB and need to make Basic authentication, only URLs for health checks must be in a state where authentication is ineffective.

Create a read-only user with aws ec2

Create a read-only user on IAM.

Select IAM on the service list page

Select users from the left menu of the IAM dashboard

Click add user button

set username and programmatic access for access type

At this point the user has no permissions.

On the user detail page you just created, open the security crudential tab

Click Access keys to create a new access key and secret key.

Well, finally it’s coming to set permissions. Select add permissions button from the permission tab.

From add user to group, press create group.

In management console Create policy, chose service for EC2 and Access level should be Read.

Put name for read-only-ec2 and create policy.

finally attache user to just created read-only-ec2 policy.

Then, user permission has changed to access EC2.
I explained how to make ReadOnly IAM users using IAM. There are many things IAM can do, such as creating groups, writing policies in detail, and creating Role. I think that AWS is the only cloud that can control privilege so far. Want to make good and secure system.

セキュリティパッチとは何か?

セキュリティパッチとは、プログラムの脆弱性やセキュリティホールなどが発見された際に、それらの問題を修正するためのプログラムのこと。
ソフトウェアやOSなどの製品では、リリースされてから幾つか問題が発見されることがある。

SocketException: Connection reset

JavaとサーバサイドのSSL/TLSの使用プロトコルの差異

TLSとはなにか?
SSLはSecurity Sockets Layerで安全に通信するためのセキュリティプロトコル。
TLSはSSLの次世代規格。SSLと呼んでいるものは、実際TLSを指している場合もある
TLSはTransport Layer Securityの略

TLSが提供するチャネルでは
– 通信データ暗号化することで盗聴しても内容が分からないようにする
– 通信データが伝送される途中で改ざんされた時にそれを検出する
– 通信相手が正しいとこいうことを確認できる

最新バージョンはTLS1.3

Linuxのssh-add コマンドとは何か?

ssh-addって何?

ssh-add: 認証エージェントに秘密鍵(id_rsa)を登録すること。
引数なしで実行された場合、~/.ssh/id_rsaが追加される。
秘密鍵(id_rsa)を読み込んだ後、ssh-addはそれに対応する情報を、秘密鍵のファイル名にサフィックス-cert.pubを追加したファイルから読み込もうとする。

秘密鍵の登録状況の確認

ssh-add -l

秘密鍵の確認

ssh-add hoge/fuga

ssh-keygenとは

ssh-keygenコマンドとは何か?

ssh-keygenコマンドは、sshで利用する認証用の鍵を生成・管理・変換するコマンド
sshプロトコルバージョン1のRSA鍵、sshプロトコルバージョン2のRSA鍵、DSA鍵が生成できる。

sshプロトコルのバージョンには2つある。
sshバージョン1 特許を持つ数種の暗号化アルゴリズムを使用し、通信ストリームに侵入者のデータ挿入を認める脆弱性
sshバージョン2 Red Hat Enterprise Linuxのopen sshセットはsshバージョン2を使用 鍵交換アルゴリズムを改良しており、バージョン2が推奨されている
RSA暗号とは 桁数が大きい合成数の素因数分解問題が困難であることを安全性の根拠とした公開鍵暗号の一つ
公開鍵:平文に暗号をかけるための鍵
秘密鍵:暗号文を元の平文に戻す為の鍵

ssh-keygenでは、公開鍵、暗号鍵両方つくる。

公開鍵認証の仕組み
事前にローカル側で作成した公開鍵を、ログイン先のサーバーに登録する。登録された公開鍵に対応した秘密鍵を持っているローカルから接続ができる。

実際に作ってみましょう
>ssh-keygen -t rsa
Generating public/private rsa key pair.
Enter file in which to save the key (C:\Users\user/.ssh/id_rsa):
Enter passphrase (empty for no passphrase):
Enter same passphrase again:
Your identification has been saved in C:\Users\user/.ssh/id_rsa.
Your public key has been saved in C:\Users\user/.ssh/id_rsa.pub.
The key fingerprint is:
hogehoge user@DESKTOP-7QL099V
The key’s randomart image is:
+—[RSA 2048]—-+
|B*oo. |
|E*.o. |
|%.* .+ |
|**.o=.o |
| ooo.= S |
| =.o.. |
| o.*.* . |
| ..o *.+ |
| .. o. .. |
+—-[SHA256]—–+

.sshにid_rsa(秘密鍵:暗号文を元の平文に戻す為の鍵)、id_rsa.pub(公開鍵:平文に暗号をかけるための鍵)ができている。
公開鍵認証による接続は、このid_rsa.pub(公開鍵)をリモート先に置いて、id_rsa(秘密鍵)で開けてログインする。

リモート先の「~/.ssh/authorized_keys」に公開鍵を登録する
vagrantの場合だと、/home/vagrant 配下の/.ssh/authorized_keysが既に生成されている。

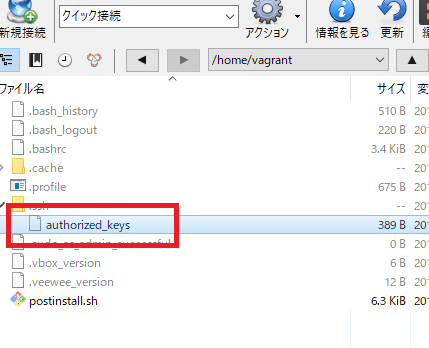
公開鍵の中身(authorized_keys/p)を見てみる
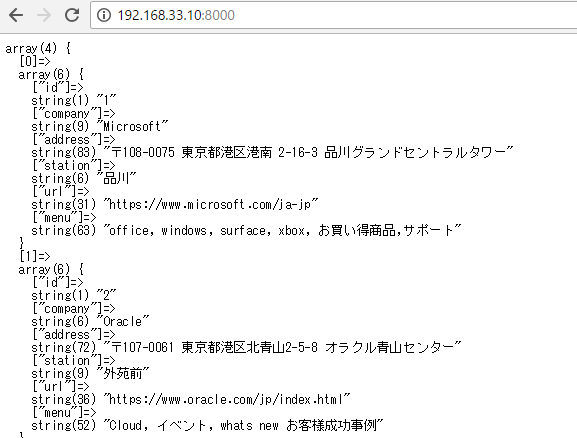
vagrantのauthorized_keys

ssh-rsa AAAAB3NzaC1yc2EAAAADAQABAAABAQCwr/w9xN1wmHFNM3VCcf9wH9LRSLWxrE1tuQTRjp2VO//dmwwJZShapE+1/ylGt8QGnZSBNQqVPa/mOy9AZ47xOvnT9OXoKVinM3hASv02g+DsV5pUWujW6ToGXiW3CRtGvmDRMDpCs4ENBpxO82C3f7SavaqIiM3Wkrl5hYDJL0JkLKq8kcrDmDDAt3s1ZdkMt1255rXEGhDkHetdHFBw4ue7swumJ423tZShHRRQxzKEbUw44nBAvBAehogehoge vagrant

ssh-keygen -t rsaで作成した公開鍵(github_rsa.pub)

ssh-rsa AAAAB3NzaC1yc2EAAAADAQABAAABAQDRvyk/aNTrWKq/U5h7B2gA2dSmrsy7ngAgatv0PPq15XYR7oxFtlJQ8rqhbI9yA7P3zzE1d6SQGsWi/RXYTI/4hGhm6gmItBmOs4YKFdwTH0FqMtIZQ7UwJ/I5bY7tt+SWAJJhg3hQuVAPtzU80PJhDEiw1SY/ZxIfTMdfDqIb6fIIB/yZxZycMno9wBQlE9lgPRGqCr7dENH80Ua99QTb+VLy9AF6XbYQHRdH+KZ4drFOFWTVyzDoGZiazpmguBZdmpxyhogehoge user@DESKTOP-hogehoge

基本的に一緒だ!最後のvagrant, user@DESKTOP-hogehogeがusernameかな?

chmod 600 ~/.ssh/authorized_keys で、パーミッションを追加

やべー、公開鍵認証を理解した俺、かっけー

apache benchを使ってみよう

[vagrant@localhost app]$ ab -n 10 -c 10 http://www.hpscript.com/
This is ApacheBench, Version 2.3 <$Revision: 655654 $>
Copyright 1996 Adam Twiss, Zeus Technology Ltd, http://www.zeustech.net/
Licensed to The Apache Software Foundation, http://www.apache.org/

Benchmarking www.hpscript.com (be patient)…..done

Server Software: nginx
Server Hostname: www.hpscript.com
Server Port: 80

Document Path: /
Document Length: 0 bytes

Concurrency Level: 10
Time taken for tests: 3.639 seconds
Complete requests: 10
Failed requests: 2
(Connect: 0, Receive: 0, Length: 2, Exceptions: 0)
Write errors: 0
Non-2xx responses: 10
Total transferred: 3040 bytes
HTML transferred: 1066 bytes
Requests per second: 2.75 [#/sec] (mean)
Time per request: 3638.692 [ms] (mean)
Time per request: 363.869 [ms] (mean, across all concurrent requests)
Transfer rate: 0.82 [Kbytes/sec] received

Connection Times (ms)
min mean[+/-sd] median max
Connect: 55 62 4.8 64 69
Processing: 732 2269 694.0 2483 2801
Waiting: 717 2256 690.2 2479 2787
Total: 787 2331 695.1 2538 2865

Percentage of the requests served within a certain time (ms)
50% 2538
66% 2754
75% 2792
80% 2855
90% 2865
95% 2865
98% 2865
99% 2865
100% 2865 (longest request)

以下が時間ですな。
Time per request: 3638.692 [ms] (mean)
Time per request: 363.869 [ms] (mean, across all concurrent requests)

これは結構使えるかも。

複数ファイルに.htaccessを設定する

<Files app_a.php>
AuthUserFile .htpasswd
AuthType Basic
AuthName "Web access"
Require valid-user
</Files>

<Files app_b.php>
AuthUserFile .htpasswd
AuthType Basic
AuthName "Web access"
Require valid-user
</Files>

htpasswd用パス作成ツール
http://phpspot.net/php/pghtpasswd%E7%94%A8%E3%83%91%E3%82%B9%E4%BD%9C%E6%88%90%E3%83%84%E3%83%BC%E3%83%AB.html

vagrantからPDOでazure mysqlにssl接続する

以下のURLから証明書を取得し、BaltimoreCyberTrustRoot.crt.pemで、vagrantに保存する。
https://www.digicert.com/CACerts/BaltimoreCyberTrustRoot.crt.pem

azure mysqlのadminで接続のセキュリティがSSLを強制する、となっているか確認する。

optionで、PDO::MYSQL_ATTR_SSL_CA => ‘BaltimoreCyberTrustRoot.crt.pem’ と書きます。

$dsn = "mysql:dbname=sier;host=namysql.database.windows.net";
$user = "hoge";
$password = "hogehoge";
$options = array(
  PDO::MYSQL_ATTR_SSL_CA => 'BaltimoreCyberTrustRoot.crt.pem' 
);
try {
    $dbh = new PDO($dsn, $user, $password, $options);
} catch (PDOException $e){
    print('connection failed:'.$e->getMessage());
} 

$sql = "select * from forein";
// $sql = "show status like 'ssl_cipher'";
$stmt = $dbh->query($sql);
 
$result = $stmt->fetchAll(PDO::FETCH_ASSOC);
print_r('<pre>');
var_dump($result);
print_r('</pre>');

$sql = “show status like ‘ssl_cipher'”;と書くと、ssl通信の場合、[“Value”]=>string(10) “AES256-SHA” で返ってきます。

> .pemは、Base64で符号化された証明書です。.pem SSL サーバ証明書(連結SSLサーバ証明書)では複数のサーバ証明書を1ファイルに連結させることができ、SSLサーバ証明書のインストール用によく使われます。

いいね~
しかし、azure始めた途端、参照するブログ書いている方のレベルが高くなった気が。。。

では、続いてgit commit/pushしましょう。