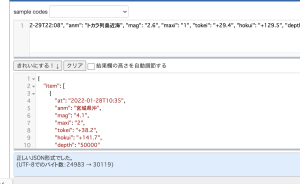
Pythonでlistから最も近い数字を抽出し、辞書の値をprint

numpyを使う

# -*- coding: utf-8 -*-
import numpy as np

def getNearestValue(list, num):
	idx = np.abs(np.asarray(list) - num).argmin()
	return list[idx]

# 辞書
d = {}
d[0.743722677230835] = 'value1'
d[0.9442239999771118] = 'value2'
d[0.8997899889945984] = 'value3'
print(d)

# リスト
list = []
list.append(0.743722677230835)
list.append(0.9442239999771118)
list.append(0.8997899889945984)

# 最も近い数字
nearest = getNearestValue(list, 0.9602155685424805)

# 最も近い数字のvalue
print(nearest)
print(d[nearest])

$ python3 test.py
{0.743722677230835: ‘value1’, 0.9442239999771118: ‘value2’, 0.8997899889945984: ‘value3’}
0.9442239999771118
value2

やりたいことはできた。
これをNLPでやる。

[自然言語処理] word2vecによる類似単語を検索

$ pip3 install gensim==3.8.1

### word2vecのファイルをDL
$ wget http://public.shiroyagi.s3.amazonaws.com/latest-ja-word2vec-gensim-model.zip

$ unzip latest-ja-word2vec-gensim-model.zip

app.py

# -*- coding: utf-8 -*-
from gensim.models import word2vec

model = word2vec.Word2Vec.load('word2vec.gensim.model')
results = model.wv.most_similar(positive=['日本'])
for result in results:
	print(result)

$ python3 app.py
(‘韓国’, 0.7088127732276917)
(‘台湾’, 0.6461570262908936)
(‘日本国内’, 0.6403890252113342)
(‘欧米’, 0.6350583434104919)
(‘日本国外’, 0.6200590133666992)
(‘台湾出身’, 0.6174061894416809)
(‘中華圏’, 0.612815260887146)
(‘日本の経済’, 0.6088820099830627)
(‘日本の歴史’, 0.6070738434791565)
(‘韓国国内’, 0.6054152250289917)

gensimはバージョンを指定しないとエラーになるので注意が必要

OK
これを繋げていく

さくらレンタルサーバーにPython3とPip3を入れる手順

さくらレンタルサーバーにPython3をPip3を入れて動かそうとすると、
ModuleNotFoundError: No module named ‘_ctypes’ となるので、
あらかじめlibffiをインストールする必要がある。

### libffiインストール
mkdir -p ~/work/libffi
cd work/libffi
wget ftp://sourceware.org/pub/libffi/libffi-3.2.1.tar.gz
tar xvfz libffi-3.2.1.tar.gz
cd libffi-3.2.1
./configure –prefix=$HOME/local/libffi/3_2_1
make
% mkdir -p ~/local/include
% ln -s $HOME/local/libffi/3_2_1/lib/libffi-3.2.1/include/ffi.h $HOME/local/include/
% ln -s $HOME/local/libffi/3_2_1/lib/libffi-3.2.1/include/ffitarget.h $HOME/local/include/
% mkdir -p ~/local/lib
% ln -s $HOME/local/libffi/3_2_1/lib/libffi.a $HOME/local/lib/
% ln -s $HOME/local/libffi/3_2_1/lib/libffi.la $HOME/local/lib/
% ln -s $HOME/local/libffi/3_2_1/lib/libffi.so $HOME/local/lib/
% ln -s $HOME/local/libffi/3_2_1/lib/libffi.so.6 $HOME/local/lib/
% mkdir -p ~/local/lib/pkgconfig/
% ln -s $HOME/local/libffi/3_2_1/lib/pkgconfig/libffi.pc $HOME/local/lib/pkgconfig/

% cd ~/
% vi .cshrc
// パスを最終行に追加

setenv  LD_LIBRARY_PATH $HOME/local/lib
setenv  PKG_CONFIG_PATH $HOME/local/lib/pkgconfig

% source ~/.cshrc
% rehash

### Python3インストール
% mkdir -p ~/work/python3
% cd ~/work/python3
% wget –no-check-certificate https://www.python.org/ftp/python/3.9.0/Python-3.9.0.tgz
% tar zxf Python-3.9.0.tgz
% cd ./Python-3.9.0
% ./configure –prefix=$HOME/local/python/ –with-system-ffi LDFLAGS=”-L $HOME/local/lib/” CPPFLAGS=”-I $HOME/local/include/”
% make
% make install

% cd ~/
%vi .cshrc
// 最終行に以下を追加

set path = ($path $HOME/local/python/bin)

% source ~/.cshrc
% rehash

% python3 –version
Python 3.9.0
% pip3 –version
pip 20.2.3

$ pip3 install ${package}

libffiが無くて、何度もNo module named ‘_ctypes’となり、焦りました。

[Python] 画像を圧縮

まず画像を用意します。

#! /usr/bin/python3
# -*- coding: utf-8 -*-
from PIL import Image
from io import BytesIO
import os

COMPRESS_QUALITY = 30

path = "./src"

images = os.listdir(path)

for image in images:
	if image.endswith('.jpg'):
		with open("./src/" + image, 'rb') as inputfile:
			im = Image.open(inputfile)
			im_io = BytesIO()
			im.save(im_io,'JPEG', quality=COMPRESS_QUALITY)
		with open("./src/comp_" + image, mode='wb') as outputfile:
			outputfile.write(im_io.getvalue())
	if image.endswith('.jpeg'):
		with open("./src/" + image, 'rb') as inputfile:
			im = Image.open(inputfile)
			im_io = BytesIO()
			im.save(im_io,'JPEG', quality=COMPRESS_QUALITY)
		with open("./src/comp_" + image, mode='wb') as outputfile:
			outputfile.write(im_io.getvalue())
	if image.endswith('.png'):
		with open("./src/" + image, 'rb') as inputfile:
			im = Image.open(inputfile)
			im_p = im.convert('P')
			with open("./src/comp_" + image, mode='wb') as outputfile:
				im_p.save(outputfile)

我ながらよく出来ています。

[Python] リストで重複を調べる

& 演算子で取得

l1 = ['今日', '形態素', '解析', '研究']
l2 = ['明日', '研究', '麦芽', '形態素']

l1l2 = set(l1) & set(l2)
print(l1l2)

$ python3 app.py
{‘研究’, ‘形態素’}

lenを使って重複率を調べて分岐処理を行う

l1 = ['今日','の','形態素', '解析', '研究']
l2 = ['明日', '研究', '麦芽', '形態素', '研究']

l1l2 = set(l1) & set(l2)

if(len(l1l2) / len(l1) > 0.2):
	print('重複した文章です')
else:
	print('異なる文章です')

$ python3 app.py
重複した文章です

OK、意外と直ぐに行けた

Pythonでメモ帳にテキストデータを追加して保存

f = open('myfile.txt', 'w')
f = open('myfile.txt', 'a')
f = open('myfile.txt', 'x')

‘w’を指定した場合は新規に作成、上書き
‘a’を指定した場合は最後に追加で書き込み
‘x’はファイルが存在していた場合は、FileExistsError

– timedelta(hours=+9)として、日本時間の日時でテキストファイルを作ります。
– f.write(‘\n’)でコメントごとに改行を入れるようにします。

#! /usr/bin/python3
# -*- coding: utf-8 -*-
from datetime import datetime, timedelta, timezone
JST = timezone(timedelta(hours=+9), 'JST')

today = str(datetime.now(JST).date())

f = open(today +'.txt', 'a')
f.write('そしてアメリカのナイジャ・ヒューストンです')
f.write('\n')
f.close()

f = open(today +'.txt', 'a')
f.write('おっ お〜、ヤバ いややっぱ勝負強いっすよね〜')
f.write('\n')
f.close()

f = open(today +'.txt', 'a')
f.write('今日イチの雄叫びとガッツポーズが此処まで聞こえてきます')
f.write('\n')
f.close()

$ python3 app.py
そしてアメリカのナイジャ・ヒューストンです
おっ お〜、ヤバ いややっぱ勝負強いっすよね〜
今日イチの雄叫びとガッツポーズが此処まで聞こえてきます

OK

Pythonでjson出力

import json

print('********** JSON **********')
data = dict()
data['message'] = 'Python json test'
data['members'] = [
	{'name': 'momo', 'color': '#FA3E05' },
	{'name': 'dubai', 'color': '#FFFFAA'}
]

print(json.dumps(data, ensure_ascii=False, indent=2))

$ python3 app.py
********** JSON **********
{
“message”: “Python json test”,
“members”: [
{
“name”: “momo”,
“color”: “#FA3E05”
},
{
“name”: “dubai”,
“color”: “#FFFFAA”
}
]
}

json.dumpsで出力できる
問題ありませんね

[Python3 音声認識] juliasを使ってみる

### juliusとは
– 京大や名古屋工業大が開発しているオープンソース音声認識ライブラリ
– C言語で書かれている
– 独自の辞書モデルを定義することが可能
– 単体では動作せず、言語認識をするモデルを読み込んで動かす
– Juliux GitHub: https://github.com/julius-speech/julius

### julius install
$ sudo yum install build-essential zlib1g-dev libsdl2-dev libasound2-dev
$ git clone https://github.com/julius-speech/julius.git
$ cd julius
$ ./configure –enable-words-int
$ make -j4
$ ls -l julius/julius
-rwxrwxr-x 1 vagrant vagrant 700208 Jul 31 16:39 julius/julius

### julius model
https://sourceforge.net/projects/juliusmodels/
「ENVR-v5.4.Dnn.Bin.zip」をDownloadします。
$ unzip ENVR-v5.4.Dnn.Bin.zip
$ cd ENVR-v5.4.Dnn.Bin
$ ls
ENVR-v5.3.am ENVR-v5.3.layer5_weight.npy ENVR-v5.3.prior
ENVR-v5.3.dct ENVR-v5.3.layer6_bias.npy README.md
ENVR-v5.3.layer2_bias.npy ENVR-v5.3.layer6_weight.npy dnn.jconf
ENVR-v5.3.layer2_weight.npy ENVR-v5.3.layerout_bias.npy julius-dnn-output.txt
ENVR-v5.3.layer3_bias.npy ENVR-v5.3.layerout_weight.npy julius-dnn.exe
ENVR-v5.3.layer3_weight.npy ENVR-v5.3.lm julius.jconf
ENVR-v5.3.layer4_bias.npy ENVR-v5.3.mfc mozilla.wav
ENVR-v5.3.layer4_weight.npy ENVR-v5.3.norm test.dbl
ENVR-v5.3.layer5_bias.npy ENVR-v5.3.phn wav_config

$ sudo vi dnn.jconf

feature_options -htkconf wav_config -cvn -cmnload ENVR-v5.3.norm -cvnstatic
// 省略
state_prior_log10nize false // 追加

### Recognize Audio File
$ ../julius/julius/julius -C julius.jconf -dnnconf dnn.jconf
————-pass1_best: the shower
pass1_best_wordseq: the shower
pass1_best_phonemeseq: sil | dh iy | sh aw ax r
pass1_best_score: 130.578949
### Recognition: 2nd pass (RL heuristic best-first)
STAT: 00 _default: 21497 generated, 4114 pushed, 332 nodes popped in 109
ALIGN: === word alignment begin ===
sentence1: the shower
wseq1: the shower
phseq1: sil | dh iy | sh aw ax r | sil
cmscore1: 0.552 0.698 0.453 1.000
score1: 88.964218
=== begin forced alignment ===
— word alignment —
id: from to n_score unit
—————————————-
[ 0 11] 0.558529 []
[ 12 30] 2.023606 the [the]
[ 31 106] 2.249496 shower [shower]
[ 107 108] -2.753532
[
]
re-computed AM score: 207.983871
=== end forced alignment ===

——
### read waveform input
1 files processed

音声認識をやってるっぽいのはわかるけど、Google-cloud-speechとは大分違うな

$ sudo vi mic.jconf

-input mic
-htkconf wav_config
-h ENVR-v5.3.am
-hlist ENVR-v5.3.phn
-d ENVR-v5.3.lm
-v ENVR-v5.3.dct
-b 4000
-lmp 12 -6
-lmp2 12 -6
-fallback1pass
-multipath
-iwsp
-iwcd1 max
-spmodel sp
-no_ccd
-sepnum 150
-b2 360
-n 40
-s 2000
-m 8000
-lookuprange 5
-sb 80
-forcedict

$ ../julius/julius/julius -C mic.jconf -dnnconf dnn.jconf
Notice for feature extraction (01),
*************************************************************
* Cepstral mean and variance norm. for real-time decoding: *
* initial mean loaded from file, updating per utterance. *
* static variance loaded from file, apply it constantly. *
* NOTICE: The first input may not be recognized, since *
* cepstral mean is unstable on startup. *
*************************************************************
Notice for energy computation (01),
*************************************************************
* NOTICE: Energy normalization is activated on live input: *
* maximum energy of LAST INPUT will be used for it. *
* So, the first input will not be recognized. *
*************************************************************

——
### read waveform input
Stat: adin_oss: device name = /dev/dsp (application default)
Error: adin_oss: failed to open /dev/dsp
failed to begin input stream

使い方がイマイチよくわからん
全部コマンドラインでアウトプットが出てくるんかいな

[Laravel x Python] exec($command, $output)のトラブルシューティング

execコマンドがvagrantのamazon linux2では問題なく動作するのに、ec2にデプロイして実行すると反応しない。
execコマンドだとダメそうなので、SymphonyのProcessでやってみたが、それでもダメ。
NLPは最も肝となる処理なので諦めるわけにはいかん、とトラブルシューティングを丸一日。Webの記事を探しまくるも一向に解決せず。

該当のcontroller

            $input = $request->input;
            $replace_input = str_replace(" ", "\ ", $input);
            $path = app_path() . "/python/main.py";
            // $command = "python3 " . $path . " ".$replace_input;
            // exec($command, $output);
            $process = new Process(["python3", $path, $replace_input]);
            $process->run();
            $output = $process->getOutput();
            dd($output);

結論から言うと、ProcessFailedExceptionでエラー原因を表示させたらわかった。sudu pip3でpandas, sklearn, MeCabなどをインストールすればよかった。

use Symfony\Component\Process\Process;
use Symfony\Component\Process\Exception\ProcessFailedException;
// 省略

            $process = new Process(["python3", $path, $replace_input]);
            $process->run();
            if (!$process->isSuccessful()) {
                throw new ProcessFailedException($process);
            }

エラーが起きたら、まず、Exceptionで原因を調べるのが早いですね。
laravelでpythonの処理は変則的なので、かなり焦りました。
もっと上達してええええええええええええ

[python3.x] 空白を含めたコマンドライン引数を送る

英文をコマンドライン引数で送って実行させたいが、英文の場合半角スペースが含まれる為、引数が分かれてしまう。
例えば、「The official site of the Boston Celtics. Includes news, scores, schedules, statistics, photos and video」を引数で渡そうとして実行すると、第一引数は「The」のみになってしまう。

L 半角スペース(” “)の文頭に”\”があると、エスケープされて処理される。

            $input = $request->input;
            $replace_input = str_replace(" ", "\ ", $input);
            $path = app_path() . "/python/en_ja.py";
            $command = "python3 " . $path . " ".$replace_input;
            exec($command, $output);
            $output = $output[0];

上記のようにエスケープすると、英文でも引数として渡すことができる。

なるほど、中々面白いね。