【Rust】axumでget, post, psql

まずテーブル作成
$ sudo -u postgres psql
$ CREATE TABLE “todo” (
id UUID primary key,
description varchar(100) not null,
deadline_at timestamp not null
);

postgres=# \dt
List of relations
Schema | Name | Type | Owner
——–+——–+——-+———-
public | todo | table | postgres

chrono = "0.4.31"
sqlx = { version = "0.7.2", features = ["runtime-tokio-native-tls", "chrono", "uuid"]}
uuid = { version = "1.6.1", fatures = ["v4", "serde"] }
use axum::{Router, extract::State, response::Html, routing::get};
use tera::{Context, Tera};
use serde::{Serialize, Deserialize};
use sqlx::{FromRow, PgPool};
use uuid::Uuid;

//

#[derive(Clone)]
struct ServiceState {
    tera: Tera,
    pool: PgPool,
}

//

#[tokio::main]
async fn main() {

    let pool = PgPool::connect("postgres://postgres:password@localhost:5432/postgres").await.unwrap();

    let tera = match Tera::new("templates/**/*.html"){
        Ok(t) => t,
        Err(e) => {
            println!("Parsing error(s): {}", e);
            ::std::process::exit(1);
        }
    };

    
    let app = Router::new()
        .route("/", get(index))
        .with_state(ServiceState {tera, pool});
    let listener = tokio::net::TcpListener::bind("0.0.0.0:3000").await.unwrap();
    axum::serve(listener, app).await.unwrap();
}

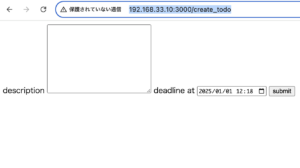
http://192.168.33.10:3000/create_todo

### 入力結果の表示
templates/todos.html

<a href="/create_todo">Todoを作成</a>
<table>
    <thread>
        <tr>
            <th scope="col">description</th>
            <th scope="col">deadline at</th>
        </tr>
    </thread>
    <tbody>
        {% for todo in todos %}
        <tr id="{{ todo.id }}">
            <td>{{ todo.description }}</td>
            <td>{{ todo.deadline_at }}</td>
        </tr>
        {% endfor %}
    </tbody>
</table>
use axum::{Router, extract::State, response::{Redirect, Html}, Form, routing::get};
use chrono::NaiveDateTime;
use tera::{Context, Tera};
use serde::{Serialize, Deserialize};
use sqlx::{FromRow, PgPool};
use uuid::Uuid;

pub fn deserialize_date<'de, D: serde::Deserializer<'de>>(
    deserializer: D,
) -> Result<NaiveDateTime, D::Error> {
    let s = String::deserialize(deserializer)?;
    NaiveDateTime::parse_from_str(&s, "%Y-%m-%dT%H:%M")
        .map_err(serde::de::Error::custom)
}

#[derive(Serialize)]
struct Index {
    name: String
}

#[derive(Clone)]
struct ServiceState {
    tera: Tera,
    pool: PgPool,
}

#[derive(Debug, Serialize, FromRow)]
struct Todo {
    id: Uuid,
    description: String,
    deadline_at: NaiveDateTime,
}

#[derive(Debug, Deserialize)]
struct CreateTodo {
    description: String,
    #[serde(deserialize_with = "deserialize_date")]
    deadline_at: NaiveDateTime,
}

async fn index(State(state): State<ServiceState>) -> Html<String> {
    let index = Index { name: String::from("test") };
    let page = state.tera.render("index.html", &Context::from_serialize(&index).unwrap()).unwrap();
    Html(page.to_owned())
}

async fn get_create_todo(State(state): State<ServiceState>) -> Html<String> {
    let page = state.tera.render("create_todo.html", &Context::new()).unwrap();
    Html(page.to_owned())
}

async fn post_create_todo(
    State(state): State<ServiceState>,
    Form(todo): Form<CreateTodo>,
) -> Redirect {
    let todo = Todo {
        id: Uuid::new_v4(),
        description: todo.description,
        deadline_at: todo.deadline_at,
    };

    sqlx::query("INSERT INTO todo VALUES ($1, $2, $3);")
        .bind(todo.id)
        .bind(todo.description)
        .bind(todo.deadline_at)
        .execute(&state.pool)
        .await
        .expect("todoの取得に失敗しました");

    Redirect::to("/todos")
}

async fn get_todos(
    State(state): State<ServiceState>,
) -> Html<String> {
    let todos = sqlx::query_as::<_, Todo>("SELECT * FROM todo")
        .fetch_all(&state.pool)
        .await
        .expect("todoの取得に失敗しました");
    let mut context = Context::new();
    context.insert("todos", &todos);

    let page = state.tera.render("todos.html", &context).expect("todoの描画に失敗しました");
    Html(page)
}

#[tokio::main]
async fn main() {

    let pool = PgPool::connect("postgres://postgres:password@localhost:5432/postgres").await.unwrap();

    let tera = match Tera::new("templates/**/*.html"){
        Ok(t) => t,
        Err(e) => {
            println!("Parsing error(s): {}", e);
            ::std::process::exit(1);
        }
    };

    
    let app = Router::new()
        .route("/", get(index))
        .route("/todos", get(get_todos))
        .route("/create_todo", get(get_create_todo).post(post_create_todo))
        .with_state(ServiceState {tera, pool});
    let listener = tokio::net::TcpListener::bind("0.0.0.0:3000").await.unwrap();
    axum::serve(listener, app).await.unwrap();
}

http://192.168.33.10:3000/todos
Todoを作成
description deadline at
test 2025-01-01T15:54:00
aaa 2025-01-01T15:57:00

なんだこれは…

【Rust】Rustでpsqlを操作する

$ cargo new psql

crateはpostgresを使用する
https://docs.rs/postgres/latest/postgres/#example

[dependencies]
postgres = "0.19.9"
use postgres::{Client, NoTls};

fn main() -> Result<(), Box<dyn std::error::Error>> {
    let mut client = Client::connect("host=localhost user=postgres password=password", NoTls)?;

    client.batch_execute("
        CREATE TABLE person (
            id SERIAL PRIMARY KEY,
            name TEXT NOT NULL,
            data BYTEA
        )
    ")?;

    let name = "Ferris";
    let data = None::<&[u8]>;
    client.execute(
        "INSERT INTO person (name, data) VALUES ($1, $2)",
        &[&name, &data],
    )?;

    for row in client.query("SELECT id, name, data From person", &[])? {
        let id: i32 = row.get(0);
        let name: &str = row.get(1);
        let data: Option<&[u8]> = row.get(2);

        println!("found person: {} {} {:?}", id, name, data);
    }
    Ok(())
}

$ cargo run
Compiling psql v0.1.0 (/home/vagrant/dev/rust/psql)
Finished `dev` profile [unoptimized + debuginfo] target(s) in 2.54s
Running `target/debug/psql`
found person: 1 Ferris None

おおおおおおおおおお
create tableはrustではなく、setup.shでpythonで実行して、rustではinsertとselectのみを実行するようにしたいですね。

setup.sh

pip install psycopg2-binary
yes | sudo apt install libpq-dev
pip install psycopg2

python3 init.py

init.py

import psycopg2

connection = psycopg2.connect(
    host='localhost',
    user='postgres',
    password='password'
)

cur = connection.cursor()

cur.execute('CREATE TABLE person ( \
            id SERIAL PRIMARY KEY, \
            name TEXT NOT NULL, \
            data BYTEA \
        );')

connection.commit()
cur.close()
connection.close()

$ cargo run
Finished `dev` profile [unoptimized + debuginfo] target(s) in 0.17s
Running `target/debug/psql`
found person: 1 Ferris None

転送元ノードのIPを取得してDBに入れようと思ったけど、ちょっと難しいな…

【psql】ubuntu24.04にpostgresをインストール/アンインストール

$ cat /etc/os-release
PRETTY_NAME=”Ubuntu 22.04.3 LTS”
$ psql –version
bash: psql: command not found

### インストール
$ sudo apt install postgresql postgresql-contrib
$ psql –version
psql (PostgreSQL) 14.15 (Ubuntu 14.15-0ubuntu0.22.04.1)

### アンインストール
$ dpkg -l | grep postgres
ii postgresql 14+238 all object-relational SQL database (supported version)
ii postgresql-14

$ sudo apt remove –purge postgresql
$ sudo apt remove –purge postgresql-14
$ sudo apt remove –purge postgresql-client-14
$ sudo apt remove –purge postgresql-client-common
$ sudo apt remove –purge postgresql-common
$ sudo apt remove –purge postgresql-contrib
$ dpkg -l | grep postgres
$ psql –version
bash: /usr/bin/psql: No such file or directory

【PostgreSQL】pg_repackとvacuum full

pg-repackはテーブルの再編成を行えるPostgreSQLの拡張ツール
VACUUM FULLはテーブルの排他ロックがかかり、実行に長い時間がかかる
pg-replackは短い間しか排他ロックをかけないため、リリース戦略としては有効

pg_repackの再編成の種類
– オンラインCLUSTER(テーブルデータを物理的にINDEX順で並び替え)
– 指定カラムでレコードを並び替える
– オンラインVACUUM FULL(レコードの隙間を詰める)
– 指定テーブルのインデックス再構築・再配置

pg_repack

postgres=# \dn
List of schemas
Name | Owner
——–+———-
bank1 | postgres
bank2 | postgres
public | postgres
(3 rows)

スキーマ全体にcluster, vacuum full
postgres=# pg_repack bank1
カラムを指定してレコードを並び替え
pg_repack -o role_id -t user test_schema
pg_repack -o role_id,id -t user test_schema
テーブルを指定してVACUUM FULLを実行
pg_repack -n -t foo test_schema
pg_repack -n -t foo -t bar test_schema
pg_repack -x -t users test_schema

PostgreSQLが追記型アーキテクチャとなっているためファイルサイズが大きくなると肥大化する
auto vaccumがonになっている

VACUUM FULL, REINDEXは気軽に実行できない
VACUUM FULL実行中は排他ロックがかかるのでテーブル参照処理もできなくなる
pg_repackは排他ロックを瞬間的にだけ掛けて、必要最小限だけのロックとなるため、参照・更新処理が実施できる

PostgreSQLのconstraint

テーブルを作成したのちにテーブルの主キー制約を変更したいことがある
その時に、ALTER TABLE ~ DROP CONSTRAINT と ALTER TABLE ~ ADD CONSTRAINT を使用する

### テーブル作成
CREATE TABLE test(a int PRIMARY KEY, b int, c int);

### 主キー制約の削除
名前をつけていなければ テーブル名_pkey でOK
ALTER TABLE test DROP CONSTRAINT test_pkey;

not nullの削除の方法
ALTER TABLE test ALTER COLUMN a DROP NOT NULL;

### 主キー制約の追加
ALTER TABLE test ADD CONSTRAINT test_pkey PRIMARY KEY(a, b);

【psql】レコードロック

データベースの機能の一つで、あるユーザが参照しているレコードに他のユーザがアクセスできないようにする

FOR UPDATE … 自分が更新する目的で行をロックしておく
FOR SHARE …他からの更新がかからないように行をロック

【PostgreSQL】トランザクション処理の実行

$ sudo -u postgres psql
psql (14.2 (Ubuntu 14.2-1.pgdg20.04+1))
Type “help” for help.

postgres=# \c testdb;
You are now connected to database “testdb” as user “postgres”.
testdb=#

CREATE TABLE book (
id serial NOT NULL,
name VARCHAR(30) NOT NULL,
author VARCHAR(30) NOT NULL,
age integer,
PRIMARY KEY (id)
);

INSERT INTO book(name, author, age) VALUES (‘SQL入門’, ‘Masumi’, 25);
INSERT INTO book(name, author, age) VALUES (‘Flutter入門’, ‘Masumi’, 25);
INSERT INTO book(name, author) VALUES (‘HTML入門’, ‘Hiro’);
INSERT INTO book(name, author, age) VALUES (‘Github入門2’, ‘Emma’, 22);
INSERT INTO book(name, author, age) VALUES (‘Flutter上級’, ‘Oliva’, 45);

testdb=# select * from book;
id | name | author | age
—-+————-+——–+—–
1 | SQL入門 | Masumi | 25
2 | Flutter入門 | Masumi | 25
3 | HTML入門 | Hiro |
4 | Github入門2 | Emma | 22
5 | Flutter上級 | Oliva | 45
(5 rows)

### BEGIN / COMMITとは?
beginはトランザクションを開始するコマンド。
beginが実行されると、自動コミットモードが解除され、それ以降のSQL文による変更が確定しない状態になる。beginをトランザクションを張ると表現することがある。
commitはトランザクションを終了し、変更を確定する

testdb=# begin;
BEGIN
testdb=*# update book set age=age+10 where author=’Emma’;
UPDATE 1
testdb=*# update book set age=age-10 where author=’Oliva’;
UPDATE 1
testdb=*# commit;
COMMIT
testdb=# select * from book;
id | name | author | age
—-+————-+——–+—–
1 | SQL入門 | Masumi | 25
2 | Flutter入門 | Masumi | 25
3 | HTML入門 | Hiro |
4 | Github入門2 | Emma | 32
5 | Flutter上級 | Oliva | 35
(5 rows)

ROLLBACKはトランザクションを終了し、変更を取り消すコマンド

beginとcommitはセットで見た方が良さそうやね

【PostgreSQL】トランザクションについて

トランザクションとはデータベースのデータを利用するときに、複数の処理を一連のものとしてまとめる単位のこと
– Aさんの銀行口座から500万円出金
– Bさんの銀行口座に500万円入金

一連の処理が問題なく行われたときはコミットで終了、途中エラーが発生したときはロールバック
DBのトランザクションはACID特性がある
Atomicity … 完全に実行されるか
Consistency … 実行前後でデータの整合性が担保
Isolation … コミットが確実に保存される

### トランザクションのコマンド
BEGIN
START TRANSACTION
COMMIT
END
ROLLBACK
ABORT

### 分離レベル
READ UNCOMMITED
READ COMMITED
REPEATABLE READ
SERIALIZABLE

なるほど、概念はなんとなく理解した

【PostgreSQL】複数レコードを一括更新

まずテーブルを作成します。

create table myschema.product (
  name varchar(10), 
  price integer, 
  stock integer
);

続いてデータを挿入します

insert into product values
  ('Orange', 200, 12),
  ('Melon', 450, 6),
  ('Grape', 320, 8),
  ('Apple', 180, 14),
  ('Peach', 380, 5);

testdb=# select * from product;
name | price | stock
——–+——-+——-
Orange | 200 | 12
Melon | 450 | 6
Grape | 320 | 8
Apple | 180 | 14
Peach | 380 | 5
(5 rows)

testdb=# update product set price=340 where name=’Grape’;
UPDATE 1
testdb=# select * from product;
name | price | stock
——–+——-+——-
Orange | 200 | 12
Melon | 450 | 6
Apple | 180 | 14
Peach | 380 | 5
Grape | 340 | 8

testdb=# update product set price=price-50 where stock < 10; UPDATE 3 testdb=# select * from product; name | price | stock --------+-------+------- Orange | 200 | 12 Apple | 180 | 14 Melon | 400 | 6 Peach | 330 | 5 Grape | 290 | 8 (5 rows) 複数更新する場合も条件式でできるのね。

PostgreSQL innerjoinとleftjoin

テーブルとテストデータ作成
CREATE TABLE companies(
id bigint primary key,
name varchar(50) NOT NULL,
tel varchar(50)
);

CREATE TABLE employees(
id bigint primary key,
company_id bigint,
name varchar(50) NOT NULL,
age integer,
FOREIGN KEY (company_id) references companies(id)
);

INSERT INTO companies(id, name, tel) VALUES
(1, ‘株式会社ほげ’, ’00-0000-0000′),
(2, ‘株式会社ふが’, ’00-0000-1111′),
(3, ‘株式会社ぴよ’, ’00-0000-2222′);

INSERT INTO employees(id, company_id, name, age) VALUES
(1, 1, ‘テスト太郎’, 25),
(2, 1, ‘テスト次郎’, 20),
(3, 2, ‘テスト三郎’, 30),
(4, null, ‘テスト五郎’, 40);

### 内部結合(inner join)
結合条件に一致するレコードだけ表示
testdb=# SELECT
testdb-# e.id AS employee_id,
testdb-# e.name AS employee_name,
testdb-# c.id AS company_id,
testdb-# c.name AS company_name
testdb-# FROM employees e
testdb-# JOIN companies c ON c.id = e.company_id;
employee_id | employee_name | company_id | company_name
————-+—————+————+————–
1 | テスト太郎 | 1 | 株式会社ほげ
2 | テスト次郎 | 1 | 株式会社ほげ
3 | テスト三郎 | 2 | 株式会社ふが

### LEFT JOIN
左外部結合。左テーブルを全て表示し、結合条件に一致しない右テーブルはNULLとして結合
testdb=# SELECT
testdb-# e.id AS employee_id,
testdb-# e.name AS employee_name,
testdb-# c.id AS company_id,
testdb-# c.name AS company_name
testdb-# FROM employees e
testdb-# LEFT JOIN companies c ON c.id = e.company_id;
employee_id | employee_name | company_id | company_name
————-+—————+————+————–
1 | テスト太郎 | 1 | 株式会社ほげ
2 | テスト次郎 | 1 | 株式会社ほげ
3 | テスト三郎 | 2 | 株式会社ふが
4 | テスト五郎 | |

### LIGHT JOIN
testdb=# SELECT
testdb-# e.id AS employee_id,
testdb-# e.name AS employee_name,
testdb-# c.id AS company_id,
testdb-# c.name AS company_name
testdb-# FROM employees e
testdb-# RIGHT JOIN companies c ON c.id = e.company_id;
employee_id | employee_name | company_id | company_name
————-+—————+————+————–
1 | テスト太郎 | 1 | 株式会社ほげ
2 | テスト次郎 | 1 | 株式会社ほげ
3 | テスト三郎 | 2 | 株式会社ふが
| | 3 | 株式会社ぴよ
(4 rows)

なるほど、これは勉強になる。